Bake Chocolate Cheesecake: Decadent Delight
- Look into Into Decadence: The Story Behind Bake Chocolate Cheesecake
- What Makes this Cheesecake a Standout
- The Sweet Benefits of your New Favorite Recipe
- Your Essential Ingredients Guide for Baking Bliss
- Professional Cooking Method: The Cozy Journey to Cheesecake Glory
- Pro Tips & Secrets for the Bake Chocolate Cheesecake: Decadent Delight
- Perfect Presentation
- Storage & Make-Ahead
- Creative Variations
- Complete Nutrition Guide
- Frequently Asked Questions
- 📝 Recipe Card
Look into Into Decadence: The Story Behind Bake Chocolate Cheesecake
Have you ever found yourself in the kitchen, determined to whip up something that makes your taste buds dance? i can vividly recall one rainy saturday when the idea of a bake chocolate cheesecake: decadent delight hit me like a lightbulb moment.
Picture this: my best friend and i were curled up watching cheesy rom-coms, and nothing sounded better than a creamy, chocolatey dessert to sweeten our day.
I thought, “what could be better than chocolate cheesecake?” spoiler alert: not much!
This concoction isn't just about the flavors; it’s about memories, laughter, and a dash of chocolate therapy. the beauty of a chocolate cheesecake recipe is in its silky smoothness and rich taste, transforming an ordinary day into something special.
Trust me, once you start talking about cheesecake, the conversation takes a delightful turn. you know? everyone wants in on the fun, whether they’re chocoholics or just looking to impress their friends at the next gathering.
What Makes this Cheesecake a Standout
The bake chocolate cheesecake carries with it a rich history, rooted in traditional cheesecake recipes dating back to ancient greece.
Fast forward to modern times, and it’s become a favorite among dessert lovers, especially with its glamorous twist of dark chocolate.
These days, chocolate cheesecakes are popping up everywhere from birthday parties to holiday feasts each slice a celebration of flavor and texture.
Now, let’s be real: the process isn't rocket science, but it’s not entirely a walk in the park either. with about 1 hour and 45 minutes from start to finish (not including that crucial overnight chill), you’re dedicating some time for a well deserved treat.
The prep involves pouring some love into gathering your ingredients and mixing them up. the challenge? achieving that perfectly smooth texture.
But honestly, the medium difficulty level makes it accessible even if you’re a novice in the kitchen.
And cost? well, it won’t break the bank if you keep an eye on prices for cream cheese and chocolate.
Plus, this recipe yields a generous ten slices , so you can share (or not) and still have plenty left over!
The Sweet Benefits of your New Favorite Recipe
Now, let’s talk benefits because who doesn't love a good reason to indulge? first off, health wise , this cheesecake has some perks, thanks to its primary ingredient, cream cheese .
It's rich in calcium and offers protein and fat that can keep you satisfied longer. and let’s not forget those divine layers of dark chocolate rich in antioxidants and serotonin! perfect for when you need a little pick-me-up.
This silky smooth cheesecake is fantastic for special occasions, birthdays, or even cozy nights in. imagine celebrating with friends, each slice accompanied by laughter and the joy of indulging in decadent desserts.
It’s not just another cake; it’s a centerpiece that excites those around you. plus, when folks bite into that layer of luscious chocolate, they won’t be able to resist complimenting your culinary skills!
You can easily switch up your serving style too. try out different cheesecake crust variations or go wild with unique cheesecake toppings .
A drizzle of caramel or a sprinkle of sea salt on top can elevate your cheesecake to gourmet status. how about pairing it with coffee? the best way to enhance those chocolatey notes is to sip on an espresso as you indulge.
Yum!
Feeling inspired? let’s dive into what you’ll need to conjure this masterpiece! the ingredients are simple yet mighty, combining to create something that feels sophisticated, all while being totally doable right in your kitchen.
Stay tuned for the ingredient list you won’t want to miss it!
Your Essential Ingredients Guide for Baking Bliss
When it comes to whipping up an indulgent bake chocolate cheesecake: decadent delight , having the right ingredients makes all the difference.
Today, i’m breaking down the essentials, so you can get cooking without a hitch. let’s dive right in!
Premium Core Components
Before any baking magic occurs, you’ve got to start with quality ingredients. for the crust, we're using 1 ½ cups (150 g) chocolate graham cracker crumbs , ⅓ cup (75 g) unsalted butter , and 2 tablespoons (25 g) granulated sugar .
A quick tip here? make sure your butter is melted well this helps the crust hold together beautifully.
Storage is key, too. keep your items in a cool, dry place. your graham cracker crumbs can stay fresh for about 3 months if kept sealed.
As for eggs, fresh is best, so use them within a few weeks of purchase.
To ensure your cheesecake maintains that silky smooth texture , always go for room temperature cream cheese (about 16 oz or 450 g ). Trust me; nobody wants a lumpy filling.
Signature Seasoning Blend
Now onto flavor town! you’ll want to mix up some essential spice combinations to elevate your cheesecake. while this recipe leans heavily on the gorgeous richness of dark chocolate , a touch of vanilla extract (1 teaspoon) rounds out the flavor beautifully.
And if you’re feeling adventurous, why not toss in some herbs ? I know it sounds wild, but a hint of fresh mint can transform your chocolate cheesecake into a sophisticated dessert.
Smart Substitutions
What if you find yourself in a pinch? no worries! here are a few common alternatives . if you’re out of graham crackers, you could use oreo crumbs for that extra kick flavor wise.
For a lighter option, swap out sour cream with greek yogurt . it’s an easy switch that won’t compromise on taste.
Plus, if you’re vegan or just out of eggs, flax eggs can work in a pinch just mix 1 tablespoon of ground flaxseed with 3 tablespoons of water and let it sit for a few minutes before adding to your mixture.
Kitchen Equipment Essentials
You don’t need all the fancy gadgets for this chocolate cheesecake recipe, but a few key tools can really help.
You’ll definitely need a 9 inch springform pan . it’s perfect for releasing the cheesecake without a lot of fuss.
An electric mixer works wonders for creating that fluffy filling, but if you want to work those arms, a good old-fashioned whisk will do.
Keep in mind, a baking sheet is essential for that water bath more on that later.
Baking Techniques for Cheesecake
One crucial tip i learned the hard way is to bake your cheesecake in a water bath . this helps regulate the temperature and keeps the surface smooth no one wants a cracked cheesecake! so, fill your baking sheet with hot water before placing the cheesecake pan in.
It’s all about those layers of flavors in dessert !
Now that we’ve got the essentials covered, it’s time to roll up your sleeves and get cooking!
Wrapping Up
Creating a homemade cheesecake is all about finding your groove, exchanging tips, and oh-so-satisfying bites of that rich concoction you just made.
Remember, embracing your personal twist will turn a classic dessert into a special treat.
As we move on to the detailed recipe for that bake chocolate cheesecake: decadent delight , keep these essential ingredients and kitchen hacks in mind.
Get excited, because this is going to be one unforgettable dessert that chocolate lovers and cheesecake aficionados alike will drool over!
Professional Cooking Method: The Cozy Journey to Cheesecake Glory
Cooking can feel like a whirlwind, right? but don’t worry, i’m here to help you figure out the essential steps to make that bake chocolate cheesecake: decadent delight .
Let’s break down everything from prep to plate, making it as smooth as that silky cheesecake.
Essential Preparation Steps
First things first, we've got to get organized. mise en place is your best friend. it’s fancy french for “everything in its place.
” so, before you start baking your chocolate cheesecake , measure out all your ingredients and have them ready. saves time and keeps your mind clear, trust me!
Time management tips are crucial here. use that 20-minute active prep time to focus solely on the crust. after that, while the cheesecake is baking, you can clean up or plan how to plate your dessert.
Organization is key! Line up your mixing bowls, measuring cups, and utensils so you can grab them without a fuss. It’s like setting the stage for your excellent performance.
And hey, let’s talk safety. always be cautious with the hot water bath and melted chocolate; nobody wants a burnt hand.
Keep your workspace tidy to avoid slips and trips. safety first, friends!
Step-by-step Process
Now, here’s how to get to the yumminess!
Prepare the crust : preheat your oven to 350° f ( 180° c) . mix your chocolate graham cracker crumbs, melted butter, and sugar.
Press it into the pan, and bake for 10 minutes . simple, right?
Mix the filling : beat that cream cheese until smooth, then add your sugar. combine everything else gently, making sure to slow down when you mix in the eggs.
This helps avoid cracks in the surface later on.
Bake the cheesecake : pour your creamy chocolate goodness over the crust. place the pan in a baking sheet filled with hot water.
Bake for 50- 55 minutes until the edges look set and the middle is a bit wobbly. it’s okay; a slight jiggle is what you want!
Chill & celebrate : after turning off the oven, let it cool inside with the door cracked for an hour.
Then, cover it and pop it in the fridge for at least 4 hours but overnight is better! that chilling time is essential for flavor!
Serve & Enjoy : Gently run a knife around the edge before releasing your cheesecake from the springform pan. Slice it nice and neat!
Expert Techniques
Want to up your cheesecake game? here are some professional methods . make sure your cream cheese is really soft; nobody likes lumps in their cheesecake.
Also, when you melt your chocolate, do it slowly. use a double boiler or go slow in the microwave nobody needs burnt chocolate ruining their indulgent dessert!
Keep an eye on quality checkpoints like the texture of your filling. before you pour it in the pan, it should be ultra smooth and creamy.
And if you do see cracks forming during baking, do not panic! they can be covered up with whipped cream when you serve!
Success Strategies
It’s so easy to make mistakes in cooking. common ones here include not properly softening your cream cheese or being too eager to mix fast.
Take it easy and you’ll make this like a pro!
For quality assurance, always taste your filling before it goes into the oven. if you lean towards sweeter, toss in a bit more sugar! if you want to go rich and balanced, bring in a touch of salt.
For perfect results, always chill overnight it’s a game changer! And if you're pressed for time, you can make no-bake cheesecake options, too. But shhh, don’t tell anyone I said that!
Now you’re all set to try this recipe. Cheesecake baking tips will have you mastering this homemade cheesecake tutorial in no time.
When you're ready, dive into Additional Information to take your cheesecake world to the next level!
Pro Tips & Secrets for the Bake Chocolate Cheesecake: Decadent Delight
Hey there, cheesecake lovers! so, you’re ready to whip up a bake chocolate cheesecake: decadent delight ! oh my gosh, let me tell you it’s gonna blow your mind.
But before you dive in, here are some pro tips to make your cheesecake experience even smoother.
Chef's Personal Insights
First off, make sure your cream cheese is at room temperature. this is the key to a silky smooth cheesecake .
Seriously, no one wants lumpy cheesecake, right? nobody has time for that! trust me, i learned this the hard way get that cream cheese nice and soft first.
Time Saving Techniques
Need to save some time? Melt your dark chocolate in the microwave! Just do it in 30-second bursts, stirring in between. It’s fast, easy, and oh-so-yummy why complicate things, right?
Flavor Enhancement Tips
If you wanna amp up your cheesecake game, consider adding a splash of espresso to the filling. it enhances the chocolate flavor and is a game changer! you’ll see everyone will be asking you for the gourmet cheesecake recipe .
Presentation Advice
Now, about presentation don’t rush it. once you bake your cheesecake, let it chill in the oven for an hour. this helps reduce those pesky cracks.
When it’s time to serve, run a knife around the edges before removing the springform pan. it’s a simple step but makes all the difference!
Perfect Presentation
Listen, we eat with our eyes first! So, let’s make that cheesecake look Instagram worthy.
Plating Techniques
When slicing the cheesecake, use a warm knife. just dip it in hot water for a couple of seconds, then wipe it dry.
You'll get those perfect slices every time no one wants a messy situation!
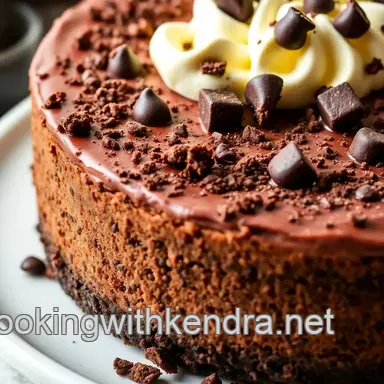
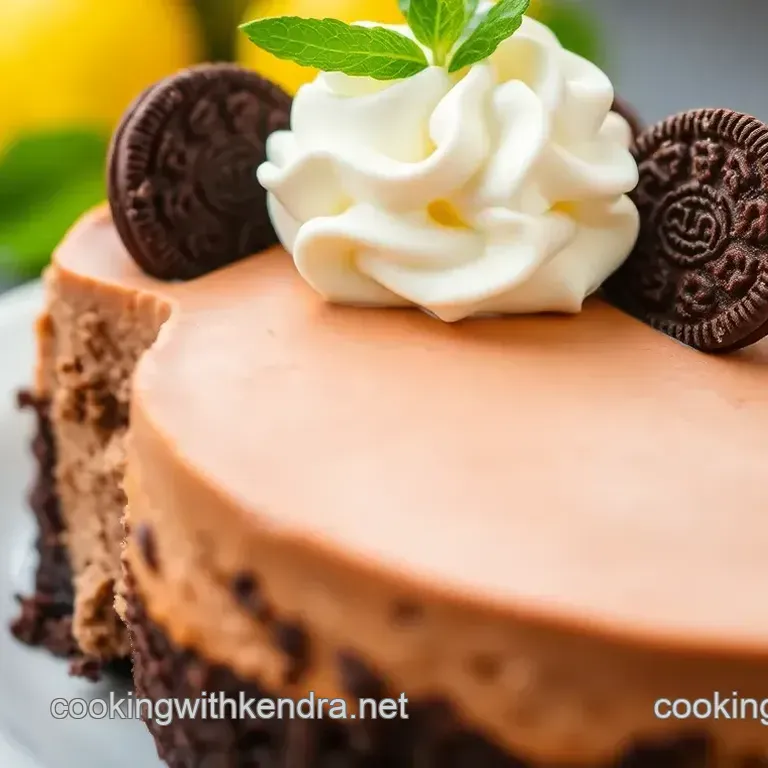
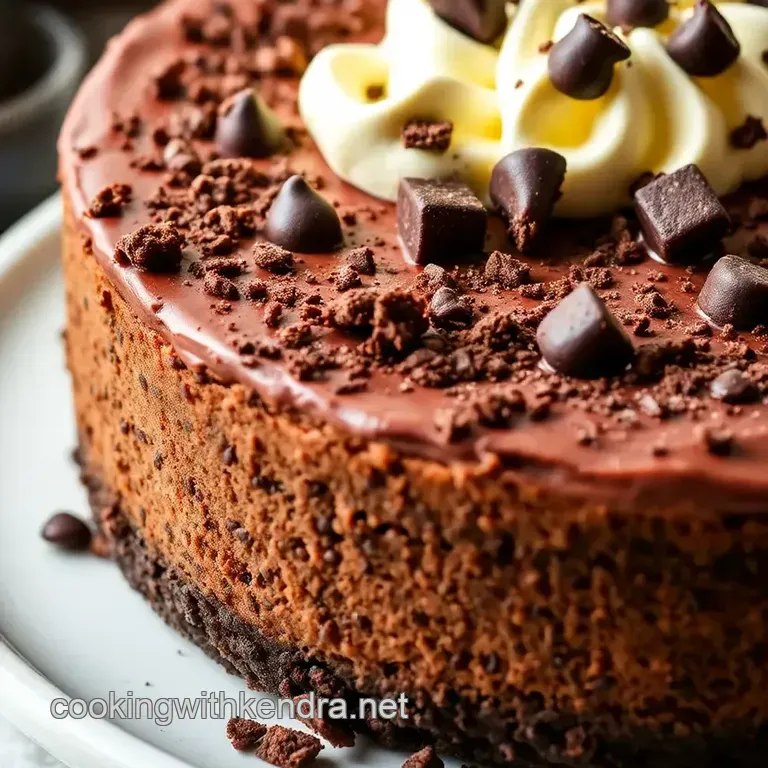
Garnish Ideas
Top off your cheesecake with whipped cream and sprinkle some chocolate shavings over it. For a little flair, add some fresh berries! It’s all about those pops of color you want it to scream "I’m a treat!"
Color Combinations
Contrast is key. The rich, dark chocolate against the light whipped cream creates a stunning presentation. Maybe toss on some mint leaves for a splash of green gorgeous!
Visual Appeal Tips
Don’t forget to keep the edges clean! Clean as you go, and your cheesecake will definitely shine at any gathering.
Storage & make-ahead
Okay, so you might have too much cheesecake (is that even possible?). Here’s how to store it like a pro.
Storage Guidelines
Wrap it up tight! I use plastic wrap, but you can also use aluminum foil. Make sure to store it in the fridge we all want to keep that creamy goodness fresh.
Preservation Methods
If you want to keep it longer, you can freeze individual slices. Just make sure you wrap them well. When you’re ready for a slice, let it thaw in the fridge overnight.
Reheating Instructions
You don’t need to reheat; cheesecake is best served cold. Trust me, no one wants a warm cheesecake it loses that creamy texture!
Freshness Duration
Generally, your cheesecake will stay fresh in the fridge for about 5-7 days . After that, it’s still safe to eat but may not taste as fresh.
Creative Variations
Feeling adventurous? Here are some creative variations for your cheesecake!
Flavor Adaptations
Have you ever thought about a mint chocolate cheesecake ? Just add a couple of drops of peppermint extract into the mix. It’s refreshing and so delicious!
Dietary Modifications
Trying to cater to some dietary restrictions? Swap out the cream cheese for a vegan alternative, or use a gluten-free crust. It’s easier than you think to make it inclusive!
Seasonal Twists
Pumpkin season? Try a pumpkin spice cheesecake! Add some cinnamon and nutmeg to your batter. It’s perfect for Thanksgiving gatherings.
Regional Variations
How about an Italian style cheesecake? Switch the chocolate for ricotta cheese. It’s light, creamy, and a great twist!
Complete Nutrition Guide
Let’s talk numbers. This cheesecake isn’t just about indulgence; it’s got some good stuff too!
Detailed Breakdown
Each slice of your Bake Chocolate Cheesecake: Decadent Delight packs about 350 calories . Not too shabby for a dessert, right?
Health Benefits
Dark chocolate contains antioxidants and can be heart healthy. So you can feel a bit better about indulging!
Dietary Considerations
Keep in mind the amount of sugar and cream if you’re counting calories, moderation is your friend.
Portion Guidance
A serving size is about one slice, which should satisfy your cravings without feeling guilty. Perfect for those sweet treats for chocoholics !
And there you have it! these tips and tricks will ensure that your bake chocolate cheesecake: decadent delight not only looks gorgeous but tastes phenomenal too.
So dive into the kitchen and get baking your friends and family will thank you! enjoy the process and remember the joy is in the journey just as much as the delicious end result!
Frequently Asked Questions
What is the best way to store my Bake Chocolate Cheesecake: Decadent Delight?
For optimal freshness, store your cheesecake in the refrigerator, covered with plastic wrap or in an airtight container. It can stay fresh for up to 5 days. If you want to keep it longer, consider freezing it, tightly wrapped in plastic and aluminum foil, for up to 3 months.
How can I avoid cracks in my Bake Chocolate Cheesecake: Decadent Delight?
To minimize cracks, slowly cool the cheesecake in the oven after baking, and avoid overmixing the filling. Additionally, using a water bath during baking helps maintain moisture and even temperature, which can also prevent cracking.
Can I make variations of the Bake Chocolate Cheesecake: Decadent Delight?
Yes! You can customize this cheesecake by adding flavors such as mint extract for a mint chocolate version, or substituting white chocolate for a different taste. Adding instant espresso can also give your cheesecake a delightful mocha twist!
What is the nutritional information for Bake Chocolate Cheesecake: Decadent Delight?
Each serving of Bake Chocolate Cheesecake: Decadent Delight contains approximately 350 calories, with 6 grams of protein, 24 grams of fat, and 29 grams of carbohydrates. You can adjust ingredients (like using low-fat cream cheese) to make lighter variations if desired.
How long do I need to chill the cheesecake after baking?
It's essential to chill the cheesecake for at least 4 hours after baking, but refrigerating it overnight will yield the best flavor and texture. This allows the filling to firm up and enhances the overall taste.
Can I use substitutes for the ingredients in the Bake Chocolate Cheesecake: Decadent Delight?
Absolutely! You can use Greek yogurt in place of sour cream for a healthier option, and other cookies like Oreos can be used instead of chocolate graham cracker crumbs for crust. Feel free to modify the recipe to fit your dietary needs or flavor preferences.
Bake Chocolate Cheesecake Decadent Delight