Chocolate Dump Cake: the Easiest, Fudgiest Chocolate Cobbler Recipe
- Embracing the Ease: Why the Chocolate Dump Cake is the Ultimate Dessert Cheat
- The Science of Indulgence: Achieving the Perfect Molten Core and Crisp Topping
- Essential Ingredients and Smart Swaps for Your Chocolate Dump Cake
- Two-Minute Prep: Step-by-Step Guide to the Perfect Chocolate Dump Cake
- Troubleshooting Your Bake: Expert Tips and Avoiding Common Dump Cake Errors
- Maximizing Freshness: Storing and Reheating Chocolate Dump Cake
- Perfect Pairings: Serving Suggestions for Your Rich Chocolate Dump Cake
- Recipe FAQs
- 📝 Recipe Card
Embracing the Ease: Why the Chocolate Dump Cake is the Ultimate Dessert Cheat
That moment when the oven timer dings and the aroma of baking dark chocolate slams into you? That’s pure joy, folks. This is the scent of a dessert that delivers the gooey satisfaction of a brownie married to the crunchy texture of the finest cobbler.
It is rich, it is deeply chocolatey, and it demands to be eaten with a big spoon while still warm.
I totally understand the desire for scratch baking, but honestly, sometimes life just calls for shortcuts. This Chocolate Dump Cake is a brilliant culinary cheat fast, incredibly easy, and so cheap to make. You truly only need about ten minutes of active preparation before you shove it into the oven. If you can open a box and pour liquid, you can make this cake perfectly, leaving you time to make complex things like my recipe for Mini Strawberry Cheesecakes: Creamy, Individual Baked Treats later.
Forget fussy mixing or complex techniques; we are focusing entirely on maximum indulgence today. Let’s dive into why this specific recipe elevates the classic convenience dish into something truly divine. It’s all about the layers, darling.
The Science of Indulgence: Achieving the Perfect Molten Core and Crisp Topping
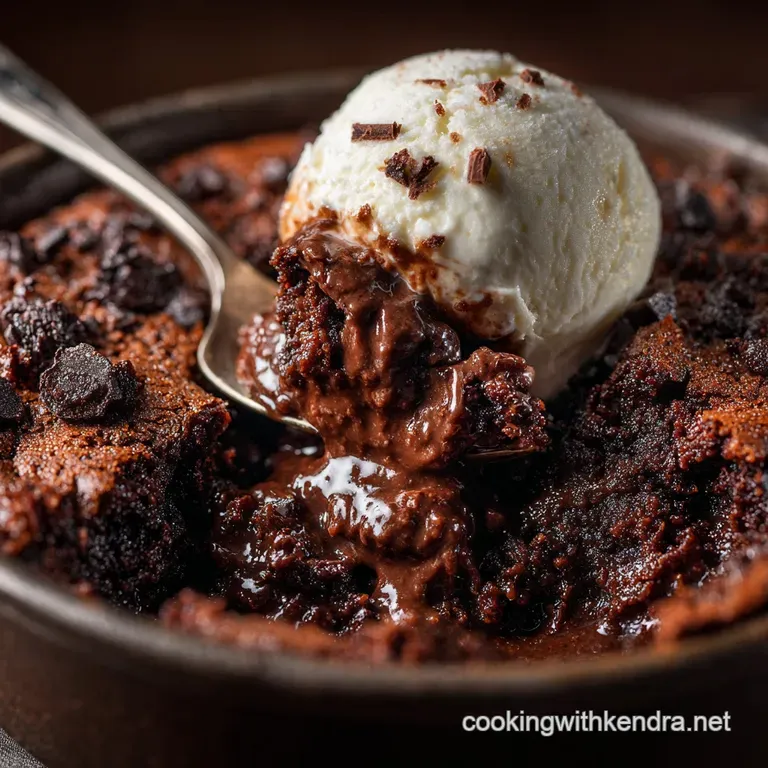
The magic of the dump cake lies in the structural integrity or lack thereof before it bakes. It’s a study in controlled chaos. When done right, you get a buttery, crisp cake topping giving way to an unbelievably fudgy, almost pudding like layer underneath.
What Exactly Is a "Dump Cake"?
A dump cake is exactly what it sounds like: a dessert where the cook "dumps" the ingredients into a baking dish without mixing them. Unlike traditional cakes that rely on aeration, this style depends on the ingredients reacting to heat and steam from the bottom layer. It’s brilliant.
The Difference Between a Cobbler and a Dump Cake Structure
While many people call this a chocolate cobbler, the structure is slightly different. A classic cobbler features a dropped biscuit or crust topping placed over a cooked fruit filling. Our dump cake builds the topping on top of the wet filling using dry cake mix and fat.
The resulting texture is closer to a dense, fudgy pudding beneath a chewy, golden crust.
The Magic of the Wet-on-Dry Method
This method is the whole reason we skip the mixer. When you layer the dry mix over the wet base and top it with cold butter slices, the melting fat slowly hydrates the cake powder, turning it into a beautiful, crackled, cobbler like crust.
Meanwhile, the dry layer acts like a sponge, holding back the molten base until the very end. Do not stir the layers; I cannot stress this enough.
Why Boiling Water Creates the Fudgy Sauce
My particular recipe uses evaporated milk and chocolate chips, which melt down into an instantly luxurious fudge. Some Chocolate Dump Cake recipes call for pouring boiling water over the top of the butter.
If you use the boiling water method instead of evaporated milk, the steam activates the starches in the dry cake mix and the sugar instantly, rushing downward to create that incredibly thick, molten sauce layer. It's a faster chemical reaction, but I prefer the richness the evaporated milk provides.
Essential Ingredients and Smart Swaps for Your Chocolate Dump Cake
Using quality ingredients here really matters, even if the recipe starts with a boxed mix. Remember, the fewest ingredients a recipe has, the better those ingredients need to be.
Selecting the Right Chocolate Cake Mix (Or Scratch Equivalent)
We are using a standard 15.25 ounce box of dry chocolate cake mix. You don't need any special blend, but make sure it’s fresh. Do not use the pudding-in-the-mix variety as it can make the topping too dense.
If you want to make this a Dump Cake From Scratch, substitute the box mix with a blended mixture of 3 cups all-purpose flour, 1.5 cups sugar, 1 tablespoon baking powder, and 1/2 teaspoon salt.
The Importance of Quality Cocoa Powder (For the Molten Layer)
If you decide to skip the chips and just use cocoa powder in the base (mixing it into the evaporated milk), use Dutch processed cocoa powder. It has a deeper, less acidic flavour that contributes to a more intense, darker chocolate experience.
Dairy Options: Butter, Milk, and Cream Substitutes
The butter gives us that gorgeous top crust, but it’s easy to swap the liquid base.
| Ingredient | Standard Ingredient | Viable Substitute |
|---|---|---|
| Fat | Unsalted Butter (cold) | Vegan Butter Sticks, Margarine (though texture may be slightly softer) |
| Liquid Base | Evaporated Milk | Full Fat Canned Coconut Milk (stir well), or Half and Half |
Elevating Flavor with Extracts and Espresso Powder
This is where you make the cake yours. Always add a teaspoon of vanilla extract to the base, as it rounds out the sharpness of the chocolate. Also, please, please, try adding instant espresso powder .
Just a teaspoon intensifies the cocoa flavour beautifully without adding any discernible coffee taste. This is the secret to a seriously deep and rich Indulgent Chocolate Cobbler .
Two-Minute Prep: step-by-step Guide to the Perfect Chocolate Dump Cake
My biggest mistake when I first started making these? Trying to rush the layering process and accidentally stirring the base. Learn from my culinary fumbles!
Preparing the Dry Base Layer (The Initial 'Dump')
Start by preheating the oven to 350°F (175°C) and lightly greasing your 9x13 inch dish. In a separate bowl, whisk together your evaporated milk, chocolate chips, vanilla, salt, and that magical espresso powder. Pour this complete liquid mixture evenly across the bottom of the prepared pan.
This forms the decadent, molten bottom layer.
Layering the Butter and Liquid Elements (Creating the Top Crust)
Now comes the "dump" part. Take your dry cake mix and gently sprinkle the entire contents over the liquid base. You need to ensure the liquid base is completely covered by the powder. Use a spoon to gently pat it down, if necessary, but do not poke or stir into the liquid underneath .
Sprinkle any optional nuts evenly over this dry layer.
The Crucial Final Pour: Activating the Molten Bottom
Next, slice your cold butter into uniform, thin pieces. I aim for about 24 slices from 1 1/2 sticks. Lay these butter slices closely together across the entire dry surface. Every single spot of dry mix needs to be touched by a slice of butter.
This ensures even hydration during the bake, avoiding those tragic dry, powdery patches.
Baking Time and the "Done Test" (Knowing When It's Ready)
Bake this beauty for 45 to 50 minutes. The topping should be golden brown, looking crisp and slightly cracked, and the chocolate base should be visibly bubbling around the edges of the pan.
The centre shouldn't look wet, but it shouldn't feel rock solid either a gentle jiggle is okay, indicating that gooey centre is still molten.
Chef's Note: If you notice the edges are browning too quickly around the 35 minute mark, loosely tent the top with aluminum foil to prevent burning while the centre finishes cooking.
Troubleshooting Your Bake: Expert Tips and Avoiding Common Dump Cake Errors
Preventing a Dry Cake Top (Ensuring Moistness)
The main culprit for a dry top is inadequate butter coverage. If the butter doesn't touch the dry mix, that area will remain dusty and powdery. Fix: Ensure those butter slices are touching, or melt a little extra butter and drizzle it gently over any bare spots before baking.
Why Your Bottom Layer Didn't Fudgy Up (Checking Water Temperature)
If your bottom layer is grainy or separates, you might have stirred it slightly, or maybe your evaporated milk mixture wasn't completely incorporated. If you are using the hot water method for activation, ensure the water is truly boiling when you pour it over the top.
Lukewarm water won't generate the necessary steam to create that proper molten, fudgy texture.
Adjusting for High Altitude Baking
High altitude often causes cakes to dry out or dome excessively. For this Quick Chocolate Dump Cake, try increasing the evaporated milk by about 2 tablespoons, or reduce the bake time by about 5 minutes. Reducing the oven temperature by 15 20 degrees often helps immensely, too.
Maximizing Freshness: Storing and Reheating Chocolate Dump Cake
Does this delightful dessert freeze well? You bet. But it’s so easy, you probably won't have leftovers!
Best Practices for Refrigerated Storage
Once the cake is completely cooled, cover the dish tightly with plastic wrap or transfer leftovers to an airtight container. This cake will keep beautifully in the refrigerator for up to 4 days. When chilled, the fudgy bottom layer will firm up slightly, resembling a giant, dense brownie.
Freezing and Reheating Instructions
You can freeze leftover portions easily. Cut them into squares and wrap each piece tightly in plastic wrap, then place them in a freezer safe bag. It will last for up to 2 months. To reheat, you have options.
My favourite is placing a single serving on a plate and microwaving it for 30 60 seconds until the chocolate base is warm and molten again. Alternatively, reheat the entire pan (covered with foil) in a 300°F (150°C) oven for about 20 minutes.
Perfect Pairings: Serving Suggestions for Your Rich Chocolate Dump Cake
This dessert is inherently rich and requires a cool contrast to truly shine. It's too heavy to serve alongside something delicate, like my recipe for Mini Cranberry Cheesecakes: Ultra Creamy Holiday Mini Dessert Recipe , but perfect as the grand finale itself.
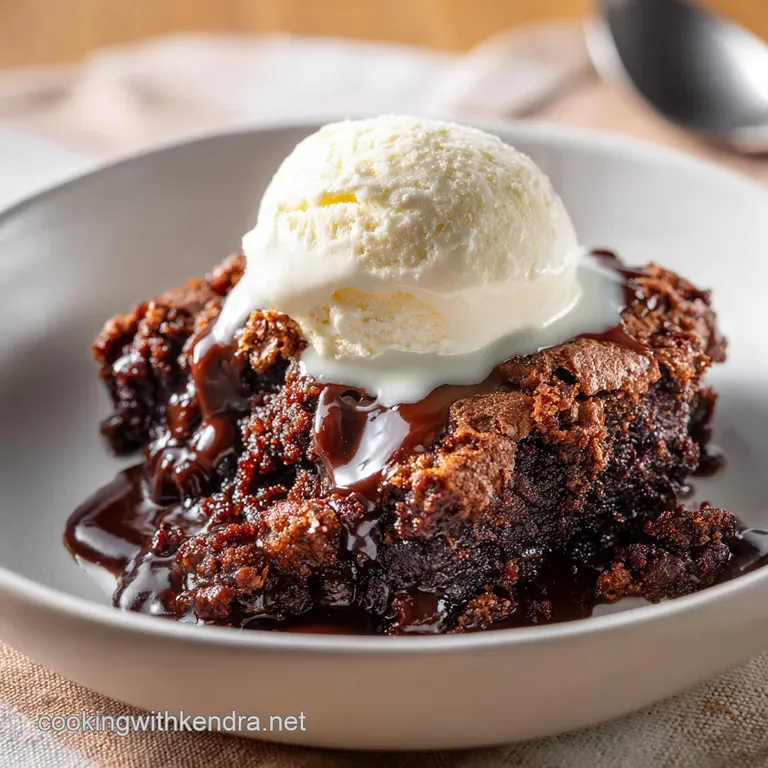
The Essential Ice Cream Pairing (Temperature Contrast)
This is non-negotiable, in my opinion. The warm, gooey, fudgy cake absolutely demands a scoop of cold vanilla bean ice cream. The temperature and texture contrast is heavenly. Salted caramel ice cream is also an excellent choice, enhancing the depth of the chocolate.
Balancing the Richness with Coffee or Liqueurs
To prevent this from feeling too heavy after a meal, serve small slices alongside a strong cup of black coffee or a digestif. A shot of good espresso or a small glass of raspberry liqueur (framboise) cuts through the sweetness beautifully, leaving a sophisticated finish. Enjoy every single gooey bite!

Recipe FAQs
How can I adapt this Chocolate Dump Cake recipe to include fruit variations like cherry, strawberry, or pineapple?
Dump cakes are highly versatile when it comes to fruit. To incorporate fruit, simply spread a 20 oz can of drained, crushed fruit (like pineapple, cherries, or strawberries) or canned pie filling evenly across the bottom of the dish before adding the dry cake mix and butter.
This layering ensures the fruit melts into the fudgy bottom layer.
What are the essential ingredients for a classic, easy chocolate dump cake?
The true magic of the dump cake lies in its simplicity, requiring just three core elements: a box of dry cake mix (usually chocolate or yellow), a liquid or moist base (often canned fruit, pudding, or milk), and a fat source like melted butter poured over the top.
This technique eliminates the need for mixing bowls entirely.
What makes this dish an "old-fashioned" dump cake, and does it require pre-mixing?
The "old-fashioned" aspect refers to the technique of simply layering (or dumping) all the ingredients into the pan without any stirring whatsoever, ensuring the distinct fudgy bottom and crisp topping layers form naturally during baking.
Pre-mixing the dry and wet ingredients would turn it into a standard cobbler batter and eliminate the characteristic structure of a dump cake.
Why did my dump cake turn out dry, and how can I ensure the base remains fudgy?
Dryness usually results from too little liquid in the base, or baking it for too long, causing the fat (butter) to cook out excessively. Ensure you use the full amount of liquid called for in the recipe, and resist the urge to overbake; the center should look set but still slightly soft when removed from the oven, as it will continue to firm up as it cools.
Can I use instant pudding mix in this recipe, and what effect does it have on the texture?
Yes, instant pudding mix is an excellent addition, typically whisked into the liquid base (if using a recipe with a liquid base). It adds deep flavor and acts as a thickening agent, resulting in a much richer, denser, and more stable fudgy layer than cakes made without it. Use the dry mix, not prepared pudding.
What is the best way to store leftover Chocolate Dump Cake?
Store leftover dump cake tightly covered in the refrigerator for up to 3 to 4 days; refrigeration is recommended due to the high moisture content of the base. To reheat, scoop individual portions into a microwave safe bowl and warm them slightly, or cover the whole dish loosely with foil and reheat at 300°F (150°C) until warm through.
Is it possible to make this Chocolate Dump Cake suitable for vegan diets?
Absolutely, simply swap the standard cake mix for a dairy-free version (ensure it contains no animal fats), replace dairy butter with a solid plant based butter alternative, and ensure any base liquid is replaced with a non-dairy option such as oat or almond milk. The process of dumping and baking remains the same.
Chocolate Dump Cake Two Minute Prep
Ingredients:
Instructions:
Nutrition Facts:
| Calories | 642 kcal |
|---|---|
| Protein | 7.2 g |
| Fat | 24.7 g |
| Carbs | 97.7 g |
