The Forktender Dream Classic Slowcooked Beef Pot Roast with Rich Red Wine Gravy
- Why This Slow-Cooked Pot Roast Redefines Comfort Food
- The Alchemy of Low and Slow: Achieving Unforgettable Tenderness
- Master List: Assembling Your Pot Roast Components
- Phase One: Deepening Flavor Through Searing and Building the Base
- The Long Haul: Detailed Braising and Tenderizing Sequence
- Maximizing Leftovers: Storage and Next-Day Delight
- Nutritional Snapshot: Understanding the Build of This Rich Meal
- Creative Twists: Variations on the Traditional Recipe
- Recipe FAQs
- 📝 Recipe Card
Why This Slow Cooked Pot Roast Redefines Comfort Food
There are few dishes that carry the immediate, soul warming satisfaction of a perfectly executed pot roast. It is the cornerstone of home cooking, a benchmark against which all other hearty meals are often measured.
Yet, so often, the results fall short dry edges, watery gravy, or meat that requires sawing rather than slicing. This particular Pot Roast Recipe has been honed to eliminate those disappointments entirely.
We are aiming for the "fork tender dream," where the collagen in the beef breaks down into gelatin, basting the meat from the inside out while creating an unparalleled richness in the cooking liquid.
Whether you are preparing a simple, restorative weeknight dinner or looking for impressive Christmas Pot Roast Recipes , this method ensures a consistently spectacular outcome, transforming a relatively inexpensive cut of beef into something truly luxurious.
The Alchemy of Low and Slow: Achieving Unforgettable Tenderness
The magic behind transforming a tough cut of meat, like chuck roast, into something that melts in your mouth lies entirely in the application of low, moist heat over an extended period. This slow cooking process is not merely about warming the food; it is a chemical transformation.
When connective tissues (collagen) are exposed to temperatures between 160° F and 205° F ( 71° C to 96° C) for several hours, they dissolve into rich, silky gelatin.
This gelatin coats the muscle fibers, yielding that signature, incredibly juicy texture that defines a superb Roast Beef Recipe .
Setting the Scene: The Aroma of a Perfect Afternoon Meal
Imagine walking into your kitchen on a cool afternoon. That deep, savoury scent mingling with hints of roasted garlic, thyme, and simmering red wine that is the signature bouquet of a successful Pot Roast . This dish is an immersive experience.
While much of the time is hands off, the initial 30 minutes of preparation, involving the crucial searing and aromatic sautéing, lays down the necessary flavour foundation that will permeate the entire meal.
Beyond the Basics: What Makes Our Gravy Unbeatable
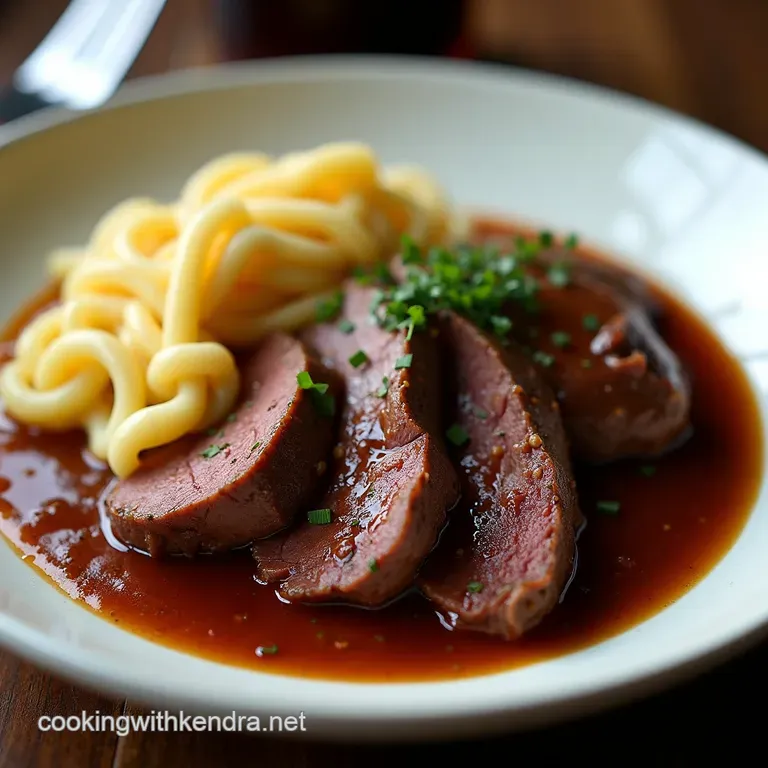
A fantastic roast deserves an equally magnificent sauce. Many recipes rely solely on the beef drippings, resulting in a thin, sometimes greasy liquid. Our approach builds complexity by utilizing three critical components: the flour dredge on the initial sear, the tomato paste for umami depth, and, crucially, a splash of dry red wine for brightness and acidity.
This results in a gravy that is dark, glossy, and coats the back of a spoon beautifully, making it perfect for soaking into accompanying mashed potatoes.
Ease of Execution: Weeknight Ready, Sunday Worthy
Despite the several hours it spends gently bubbling away, the active time commitment for this Pot Roast is surprisingly low about 30 minutes of focused effort.
This means that while it’s perfect for that relaxed Sunday lunch, it's equally manageable after work if you get an early start. You have the option of utilizing an oven for consistent, dry heat, or leveraging the set-it-and-forget-it convenience of a Pot Roast Slow Cooker or Pot Roast Crock Pot setup; the principles of searing and liquid layering remain the same, though the cooking vessel changes.
Master List: Assembling Your Pot Roast Components
To achieve this ultimate comfort meal, you need to think about three core elements: the beef itself, the aromatic base, and the vegetables that will absorb all that beautiful cooking liquor.
We’ll use a standard 3 to 4-pound chuck roast, which has the ideal marbling to withstand the long braise without drying out.
Choosing Your Cut: Selecting the Perfect Beef for Braising
For any successful braise, you need a working class cut of meat rich in intramuscular fat and connective tissue. Chuck roast, shoulder roast, or even short ribs (though they take longer) are ideal candidates.
Avoid lean cuts like eye of round, as they will inevitably become dry and stringy under this extended heat application. If your roast is boneless, taking a moment to tie it securely with butcher's twine ensures it maintains a uniform shape during cooking, leading to more even shredding later.
The Flavor Foundation: Herbs, Aromatics, and Seasoning Ratios
The flavour architecture begins with aggressive seasoning. Before searing, the 3 to 4-pound piece of beef needs to be liberally seasoned with about 1 tablespoon of kosher salt and 1 teaspoon of freshly ground black pepper, along with a light dusting of flour.
This dredging is essential not just for crust development but also to help thicken the eventual gravy. We then build layers using one large yellow onion, three stalks of celery, four smashed garlic cloves, and two tablespoons of concentrated tomato paste, alongside dried thyme and bay leaves for that classic herbaceous background.
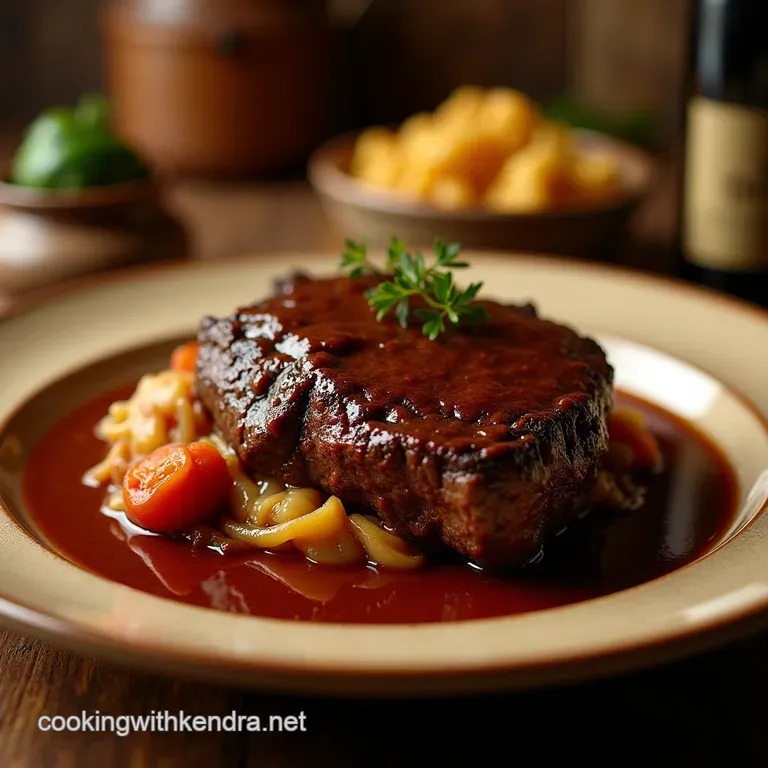
Building the Body: Vegetables That Stand Up to the Slow Cook
The vegetables serve dual purposes: they infuse the cooking liquid with earthy sweetness and become perfectly tender side components themselves. We incorporate sturdy root vegetables like four large carrots, roughly chopped into two-inch pieces.
The potatoes about 2 pounds of Russets are added later in the cooking sequence, roughly quartered, to ensure they are soft but haven't completely disintegrated into the sauce during the hours of simmering required for the beef.
Phase One: Deepening Flavor Through Searing and Building the Base
The initial hands-on work is where we create maximum impact. We are aiming for the Maillard reaction, the browning process that creates hundreds of new flavour compounds.
The Critical Step: Achieving the Maillard Reaction on Your Roast
Heat two tablespoons of olive oil in your chosen vessel ideally a heavy Pot Roast Dutch Oven —over medium high heat until it shimmers. Carefully place the seasoned roast into the hot oil. Resist the urge to move it for at least three to four minutes per side.
You are looking for a deep, dark mahogany crust. This searing step is non-negotiable; a pale sear equals a pale flavour profile. Once all sides are beautifully browned, remove the meat and set it aside.
Layering Liquids: Deglazing and Initial Simmering
With the roast removed, reduce the heat slightly. Add your chopped onions, celery, and carrots to the residual fat left in the pot. Sauté these aromatics until they begin to soften, about five to seven minutes.
As they cook, use a wooden spoon to scrape up the browned bits (the fond ) stuck to the bottom of the pot this is concentrated flavour gold. Now, stir in the garlic and tomato paste, cooking for just one minute until the paste darkens slightly.
Next comes the liquid gold: pour in one cup of dry red wine. Allow this to bubble vigorously and reduce by half, scraping the bottom again to lift any last remnants of flavour. Finally, pour in three cups of low-sodium beef broth, add your thyme and bay leaves, and bring this mixture to a gentle simmer on the stovetop before carefully nestling the seared Pot Roast back into the liquid.
Related Recipes Worth Trying
- The Proper Picnic Platter Tangy Mustard Herb Potato Salad — Ditch the bland supermarket tubs This Easy Potato Salad Recipe uses red wine vinegar and Dijon for a bright tangy dressing that truly sings Perfect for your...
- Easy Crockpot Taco Soup Recipe SetandForget Fiesta — Need a comforting weeknight winner This Easy Crockpot Taco Soup is packed with robust flavour and requires almost no effort Taste tested and approved
- Velvet Dream The Silkiest Creamy Potato Soup Recipe — Forget watery soup This velvety potato soup recipe uses slowsautéed leeks for a rich comforting flavour that tastes like a pub lunch at home Get the...
The Long Haul: Detailed Braising and Tenderizing Sequence
With the liquid established and the meat returned to the pot, the transformation begins.
Monitoring Progress: When Is Your Pot Roast Truly Done?
If using the oven, preheat it to 325° F ( 160° C). Place the tightly covered Dutch oven inside. Allow the roast to braise undisturbed for a full 2. 5 hours. This extended initial period allows the dense muscle structure to begin relaxing.
After this time, carefully remove the lid be mindful of the burst of steam and gently nestle the quartered potatoes around the meat. Replace the lid and return the pot to the oven for another 60 to 90 minutes.
The roast is truly done when a fork inserted into the thickest part meets virtually no resistance; it should shred with minimal effort.
Thickening Secrets: Perfecting the Gravy Consistency
Once the meat is resting outside the pot, skim off any significant surface fat from the cooking liquid, which now holds all the dissolved collagen. If the resulting liquid is already thick enough due to the flour dredge, simply taste and adjust the seasoning.
For a smoother, restaurant quality texture, pour the liquid through a fine mesh sieve into a saucepan, pressing down on the cooked vegetables to extract all the moisture, then discard the solids. Return the strained liquid to the heat and simmer gently for 5 to 10 minutes.
If it remains too thin, create a cornstarch slurry (one tablespoon of cornstarch mixed with two tablespoons of cold water) and whisk it slowly into the simmering gravy until the desired consistency is reached.
Maximizing Leftovers: Storage and Next Day Delight
A properly made Pot Roast actually improves overnight. The flavours continue to meld as it cools.
Freezer Friendly Facts: How Long to Keep Your Braised Masterpiece
Once cooled completely, store leftover shredded meat and gravy together in an airtight container in the refrigerator for up to four days. For longer storage, freeze portions in heavy duty, freezer safe bags, squeezing out all excess air.
This dish freezes exceptionally well for up to three months; when reheating, thaw overnight in the fridge and warm gently on the stovetop, adding a splash of extra broth if it seems dry.
Pairing Suggestions: The Best Sides to Serve Alongside
This hearty meal requires sides capable of soaking up that incredible gravy. Creamy, buttery mash is the undisputed champion. If you are exploring Healthy Pot Roast Recipes , consider substituting traditional mash with a parsnip and cauliflower mash.
A side of quick sautéed Swiss chard or tender crisp asparagus provides a necessary bright, slightly bitter contrast to the richness of the beef and gravy.
Adjusting for Smaller Portions: Scaling the Recipe Accurately
If you are cooking for fewer than six people, you can easily scale this recipe down. If starting with a 2-pound roast, adjust the carrots, celery, and onions proportionally. Crucially, maintain the ratio of liquid to meat, ensuring the roast remains mostly submerged.
You may need slightly less cooking time, so start checking for tenderness around the 3-hour mark.
Nutritional Snapshot: Understanding the Build of This Rich Meal
This recipe delivers substantial nutrition, centred around high-quality protein. Chuck roast, while containing more fat than leaner cuts, provides essential iron and B vitamins. The vegetables contribute significant dietary fibre and Vitamin A.
While it is inherently rich due to the breakdown of fat during the slow braise, trimming excess fat after cooking but before making the gravy can significantly lower the overall calorie and saturated fat count, helping align it with Healthy Pot Roast Recipes goals without sacrificing texture.
Creative Twists: Variations on the Traditional Recipe
While the classic preparation is divine, this method is robust enough to handle exciting modifications.
Freezer Friendly Facts: How Long to Keep Your Braised Masterpiece
For an entirely different profile, try a Mediterranean twist. Instead of red wine and thyme, use beef broth, a splash of sherry vinegar, and fresh rosemary. Add Kalamata olives and pearl onions during the last hour of cooking instead of potatoes.
This variation moves the traditional Pot Roast closer to an Italian stracotto style.
Freezer Friendly Facts: How Long to Keep Your Braised Masterpiece
When making Pot Roast Slow Cooker versions, consider substituting some of the beef broth with dark beer, such as a stout or porter, for a maltier, deeper undertone that complements the caramelization achieved during searing.
Just ensure you still use a thickener at the end if needed, as beer alone may result in a thinner consistency than wine.

Recipe FAQs
Why is my Pot Roast still tough even after cooking for hours?
Toughness usually means the connective tissues haven't had enough time or heat to break down into lovely gelatin. Make sure you are cooking low and slow 325°F (160°C) is your friend!
Also, check that the liquid is actually simmering gently inside the Dutch oven; if it’s too dry, the meat will seize up instead of tenderising.
What is the absolute best cut of beef to use for a proper Pot Roast?
For that authentic, fork tender result, you really can’t beat chuck roast (also known as blade steak). It has great marbling and connective tissue that melts away during the long cook time, making the meat succulent. Avoid leaner cuts like sirloin, as they tend to dry out rather than become meltingly tender.
Can I skip searing the beef for this Pot Roast recipe? I’m a bit short on time.
While you technically can skip it, I wouldn't advise it unless you’re in a proper pickle. Searing creates the Maillard reaction, which is where all the deep, complex, savoury flavour of your final gravy comes from. It’s a crucial step that separates a good roast from a truly brilliant one!
How long can I safely keep leftover Pot Roast and can I freeze it?
Leftovers are brilliant for next day sandwiches, though! Keep the meat and gravy stored in an airtight container in the fridge for up to 3 or 4 days. Yes, it freezes beautifully; just portion the shredded meat and gravy separately, and it will be good in the freezer for up to three months perfect for a quick mid-week supper.
My gravy seems too thin. How can I thicken it up without adding loads of flour?
The easiest way is to simmer it uncovered on the stovetop; evaporation will naturally concentrate the flavour and thicken it up nicely over 10 to 15 minutes. If you need it thicker right now, mix a tablespoon of cornstarch with an equal amount of cold water to form a slurry, then whisk that gently into the simmering liquid until it hits your desired consistency.
Classic Forktender Pot Roast
Ingredients:
Instructions:
Nutrition Facts:
| Calories | 946 kcal |
|---|---|
| Protein | 12.3 g |
| Fat | 24.4 g |
| Carbs | 68.5 g |
| Fiber | 21.9 g |
| Sodium | 281 mg |
