Classic Peanut Butter Lunch Lady Cookie Bars: the Chewy 9X13 Comfort Dessert
- The Ultimate Comfort Food: Classic Peanut Butter Lunch Lady Cookie Bars
- Achieving the Perfect Lunch Lady Texture: Science Behind the Chew
- Essential Ingredients for Classic Peanut Butter Lunch Lady Cookie Bars
- Baking Method: How to Assemble and Bake the Peanut Butter Base
- The Iconic Finish: Preparing the Silky Chocolate Fudge Glaze
- Expert Tips for Failsafe Classic Peanut Butter Lunch Lady Cookie Bars
- Maximizing Freshness: Storage and Freezing Your Peanut Butter Bars
- The Lunch Lady Experience: Best Ways to Serve
- Recipe FAQs
- 📝 Recipe Card
The Ultimate Comfort Food: Classic Peanut Butter Lunch Lady Cookie Bars
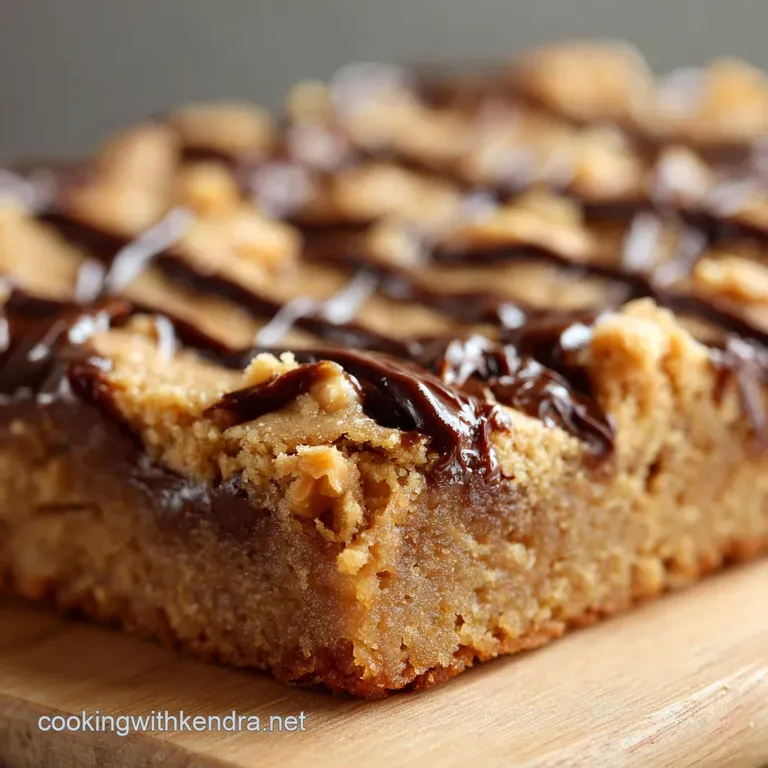
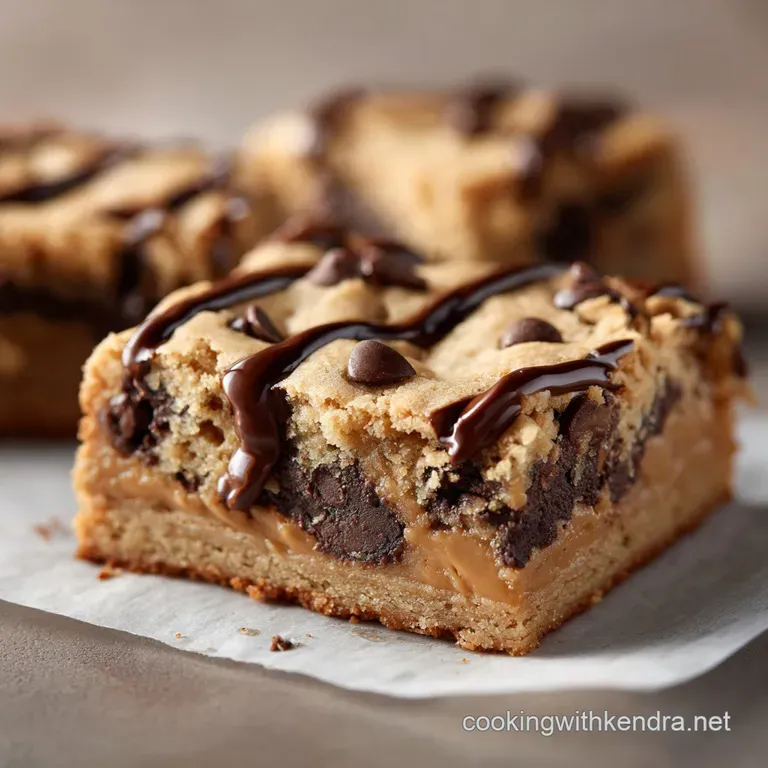
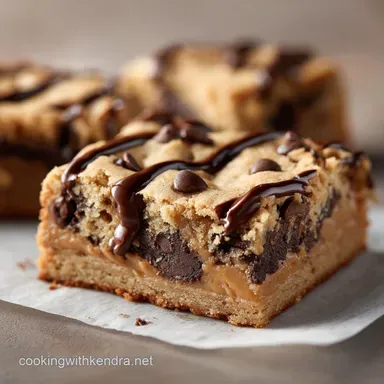
That smell. It's pure, warm, toasted peanut butter goodness mixed with baking sugar, wafting through the house and promising instant comfort. The finished bar texture is gloriously dense, almost fudgy in the center, yet it holds together perfectly when chilled.
You just know, instantly, that these Peanut Butter Cookie Squares are going to hit the absolute sweet spot.
Honestly, this recipe is a total lifesaver for busy weeks and last minute potlucks. Forget fussy drop cookies that require chilling and scooping. This is a brilliant, one-bowl wonder, pressed quickly into a 9x13 pan, and ready to feed a hungry crowd in record time.
They are unbelievably easy and, let's be real, surprisingly cheap to make using pantry staples.
We're not aiming for delicate or gourmet results here, my friend. We are going straight back to true cafeteria comfort, recreating the legendary, chewy, and rich Classic Peanut Butter Lunch Lady Cookie Bars.
Let's ditch the confusing cookbook instructions and focus on the tips that actually guarantee this incredible texture every single time.
Achieving the Perfect Lunch Lady Texture: Science Behind the Chew
The magic of these Chewy Peanut Butter Bars is all about density and structure control, which makes them fundamentally different from regular cookies. We want that low-rise, intense chew that sticks to the roof of your mouth a little bit (in the best way possible).
Getting this texture right is all about controlling how much your dough spreads and rises.
The Magic of the 9x13 Pan: Why Bars Beat Cookies
Using the 9x13 pan is the key to creating a deep, moist environment. When you bake the dough in a single, thick slab, the edges set while the center remains slightly soft, resulting in a supremely chewy interior. Trying to replicate this texture in individual cookies is almost impossible.
Plus, slicing squares is way faster than scooping 24 perfect rounds.
Nostalgia on a Plate: Recreating the School Cafeteria Treat
The classic Lunch Lady flavor profile relies heavily on standard, commercially processed creamy peanut butter. This type of peanut butter, which includes stabilizers, is essential for keeping the bar dense and preventing excessive spreading or crumbling. It's about getting that exact, reliable texture we all remember.
Why Skip the Rolling Pin? The Beauty of No-Chill Baking
Because we are creating a thick bar, we don't need to worry about the dough spreading too much or losing its shape. This is true no-fuss baking. We use softened (not melted) butter to ensure the dough is pliable enough to press into the pan immediately, cutting down on mandatory chill time.
Balancing Salty Peanut Butter and Sweet Chocolate Fudge
A good peanut butter bar needs contrast. We use a generous amount of salt in the cookie base to sharpen the nutty flavor, which prevents the final product from tasting overly sweet. The slight saltiness of the base is what makes the chocolate fudge topping taste so incredible.
The Secret to Extreme Chewiness (Sugar Ratios)
We use a specific blend of light brown sugar and granulated sugar. Brown sugar is non-negotiable because of its molasses content, which holds moisture and makes the bars delightfully chewy and fudgy.
The granulated sugar helps provide a bit of necessary lift and structure, ensuring they don't turn into pure peanut butter fudge.
Density Control: Preventing Dry or Crumbly Bars
The absolute biggest mistake people make is over baking the base. You must remove the bars when the center still looks slightly under baked or glossy, not fully matte and golden. They continue to cook and set up dramatically as they cool, guaranteeing a moist interior.
Essential Ingredients for Classic Peanut Butter Lunch Lady Cookie Bars
Every great bake starts with proper ingredients, but sometimes you just need a quick swap. Here are the must haves and their reliable substitutions.
Choosing the Right Peanut Butter (Creamy vs. Natural)
Use standard creamy peanut butter like Jif or Skippy. I’ve tried the healthier natural stuff, and trust me, the oil separation messes with the dough’s structure, resulting in a drier, more crumbly bar. Save the natural peanut butter for sandwiches!
| Ingredient | Why We Use It | Substitution Suggestion |
|---|---|---|
| All-Purpose Flour | Structure and stability. | Use a 1:1 gluten-free Blend (must contain xanthan gum). |
| Unsalted Butter | Flavor and structure base. | high-quality dairy-free butter sticks (use same amount). |
| Creamy Peanut Butter | Flavor, moisture, density. | No good substitute exists for this recipe. If you dislike peanuts, make my famous Lunch Lady Peanut Butter Bars: The Easy No-Bake Nostalgic Recipe instead, and use Biscoff or sunflower butter paste. |
| Brown/Granulated Sugar | Moisture/Chew. | Use coconut sugar or light agave nectar, but reduce liquid slightly and note texture may vary. |
| Eggs | Binder and lift. | Flax Eggs (1 Tbsp flaxseed meal + 3 Tbsp water per egg) or commercial egg replacer. |
The Role of Brown Sugar in Moisture and Flavor Depth
As mentioned, brown sugar is the moisture workhorse here. It adds deep caramel notes that plain granulated sugar just can’t replicate. Always pack the brown sugar firmly into your measuring cup for accurate moisture.
Glaze Components: Cocoa Powder vs. Melted Chocolate
We use a simple powdered sugar and cocoa powder glaze, which sets perfectly firm and shiny at room temperature. Using melted chocolate requires tempering and is honestly just overkill. The cocoa glaze is exactly what the Lunch Lady used, and it creates that iconic snap when you slice into the bar.
Ingredient Swaps: Making gluten-free or dairy-free Bars
Making this gluten-free is simple: use a high-quality 1:1 blend. Making it dairy-free requires swapping the butter for sticks of vegan butter and using plant milk (like oat or almond) in the glaze. The structure holds up beautifully regardless of the swap.
Baking Method: How to Assemble and Bake the Peanut Butter Base
The actual baking process is incredibly straightforward, but attention to the details will prevent a dry bar.
Preparing the Base Dough: Creaming Butter and Sugars Properly
Start with genuinely softened butter , not melted, not cold from the fridge. Creaming the butter, peanut butter, and both sugars together for a full three minutes until the mixture looks pale and fluffy incorporates air. This initial aeration gives the bar just enough lift.
Chef's Note: If your eggs are cold, stick them in a bowl of warm water for five minutes. Room temperature eggs emulsify better and prevent the dough from separating or becoming dense. Trust me on this little trick!
Pressing the Dough: Achieving Uniform Thickness
Once the dough is mixed, it will be quite stiff. Press it into your parchment lined 9x13 pan. I find using a piece of plastic wrap over the dough, and then pressing down with the bottom of a flat measuring cup, creates a perfectly uniform surface. This step prevents thin, burnt edges and ensures even baking.
Timing is Everything: Knowing When the Cookie Base is Done
Preheat your oven to 350°F (175°C). The bars bake for 25 to 30 minutes. Look for the edges to be golden, but the center should still look soft, slightly dull, and maybe even a little sunken. Pull them out immediately.
If you wait for the center to look baked, you've waited too long, and you'll get dry, crumbly squares instead of chewy ones.
The Iconic Finish: Preparing the Silky Chocolate Fudge Glaze
This simple four ingredient glaze is what transforms a peanut butter cookie slab into a proper Lunch Lady bar.
Melting Components for a Smooth, Non-Gritty Glaze
The key to a silky glaze is sifting the dry ingredients first that’s the powdered sugar and the cocoa powder. This step prevents lumps. Next, add the melted butter and milk, whisking until the mixture is uniform and shiny.
Pouring and Spreading Techniques for a Perfect Mirror Finish
We need the right consistency. The glaze should pour easily, but it shouldn't run off the sides instantly. Add the milk one teaspoon at a time until it coats the back of a spoon thickly. Pour it over the fully cooled bars and use an offset spatula to spread it smoothly.
The Critical Importance of Waiting to Slice
You absolutely, positively must allow the glaze to set completely before slicing. If you cut too soon, the chocolate will ooze, stick to your knife, and create a messy edge. This usually takes about 30 minutes at room temperature or 10- 15 minutes in the fridge.
Expert Tips for Failsafe Classic Peanut Butter Lunch Lady Cookie Bars
Troubleshooting Dry or Crumbly Bars: Adjusting Mixing Time
If your bars come out dry, you either over baked them (see above) or you over mixed the flour. As soon as the flour hits the wet ingredients, mix only until just combined. Over mixing develops too much gluten, which leads to a tough, dry texture.
Slicing Perfection: Achieving Clean, Crisp Edges
Once the bars are set and hard, lift the whole slab out of the pan using the parchment paper sling. Use a large, sharp chef's knife. For truly beautiful edges, run the knife under hot water for 30 seconds, dry it completely, and make a clean cut. Repeat this hot water/dry cloth step for every cut.
The Importance of Oven Calibration (Avoid Burnt Edges)
Have you checked your oven temperature recently? I used to get frustratingly burnt edges until I realized my oven ran 25 degrees hot. An oven thermometer is the cheapest, most effective baking tool you can buy.
If your edges are browning too fast, try covering the pan loosely with foil for the last 5 minutes.
Maximizing Freshness: Storage and Freezing Your Peanut Butter Bars
These bars are excellent for making ahead because they only get better on day two!
Proper Airtight Storage for Peak Freshness
Store the sliced bars in an airtight container at room temperature for up to 3 days, or in the refrigerator for up to a week. Storing them chilled often helps maintain the integrity and firmness of the chocolate glaze, giving a better snap when bitten.
Freezing the Uncut Slab vs. Individual Portions
You can absolutely freeze these. I prefer freezing the entire uncut slab after the glaze has fully set. Wrap the slab tightly in plastic wrap, then wrap again in foil. Frozen bars last up to 3 months.
How to Thaw and Refresh Frozen Bars
To thaw, simply remove the foil and plastic wrap and let the slab sit at room temperature for a couple of hours. Do not microwave! If you want a "fresh baked" feel, slice them and pop the individual squares in a toaster oven for 30 seconds just enough to soften the cookie base without melting the glaze completely.
The Lunch Lady Experience: Best Ways to Serve
These bars are rich, dense, and seriously satisfying. You don't need much fanfare.
- The Classic Pairing: A tall, ice-cold glass of whole milk is mandatory. Seriously.
- The Adult Treat: Serve slightly warmed alongside a strong cup of coffee or espresso; the bitterness perfectly balances the sweetness.
- A Spoonful of Fun: They are fantastic crumbled over vanilla ice cream, or cut into large squares and drizzled with caramel sauce.

Recipe FAQs
Why are my peanut butter bars dry and crumbly instead of chewy?
This is usually a sign of overbaking. These bars should be slightly underdone when removed from the oven the edges should be set, but the center should look soft or slightly glossy. They firm up significantly as they cool, so remove them immediately when the edges just begin to show a light golden color.
Can I substitute the peanut butter for an alternative butter (like almond or sunflower)?
Yes, you can easily substitute creamy peanut butter with high-quality almond or cashew butter for a similar texture. If you choose to use sunflower seed butter, please note that the baking soda in the recipe may react chemically, causing the bars to develop a harmless greenish hue after cooling.
My chocolate fudge glaze isn't setting up properly. What went wrong?
The glaze relies on a specific ratio of powdered sugar to liquid. Ensure you use sifted powdered sugar and only add enough milk to make the mixture spreadable, not runny. If the glaze remains too thin after mixing, try vigorously whisking in an additional tablespoon of powdered sugar immediately before pouring.
How should I store the leftover bars to keep them fresh and moist?
Once completely cooled and the glaze is set, store the bars in an airtight container at cool room temperature for up to four days. If you need to keep them longer, or if your kitchen is very warm, refrigeration will help maintain the glaze integrity and prevent the bars from drying out.
Can I freeze these classic cookie bars?
Absolutely, these cookie bars freeze beautifully. We recommend slicing them first, then arranging them in a single layer in a freezer safe container, using parchment paper to separate layers. They will retain quality for up to three months; thaw them overnight in the refrigerator or at room temperature.
Can I use brown sugar instead of granulated sugar in the dough?
Yes, substituting granulated sugar with packed light brown sugar will significantly increase the moisture content, resulting in an even richer and chewier bar. If you make this substitution, consider adding one extra tablespoon of all-purpose flour to ensure the dough remains manageable and not too sticky to spread.
Can I bake this recipe in a smaller 8x8 square pan?
You can, but the full recipe will create very thick bars requiring a much longer bake time, generally an additional 15 20 minutes. For a better result that fits an 8x8 pan standard thickness, we recommend scaling down all the ingredients by exactly half, keeping the original baking time as a guide.
Classic Peanut Butter Lunch Lady Bars
Ingredients:
Instructions:
Nutrition Facts:
| Calories | 392 kcal |
|---|---|
| Protein | 7.0 g |
| Fat | 23.0 g |
| Carbs | 42.0 g |
