Cotton Candy Cakes
- What’s Your Favorite Birthday Memory Involving Cake?
- A Sweet Walk Down Memory Lane
- Secrets Behind Perfect Cotton Candy Cakes
- What Makes This Recipe Special?
- Health and Nutrition Highlights
- Recipe at a Glance
- Perfect Ingredients Selection
- Kitchen Equipment Essentials
- Expert Cooking Method
- Expert Kitchen Wisdom
- Perfect Presentation
- Storage and Make-Ahead
- Creative Variations
- Complete Nutrition Guide
- Expert FAQ Solutions
- 📝 Recipe Card
What’s Your Favorite Birthday Memory Involving Cake?
Have you ever had a cake so fantastic that it felt like a ticket back to childhood? for me, nothing quite captures that pure joy like the whimsical delight of cotton candy cakes .
There’s something magical about that airy sweetness that evokes memories of summer fairs and carefree days. this recipe isn’t just a treat for the taste buds; it’s a celebration on a plate!
With just 30 minutes of prep time and 25 minutes in the oven , you’re looking at a total time commitment of about 55 minutes .
The difficulty? honestly, it's medium but don't let that scare you off! i promise that if you follow the steps, you'll end up with a cake that’s not only fluffy but also a show stopper at your next gathering!
A Sweet Walk Down Memory Lane
Now, let’s delve a little deeper into the history. traditionally, cotton candy has a rich heritage that goes back to the 18th century.
Most people remember it as that feathery treat spun on sticks at fairs, but its journey to becoming a cake stemmed from our obsession with taking the nostalgic flavors of childhood and folding them into modern desserts.
Cotton candy isn’t just sugar; it symbolizes moments of joy often tied to celebrations. today, this cake has become a sensation at kid’s birthday parties and even high tea events, bringing smiles to all ages.
Secrets Behind Perfect Cotton Candy Cakes
Alright, let’s talk specifics these cotton candy cakes are not just another dessert on the block. they embody a rich culinary heritage, merging traditional baking techniques with the playful essence of carnival treats.
It's fascinating to see how common desserts are being revitalized with whimsical flavors like cotton candy. this cake stands out as a staple for summer celebrations, birthday parties, and makes for a festive centerpiece that'll turn heads.
What Makes This Recipe Special?
You’re probably wondering what sets this cake apart from the vanilla variety at your local bakery. first off, we’re talking about unique flavor combinations here think fluffy cake bursting with cotton candy flavor, topped off with a frosting that’s equally sweet and delightful.
I’ve made more than my fair share of cakes, and i can tell you, the secret lies in the technique.
You want to ensure you're not overmixing your batter to keep it light and airy. plus, let’s be real, adding cotton candy as a garnish just sends it over the top!
Health and Nutrition Highlights
Now, before you raise an eyebrow at the thought of a cake being healthy, let’s clarify a few things. while this cake definitely leans into that indulgent territory, we can still chat about its nutritional profile.
Each serving has around 350 calories , which might not be what you’d call "health food,” but hey, it’s a treat! it’s essential to think about balance when enjoying sweet treats.
I always remind myself that life is all about moderation savor that slice!
Recipe at a Glance
To summarize, this playful cotton candy cake recipe requires:
- Preparation Time: 30 minutes
- Cooking Time: 25 minutes
- Total Time: 55 minutes
- Skill Level: Medium
- Serving Size: 12 servings
- Cost Efficiency: Quite budget friendly when you look at all the servings you get!
Before we dive into the nitty gritty of ingredients, let me quickly tell you about the joy that awaits. when you take that first slice, you’ll be greeted by layers of soft, sweet cake paired with that airy frosting, and the added cotton candy brings back those carefree, carnival inspired feelings in a way that grocery store options just can't replicate.
Now, are you ready to gather your ingredients and get baking? Let’s make that dreamy cotton candy cake come to life!
Perfect Ingredients Selection
Creating a delightful cotton candy cake is all about using the right ingredients . i remember the first time i attempted to bake this whimsical treat; i was utterly determined.
However, i quickly learned that using quality ingredients made all the difference. so, let’s dive into the nitty gritty!
Premium Core Ingredients
For the cake, you’ll need:
- 2 ¾ cups all-purpose flour : Look for unbleached flour; it gives the best texture.
- 2 ½ teaspoons baking powder : Get a fresh batch if you can. Older baking powder can lose its potency, and trust me, flat cakes are no fun.
- ½ teaspoon salt : A pinch of salt brings out all the flavors.
- 1 cup unsalted butter , softened: Room temperature is key! Leave it out for about an hour before you start.
- 2 cups granulated sugar : I like to use fine sugar because it dissolves better.
- 4 large eggs : Go for the freshest ones you can find for the best taste.
- 1 tablespoon vanilla extract : The good stuff - pure vanilla, not imitation. It makes a world of difference in flavor.
- 1 cup buttermilk : If you don’t have buttermilk, a quick substitute is milk mixed with a tablespoon of vinegar or lemon juice.
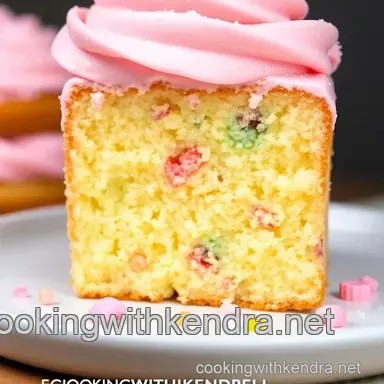
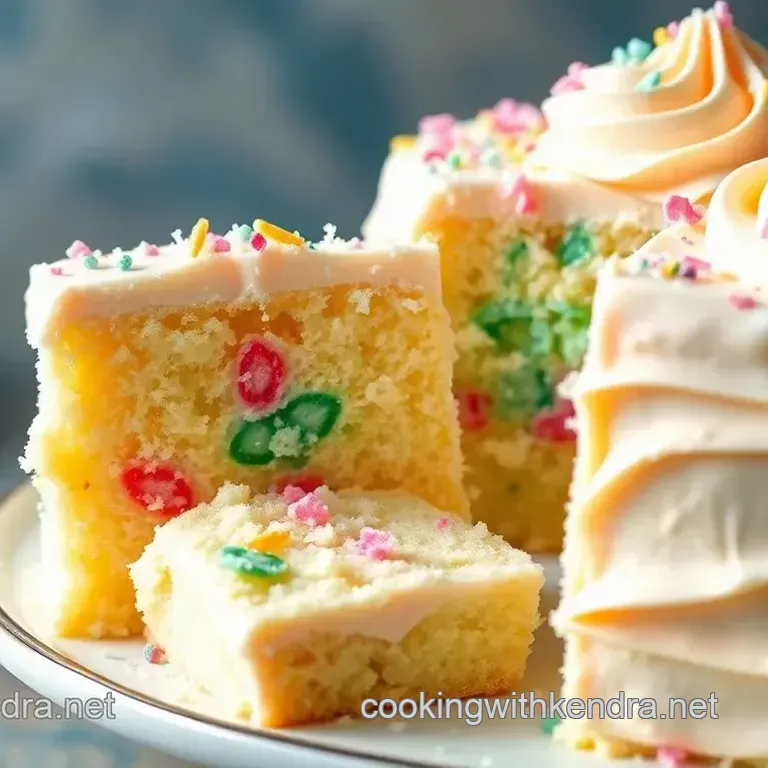
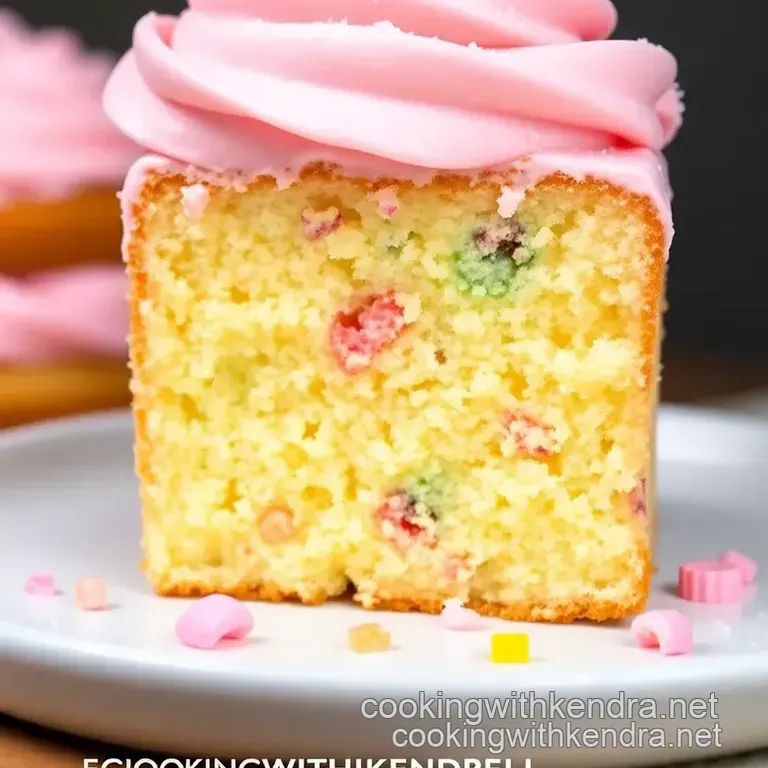
- 1 cup cotton candy : The fun part! Try to get fluffy cotton candy in pink or blue for that festive look.
When storing these ingredients, keep your flour and sugar in airtight containers to increase their shelf life. butter should be stored in the fridge, of course, and eggs can be kept in their original carton.
Signature Seasoning Blend
Even cakes need a little love from herbs and spices!
- While cotton candy doesn’t precisely have a seasoning blend, think about enhancing flavors with a sprinkle of salt in the batter. It truly balances out the sweetness.
- If you have some vanilla bean powder lying around, throw in a pinch; it boosts the vanilla flavor spectacularly.
- Consider adding a hint of almond extract (no more than ½ teaspoon) to change things up.
Smart Substitutions
Now, if you’re looking to tailor this recipe, here are some easy swaps:
- Instead of unsalted butter, use coconut oil for a slightly different flavor just ensure it’s softened.
- For a lighter cake, try replacing some of the all-purpose flour with almond flour .
- Need it dairy-free? Substitute the buttermilk with almond milk blended with a tablespoon of apple cider vinegar.
And don’t forget, seasonal variations can also work! Pumpkin spice cotton candy cakes would be quite the hit come autumn.
Kitchen Equipment Essentials
Let’s talk tools. You don’t want to be caught mid-bake without your essentials!
- Mixing bowls : A sturdy set in various sizes is a must. I like glass; they’re pretty and easy to clean.
- Measuring cups and spoons : Being precise is crucial. Grab a set that's all-in-one to save space.
- Hand mixer or stand mixer : I confess, I started with a hand mixer, but now I adore my stand mixer talk about saving time!
- Spatula : A good rubber spatula is like gold. You’ll want one for folding that lovely cotton candy into the batter.
When it comes to baking, ensure your cake pans are of good quality, preferably non-stick, and staggered layers look lovely. If you only have one pan, you can always bake in batches!
Pro Ingredient Tips
Let me share a few secrets I picked up along the way:
- Always, and I mean always , check the expiration dates of your baking soda and powder. Nothing worse than a cake that won’t rise.
- For fresh eggs, the float test works wonders. A fresh egg will sink, while an old one will float.
- Was your cake too dry last time? This could be due to over mixing. Gentle folding is your friend.
Don’t go spending loads on fancy ingredients, either buy in bulk when you can. You’ll save a pretty penny on things like flour and sugar.
Now that we've gathered everything we need, let’s whisk together our ingredients and create the most delightful cotton candy cakes! get ready for the sweetness of nostalgia wrapped in a fun, up-in-the-air frosting.
The next section will walk you through those easy-to-follow steps that'll have your cakes rising beautifully!
Expert Cooking Method
Creating a whimsical cotton candy cake isn’t just about throwing ingredients together; it’s an art! to ace this sweet masterpiece, let’s dive into the nitty gritty of preparation, execution, and all those pro tips that’ll make your cake dazzle.
Essential Preparation Steps
Mise en place: before you even heat that oven, let’s get organized! gather all your ingredients flour, sugar, eggs, butter, you name it.
Line your measuring cups, spoons, and bowls up like you’re orchestrating a little kitchen parade. trust me, this will save you from those panicked “i thought i had more sugar!” moments.
Prep techniques: your flour needs to be aerated so there are no lumps in your cake. a good whisking helps.
For the cotton candy, fluff it up gently so it’s ready to be folded in later. also, having room temperature ingredients is key; it helps create that airy, fluffy texture.
Time management: your total time is about an hour, so plan accordingly. about 30 minutes should be dedicated to prep and 25 to baking.
Use the cooling period creatively clean up or prepare frosting ingredients while the cake is doing its baking dance.
Organization tips: line everything up on your counter. i swear by the “everything in its place” mantra. it avoids chaos and keeps you aware of what you need next.
Plus, it makes for a beautiful cooking space!
Professional Cooking Method
Alright, let’s get into the actual baking.
Preheat the oven: set your oven to 350°f (175°c) . this is crucial; an oven that's too hot or too cold can wreck your cake.
Greasing and flouring the pans now means less mess later!
Prepare the dry ingredients: in a medium bowl, whisk together 2 ¾ cups of flour, 2 ½ teaspoons of baking powder, and ½ teaspoon of salt.
This mixture should be nice and light no lumps allowed!
Make the cake batter: in a large bowl, cream 1 cup of softened butter and 2 cups granulated sugar . you want a light, fluffy texture, about 4-5 minutes of mixing should do it.
Add Eggs and Vanilla: Next, crack in 4 large eggs , one at a time. Mix well after each addition, then toss in 1 tablespoon of vanilla extract that’s the golden nectar right there!
Combine dry and wet ingredients: gradually add your flour mixture and 1 cup of buttermilk , alternating as you go.
Start and end with the flour this keeps the batter well mixed without overdoing it.
Add Cotton Candy: Now comes the fun part. Fold in 1 cup of cotton candy with a spatula. Don’t stir too aggressively; you want those lovely pockets of sweetness.
Pour and bake: split the batter evenly across three prepared cake pans. bake for 20-25 minutes until a toothpick comes out clean.
Keep an eye on them. i once got sidetracked and nearly baked mine into oblivion!
Cool the Cakes: Let the cakes cool in the pans for about 10 minutes before transferring to wire racks. Patience is a virtue here!
Prepare the frosting: for the frosting, mix 1 cup softened butter, 4 cups powdered sugar, 2 tablespoons heavy cream, and 1 teaspoon vanilla extract together until fluffy, about 3-5 minutes .
You want a spreadable, heavenly mix; adjust it with more cream or sugar if needed.
Frost the cakes: stack ‘em up! frost the first layer and keep it fun with sprinkles or layers of cotton candy in between.
Repeat with the second, add the final layer, and frost the outside.
Garnish with Cotton Candy: Top it all off with a big ol’ fluff of cotton candy. It’s like a party hat for your cake!
Slice and Serve: You’ve made it! Slice into your creation and serve it with pride.
Expert Techniques
Temperature Control: Keep track of your oven. If it’s not accurate, you’re in for surprises. Using an oven thermometer can solve a lot of headaches.
Timing Precision: Timing isn’t just about when to mix or bake. Be aware of how long to cool; rushing can lead to a mushy disaster.
Success Indicators: Look for a golden color on the tops and the feel of the cakes light touch should bounce back, not leave a dent.
Success Strategies
Troubleshooting Tips: If your cake domes too much, you might have overmixed or used too much baking powder. A flat cake is preferable, trust me!
Quality Assurance: Always taste your frosting before slapping it on the cake. It should be sweet but balanced.
Perfect Results Guide: Keep experimenting. If the cotton candy disappears into the batter too fast, try pulling it out sooner or using more next time.
So there you have it! with a bit of patience and a sprinkle of creativity, you’ve crafted a cotton candy cake that will dazzle at any bash.
Now, if you’re ready for some extra inspiration on how to elevate this cake with decorations or flavors, keep reading for more buttery tips and beautiful twists!
Expert Kitchen Wisdom
When i first ventured into the world of baking, my attempts at cotton candy cakes left much to be desired.
There were a few disastrous first tries, but boy, did i learn a lot! one of the key insights i've gathered is to always read through your recipe twice before even picking up a spatula.
It saves time and avoids the dreaded “oh no, i forgot to put in the eggs” moment.
Professional insights? baking is like a science experiment! understanding the roles of ingredients like baking powder as your leavening agent is crucial.
It might feel geeky, but trust me, knowing what each ingredient does guarantees your success . don’t shy away from experimenting once you get the hang of the basics; just remember a bit of structure never hurt anyone!
Perfect Presentation
Oh, this part is where the real fun begins! once my cotton candy cakes were frosted and looking fab, i dove into the art of plating.
Plating techniques can elevate your cake from just a dessert to a centerpiece. use a cake stand to add height or even a simple white plate to make the colors pop.
A sprinkle of edible glitter or colorful sprinkles can add that touch of whimsy perfect for kids’ birthday cakes.
Now let’s talk garnish : cotton candy on top? absolute showstopper! it’s like you’re screaming, “surprise!” right before they take a bite.
Visual appeal matters, so don’t be afraid to play around with your garnishes; sometimes it’s the small details that leave a lasting impression.
Storage and make-ahead
Planning ahead can be a lifesaver, especially when entertaining. to store your cotton candy cake , make sure it's completely cooled before wrapping it in plastic wrap or tin foil.
Keep it in the fridge if you’ve frosted it, and it’ll last a good 3-4 days.
If you wanna get a jump on your baking, you can bake the cake layers ahead of time. just cool them completely, wrap tightly, and toss them in the freezer.
They’ll keep their moisture and flavor well! i also learned that letting the cake sit for a few hours after icing helps meld those flavors, making it all the more delicious when it comes time to serve.
Reheating? Errr, not usually recommended for frosted cakes, but if you sneak a slice too late? Just a few seconds in the microwave can make it delightful again, as long as the frosting doesn’t melt!
Creative Variations
Feeling adventurous? let’s get creative! i’ve tried flavor adaptations by incorporating different types of cotton candy, like rainbow or even grape flavored cotton candy cakes, which were a huge hit at the last summer bbq.
When it comes to dietary modifications , gluten-free baking can be a tiny challenge, but you can substitute all-purpose flour with almond or coconut flour.
Trust me, your cake can still turn out wonderfully! seasonally, try swapping out cotton candy for fresh berries in the summer or pumpkin spice for a fall twist.
Why not embrace regional variations too? throw in some chai spices to create a cotton candy chai cake definitely a crowd pleaser!
Complete Nutrition Guide
Now, let’s bring some clarity to this sweet cup of fun. each slice of my cotton candy cake packs around 350 calories , which screams celebration to me! sure, it has a fair amount of sugar, but hey, we're celebrating here! plus, the health benefits of bringing joy and smiles to life's moments can't be overlooked.
Just keep in mind portion sizes. one slice is often enough to satisfy that sweet tooth without going overboard.
Expert FAQ Solutions
Here’s a little troubleshooting i’ve learned: if your cake sinks in the middle, you might have overmixed the batter or opened the oven door too early.
Keep that door shut till the end! “why is my frosting too runny?” you ask? it’s likely you’ve added too much cream.
Just balance it out with a sprinkle more powdered sugar, and you’re back in business.
If you have any common concerns , perhaps about using colored cotton candy, be mindful sometimes they can tint your frosting.
Just mix the colors slowly and test the hues. my best success tip ? amid all the chaos of baking, don’t forget to have fun; that’s what it’s all about!
In conclusion, making cotton candy cakes is like crafting a piece of art that’s completely edible. the laughter, the memories, and sometimes even the mess ups, are what truly make the experience worthwhile.
You might find a few surprises in the kitchen some good, some not so much but each one is a step towards sweet success.
So grab your apron, get that flour flying, and let’s bring some joy to the dessert table!
Cotton Candy Cakes 10 Whimsical Recipes To Delig