Crispy Chicken Snitel De Pui Recipe
Crispy Chicken Snitzel: A Taste of Home
Oh my gosh, let me tell you about the first time i made snitele de pui the romanian version of crispy chicken schnitzel.
I was trying to impress my family on a sunday evening, and i thought, "how hard can it be to fry some chicken?" well, spoiler alert: it turns out that frying it just right is an art! but when that first batch hit the table, golden brown and crunchy, you could literally see the excitement in their eyes.
It was a total game changer.
If you’ve ever wondered how to bring a bit of romanian cuisine into your kitchen, this recipe is it! the great thing about snitzel recipes is that they're not only popular in romania; they're downright beloved worldwide.
It’s like comfort food on steroids. think crispy chicken, juicy inside, and perfect for any occasion. who doesn't want that?
Recipe Overview: A Little Bit of History
The origins of crispy chicken schnitzel, or snitele de pui , date back to traditional eastern european cooking. schnitzels were originally made with veal, but chicken has made a spectacular rise in popularity.
No wonder it has become a staple in many homes today! with just a bit of breading, some frying, and a sprinkle of seasoning, you’ve got a dish that can make anyone’s mouth water.
This recipe is super easy , even for beginner cooks. you’re looking at about 15 minutes of active prep, plus a 30-minute chill time (that means you can catch up on your favorite show while you wait!).
Cooking time is just around 10 minutes. total time? about 55 minutes to serve up four hearty portions. and trust me, they won't last long on the table!
When it comes to cost, this is one of those family friendly recipes that doesn’t break the bank. with basic ingredients like chicken breasts, flour, and breadcrumbs, you can whip up a nutritious dinner option without feeling guilty about your wallet.
Key Benefits: Why You’ll Love It
Now let’s get into why this dish is a winner. first off, we’re talking about health benefits . grabbing chicken breast means you’re looking at lean protein, and with the right seasoning, you’re packing in flavor without all that extra fat.
Plus, what’s super cool about snitele de pui is its versatility. you can serve it alongside creamy mashed potatoes, fresh salads, or even over pasta.
It fits right in for special occasions , lazy sundays, or quick weeknight meals when you just don’t have it in you to whip up something fancy.
Compared to many other fried chicken recipes , this one stands out because it’s crispy without being too greasy thanks to our best frying oils and that chilling technique i mentioned.
Trust me, that makes all the difference!
One of the unique selling points? you can easily customize it! want it spicy? just add some heated cayenne or a dash of hot sauce into that breadcrumb mix.
Gluten-free? swap in some gluten-free breadcrumbs and you're good to go!
So, are you ready to dive into the world of homemade schnitzel ? before we jump to the ingredients, think about all the ways you can serve these crispy delights.
A zesty dipping sauce? perfect! throw in some garlic seasoning to the breadcrumb mix? yes, please!
Next up: let's look at what you need to get cooking and bring home that delightful crunch!
Essential Ingredients Guide to Crispy Chicken Snitzel (Snitele de Pui)

Hey there, food lovers! if you're ready to dive into making the best crispy chicken schnitzel or as we say in romanian, “ snitele de pui ” then stick around! this guide will help you stock your kitchen with all the essentials you need for a successful and delicious cooking adventure.
Let's jump into it!
Premium Core Components
First off, let's talk about the must haves for our schnitzel magic:
Detailed measurements: you’ll need 4 boneless, skinless chicken breasts (about 1 pound or 450 grams ). in baking, it's all about precision folks! so for the breading, grab 1 cup (120 grams) of all-purpose flour, 2 large eggs , and 1 cup (100 grams) of your favorite breadcrumbs.
A little salt and pepper to taste will tie it all together.
Quality Indicators: Fresh chicken should smell mild, not funky. Your breadcrumbs? They should be crisp and golden, ready to lend that crunch we all love.
Storage guidelines and shelf life: store your chicken in the coldest part of your fridge, but use it within 2 days for safety.
Breadcrumbs can chill in the pantry for a couple of months if kept sealed.
Freshness Tips: When selecting chicken, look for a bright pink color. If it’s looking beige, Pass. For breadcrumbs, check for an aroma fresh is best!
Signature Seasoning Blend
Now, seasoning is where it's at:
Essential Spice Combinations: Don't skimp on flavor! A teaspoon of garlic powder and a dash of paprika really kick things up a notch.
Herb Selections: Italian seasoning adds a nice touch. You can even throw some fresh herbs into the breadcrumbs for a garden vibe!
Flavor Enhancers: Consider splashing in some cayenne for a spicy schnitzel variation. That little heat can turn a classic dish into something unforgettable.
Regional Variations: While traditional schnitzel is fantastic, mix it up with a Romanian twist. Add some dill to your breadcrumbs for an authentic feel!
Smart Substitutions
Now, what if you're out of a key ingredient? No worries!
Common Alternatives: If you’re low on eggs, try using buttermilk as a binder!
Dietary Modifications: For gluten-free options, swap out regular flour and breadcrumbs for almond flour and crushed nuts. Yum!
Emergency Replacements: All out of breadcrumbs? Crushed cornflakes work in a pinch crispier than a sitcom laugh track!
Seasonal Options: Fresh herbs and veggies can be swapped in or added to bring that seasonal freshness to your schnitzel, making it even tastier.
Kitchen Equipment Essentials
Let’s ensure you’re equipped for schnitzel success:
Must Have Tools: A meat mallet or rolling pin is crucial for flattening those chicken breasts. Have plenty of shallow bowls for breading this is a messy business!
Alternative Equipment: Don’t stress if you don’t have a meat mallet a heavy skillet will do. Just be gentle!
Preparation Tips: Always pound meat evenly to ensure it cooks perfectly. And chill that breaded chicken for 30 minutes . Trust me; it's worth it for that crispy crunch!
Storage Solutions: Keep your fried schnitzel crispy by placing them on a wire rack rather than paper towels to drain. Nobody likes soggy schnitzel!
So there you have it a super helpful guide to get you ready to whip up a crispy chicken schnitzel that your family will devour! with all these tips in your back pocket, you’re ready to tackle this easy chicken dinner that’s full of flavor and nostalgia.
Next up, we'll get into the step-by-step recipe instructions that'll have your kitchen smelling like a cozy romanian eatery in no time! let’s get cooking!
Mastering the Art of Crispy Chicken Snitzel (Snitele de Pui)
Alright, friends! let’s dive into one of my all-time comfort food favorites: crispy chicken snitzel , or as they say in romania, snitele de pui .
This dish is not only a crispy delight but also super easy to whip up for an easy chicken dinner that’ll have the fam swooning.
So roll your sleeves up and get ready to make some magic in your kitchen!
Essential Preparation Steps
First things first let's talk mise en place . this fancy french term just means having everything ready before you start cooking.
Trust me, it makes life so much easier! for this snitzel, you’ll need:
- 4 boneless, skinless chicken breasts
- Some salt and pepper (don’t skimp on flavor!)
- Garlic powder and paprika (optional but highly recommended)
Make sure you double check your ingredients and have everything laid out. oh, and don’t forget to wash your hands! food safety is key.
While you’re at it, keep those chicken breast recipes handy because you might want to experiment later on.
Time management is crucial prep time is about 15 minutes , and then you’ll chill the breaded chicken for 30 minutes to really set that coating.
Trust me; this little wait makes a huge difference.
Step-by-step Process
Alright, let’s break it down with clear instructions.
Prepare the Chicken
- Pat your chicken breasts dry (nobody likes soggy schnitzel!).
- Pound them to about 1/2 inch thick using a meat mallet. This makes them cook evenly.
Set Up Your Breading Station
- Get 3 shallow bowls. One for 1 cup of flour , one for 2 beaten eggs , and the last for 1 cup of breadcrumbs mixed with a dash of salt and Italian seasoning.
Bread the Chicken
- Dredge the chicken in flour, then dip in eggs, and finally coat in those glorious breadcrumbs. Press to adhere; you want that golden crunch!
Chill Out
- Place the breaded chicken on a plate and chill in the fridge for 30 minutes . This helps everything stick better when frying.
Fry Time
- Heat ½ cup of vegetable oil in a skillet over medium high heat. When it’s shimmering (that’s your cue), add the chicken.
- Fry for 4- 5 minutes on each side until golden brown. Check for doneness you're aiming for an internal temperature of 165° F ( 74° C) !
Drain and Serve
- Let 'em rest on paper towels to soak up excess oil. Serve hot with your favorites mashed potatoes, maybe a simple salad?
Expert Techniques
You want to elevate your schnitzel game? Here are a few critical steps :
- Chilled Breading Technique : Keeping the breaded chicken cold before frying helps maintain that crispy shield.
- Frying Dos and Don’ts : Don’t overcrowd your pan. If you throw too much chicken in, it lowers the oil temperature. You want that impressive sizzle!
And speaking of frying, sniff around for the best frying oils —canola or peanut oil works wonders for high heat frying.
Success Strategies
Now let's avoid those common mistakes. Here’s what to watch out for:
- Don’t skip the chilling step; it’s a game changer.
- If your coating falls off while cooking, you've got to check your breading technique.
- Want to make-ahead options? You can freeze un-fried schnitzels and pull them out when needed!
And remember, if you’re looking for quick weeknight meals , this schnitzel recipe is your go-to. It not only pleases the crowd but also serves as a great base for recipe variations for schnitzel think spicy variations or even swapping chicken for pork!
Additional Information
So, get ready to impress your guests with your homemade snitele de pui . this dish showcases the delightful crunch of fried chicken recipes while being rooted in romanian cuisine .
Whether you keep it classic or play around with some recipe substitutions , i promise it’s gonna be a hit!
Trust me, once you get this down, your cooking confidence will skyrocket. Happy cooking!
Additional Recipe Information for Crispy Chicken Snitzel (Snitele de Pui)
Pro Tips & Secrets
Okay, folks, let’s talk about how to make your snitele de pui really shine! first off, if you want a layer that’s super crispy, try switching out regular breadcrumbs for panko breadcrumbs .
Seriously, they’re a game changer! and here’s a time saving trick: while you’re waiting on your chicken to chill, prep all your sides and sauces.
You’ll feel like a total kitchen rockstar.
Now, flavor is key. make sure to season your breadcrumbs with some italian herbs or maybe a bit of garlic seasoning.
You’ll be surprised how those little tweaks can elevate simple chicken schnitzel into something spectacular. and don’t forget to let them rest a few minutes after frying.
This isn’t just a waiting game; it allows those juices to redistribute. soggy schnitzel? not today!
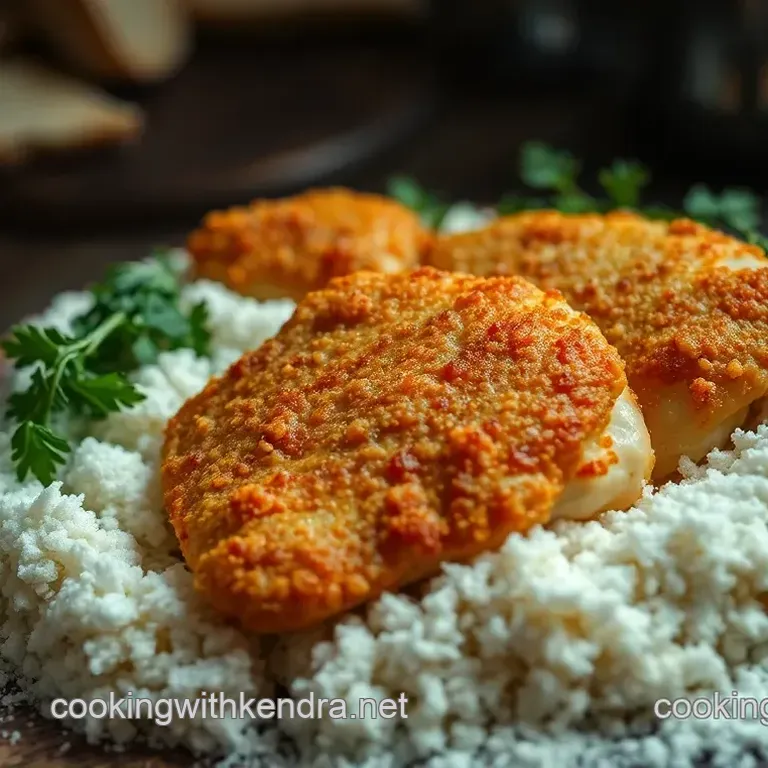
Perfect Presentation
Let’s get fancy! a well plated schnitzel can turn a simple meal into a feast. for a great visual, cut the schnitzel into strips and fan them out like an elegant deck of cards.
And garnish oh, sweet garnish! a squeeze of lemon, a sprinkle of parsley, or even some cherry tomatoes can add that pop of color.
Think about your color combinations. you want that golden brown from the chicken against a vibrant green from the salad or a rich, warm hue from your mashed potatoes.
Let me tell ya, heaven is a plate that looks as good as it tastes!
Storage & make-ahead
If you find yourself with leftovers (which, let’s be honest, is rare given how good these are), you can store them in an airtight container in the fridge for about 3-4 days .
Want to freeze them? just put those leftover fried chicken recipes in a single layer on a baking sheet, freeze until solid, and then transfer them to a freezer bag.
They’ll hold up for about 2-3 months .
When you’re ready to reheat, skip the microwave if you can. just pop them back in a hot skillet for a couple of minutes to get that crunch back.
No one wants sad, soggy schnitzel!
Creative Variations
Bored with the original? let’s spice things up! you can easily adjust your schnitzel to cater to different taste buds.
Try adding a bit of cayenne to your flour for a spicy schnitzel variation that’ll wake up your taste buds.
Got some extra veggies laying around? toss 'em in your breading mix for some added crunch and nutrition.
Feeling adventurous? swap the chicken out for pork or turkey cutlets. this gives you a whole new flavor profile while keeping it within the traditional schnitzel realm.
The possibilities are endless, my friend!
Complete Nutrition Guide
Now, we’re all about that balance. with around 400 calories per serving , this schnitzel is a filling option. you'll get 30 grams of protein from that chicken breast, making it a solid choice for a nutritious dinner option .
Just be mindful of your sides, though! pairing it with something like a crisp green salad adds freshness without piling on the calories.
For those counting carbs, just keep an eye on the amount of breading you use, or try the gluten-free schnitzel by switching out to gluten-free flour. Everything in moderation, right?
Expert FAQ Solutions
Got questions? i’ve got answers! one common issue is chicken that’s not cooked through; make sure you are cooking it to an internal temperature of 165° f ( 74° c) .
If your frying game isn’t on point, remember: don’t overcrowd the pan, and let the oil get hot enough before dropping in the schnitzel.
Need some schnitzel dipping sauces ? How about a classic homemade tartar or a zesty aioli? They can take your crispy bites to a whole new level!
Conclusion
Crispy chicken snitzel de pui is not just another meal; it’s a comforting hug on a plate. so whether you’re whipping it up for a quick weeknight dinner or impressing friends with your homemade schnitzel prowess, you now have all the tips and secrets to make it a success.
Keep experimenting, keep tasting, and most importantly, enjoy every crunchy bite. you’ve got this!
Crispy Chicken Snitel De Pui Recipe