Mac and Cheese Balls: Shattering Panko Crust
- Time: Active 30 minutes, Passive 135 minutes, Total 165 minutes
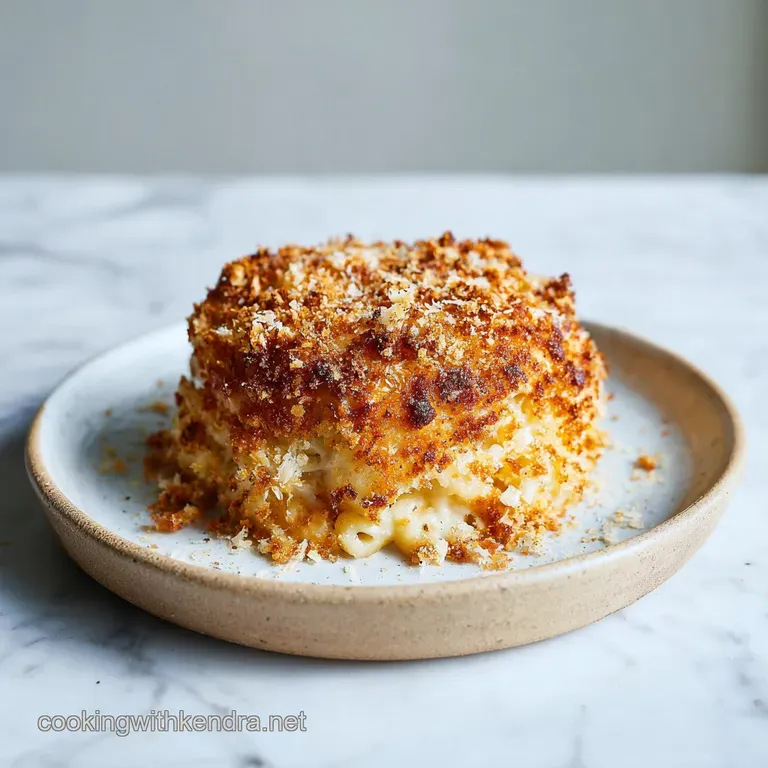
- Flavor/Texture Hook: Shattering panko crust with a velvety, oozing cheese center
- Perfect for: Game day snacks, kid approved dinners, or utilizing leftover party food
- The Secret Behind the Most Addictive Mac and Cheese Balls
- Why This Works
- Key Numbers and Timing for Perfect Fried Pasta Bites
- Selecting the Best Ingredients for the Ultimate Cheesy Center
- The Basic Kitchen Gear Needed for Success Every Time
- Transforming Cold Pasta into Golden Fried Macaroni Masterpieces
- Solving Problems Like Leaking Cheese or Soggy Breadcrumb Coatings
- Creative Variations Ranging from Spicy Bites to Air Fried Options
- Storage Methods for Keeping Your Fried Bites Fresh
- Pairing Your Golden Fritters with Savory Sauces and Side Dishes
- Kitchen Truths and Myths
- Recipe FAQs
- 📝 Recipe Card
The Secret Behind the Most Addictive Mac and Cheese Balls
Long before these golden bites became a staple on gastropub menus across the country, they lived a humbler life in the kitchens of Southern Italy. In Naples, the tradition of frittatine di pasta—fried pasta cakes was born from a beautiful, thrifty necessity.
Families wouldn't dream of tossing out yesterday's macaroni. Instead, they would bind the cold noodles with a thick bechamel, maybe tuck in some peas or ham, and fry them until they were crisp enough to eat while walking through the narrow city streets.
It was the ultimate street food, designed to be portable, filling, and incredibly comforting.
I remember my first attempt at making these at home. I thought I could just scoop warm mac and cheese, roll it in some crumbs, and drop it in oil. It was a disaster. The moment the heat hit the cheese, the balls disintegrated into a greasy soup, leaving me with a pot of ruined oil and a very empty stomach.
That was the day I learned that the real magic of this dish isn't in the frying it is in the waiting.
We are making a version that honors that Italian "waste not" spirit but adds a modern, crispy twist. These aren't just fried snacks; they are a textural experience. You get that initial shatter from the panko, followed by the bite of the pasta, and finally, the rush of melted mozzarella and sharp parmesan.
It’s the kind of food that makes everyone at the table go silent for a second while they process how something so simple can taste so decadent. We're going to use cold, set pasta to create a structural masterpiece that survives the hot oil every single time.
Why This Works
- Thermal Stability: Chilling the mac and cheese for 150 minutes allows the fats and starches to solidify into a "block," which prevents the balls from falling apart when they hit the hot oil.
- Starch Bonding: Adding extra mozzarella and parmesan acts as a secondary binder, creating a "glue" that holds the macaroni elbows together even as the internal temperature rises.
- The Panko Shield: A double coating of flour, egg, and panko creates a reinforced barrier that traps steam inside, ensuring the cheese melts without the crust breaking.
- Moisture Management: Using panko instead of traditional breadcrumbs provides a larger surface area, which creates more "crunch points" and prevents the coating from becoming a heavy, oily sponge.
| Cook Method | Time | Texture | Best For |
|---|---|---|---|
| Deep Frying | 4 minutes | Brittle, mahogany brown, ultra crunchy | Maximum "wow" factor and traditional flavor |
| Air Frying | 12 minutes | Light, golden, less oily | A lighter snack with minimal cleanup |
| Oven Baking | 20 minutes | Firm, slightly softer crust | Large batches for kids or meal prep |
Choosing the right method depends entirely on your afternoon. If I’m hosting a party and want that "shatter" factor, I always go for the stovetop fry. The way the oil interacts with the panko creates a specific kind of crunch that you just can't replicate in a dry environment.
However, if I'm just making a quick batch for the family on a Tuesday, the air fryer is a reliable shortcut that keeps things a bit leaner without sacrificing too much of that cheesy joy.
Key Numbers and Timing for Perfect Fried Pasta Bites
When we talk about the timing for this recipe, the passive time is just as important as the active cooking. You'll notice the total time is 165 minutes, with the vast majority of that being the "set" time in the fridge. This is non negotiable.
If the pasta isn't cold enough to be sliced like fudge, it won't survive the breading process. I've tried to rush it with a quick stint in the freezer, but it doesn't give the starches enough time to fully hydrate and bond.
| Ingredient | Science Role | Pro Secret |
|---|---|---|
| Mozzarella | Structural binder | Use low moisture blocks for a better "stretch" |
| Panko | Texture agent | Press it firmly with your palms to "lock" it into the egg |
| Eggs | Protein bridge | Adding 15 ml of water thins the egg for a more even, thinner coat |
| Smoked Paprika | Flavor depth | It cuts through the heavy fat of the cheese with a hint of wood smoke |
The science of the breading station is what separates a soggy mess from a professional fritter. The flour dries the surface so the egg can cling, and the egg acts as the adhesive for the panko.
If you skip the flour, the egg will just slide right off the cold pasta, leading to "bald spots" where the cheese will eventually leak out. I learned this the hard way during a Super Bowl party when half my cheese balls "bled" out into the fryer. It wasn't pretty.
Selecting the Best Ingredients for the Ultimate Cheesy Center
To make the best version of this dish, you need to start with a solid foundation. While you can use any leftover mac, a baked macaroni and cheese usually has a higher starch to cheese ratio that makes for a sturdier ball. If your sauce is too runny, the balls will be difficult to shape.
- 4 cups Prepared Macaroni and Cheese: This is the heart of the recipe. Why this? The starch in the pasta provides the essential structure needed for frying.
- 1/2 cup Shredded Mozzarella: Use the low moisture kind. Why this? It provides the iconic cheese pull without adding too much liquid.
- 1/4 cup Grated Parmesan: This adds a salty, nutty kick. Why this? It seasons the interior and helps thicken the cold pasta mixture.
- 1 tsp Garlic Powder: Don't use fresh garlic here; it can burn in the fryer. Why this? It provides a uniform savory note throughout the pasta.
- 1/2 tsp Smoked Paprika: Adds a beautiful color and a hint of BBQ vibe.
- 1 cup All Purpose Flour: The base of our breading. Why this? It creates a dry surface for the egg wash to grab onto.
- 3 Large Eggs: The "glue" of the recipe.
- 1 tbsp Water: Just enough to break the surface tension of the eggs.
- 2 cups Panko Breadcrumbs: These are Japanese style crumbs. Why this? They stay crispier for much longer than standard breadcrumbs.
- 1/2 tsp Sea Salt: For seasoning the crust.
- 1/4 tsp Cayenne Pepper: This doesn't make it "hot," just interesting.
- Neutral Oil: Use canola, vegetable, or peanut oil. Why this? High smoke points are required for the 175°C frying temperature.
The Basic Kitchen Gear Needed for Success Every Time
You don't need a professional kitchen to pull this off, but a few specific tools make the process much smoother. For the frying, a heavy bottomed pot like a Dutch oven is superior because it holds heat better. When you drop cold pasta into hot oil, the temperature can plummet.
A heavy pot acts like a thermal battery, keeping the oil at that crucial 175°C mark so the crust crisps up immediately instead of soaking up oil.
I also highly recommend using a small cookie scoop (about 1.5 tablespoons). This ensures every ball is the exact same size. Why does that matter? If they are different sizes, the small ones will overcook and burst before the large ones are even warm in the middle.
Uniformity is the secret to a professional looking platter. Finally,, a wire cooling rack is far better than paper towels for draining. Paper towels trap steam under the balls, which can turn your carefully crafted crust soggy in seconds. On a rack, air can circulate, keeping the bottom just as crunchy as the top.
Transforming Cold Pasta into Golden Fried Macaroni Masterpieces
- Enhance the base. Fold the extra mozzarella, parmesan, garlic powder, and smoked paprika into your room temperature macaroni and cheese until evenly distributed.
- Set the mold. Spread the mixture into a shallow dish (about 2cm thick) and refrigerate for at least 120 minutes. Note: It must be cold enough to handle without sticking to your fingers.
- Portion and shape. Using a 1.5 tablespoon scoop, create spheres and roll them firmly between your palms. Note: Compressing them removes air pockets that could cause the balls to expand and pop during frying.
- Flash freeze. Place the balls on a parchment lined tray and freeze for 30 minutes. This "sets" the outer layer, making breading much easier.
- Organize the station. Prepare three bowls: flour in the first, eggs whisked with 15 ml water in the second, and panko mixed with salt and cayenne in the third.
- The first coat. Dredge each ball in flour, shaking off every bit of excess until only a fine dust remains.
- The double dip. Dip in the egg wash, then roll in panko. Dip back into the egg and then into the panko a second time. until the pasta is completely invisible behind the crumbs.
- Heat the oil. Fill a heavy pot with 5-7 cm of oil and heat to 175°C. Note: Use a thermometer; guessing usually leads to greasy or burnt results.
- Fry in batches. Carefully lower 4-5 balls into the oil and fry for 3-4 minutes until they reach a deep mahogany brown.
- Drain and rest. Remove with a slotted spoon and place on a wire rack. Let them sit for 2 minutes before serving so the molten center can stabilize.
Solving Problems Like Leaking Cheese or Soggy Breadcrumb Coatings
The Explosion Issue
One of the most common heartbreaks is watching your cheese ball literally "erupt" in the oil. This usually happens because the interior gets too hot too fast, or there was a gap in the breading. When steam builds up inside with nowhere to go, it finds the weakest point in your crust and blows a hole through it.
The Greasy Crust
If your bites come out heavy and oily rather than light and crisp, your oil temperature was likely too low. When the oil isn't hot enough to instantly steam the moisture out of the breadcrumbs, the crumbs simply absorb the oil like a sponge.
Always wait for the oil to return to 175°C between batches.
| Problem | Root Cause | Solution |
|---|---|---|
| Balls falling apart in oil | Pasta wasn't cold enough | Chill the mixture for at least 120 minutes until solid |
| Breadcrumbs falling off | Skipped the flour step | Flour is essential for the egg to "grip" the pasta surface |
| Cold center/burnt outside | Oil temperature too high | Lower heat to 175°C and fry for a full 3-4 minutes |
Common Mistakes Checklist
- ✓ Never use "fresh" mozzarella with high water content; it will steam and cause a blowout.
- ✓ Don't skip the second coat of panko - that "double armor" is what keeps the cheese inside.
- ✓ Avoid overcrowding the pot; frying too many at once drops the oil temp by 20-30 degrees.
- ✓ Always use a wire rack for draining to prevent the "sweaty" bottom syndrome.
- ✓ Let the balls sit at room temp for 5 minutes after the freezer before frying to prevent "thermal shock."
Creative Variations Ranging from Spicy Bites to air-fried Options
If you’re looking for a different spin, you can easily tweak the flavors. For a "Jalapeño Popper" version, fold in 2 tablespoons of finely minced canned jalapeños and a dollop of cream cheese into the base before chilling. The cream cheese adds an extra level of silkiness that contrasts beautifully with the spicy peppers. For a different vibe, you might want to try making Cream Cheese Pinwheels for a sweet contrast if you're setting up a full appetizer spread.
Swapping for Air Fryer Mac and Cheese Balls
To make these in the air fryer, follow the breading steps exactly as written. Spritz the breaded balls generously with cooking oil spray this is the only way to get them golden in the air fryer. Arrange them in a single layer with space between each ball.
Cook at 200°C for about 10-12 minutes, shaking the basket halfway through. They won't have quite the same mahogany color as the deep fried version, but they will be remarkably crunchy and much lighter.
Storage Methods for Keeping Your Fried Bites Fresh
The best part about this recipe is that it's tailor made for the freezer. You can actually do all the work up until the frying stage and then freeze the breaded balls in a single layer. Once they are frozen solid, toss them into a freezer bag. They’ll stay fresh for up to 2 months.
When you're ready to eat, you can fry them directly from frozen just add 1-2 minutes to the total fry time to ensure the center gets hot.
For leftovers that are already fried, store them in an airtight container in the fridge for up to 3 days. Whatever you do, do not use the microwave to reheat them! The microwave will turn that beautiful panko crust into a limp, rubbery mess.
Instead, pop them into a 180°C oven or an air fryer for 5-7 minutes. This will re crisp the exterior while gently melting the cheese inside again.
For a zero waste tip: if you have leftover panko and egg wash, don't throw them out! You can mix the leftover crumbs and egg with any remaining bits of cheese or herbs to make little "hushpuppy" style fritters. It’s a great way to use every last bit of your breading station.
Pairing Your Golden Fritters with Savory Sauces and Side Dishes
While these are incredible on their own, a good dipping sauce takes them to the next level. A classic spicy ranch or a smoky chipotle aioli works wonders by cutting through the richness of the cheese. I personally love a very simple, slightly spicy marinara sauce, which brings us back to those Italian roots.
The acidity of the tomatoes balances the heavy fats of the macaroni and the oil from the frying.
If you are serving these as a main meal for the kids, pair them with a simple green salad dressed with a sharp lemon vinaigrette. The brightness of the lemon cleanses the palate between bites of the cheesy pasta. For a party, I like to serve them alongside other finger foods like buffalo wings or veggie sticks.
The key is to have something fresh or acidic to balance the deep fried goodness. Honestly, just make sure you have plenty of napkins these are meant to be eaten with your hands, and things are going to get wonderfully messy.
Kitchen Truths and Myths
A common misconception is that you need a specialized deep fryer to get good results. This is simply not true. A heavy bottomed pot and a reliable thermometer are all you need. In fact, deep fryers can sometimes be harder to clean and maintain for a small batch like this.
Another myth is that "searing" or "frying" the outside locks in the moisture. In reality, the crust acts as a thermal barrier, but it’s the structural integrity of the cold pasta and the double breading that keeps the cheese from leaking out. The crust is there for texture and flavor, not as a waterproof seal.
Finally,, don't believe anyone who says you can't use box mix mac and cheese for this. While homemade is great, a standard box of mac and cheese works perfectly because it often has a very consistent, stable cheese sauce that sets up beautifully in the fridge.
Trust your leftovers they are the secret weapon of the home cook.

Recipe FAQs
What's the secret to perfect mac & cheese balls?
Use the double breading method. Dipping your balls into the egg wash and panko a second time creates a reinforced crust that prevents the cheese from leaking during the fry. If you enjoyed mastering this structural coating technique, see how we apply similar crisping principles in our homemade sopes.
Can heart patients have mac and cheese?
No, this dish is likely not suitable. Given the high fat content from cheese, eggs, and deep frying, it is generally considered an occasional indulgence rather than a heart healthy meal.
How to turn leftover mac and cheese into balls?
Fold in mozzarella, parmesan, garlic powder, and smoked paprika, then refrigerate the mixture for 2 hours. Once firm, scoop into spheres, compress them by rolling firmly between your palms, and freeze for 30 minutes before breading to ensure they hold their shape.
What is the best breading for mac balls?
Use panko mixed with sea salt and cayenne pepper. Panko creates a significantly crunchier, more durable exterior than standard breadcrumbs, which is essential for withstanding the 350°F (175°C) frying process.
Is it true I can fry these directly from the freezer?
Yes, this is highly recommended for best results. You can fry the breaded balls straight from the freezer, just increase the total fry time by 1-2 minutes to ensure the center reaches the proper temperature.
How to prevent the balls from exploding in the oil?
Avoid overcrowding the pot and always use a double coat of panko. If you drop too many balls at once, the oil temperature drops, causing the crust to fail; also, ensure you let them sit for 5 minutes after the freezer to prevent thermal shock.
How to keep the exterior from getting greasy?
Drain the finished balls on a wire cooling rack instead of paper towels. Placing them on a rack allows air to circulate underneath, preventing the "sweaty" bottom effect and maintaining that shattering, crisp crust.
Crispy Mac And Cheese Balls

Ingredients:
Instructions:
Nutrition Facts:
| Calories | 168 kcal |
|---|---|
| Protein | 5.6 g |
| Fat | 9.8 g |
| Carbs | 14.2 g |
| Fiber | 0.6 g |
| Sugar | 0.9 g |
| Sodium | 295 mg |
