Crispy Creamy Bitesized Sicilian Cannoli Jewels
- Sicilian Sunshine Cannoli Bites: A Two-Bite Masterpiece
- Ditching the Fuss: Why Miniature Cannoli Rock Your Dessert Platter
- Assembling Your Cannoli Bites Toolkit and Pantry Staples
- Crafting the Ultra-Crisp Shells: Frying to Golden Perfection
- Whipping Up the Zesty, Sweet Ricotta Core
- The Grand Finale: Filling and Garnishing Your Cannoli Bites
- Elevating Your Dessert Game: Variations and Garnishes for Cannoli Bites
- Making Ahead: Storage Secrets for Lasting Freshness
- Beyond the Basics: Troubleshooting Common Cannoli Bites Issues
- Recipe FAQs
- 📝 Recipe Card
Sicilian Sunshine Cannoli Bites: A Two-Bite Masterpiece
Cannoli they’re a proper classic, aren't they? A little taste of Sicily right in your own kitchen. But sometimes, a full sized cannolo can feel a bit... much, especially when you fancy something smaller, perhaps for a party platter or just when you need a manageable sweet fix without getting pastry shrapnel all over your nice jumper.
These miniature Cannoli Bites are the perfect solution: all that fantastic flavour, that signature textural contrast, packed into a neat, two-bite package. We’re focusing on achieving that shatteringly crisp shell and the creamy, zesty filling that defines this iconic Italian dessert.
Our goal is simple: create delish cannoli bites that are authentic, yet accessible, even if you’re new to frying pastry.
Ditching the Fuss: Why Miniature Cannoli Rock Your Dessert Platter
The magic of any great Italian pastry lies in its balance. For cannoli, that balance is the interplay between the brittle, blistered shell and the cool, sweet interior. Scaling down this intricate dessert doesn't diminish the experience; it enhances its versatility.
The Allure of the Accessible Italian Pastry
The full sized cannolo requires a certain commitment a fork, maybe a plate but mini cannoli bites eliminate all that formality. They transform a traditionally seated dessert into an effortless handheld treat, perfect for mingling.
This accessibility makes them an ideal choice when planning celebratory spreads or sophisticated afternoon tea services. They are, quite simply, the ultimate finger food desserts .
Perfect Portions: Capturing Classic Cannoli Flavour in Miniature
The flavour profile remains true to the original recipe. We capture the authenticity through key dough components namely, the wine which aids in blistering and the vibrant ricotta core brightened with citrus.
Creating these cannoli bites dessert miniatures means that every guest gets that perfect ratio of crisp shell to creamy filling in a single, satisfying mouthful, ensuring no component overpowers the other.
Why You Need These Crispy Shells in Your Life Right Now
The texture is paramount. While the filling is straightforward, the creation of the pastry shell a type of pasta frolla enriched with wine and butter is what separates good cannoli from truly great ones.
The effort invested in achieving that bubbly, golden brown exterior is what makes the final product so rewarding. This cannoli bites recipe easy approach focuses on making that challenging shell manageable without sacrificing the essential shatter.
Assembling Your Cannoli Bites Toolkit and Pantry Staples
To achieve professional results with these cannoli bites , you need the right materials, especially when it comes to the crucial shaping step. While the ingredient list is surprisingly short, the quality of your components matters immensely for the final outcome.
Essential Equipment for Perfect Shell Formation
The single most critical piece of equipment needed to make these shells correctly is the cannoli tube . These are small, cylindrical metal forms around which the pastry dough is wrapped prior to frying.
If you can source mini tubes, that’s ideal for smaller bites; otherwise, standard tubes will yield slightly larger, but still miniature, portions suitable for this recipe. Beyond the tubes, a heavy bottomed saucepan for stable oil temperature, a reliable rolling pin, and a 3 inch round cookie cutter will form the basis of your pastry work.
Sourcing the Ricotta: Achieving Optimal Creaminess
The heart of any cannolo is the filling, and it starts and ends with ricotta. You must use whole milk ricotta cheese , and critically, it needs to be thoroughly drained.
Any excess moisture will compromise the texture of your cannoli filling , leading to a runny mess that soaks the crisp shells. Ideally, drain the ricotta in a cheesecloth lined sieve set over a bowl in the refrigerator for at least 12 hours, or press it firmly before use.
This step is non-negotiable for achieving that light, pipeable consistency.
Flour, Fat, and Fizz: What Makes the Dough Shatteringly Crisp
The dough itself uses common baking staples flour, sugar, and butter but the addition of liquid is what imparts the distinctive crispness. The combination of a dry wine (like Pinot Grigio) and a touch of acid (apple cider vinegar) is key.
When this dough hits the hot oil, the alcohol and acid create steam rapidly, resulting in those desirable, characteristic air bubbles the signature "blistering" on the shell.
Crafting the Ultra Crisp Shells: Frying to Golden Perfection
The shell making process requires focus, primarily because maintaining oil temperature dictates success or failure here. This is where many attempts at this cannoli bites recipe easy might stumble if care isn't taken.
Mixing and Resting the Dough: Patience Pays Off
Begin by whisking together the dry ingredients: 1 ½ cups of all-purpose flour, two tablespoons of sugar, half a teaspoon of cinnamon, and a quarter teaspoon of salt. Next, quickly cut in two tablespoons of very cold, cubed unsalted butter until the mixture resembles coarse sand.
Whisk one egg yolk with a quarter cup of dry white wine and one teaspoon of vinegar separately, then incorporate this liquid into the dry mixture gently, just until a cohesive dough forms. Overmixing develops gluten, which results in tough, chewy shells instead of crisp ones.
Once formed into a disc, wrap it tightly and let it rest in the refrigerator for a minimum of 30 minutes to allow the gluten to relax.
Rolling Thin: Achieving the Ideal Shell Thickness
Once chilled, divide the dough and roll it out on a lightly floured surface. For true crispness, aim for a very thin sheet about 1/16th of an inch, or roughly 1.5mm thick. Using a 3 inch round cutter, cut out your circles.
Lightly grease your mini cannoli tubes, then wrap each dough circle diagonally around the tube, overlapping the edges slightly. Seal the final seam with a tiny dab of water or egg white to prevent the dough from unravelling during the heat of frying.
Temperature Control: Frying Techniques for Maximum Bubble
Heat approximately 3 to 4 cups of vegetable or canola oil in a deep, heavy bottomed pan to precisely 350° F ( 175° C). This temperature is crucial. If it drops too low, the dough will soak up oil; if too high, the outside will burn instantly.
Carefully lower three or four shaped shells (with tubes inside) into the oil using tongs. Fry for about 2 to 3 minutes, turning frequently to ensure even blistering and colouring.
Immediately remove them once they reach a light golden brown and, while still scorching hot, quickly slide the metal tubes out. Place the empty shells on a wire rack lined with paper towels to drain excess oil completely. They must cool fully before you even think about filling them.
Related Recipes Worth Trying
- Festive Funfetti Shortbread Bites Buttery Bright — Whip up these simple Funfetti Shortbread Bites They have that perfect meltinyourmouth texture The ultimate easy shortbread recipe for any celebration
- Easy Slow Cooker Garlic Butter Beef Bites Recipe — Forget pans These Slow Cooker Garlic Butter Beef Bites cook themselves into meltinyourmouth perfection A foolproof way to make hearty slow cooker comfort food
- Pharaohs Falafel Lamb Fava Bean Bites Recipe — Craving Egyptian street food These Pharaohs Falafel combine lamb mince fava for a tasty twist Crispy flavourful and easy with tahini yoghurt dip
Whipping Up the Zesty, Sweet Ricotta Core

While the shells are cooling, focus on creating the bright, luscious cannoli filling . Since we’ve already ensured our ricotta is beautifully drained, the mixing process is quick.
Combine 1 ½ cups of the drained whole milk ricotta with about ¾ cup of sifted confectioners’ sugar, adjusting sweetness to your preference. Add one teaspoon of vanilla extract and the finely grated zest of one orange this citrus component is vital for lifting the richness.
For an optional, authentic kick, stir in one tablespoon of Marsala wine or dark rum. Gently whip these ingredients together until the mixture is smooth but still retains some body; you want texture, not liquid cream. Finally, fold in a quarter cup of mini chocolate chips or finely chopped dark chocolate.
Transfer this filling to a piping bag fitted with a large star tip and chill for at least 30 minutes to firm up further, which makes piping much neater.
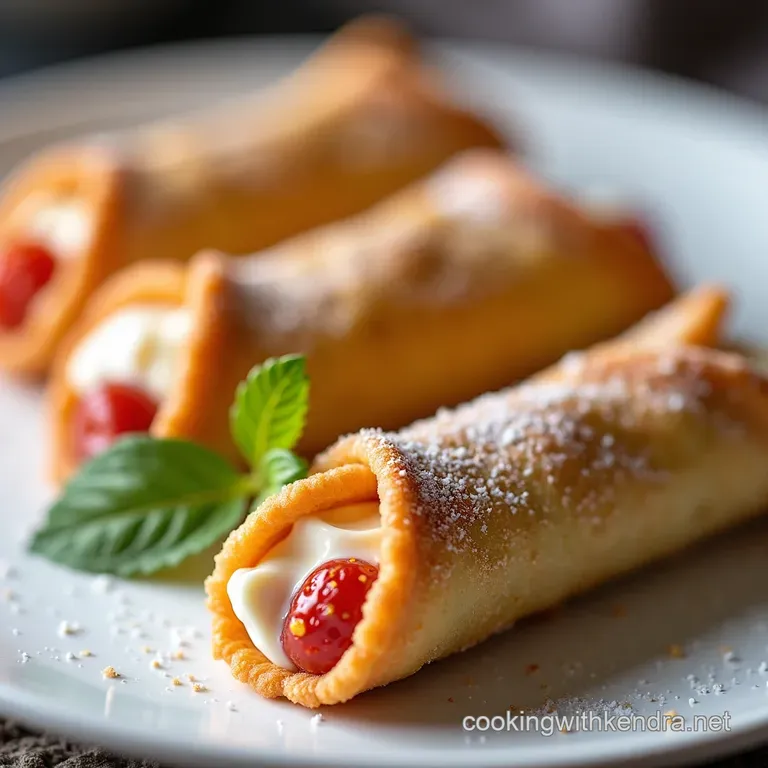
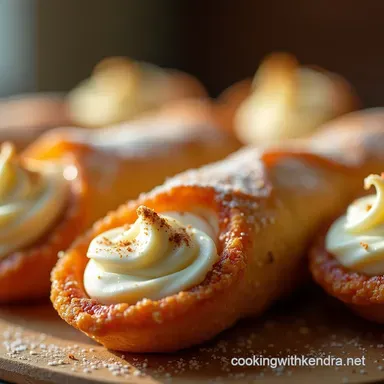
The Grand Finale: Filling and Garnishing Your Cannoli Bites
With perfectly crisp shells cooled and the filling nicely chilled, the final assembly is rewarding. This stage ensures your mini cannoli bites look as good as they taste.
Pipe the chilled ricotta filling evenly into both ends of the hollowed out shells. Take care not to overfill, as this can cause the pastry edges to crack. Once filled, the final touch is the garnish. Dust the Cannoli Bites generously with powdered sugar.
For added visual appeal and flavour contrast, dip the ends of the filled cannoli lightly into a small bowl of finely chopped pistachios or matchstick sized pieces of candied orange peel. These finger food desserts are now ready for serving.
Elevating Your Dessert Game: Variations and Garnishes for Cannoli Bites
While the classic ricotta and chocolate chip combination is unbeatable, these miniature forms are perfect canvases for creativity.
Flavour Twists: Infusing the Filling with Unique Notes
To move beyond the traditional, consider flavour infusions during the filling stage. You can swap the orange zest for lemon zest for a brighter tang, or fold in finely chopped dried cherries soaked in Grand Marnier for a deeper, boozier note.
If you prefer a richer base, try substituting half of the ricotta with mascarpone cheese for an ultra creamy, almost cheesecake like texture in your cannoli bites dessert .
The Art of the Dusting: Chocolate, Pistachio, and Citrus Zest Toppings
Garnishes are where presentation shines. Instead of relying solely on pistachios, try dipping one end in melted dark chocolate and letting it set before dusting with powdered sugar.
Alternatively, for a more sophisticated look, use finely shaved bitter chocolate or even dried, finely crushed rose petals on one end for an unexpected floral aroma. These simple additions take your cannoli bites recipe from homemade to elegant bakery quality.
Making Ahead: Storage Secrets for Lasting Freshness
The greatest enemy of a perfect cannolo is moisture. If you are preparing these ahead of time for an event, you must treat the components separately.
You can prepare the shell dough and the ricotta filling up to 24 hours in advance (store dough wrapped tightly, filling covered in the fridge). The shells themselves, once cooled, can be stored in an airtight container at room temperature for up to two days; however, for maximum crispness, aim to fry them on the same day you plan to serve.
Crucially, never fill the shells until moments before serving. If you must assemble early, fill them no more than an hour before guests arrive, and keep them refrigerated until the last possible moment to counteract the moisture transfer from the ricotta.
Beyond the Basics: Troubleshooting Common Cannoli Bites Issues
Even with a detailed guide, frying and pastry work can present minor hurdles. Addressing them swiftly ensures your cannoli bites remain perfect.
Keeping Shells Crunchy: Tips for Preventing Soggy Results
If your shells soften too quickly after filling, the culprit is usually an overly wet ricotta or a shell that didn't fry long enough. Ensure your oil temperature hit that crucial 350° F ( 175° C) mark under-fried shells retain internal steam which turns to moisture as they cool, softening the structure.
If the shells seem slightly soggy even when freshly filled, lightly dust the inside of the empty shells with a pinch of cocoa powder or finely ground almonds before piping the filling; these act as a moisture barrier, helping keep your cannoli bites recipe easy assembly results wonderfully crisp.
Flavour Twists: Infusing the Filling with Unique Notes
Sometimes the filling tastes a little flat. If this happens, don't worry; it’s often due to the sugar not fully dissolving or the zest not releasing enough oil. A quick fix is to incorporate a tiny splash more of the Marsala wine or a whisper of almond extract.
For a richer, denser texture often desired in mini cannoli bites , you can briefly beat the ricotta mixture with a hand mixer on low speed for 30 seconds, incorporating a little more air without making it watery.
The Art of the Dusting: Chocolate, Pistachio, and Citrus Zest Toppings
The final dusting should be the last thing you do before serving. If you dust too early, the powdered sugar will absorb humidity from the air and melt into a glaze, losing its light, snowy appearance.
Use a fine mesh sieve held high above the finished cannoli bites for the most even and attractive light coating of sugar.

Recipe FAQs
Why are my Cannoli Bites shells going soft instead of staying crisp?
This usually happens for one of two reasons: either the frying temperature was too low, causing the dough to soak up oil, or you filled them too far in advance. For maximum crunch, make sure your oil hits a steady 350°F (175°C) and only fill the shells right before serving ideally within an hour of eating them.
Can I make the Cannoli Bite shells ahead of time?
Absolutely! The shells keep wonderfully once they are completely cool. Store them in an airtight container at room temperature for up to a week; just keep them away from anything damp, or they'll lose that lovely shatter.
Remember to only add the creamy filling on the day you plan to serve them, or you’ll have a soggy bottom!
My ricotta filling looks a bit watery; what’s the trick to getting it thick like a proper Cannoli Bite filling?
The secret, my friend, is drainage! You must drain the ricotta overnight, ideally lined with cheesecloth in the fridge, to get rid of excess whey it's non-negotiable for a firm filling.
After draining, whipping it gently with the sugar until just smooth, then chilling it again, will help it hold its shape beautifully when piped.
I don't have Marsala wine; what can I use instead in the dough or the filling for that classic flavour?
If you’re avoiding wine, use cold water with an extra dash of vanilla or rum extract in the dough to help create the bubbles. For the filling, stick with a teaspoon of good quality vanilla and add a tiny splash of dark rum or even a drop of almond extract it provides that deep, slightly nutty Sicilian note perfectly.
Is there a way to make these Cannoli Bites without deep frying them?
While frying gives you the authentic, bubbly texture, you certainly can bake them for a healthier, less hands-on approach. Brush the dough wrappers well with egg white, wrap them around the tubes, and bake at about 375°F (190°C) until they are golden brown.
Just be aware they will turn out more like a crisp cookie shell than a traditional blistered pastry.
Easy Cannoli Bites Recipe
Ingredients:
Instructions:
Nutrition Facts:
| Calories | 336 kcal |
|---|---|
| Protein | 1.8 g |
| Fat | 7.1 g |
| Carbs | 20.6 g |
| Fiber | 2.2 g |
| Sodium | 1372 mg |
