Fiveingredient Fudge Ultracreamy 10Minute Nofail Recipe
Ditch the Candy Thermometer: The Secret to Foolproof Fudge
Let’s be honest. When you decide you want homemade fudge, you want it now . You do not want to stand over a boiling pot of molten sugar, staring intently at a delicate glass thermometer waiting for 234 degrees F. Right? That is a recipe for anxiety, not dessert.
I tried the traditional method exactly once, ended up with a rock and hard, crystallized mess, and nearly burned my entire kitchen down. I decided right then that if I couldn’t cheat, I wasn't playing.
Enter the brilliant, time and tested cheat code: Five and Ingredient Fudge. This isn't just easy; it’s genuinely foolproof. We are completely skipping the sugar boiling stages and getting straight to the decadence.
Unlocking the Magic of Condensed Milk
So, why does this easy chocolate fudge actually work? It all comes down to the big, beautiful can of sweetened condensed milk. Traditional fudge requires you to boil sugar and liquid (cream/milk) until the water evaporates and the sugar crystals achieve a specific structure. It's delicate. It's science.
Condensed milk solves all those problems because it’s already been boiled down, concentrating the milk and the sugar into a thick, syrupy binder. When you mix hot, melted chocolate and a bit of butter into this base, you’re essentially creating an instant ganache that sets up firm and unbelievably creamy when chilled.
Do not, under any circumstances, try to substitute evaporated milk. That is just thin, unsweetened milk. We need the sugar!
Why This Quick and Fix Fudge is Your Kitchen MVP
This 5 Ingredient Fudge Recipe is basically mandatory for the holiday season or whenever you need a quick hostess gift. We are talking five minutes of actual stirring time. Maybe eight minutes if you're multitasking and trying to watch Netflix at the same time.
It’s completely impossible to mess up the texture (unless you scorch the chocolate, which is covered below). Plus, it’s a brilliant base for endless customizations. If you are nervous about making candies or homemade treats, this quick fudge recipe will make you feel like a total professional.
Trust me on this.
Assembling Your Core Components for Five and Ingredient Fudge Success
We are keeping the ingredients list tight. When you only use five things, the quality of each component matters more than ever.
Essential Pantry Checklist (The Core Five)
| Component | Why it Matters | Mistake I Once Made |
|---|---|---|
| Chocolate Chips (Semi and Sweet) | This is 80% of your flavor profile. | Using cheap compound "melting wafers." They taste waxy. |
| Sweetened Condensed Milk | The structural backbone. | Buying the reduced and fat version. It doesn't set properly! |
| Unsalted Butter | Adds gloss and smoothness. | Forgetting to cube it first (takes longer to melt). |
| Vanilla Extract | Rounds out the sweetness. | Skipping it entirely (the fudge tastes flat). |
| Flaky Sea Salt | Essential finishing touch. | Using fine table salt (too much sodium, no crunch). |
Selecting the Best Quality Chocolate Base
Look, if you want that deep, satisfying, homemade candy flavor, you need decent chocolate. I am not saying you need to mortgage your house for Belgian chocolate, but avoid the bargain bin stuff. Since we are using an entire 12 ounce bag, the flavor really shines through.
I usually go for high and quality semi and sweet chips (around 45 50% cocoa). If you prefer ultra and rich dark chocolate, swap it out, but keep in mind that the resulting fudge will be significantly less sweet.
I like to chop up a couple of quality baking bars instead of using chips sometimes, because the chunks melt faster and more evenly.
Prep Work: Necessary Tools and Pan Linings
This is the non and negotiable step: Line your pan.
You need an 8x8 inch square baking tin. You absolutely must line it with parchment paper, allowing the paper to overhang the sides. These overhangs are your "handles." When the easy chocolate fudge is set, you will use those handles to lift the entire block out of the pan.
Without them, you’re scraping and potentially ruining the surface.
Crucial Warning: Do not just grease the pan. Even if you use foil, you need to lightly grease the foil and still cut the edges neatly. Parchment paper is the superior, non and stick option here. Get the pan prepped before you even turn on the heat.
Related Recipes Worth Trying
- Shiny Crackle Top Malted Fudge Squares Truly Better than Brownies — Stop settling for dry chocolate cake This ultimate fudgy brownie recipe delivers a glossy crackle top and deep malted flavour Truly Better than Brownies
- The Dukes Easy Southern Fudge Pie Gooey Fudgy — This easy southern fudge pie recipe is the absolute business Forget complicated bakesthis fudgy rich southern chocolate pie is ready in under an hour Simply...
- Emergency Chocolate Fudge Mug Cake The 5Minute Microwave Treat — When you are gagging for a bit of chocolate this easy mug cake recipe delivers A rich fudgy singleserving microwave mug cake ready in under 5 minutes No...
The Rapid Melt Method: Cooking Your Decadent Fudge
Whether you choose the stovetop or the microwave (I prefer the stovetop for better control), the key here is low and slow. We are aiming for a gentle, uniform melt, not a frantic boil.
Gentle Heating: Combining the Foundation Ingredients
Get your chocolate chips, the condensed milk, and the cubed butter into a heavy and bottomed saucepan. If you’re worried about scorching (and you should be), use a bain and marie (a heatproof bowl set over a simmering pot of water).
Start heating everything over very low heat. Very low. Stir constantly with a rubber spatula, getting right into the corners of the pan. This process should take about 5– 7 minutes.
Achieving the Perfect Smooth Stir Consistency
Here is the pro tip that separates grainy fudge from incredibly creamy fudge:
Remove the pan from the heat when there are still a few small lumps of unmelted chocolate remaining (about 75% melted).
Seriously. Take it off the heat!
Now, just keep stirring vigorously. The residual heat trapped in the pan, the butter, and the condensed milk is more than enough to melt those final chunks of chocolate. This prevents overheating the mixture, which is what causes the fat to separate and leads to that horrible, grainy texture.
Keep stirring until it is a uniform, thick, glossy river of chocolate. Stir in the vanilla extract last.
Pouring and Setting the Five and Ingredient Fudge Base
Working quickly (it starts to set up fast!), immediately scrape the mixture into your prepared 8x8 pan. Use the spatula to smooth the top. You don't need to be perfect; it smooths out pretty well on its own.
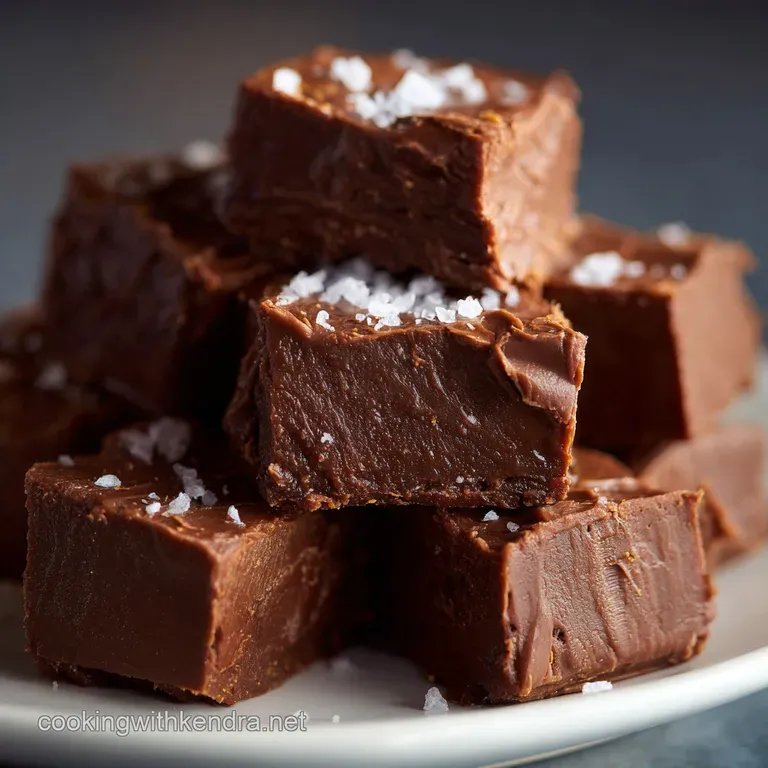
Now, grab that flaky sea salt. Sprinkle it sparingly but evenly over the top. That little burst of saltiness cuts through the intense sweetness beautifully. Pop the pan into the refrigerator. Give it at least two hours, or until it’s totally firm to the touch.
Troubleshooting and Customizing Your Batch
Shelf Life and Ideal Storage for Maximum Freshness
Homemade candies like this Five and Ingredient Fudge last surprisingly well, assuming you haven't eaten it all in one sitting (highly likely).
Store it in an airtight container at room temperature for up to one week. If you need it to last longer (or if your kitchen is very warm), keep it in the fridge for up to two weeks. I actually think the texture is best when it's kept chilled.
Fixing Common Fudge Texture Issues (Too Soft or Grainy)
-
Issue: It's too soft and sticky, even after chilling.
- Fix: You might have used slightly less chocolate than required, or perhaps your condensed milk was a little runny. Pop the whole pan into the freezer for 30 minutes. It will firm up enough to cut. Next time, try adding an extra ounce of chocolate chips to the base mixture.
-
Issue: It tastes grainy/sugary.
- Fix: You overheated the chocolate, causing the sugar/fat to crystallize. Unfortunately, once it’s grainy, it's hard to save. You can sometimes melt it down again very slowly with a tablespoon of extra condensed milk over a bain and marie, but truthfully, it’s best to just make a new batch, ensuring you remove it from the heat early next time.
Endless Flavor Possibilities: Advanced Variation Ideas
Once you nail the basic 5 Ingredient Fudge recipe, the world is your oyster.
- Chai Spice: Stir 1 teaspoon of chai spice blend (cinnamon, cardamom, ginger) into the mixture when adding the vanilla.
- Marshmallow Fluff Swirl: Immediately before pouring into the pan, gently fold in a half cup of Marshmallow Fluff. Do not overmix; you want ribbons of white fluff.
- Boozy Fudge: Stir in 1 2 tablespoons of a strong liquor like Bourbon or Bailey's right along with the vanilla.
- Birthday Cake: Swap the semi and sweet chocolate for white chocolate and fold in 1/4 cup of rainbow sprinkles right before pouring.
Cutting Techniques for Uniform Fudge Squares
I know you want those sharp, picture and perfect squares. Here’s how you get them:
- Make sure the fudge is cold (straight out of the fridge or freezer).
- Bring a mug of very hot tap water to your cutting station.
- Dip a long, sharp knife into the hot water.
- Wipe the blade completely dry.
- Make one clean cut, pressing straight down.
- Repeat the dip/wipe process before every single cut.
This warms the blade just enough to glide through the fudge without tearing the edges.
Pairing Ideas: What to Serve Alongside Homemade Fudge
This is rich. You need something strong and contrasting to serve with your beautiful homemade candies.
- A strong, freshly brewed pot of Earl Grey tea. The citrus notes cut through the chocolate beautifully.
- A robust coffee, like a French press or an espresso shot.
- A glass of aged tawny port or a spiced rum (for the adults, obviously).
- Serve tiny squares alongside a scoop of vanilla bean ice cream and a scattering of fresh, tart raspberries. That acidity is pure magic.

Recipe FAQs
Help! My fudge is grainy, not smooth. What went wrong?
Graininess usually happens if the chocolate base gets too hot or boils while melting. Ensure you melt it slowly over very low heat, removing it from the hob when only 75% melted, allowing residual heat to finish the job for a beautifully glossy result.
Once I’ve made this splendid FiveIngredient Fudge, how should I store it and how long will it last?
Store the fudge in an airtight container at room temperature for up to 2 weeks, although chilling it in the fridge will extend its shelf life to about 3 4 weeks. If you need it to last longer, it actually freezes beautifully for up to 3 months.
I'm pressed for time can I use the microwave instead of the stovetop to make this?
Yes, the microwave works perfectly, but remember the golden rule: melt in short bursts (30 seconds) and stir vigorously between each. Stop heating when a few small lumps remain, as overheating will scorch the chocolate and result in a stiff, grainy texture.
I fancy a change. Are there any easy variations for this speedy fudge recipe?
Absolutely! You can swap the semi sweet chocolate for white chocolate and stir in dried cranberries, or fold in toasted, chopped pecans immediately after adding the vanilla extract for a nutty crunch.
Why do you recommend adding flaky sea salt? Isn't the fudge sweet enough already?
The salt is the secret weapon! That necessary sprinkle of flaky sea salt cuts through the intense sweetness, providing textural contrast and balancing the flavour profile so the rich fudge doesn't taste cloyingly sweet.
Fiveingredient Fudge Quick Recipe

Ingredients:
Instructions:
Nutrition Facts:
| Calories | 401 kcal |
|---|---|
| Protein | 2.8 g |
| Fat | 16.9 g |
| Carbs | 55.9 g |
