Selfrising Flour: Ultimate Fluffy Buttermilk Scones
- The Secret to Effortless Afternoon Tea: Why This Scone Recipe Reigns Supreme
- Essential Ingredients Checklist: Quality and Measurement Notes
- Method: A Baker's Guide to Mixing, Shaping, and Baking
- The Science of the Perfect Rise: Leveraging Self-Raising Power
- Expert Baking Secrets: Troubleshooting Your Scone Rise (From the Bakers’ Bench)
- Planning Ahead: Storing and Refreshing Your Scones
- Mastering the Traditional Cream Tea Presentation
- Recipe FAQs
- 📝 Recipe Card
The Secret to Effortless Afternoon Tea: Why This Scone Recipe Reigns Supreme
Have you ever walked into a bakery when the scones were fresh out of the oven? That scent is pure comfort a warm, slightly milky, slightly yeasty hug. Achieving that perfect, light-as-air texture used to intimidate me, honestly.
I tried recipes that called for precise chemical balancing of baking soda and cream of tartar, but they often ended up dense and disappointing. Then I discovered the undeniable magic of using SelfRising Flour .
This ingredient is an absolute lifesaver, especially when you need a fancy tea spread in under 35 minutes. It bypasses all the fiddly measuring and mixing, giving you the confidence of a seasoned pastry chef without the effort.
It’s cheap, incredibly fast, and delivers a consistent, towering rise every single time. Seriously, why mess with traditional flour when the SelfRising Flour is right there, doing the heavy lifting?
We are tackling the ultimate version today: tender buttermilk scones. This recipe is the best SelfRising Flour quick bake I’ve ever perfected, leaning into simplicity to guarantee stunning results. Get your clotted cream ready, friend, because we’re about to bake the best scones of your life. If you want another quick win, check out my Self Rising Flour Scones Quick Easy Clotted Cream Recipe next!
The History of the Humble British Scone
The scone holds a prestigious place in afternoon tea rituals, originating primarily in Scotland. They were historically made with oats and cooked on a griddle, looking more like flat soda bread. It wasn't until chemical leaveners became widespread that the modern, tall, fluffy scone emerged.
The ease with which we can produce these quick breads now, primarily thanks to SelfRising Flour , is a true testament to kitchen innovation.
Introducing the Ultimate Baking Shortcut: Pre-Leavened Flour
Pre-leavened flour is genius, full stop. It is simply all-purpose flour that has already been mixed perfectly with salt and a specific quantity of baking powder. This eliminates the risk of adding too much or too little leavener, which is the number one cause of flat biscuits and scones.
When you see a recipe calling for a simple SelfRising Flour base, know that you are getting a head start on perfect texture.
What Makes the 'Two-Ingredient' Claim Possible?
You often see those viral videos claiming "Two-Ingredient Dough!" and in the case of scones, it's almost true. If you use SelfRising Flour (which already contains the flour, salt, and leavener) and a simple liquid like cream or buttermilk, you are technically only measuring two core items.
The buttermilk reacts with the leavening agent in the SelfRising Flour to create instantaneous gas bubbles. This rapid reaction is what gives the scone its characteristic lift and speed.
Essential Ingredients Checklist: Quality and Measurement Notes
Precision matters here, but the list is short! Remember, the quality of your ingredients, especially when the list is this pared down, really shines through. Don’t skip the chilling step for the butter; it’s non-negotiable for a perfect scone using SelfRising Flour.
Selecting the Right Self Rising Flour Brand for Baking
Not all flours are created equal, even the pre-leavened ones. Different brands use slightly different amounts of baking powder, and some are milled finer than others. I find that southern US brands (if you’re in America) or established UK brands generally produce the best results for quick biscuit recipe applications.
A good SelfRising Flour should be sifted before use, even if it claims not to clump.
| Ingredient | My Recommendation | Quick Substitution |
|---|---|---|
| Self Rising Flour | Freshly purchased, finely milled | All-Purpose Flour + Baking Powder + Salt (see tips) |
| Buttermilk | Full fat, very cold | Whole Milk + 1 tsp Vinegar/Lemon Juice |
| Butter | Unsalted, high fat content | Chilled, solid shortening (use 20% less) |
Why Buttermilk is Superior to Standard Milk in Scones
Buttermilk is slightly acidic, which is exactly what we want. This acidity acts as a turbocharger for the baking powder already mixed into the SelfRising Flour. This chemical reaction starts working the moment the liquid hits the dry ingredients, resulting in tiny, rapid gas bubbles.
Using standard milk still works, but the lift won't be as dramatic, and the flavor will lack that subtle, pleasant tang.
Butter Temperature: Diced, Grated, or Melted?
This is a hill I will die on: The butter must be freezing cold. I personally prefer to dice my butter into tiny cubes, toss them in the flour, and then quick rub them in. Some bakers grate frozen butter, which is also a fantastic technique for speed. The goal is to keep the butter solid.
When those tiny flecks of cold fat hit the oven’s high heat, they melt instantly, creating pockets of steam. If your butter is melted or even soft, you’ll end up with a flat, greasy disc instead of a lofty scone.
Optional Additions: Currants, Citrus Zest, and Sugar Dusting
The beauty of a basic SelfRising Flour recipe is its adaptability. Want to make it fancy? Go for it! I love adding the zest of one lemon and a few drops of vanilla extract for a sweeter afternoon treat.
If you’re adding dried fruit like raisins or currants, make sure you lightly dust them in a tablespoon of extra flour before adding them to the dough. This prevents them from sinking straight to the bottom while baking.
Method: A Baker's Guide to Mixing, Shaping, and Baking
This is where speed and gentleness matter most. Think fast hands, minimum fuss. The moment your SelfRising Flour meets the buttermilk, the clock starts ticking!
The 'Rubbing In' Technique: Achieving a Sandy Consistency
First, weigh or measure your SelfRising Flour and sugar, then sift it into your large bowl. Add the cold butter cubes. Now, using just the tips of your fingers, quickly rub the butter into the flour. Lift your hands high above the bowl to incorporate air while you work.
You want the mixture to resemble coarse, sandy breadcrumbs, or perhaps fine, wet sand. Stop immediately when no large lumps of butter remain.
Kneading Gently: The Key to Preventing Tough Scones
Make a well in the centre of the dry ingredients and pour in the cold buttermilk. Use a blunt knife or spatula to stir it just until the dough comes together into a shaggy mass. This is critical: Do not overmix. Turn the shaggy dough out onto a lightly floured surface.
Now, instead of aggressive kneading, just fold the dough over itself two or three times using light, quick presses. This minimal handling ensures a tender crumb and prevents gluten development, leading to the best biscuit recipe texture.
Cutting and Glazing: Ensuring a Tall, Golden Finish
Pat the dough out evenly to a thickness of about 1.25 inches (3 cm). Dip your round cutter straight into the flour this prevents sticking. Now, press the cutter straight down and lift straight up. Never, ever twist the cutter.
Twisting seals the edges of the dough, meaning the scone can’t expand properly, leading to an ugly, lopsided rise. Place the cut pieces "shoulder to shoulder" on the baking tray. Brush the tops lightly with egg wash, ensuring none drips down the sides.
Bake Times and Temperature: Achieving the Internal Fluff
Bake your scones at a high temperature, typically 425°F (220°C). The high heat is what makes the cold butter create maximum steam, setting the shape quickly. Bake for 12 to 15 minutes.
You’re looking for a beautiful, golden brown top and an internal crumb that smells sweet and nutty. They should sound hollow when tapped on the bottom.
The Science of the Perfect Rise: Leveraging Self Raising Power

The primary reason this recipe is so successful for even novice bakers is the precision of the SelfRising Flour itself. Baking powder is made up of an acid (often cream of tartar) and a base (baking soda). In standard recipes, these are measured separately.
But when you use pre-mixed SelfRising Flour , that crucial ratio is guaranteed. When we add the cold buttermilk, which is also acidic, we trigger the double acting baking powder in the SelfRising Flour to release CO2 gas immediately, providing the initial burst of lift even before the scones enter the oven.
Expert Baking Secrets: Troubleshooting Your Scone Rise (From the Bakers’ Bench)
I have had my share of flat, sad scones; trust me, I know the pitfalls. These are the three main errors I see people make when using a SelfRising Flour recipe.
Understanding the Leavening Agents in Self Rising Flour
If your scones didn’t rise, the first thing to check is the age of your flour. If your SelfRising Flour has been sitting in the pantry for a year, the leavening agents have likely lost their power. Always use fresh SelfRising Flour for best results.
Achieving that Signature Tender Crumb Texture
A tough, dry scone comes from over handling. If you knead this dough like you’re making bread, you develop the gluten too much. Gluten is great for chewy bread, terrible for light scones. The dough should still look slightly sticky and shaggy when you turn it out.
I often tell people: mix until it just comes together, then stop.
Chef’s Note: If you think you might have overmixed, chill the cut scones in the freezer for 10 minutes before baking. This chills the butter down again and relaxes the gluten strands, which can sometimes salvage the crumb.
The Critical Role of Cold Buttermilk and Fat
Warm liquid and soft fat are the enemies of a tall scone. If the butter melts into the flour before baking, the steam cannot form those essential internal pockets. Use buttermilk straight from the fridge and make sure your hands are cool when you rub the butter in.
If your kitchen is hot, pop the bowl of flour and butter into the fridge for five minutes before adding the liquid. This simple step, combined with reliable SelfRising Flour , guarantees success.
Planning Ahead: Storing and Refreshing Your Scones
Scones are always best eaten on the day they are baked. However, sometimes life requires planning!
- Short Term Storage: Store completely cooled scones in an airtight container at room temperature for up to two days. Reheat gently in a warm oven (150°C/300°F) for 5- 7 minutes to bring back the crisp exterior.
- Freezing Baked Scones: Allow them to cool completely. Wrap each scone individually in plastic wrap, then place them all in a freezer bag. They keep well for up to three months. Thaw overnight at room temperature.
- Freezing Unbaked Scones: This is my favorite trick! Cut the scones and place them on a parchment lined tray in the freezer for an hour until solid. Transfer the frozen, unbaked scones to a bag. When ready to bake, place them directly onto the baking sheet (no need to thaw) and increase the baking time by 3- 5 minutes. This is a brilliant way to have fresh, hot scones whenever the craving hits.
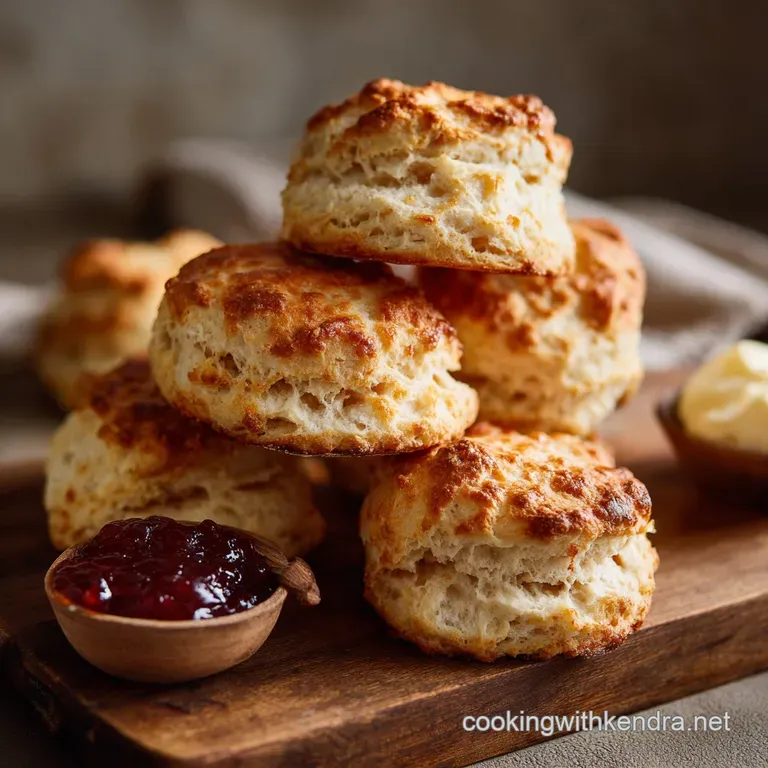
Mastering the Traditional Cream Tea Presentation
The best part of baking with SelfRising Flour is the payoff: serving them perfectly. Make sure you serve them still slightly warm, sliced open with a serrated knife. Don't forget the clotted cream and jam!
Preventing the 'Leaning Tower' Effect During Baking
A leaning scone is usually a sign that you twisted the cutter or that the dough was rolled thinner on one side than the other. Ensure the dough is perfectly uniform in thickness (use a ruler if you need to!), and strictly follow the no-twist rule.
Also, make sure your oven temperature is accurate if the heat is uneven, it can cause lopsided rising.
The Difference Between Standard Flour and Self Raising Flour Results
If you tried this exact recipe using plain flour and added leaveners yourself, you might get a good result, but the risk of error is higher. Using a certified SelfRising Flour product standardizes the variables.
The key difference lies in the fineness of the mixture and the guaranteed freshness of the leavening agents, which are often mixed industrially for optimum distribution. It just makes the whole process foolproof, which is why I recommend this SelfRising Flour recipe to all my beginner baker friends.
The Golden Rule: Handle the Dough as Little as Possible
I cannot stress this enough. Minimal contact means maximal lightness. The moment you start feeling the heat from your hands, you’re melting the fat, and you’re toughing up the crumb. This SelfRising Flour mix requires respect.
Work quickly, fold gently, cut sharply, and you will be rewarded with tall, fluffy, delicious scones that are guaranteed crowd pleasers. Go bake something amazing!

Recipe FAQs
What is the difference between self rising flour and all-purpose flour?
Self rising flour is essentially all-purpose flour that has been pre-mixed with a specific ratio of baking powder and salt. This blend simplifies baking, ensuring a consistent rise for quick breads, biscuits, and our tender scones without needing separate measurements of leavening agents.
How can I make my own self rising flour substitute?
If you don’t have self rising flour, you can easily create a substitute using standard pantry ingredients. For every 1 cup of all-purpose flour required, whisk in 1.5 teaspoons of baking powder and 1/4 teaspoon of fine salt.
Ensure you sift the mixture thoroughly to evenly distribute the leavening agent before use.
What ingredients are already included in self rising flour?
Self rising flour typically contains refined wheat flour, sodium bicarbonate (baking soda), and acid salts (which make up the baking powder component), plus salt. The manufacturers carefully calibrate this ratio to guarantee reliable lift and consistent flavor for recipes requiring quick activation.
Is self rising flour readily available outside the US (e.g., Canada or Europe)?
While standard in the UK and the Southern US, self rising flour can be less common in Canada and parts of Northern Europe, where bakers usually rely on AP flour. If you cannot find it commercially, use the recommended homemade substitute of all-purpose flour, baking powder, and salt.
Why are my scones dry and crumbly instead of fluffy and tall?
Dry or tough scones are usually the result of overworking the dough, which encourages too much gluten development. To ensure tenderness, mix the buttermilk into the flour/fat mixture only until the ingredients are just combined, and handle the dough as lightly and quickly as possible when shaping.
Can I use a milk substitute instead of buttermilk in this scone recipe?
Yes, buttermilk can be substituted by souring regular milk at home, which provides the necessary acidity to react with the self rising flour. To do this, combine 1 cup of whole milk with 1 tablespoon of white vinegar or lemon juice, and let it stand for five minutes until slightly curdled.
How should I store leftover self rising flour or baked scones?
Unopened self rising flour should be stored in a cool, dark pantry for up to six months, as the leavening agents lose potency over time. Baked scones are best consumed fresh, but can be kept in an airtight container at room temperature for up to two days, or wrapped tightly and frozen for up to three months.
Fluffy Scones With Selfrising Flour

Ingredients:
Instructions:
Nutrition Facts:
| Calories | 240 calories |
|---|---|
| Fat | 9 g |
| Fiber | 1 g |
