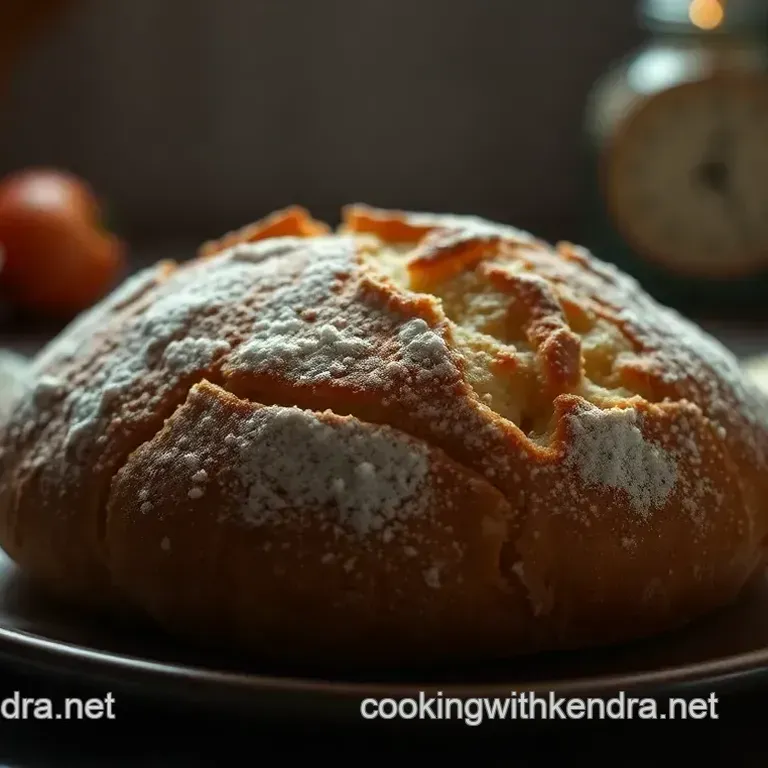
Hearty Homemade White Loaf Bread
- Let’s Talk Bread: A Hearty Homemade White Loaf Bread Adventure
- A Little History & Why It’s a Big Deal Today
- Why You’ll Love This Bread (And What Makes It Special)
- Your Ultimate Guide to Essential Ingredients for Homemade Bread
- Mastering the Art of Professional Cooking: From Prep to Plate
- Additional Recipe Information for Your Hearty Homemade White Loaf Bread
- Frequently Asked Questions
- 📝 Recipe Card
Let’s Talk Bread: A Hearty Homemade White Loaf Bread Adventure
So, picture this: i was curled up on the couch, scrolling through endless tiktok videos, when i stumbled upon an old clip showing a woman kneading dough.
I could practically smell the fresh bread through my screen! it got me thinking, "when was the last time i whipped up a loaf of bread and filled my home with that cozy aroma?" i decided it was high time to get my hands dirty and bake something wholesome.
There's honestly nothing quite like sinking your teeth into a slice of warm, homemade bread. you know what i mean? whether you’re making a sandwich, toasting it for breakfast, or just slathering on some butter it’s pure bliss.
This hearty homemade white loaf bread recipe not only satisfies your hunger but also warms your heart!
A Little History & Why It’s a Big Deal Today
Bread has been a staple in diets around the world for centuries. it goes way back to ancient times when people were figuring out how to grind grains into flour.
This particular white loaf, with roots in british baking, has become a beloved favorite here in the states too. it’s not just about feeding our bellies; it’s about traditions and family gatherings.
Nowadays, with everyone glued to their phones and the convenience of store-bought bread, taking an hour and a half to make your own feels super special.
Plus, nothing beats that first bite!
Now, let’s get real. this isn’t rocket science! it falls under the easy category. i mean, if you've got fifteen minutes to spare, you can mix your ingredients and let the magic happen while you catch up on your netflix series.
You’ll need about 1 hour 45 minutes total from start to finish, but trust me, it’s worth every second.
And here’s the best part this recipe won’t break the bank. you’re looking at ingredients you probably have lying around.
Which means not only do you get a delicious loaf, but you save some cash too!
Why You’ll Love This Bread (And What Makes It Special)
Feeling like you need some convincing? Here are the key benefits of rolling up your sleeves for this bread:
Health boost: homemade bread doesn’t include all the random preservatives you find in supermarket loaves. plus, you control the ingredients! want whole grains? just swap half the flour for whole wheat.
Easy peasy.
Versatile for occasions: i can already picture serving this bread at my next family gathering! it’s perfect for everything from a cozy brunch to a fancy dinner with friends.
Imagine slicing it fresh and placing it on the table. your friends will think you’re some kind of bread wizard!
Unique flavor profile: the combo of butter and sugar brings a lovely richness that’s hard to replicate with store-bought options.
Have you tried using this bread for sandwiches? omg, take a turkey and avocado combo to the next level!
The perfect gift: who wouldn’t want a homemade loaf of bread wrapped up and presented with a bow? whether it’s fresh baked no yeast bread or a quick no rise bread , this simple gesture warms hearts.
So, are you ready to dive into the world of homemade bread? Next up, let’s gather our ingredients and dive into this bread making adventure! Trust me, when you pull that loaf of bread out of the oven, you’re gonna feel like a rock star in your own kitchen! Let’s do this!
Your Ultimate Guide to Essential Ingredients for Homemade Bread
Let’s dive into the magical world of homemade bread! just think about the smell of a loaf of bread baking away in your kitchen.
Seriously, nothing beats that! but to get there, we need to chat about the essential ingredients that make it all happen.
If you're wondering how to successfully craft that perfect slice that makes your heart sing, you’re in the right spot!
Premium Core Components
Alright, first things first: getting down to the details . Here are some key ingredients to keep in mind:
- Flour : Use 4 cups (500g) all-purpose flour . Look for a finely milled and smooth texture. It should feel soft and almost silky.
- Yeast : You’ll need 2 teaspoons (7g) instant yeast . Make sure it’s fresh to help your dough rise like a champion!
- Sugar : Just 2 teaspoons will do. It’s not just for sweetness; it feeds the yeast and helps with browning.
- Salt : A must have! Use 1 teaspoon but don’t go overboard or it’ll mess with your yeast.
Storage Tip : Keep your flour and yeast in airtight containers in a cool, dark place. Stored well, flour can last up to six months, and yeast can last for a year.
Freshness Tip : To check your yeast, mix it with warm water and a pinch of sugar. If it bubbles up in about ten minutes, you're good to go!
Signature Seasoning Blend
So, let’s spice things up a bit! While your basic loaf is delightful, fresh or dried herbs can really elevate it.
- Herbs : Think about adding rosemary or thyme to the mix. Just a teaspoon or so goes a long way.
- Flavor Enhancers : You can toss in garlic powder or onion powder for a savory twist, which can turn a simple loaf into a flavor bomb .
It's all about experimenting with what you have! If you’re exploring your pantry, swap out classic spices for what you love best.
Smart Substitutions
“Oops, I don’t have baking soda!” Sounds familiar, right? Don’t sweat it!
- For flour : If you're low on all-purpose, whole wheat flour will do. It might give a heartier texture, which I love.
- Butter : Out of butter? Try using olive oil instead.
- No yeast, no problem : You can explore Yeast Free Dutch Oven Bread recipes or even an Easy Bake Bread No Yeast version. I’ve got your back!
And if you’re stuck with some old milk, recipes using it can actually lead to some tasty homemade bread no yeast creations. You never know what surprises await!
Kitchen Equipment Essentials
Now, let’s talk tools . Before you start kneading, make sure you have:
- A large mixing bowl : For all your ingredient combining to happen.
- A sharp dough scraper : This makes handling that sticky dough way easier!
- A loaf tin (9x5 inches will do nicely).
A good set of tools makes baking enjoyable, trust me. And don’t worry if you don’t have fancy ones; a sturdy wooden spoon will do just fine!
Wrapping It Up
You've got the scoop on essential ingredients, why they matter, and some creative substitutes for any baking conundrum. remember, you’re not just creating food you’re crafting memories.
Whether you're whipping up pumpkin bread recipes for fall or embracing a cozy tea bread , everything's better when shared (even if it’s just with yourself after a long day!).
Now that you're armed with this knowledge, let’s get baking! roll up those sleeves and let’s turn those ingredients into a warm, buttery loaf of bread .
Yes, it’s time for the marvelous step-by-step instructions that’ll have you on cloud nine in no time!
Mastering the Art of Professional Cooking: From Prep to Plate
Alright, food lovers! let's get into the nitty gritty of professional cooking methods. whether you're dreaming of whipping up a loaf of bread that rivals your grandma's or just want to level up your weeknight dinners, it's all about having the right prep, technique, and a bit of heart.
So, grab your apron and let’s dive in!
Essential Preparation Steps
Okay, first things first, we gotta talk about mise en place. it’s a fancy french term that basically means "everything in its place.
" take the time to measure out all your ingredients before you start cooking. trust me; it saves you from that frantic 3 a.
M. scavenger hunt in your pantry because you’ve forgotten the salt.
Now, let’s chat about time management. set mini deadlines for each step. for example, give yourself 15 minutes for prep and remember that your dough is gonna need an hour to rise.
Having a clock or timer can be a game changer keep things moving without the panic!
And organization is king! Keep your workspace clean. A clutter free environment makes for a clutter free mind. Plus, who wants to fish through all the junk when you’re trying to bake a No Yeast Sweet Bread ?
And oh, let’s not forget safety! Keep those knives sharp and your fingers safe. Burns happen, especially while baking, so always use oven mitts when pulling your masterpiece out!
step-by-step Process
Ready? Here we go!
Mix Dry Ingredients: Combine your flour, yeast, sugar, and salt in a bowl. Easy peasy!
Add Wet Ingredients: Gradually incorporate your warm water and melted butter. Ensure that water is between 110° F to 115° F for those perfect yeasty vibes.
Combine: Stirrers at the ready! Use a wooden spoon until you see that sticky dough come together.
Knead the Dough: On a floured surface, knead that dough for about 8- 10 minutes until smooth. Pay attention to your own dough if it’s too sticky, add a sprinkle more flour!
First Rise: Pop the dough in a greased bowl, cover it, and let it rise for 1 hour in a warm spot until it’s doubled in size. Treat that dough like royalty!
Shape the Dough: After it has risen, punch it down (a little therapeutic, right?) and shape it into your loaf.
Second Rise: In a greased loaf tin, let it sit for another 30 minutes.
Preheat the Oven: Get that oven ready at 375° F when your loaf is rising its second time.
Bake: Slide it into the oven and let it bake for 25- 30 minutes . You want it golden brown and it should sound hollow when you knock on the bottom.
Cool: Let it cool on a wire rack. Wait just a bit before slicing; it’s like letting the suspense build!
Expert Techniques
Now that you've tackled the basics, let's sprinkle in some expert level techniques. Quality checkpoints are a must! If your bread dough isn’t rising, it might be your yeast make sure it’s fresh.
Here's a little troubleshooting tip: If your oven runs cold, that loaf might get too dense. To make sure it’s perfect next time, keep an oven thermometer handy.
And if you ever feel like you might mess up, just remember baking is a science but it’s also an art.
Experiment! try out some self rising flour bread recipes or even a yeast free dutch oven bread recipe!
Success Strategies
We all mess up occasionally, right? So, here are some common mistakes to dodge:
- Forgetting to cover your dough while it rises is a no-no, as it forms a crust.
- Not testing doneness you don’t want to bite into a gooey mess after all that work, so check for that hollow sound.
And for those busy days, make-ahead options are your best friend. you can prep dough and freeze it for later.
Perfect for a quick easy bake bread no yeast option when the craving hits!
Wrapping It Up
So there you have it, folks! the road to professional cooking might feel challenging at times, but with these steps and techniques, you’ll get the hang of things quickly.
Next time you're tackling that hearty homemade white loaf bread, simply remember everything from preparation to baking. cooking is meant to be fun, so embrace the process and enjoy every bite!
Ready to carry on your culinary journey? In our next section, we’ll dive into even more fascinating cooking methods and tips to keep your kitchen life exciting!
Additional Recipe Information for Your Hearty Homemade White Loaf Bread
So, you’re ready to dive into the world of bread baking? super exciting! here’s the extra scoop on making that loaf of bread truly spectacular ! i’ve been through the ins and outs, and i’m here to share my personal insights.
Pro Tips & Secrets
Let’s get real, making bread can feel like a science project. But with a few pro tips , you'll be a bread wizard in no time!
Time Saving Techniques: If you’re in a crunch, try my favorite trick: mix the dough at night and let it rise in the fridge. It develops amazing flavors while you snooze!
Flavor Enhancement Tips: Wanna up your game? Add a pinch of garlic powder or herbs into that dough. Trust me, your friends will be banging on your door for dinner.
Presentation Advice: When you pull out that delightful loaf, give it a little dusting of flour before slicing. It’s like a classy outfit makes everything look better!
Perfect Presentation
Now, let’s talk about presentation . Word on the street is that we eat with our eyes first ! So, here are a few tricks to make your homemade bread shine.
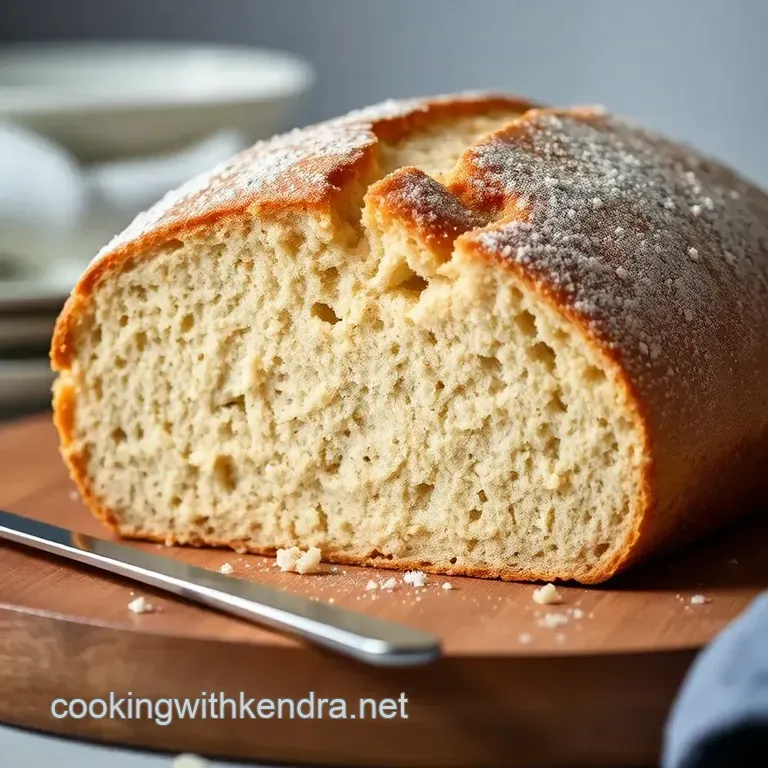
Plating Techniques: Slice your loaf and arrange it on a rustic wooden board. Maybe add a little bowl of olive oil on the side for dipping?
Garnish Ideas: Fresh herbs like rosemary or thyme can turn a simple loaf into a gourmet masterpiece. Just sprinkle a few on the side!
Color Combinations: We eat with our eyes, remember? Contrast is key. If your bread is golden brown, pair it with bright colored toppings like smashed avocado and cherry tomatoes!
Storage & make-ahead
Alright, let’s get practical. You’ve made your gorgeous loaf, now how do you keep it fresh? Here are some tips:
Storage Guidelines: Keep it in a bread bag or wrap it in cloth to avoid moisture. Bread loves comfy living!
Preservation Methods: If you want to keep it longer, slice it up and freeze it. Just pop it in the toaster when you’re craving some toast. Boom!
Reheating Instructions: To revive that warm, fresh out-of-the-oven flavor, place your slices directly in the toaster or warm them in a low oven for a few minutes.
Creative Variations
The beauty of this Hearty Homemade White Loaf ? You can play around with it like it’s a fun art project!
Flavor Adaptations: Wanna get fancy? Consider adding fresh fruit like apples or nuts for texture and a sweet surprise. Think No Yeast Sweet Bread !
Dietary Modifications: Making this for someone with dietary restrictions? Try using self rising flour instead of regular flour to keep things simple. It’s a game changer!
Complete Nutrition Guide
Let’s get down to health. What’s missing and making it a guilt free treat?
Health Benefits: Homemade bread is made from quality ingredients unlike store-bought options. You control what goes in, which means no preservatives!
Dietary Considerations: If you’re a health nut, consider adding seeds or whole grains for extra fiber.
Portion Guidance: A slice or two can fit easily into a balanced diet. Just be mindful if you're munching away while watching your favorite series!
Wrapping It Up
There you have it, my friends! making a loaf of bread is like a cozy hug for your stomach. from practical storage tips to dazzling presentation ideas, i hope you're ready to roll your sleeves up and bake that hearty homemade white loaf bread .
Don’t forget, with enough practice, you may even want to explore easy bake bread no yeast recipes next!
No matter what, just have a blast in the kitchen. Share it with family, or keep it all to yourself while watching your favorite show no judgment here! Go on, unleash your inner baker and turn that kitchen into a bread factory ! Happy baking!
Frequently Asked Questions
How do I know if my loaf of a bread is fully baked?
A perfectly baked loaf will have a golden brown top and sound hollow when tapped on the bottom. If you're unsure, use a thermometer; the internal temperature should be around 190°F (88°C).
What are some variations I can try with my loaf of a bread?
You can easily switch it up with ingredients like herbs for an herbed loaf, or substitute half of the white flour with whole wheat for a nuttier flavor. Adding seeds like sunflower or sesame can give it an extra crunch!
Can I store my loaf of a bread, and if so, how?
Absolutely! Once cooled, wrap your loaf in a kitchen towel and place it in a bread bag or wrap it in plastic. This will keep it fresh for a few days. If you want to store it longer, slice it and freeze it for up to three months!
What should I serve with a fresh loaf of a bread?
This bread pairs wonderfully with homemade jams or marmalade for breakfast. You could also enjoy it toasted with creamy avocado and poached eggs for a luxurious brunch. And let's not forget a warm bowl of hearty soup!
Is it necessary to use instant yeast for my loaf of a bread?
No worries if you don’t have instant yeast! You can substitute it with active dry yeast; just make sure to activate it in warm water for about 10 minutes before adding it to your dough. This will help it rise beautifully!
How can I make my loaf of a bread taste even better?
Consider adding a pinch of salt to your butter or even a bit of honey to the dough for enhanced flavor. You might also try sprinkling some herbs like rosemary or thyme into the mix for an aromatic touch!
Hearty Homemade White Loaf Bread
Ingredients:
Instructions:
Nutrition Facts:
| Calories | 130 |
|---|---|
| Fat | 2g |
| Fiber | 1g |
