How to Cook Beef Tenderloin: a Foolproof Roast
- Time:20 minutes active + 2 hours 15 mins cooking/resting = 215 minutes total
- Flavor/Texture Hook: Buttery, velvety interior with a salt crusted, herb infused exterior
- Perfect for: Holiday family dinners or a low stress weekend feast
- Learn how to cook beef tenderloin perfectly
- Why the Low Temperature Matters
- Understanding Your Beef Tenderloin Recipe Specifications
- Selecting the Best Ingredients and Substitutes
- Essential Kitchen Gear for Success
- Mastering the Core Cooking Steps
- Solving Common Problems and Avoiding Mistakes
- Flavor Variations and Creative Swaps
- Scaling for Large Parties
- Storage Tips and Zero Waste Ideas
- Presentation and Perfect Side Dishes
- Very High in Sodium
- Recipe FAQs
- 📝 Recipe Card
Learn how to cook beef tenderloin perfectly
There is nothing more heartbreaking than spending a small fortune on a beautiful center cut roast only to pull a gray, rubbery log out of the oven. We've all been there, hovering over the stove, poking the meat with a finger, and hoping for the best while the outside gets tough and the inside stays raw.
Most people think high heat is the answer to a good crust, but that's actually what causes the meat to seize up and lose those precious juices.
The real trick I learned after too many dry Sunday dinners is that moisture is the enemy of a good sear. If your meat is even slightly damp when it hits the pan, it steams instead of browning. This recipe fixes that problem with a simple dry brine and a reverse sear.
It’s the most forgiving way to handle such a lean, expensive cut because it gives you total control over the internal temperature without the guesswork.
You'll get a roast that looks like it came from a high end steakhouse, but without the stress of "is it done yet?" We're going to use low heat to gently bring the meat up to temperature, then finish with a heavy duty sear in a skillet.
It's a method that works whether you're a seasoned cook or taking your first crack at a big roast for the family.
Why the Low Temperature Matters
Understanding the mechanics behind the heat helps you stay confident while the meat is in the oven. It isn't just about cooking; it's about managing how the fibers in the beef react to the environment.
- Surface Evaporation: Cold air in the fridge pulls moisture from the surface, allowing the salt to penetrate deep into the fibers while leaving the outside bone dry for a better sizzle.
- Even Heat Distribution: Low oven temps prevent the outer layers from overcooking before the center reaches the target, eliminating that unappealing gray band.
- Enzymatic Tenderness: Slow roasting allows natural enzymes to work a little longer, subtly breaking down proteins for a more velvety mouthfeel.
- Carryover Control: Gentle heating means the internal temperature won't spike as aggressively once you pull it out, giving you a much tighter window of precision.
| Thickness | Internal Temp | Rest Time | Visual Cue |
|---|---|---|---|
| 2 inches | 120°F (49°C) | 15 mins | Warm red center |
| 3 inches | 120°F (49°C) | 15 mins | Consistent pink wall to wall |
| 4 inches | 120°F (49°C) | 15 mins | Succulent and juicy |
Providing this table early helps you decide when to pull the meat based on the specific cut you bought from the butcher. Since tenderloins vary in girth, the internal temperature is your only true North Star for success.
| Ingredient | Science Role | Pro Secret |
|---|---|---|
| Kosher Salt | Protein Denaturation | Use coarse grains to create tiny pockets of flavor and better moisture draw. |
| Avocado Oil | High Smoke Point | Prevents the oil from breaking down and tasting bitter during the over high heat sear. |
| Unsalted Butter | Fat Emulsion | Basting with butter at the end adds a silky coating that carries the herb aromatics. |
Understanding Your Beef Tenderloin Recipe Specifications
When you're planning a big meal, timing is everything. This recipe relies on a three step timeline: the dry brine, the slow roast, and the finish. If you're in a rush, you can skip the long brine, but you'll sacrifice that deep, mahogany crust that makes everyone's eyes light up when you bring the platter to the table.
| Feature | Classic Reverse Sear | Fast over High heat Method |
|---|---|---|
| Texture | Velvety and uniform | Firm with a chewy outer ring |
| Ease of Use | High (hard to overcook) | Low (requires constant checking) |
| Crust Quality | Shatter crisp and even | Often patchy or burnt |
This comparison shows why we stick to the classic reverse sear for "how to cook beef tenderloin" when it really matters. If you're interested in how other cuts handle high heat, you might want to see my Flank Steak recipe for a faster weeknight option. But for the tenderloin, the slow approach is king.
Chef's Tip: If your roast is uneven in thickness, tuck the thin "tail" under and tie it with kitchen twine. This ensures the entire log is a uniform cylinder so it cooks at the same rate.
Selecting the Best Ingredients and Substitutes
The ingredients here are simple because the meat is the star. We use a 4 lb center cut beef tenderloin, often called the Chateaubriand. It's the most tender part of the animal because that muscle doesn't do much heavy lifting.
Because it's so lean, we have to add fat back in the form of butter and oil during the searing phase.
- 4 lb center cut beef tenderloin: Trimmed and tied. Why this? The center cut provides the most uniform shape for even cooking.
- 2 tbsp kosher salt: Why this? Coarse salt draws out moisture then re absorbs, seasoning the meat deeply.
- 1 tbsp coarse black pepper: For a pungent, spicy bite on the crust.
- 1 tsp garlic powder: Adds an umami base without burning like fresh garlic in the oven.
- 2 tbsp avocado oil: over High heat stable for the initial sear.
- 3 tbsp unsalted butter: Used for the final aromatic basting.
- 3 sprigs fresh rosemary: Provides a woody, pine like aroma.
- 5 sprigs fresh thyme: Adds a subtle earthy sweetness.
- 4 cloves garlic, smashed: Infuses the butter during the pan sear.
| Original Ingredient | Substitute | Why It Works |
|---|---|---|
| Avocado Oil | Grapeseed Oil | Both have high smoke points (above 400°F) which prevents kitchen smoke. |
| Fresh Rosemary | Fresh Sage | Sage offers a similar earthy, robust profile that stands up to beef. |
| Kosher Salt | Sea Salt (Flaky) | Use 1.5 tbsp instead of 2 tbsp; provides a clean salty finish. |
Using high-quality salt is non negotiable here. I prefer Diamond Crystal because the hollow flakes stick to the meat better than dense table salt. If you have extra drippings after searing, they make an incredible base for a Beef Gravy recipe that will have your family licking their plates.
Essential Kitchen Gear for Success
You don't need a professional kitchen, but a few specific tools will make your life much easier. The most important is a digital probe thermometer. Trying to guess the doneness of a $100 piece of meat by "feel" is a recipe for anxiety.
- Cast iron skillet: This holds heat better than stainless steel, giving you that dark, even crust in seconds.
- Wire rack and rimmed baking sheet: This allows air to circulate under the meat, ensuring the bottom doesn't get soggy.
- Digital meat thermometer: Preferably one with a wire that stays in the meat while it's in the oven.
- Kitchen twine: Essential for shaping the roast into a uniform cylinder.
If you don't have a cast iron skillet, a heavy bottomed stainless steel pan will work, but you may need to add a bit more oil to prevent sticking. Just avoid non stick pans at all costs for this recipe; they can't handle the heat needed for a proper sear and won't give you that beautiful brown color.
Mastering the Core Cooking Steps
Follow these steps closely to ensure your beef tenderloin turns out succulent and perfectly pink from edge to edge.
- Pat the beef tenderloin completely dry with paper towels. Note: This is the most important step for a good crust.
- Combine kosher salt, black pepper, and garlic powder in a small bowl. Coat the beef generously on all sides with the seasoning mix.
- Place the seasoned meat on a wire rack set over a rimmed baking sheet. Refrigerate uncovered for at least 2 hours, or up to 24 hours. Note: This "dry brines" the meat, making it more tender.
- Preheat oven to 225°F (107°C). Insert a digital meat thermometer into the thickest part of the roast.
- Place the baking sheet in the oven and roast until the internal temperature reaches 120°F (49°C) for medium rare. This usually takes 50 to 70 minutes.
- Heat avocado oil in a large cast iron skillet over high heat until shimmering and slightly smoking.
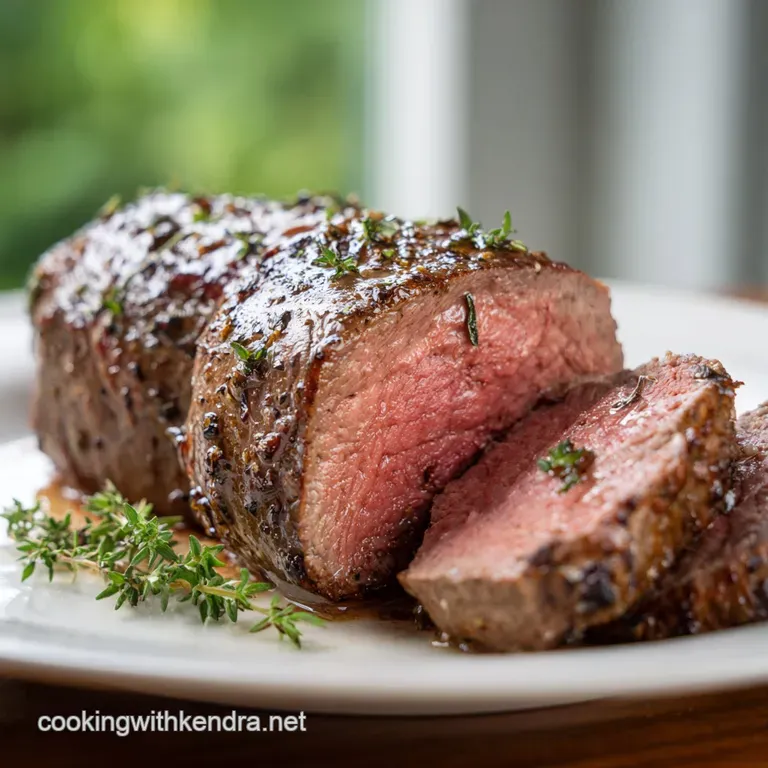
- Sear the beef for 1-2 minutes per side until a deep brown crust forms. Don't forget the ends!
- Reduce heat slightly and add butter, rosemary, thyme, and smashed garlic to the pan.
- Use a spoon to continuously baste the melted aromatic butter over the beef for the final 2 minutes. You should hear a gentle sizzle.
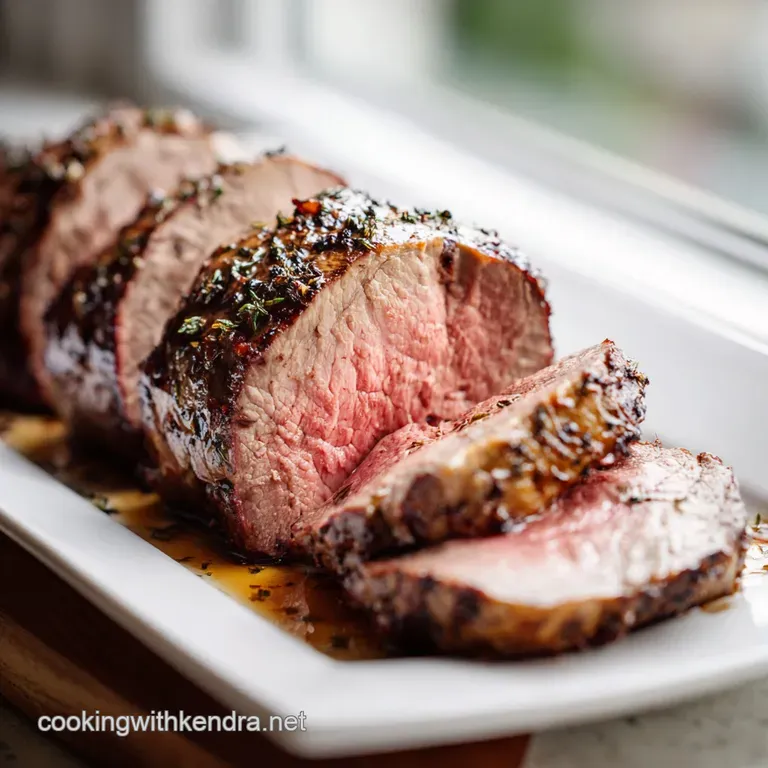
- Transfer to a cutting board and let it rest for 15 minutes. The juices will redistribute, making every bite velvety.
Solving Common Problems and Avoiding Mistakes
Even with a simple method, things can go sideways if you're not paying attention. The most common issue is the "carryover" cook, where the meat continues to rise in temperature after you pull it out of the heat.
Why Your Beef is Tough
If the meat feels chewy rather than tender, it usually means it was cooked too fast at a high temperature, or it wasn't allowed to rest. When meat is shocked by high heat, the muscle fibers tighten and squeeze out moisture. The resting period allows those fibers to relax and re absorb the juices.
Why the Crust is Pale
A pale crust is almost always caused by moisture. If the meat wasn't dried properly or if the pan wasn't hot enough, the beef will boil in its own juices. Make sure that avocado oil is shimmering before the meat ever touches the skillet.
| Problem | Root Cause | Solution |
|---|---|---|
| Gray ring under the crust | Oven temp too high | Keep the oven at 225°F (107°C) for a gentle, even cook. |
| Butter is burning | Heat is too high during basting | Lower the flame slightly before adding the butter and herbs. |
| Meat is cold in the center | Didn't use a thermometer | Always use a probe to ensure the center hits exactly 120°F (49°C). |
Common Mistakes Checklist
- ✓ Forgot to pat the meat dry (leads to steaming).
- ✓ Using table salt instead of kosher (makes it too salty).
- ✓ Skipping the wire rack (bottom gets soggy).
- ✓ Cutting the meat immediately (juices run out on the board).
- ✓ Overcrowding the skillet with too many herbs (drops the pan temp).
Flavor Variations and Creative Swaps
Once you've mastered the basic "how to cook beef tenderloin" method, you can start playing with the aromatics. The base technique stays the same, but the flavor profile can shift to suit your mood or the occasion.
If you want a deeper flavor, do this: Add 1 tsp of porcini mushroom powder to your spice rub for an intense earthy boost. Swap the butter for tallow or duck fat during the sear for a richer, meatier finish. Deglaze the pan with a splash of red wine after searing to create a quick pan sauce.
The Umami Bomb Variation
Mix 1 tbsp of Worcestershire sauce with 1 tsp of Dijon mustard and brush it onto the meat after the dry brine but before it goes into the oven. This creates a tacky surface that holds onto the pepper and garlic powder even better, resulting in a crust that is savory, tangy, and deeply browned.
The dairy-free Herb Paste
If you need to avoid butter, create a paste using 3 tbsp of olive oil, minced rosemary, thyme, and garlic. Rub this over the meat during the final 5 minutes of roasting in the oven.
You won't get the same "basted" finish, but the herbs will toast beautifully and provide plenty of flavor without the milk solids.
Scaling for Large Parties
When you're doubling this recipe for a big crowd, don't just double the time. Two roasts in the oven will take slightly longer than one because they absorb more of the heat, but they won't take twice as long.
- Scaling Up (2x): Use two separate rimmed baking sheets if possible. If you must use one large sheet, ensure there is at least 3 inches of space between the roasts. If they are too close, they will steam each other.
- Scaling Down (1/2): For a small 2 lb roast, reduce the roasting time check to 35 minutes. The internal temperature remains the same (120°F/49°C).
- Timing Tip: When cooking multiple roasts, pull each one out as it hits the target temp. They likely won't finish at the exact same second.
Storage Tips and Zero Waste Ideas
Leftover beef tenderloin is a gift. It stays tender even when cold, making it perfect for the next day's lunch. However, reheating it is a delicate process because you don't want to turn that medium rare pink into a sad, overcooked gray.
- Fridge: Store in an airtight container for up to 3 days. To keep it moist, wrap the sliced medallions tightly in foil.
- Freezer: You can freeze cooked tenderloin for up to 2 months. Thaw it slowly in the fridge overnight before using.
- Zero Waste: Don't throw away the herb infused butter left in the pan! Strain it into a small jar and keep it in the fridge. It's incredible for frying eggs the next morning or tossing with roasted potatoes.
- Leftover Idea: Slice cold leftovers very thin and serve on toasted baguette with a smear of horseradish cream and pickled red onions.
Presentation and Perfect Side Dishes
The beauty of a beef tenderloin is its elegance. To serve, remove the twine and slice the meat into thick, 1 inch medallions. Arrange them on a warmed platter, slightly overlapping, and pour any juices from the resting board back over the meat.
This roast pairs naturally with classic comfort foods. Think silky mashed potatoes, honey glazed carrots, or a crisp green salad with a sharp vinaigrette to cut through the richness of the beef.
Because the meat is so tender, you want sides that offer a bit of texture roasted Brussels sprouts with crispy bacon or a crusty loaf of sourdough are my go to choices.
Remember, the goal is to let the beef shine. Don't smother it in heavy sauces unless they are light and bright. A simple chimichurri or a classic red wine reduction is all you need to take this from a great family meal to a legendary one.
Trust the process, watch that thermometer, and you'll have a succulent roast that everyone will be talking about for weeks.

Very High in Sodium
1420 mg 1420 mg of sodium per serving (62% 62% of daily value)
The American Heart Association recommends limiting sodium intake to about 2,300mg per day, with an ideal limit of less than 1,500mg per day for most adults.
Tips to Reduce Sodium in Your Beef Tenderloin Recipe
-
Drastically Reduce Kosher Salt-25%
The 2 tbsp of kosher salt is the primary sodium contributor. Try reducing this to 1 tsp. This single change will significantly lower the overall sodium content.
-
Boost Fresh Herbs and Spices
While not adding sodium, fresh rosemary, thyme, and garlic powder provide immense flavor. Don't reduce or omit these. Consider adding more garlic powder or even finely minced fresh garlic for extra savory notes without salt.
-
Use Black Pepper Generously
The 1 tbsp of coarse black pepper adds a pleasant kick. Ensure you're using fresh, coarsely ground pepper to maximize its aromatic and slightly pungent flavor, compensating for reduced salt.
-
Use Unsalted Butter
You're already using unsalted butter, which is excellent! Continue to use unsalted varieties for cooking and finishing to avoid adding hidden sodium.
-
Amplify Garlic Flavor
The 4 smashed garlic cloves offer a robust flavor. Consider mincing them finer or even roasting them beforehand to intensify their sweetness and savory notes, which can help offset the lack of salt.
Recipe FAQs
What is the best method to cook a beef tenderloin?
Reverse searing is the superior method. By roasting the meat slowly at 225°F (107°C) before finishing with a high heat cast iron sear, you ensure edge-to-edge pink doneness without a gray band of overcooked meat.
How long should a tenderloin be cooked?
Plan for 50 to 70 minutes of roasting time. Always use a digital meat thermometer to pull the roast from the oven at 120°F (49°C), as the total time depends heavily on the specific thickness of your center cut roast.
Is it better to cook beef tenderloin fast or slow?
A slow roast followed by a fast sear provides the best texture. If you enjoyed mastering the precise temperature control needed for this roast, you can apply those same sensory doneness cues to our Classic Beef Carpaccio for equally consistent results.
What are some common mistakes to avoid when cooking beef tenderloin?
Skipping the dry-brine or failing to pat the meat dry are the biggest errors. Moisture on the surface prevents a proper crust from forming during the searing stage, so refrigerating the seasoned meat uncovered for at least 2 hours is essential.
How to ensure the beef remains tender after refrigeration?
Wrap sliced medallions tightly in foil before placing them in an airtight container. This creates a barrier against the cold air in your refrigerator, preventing the meat from drying out for up to 3 days.
Is it necessary to remove the twine before cooking?
No, keep the twine on during the roasting and searing process. The twine holds the center cut tenderloin in a uniform cylinder, which ensures the meat cooks evenly throughout; only remove it after the 15-minute resting period.
How to achieve a deep brown crust on the exterior?
Use a cast iron skillet heated with avocado oil until it is shimmering. Searing for just 1-2 minutes per side creates the Maillard reaction needed for flavor, followed by basting with butter, rosemary, thyme, and smashed garlic for the final 2 minutes.
How To Cook Beef Tenderloin

Ingredients:
Instructions:
Nutrition Facts:
| Calories | 382 kcal |
|---|---|
| Protein | 46g |
| Fat | 21g |
| Carbs | 1.2g |
| Fiber | 0.3g |
| Sugar | 0.1g |
| Sodium | 1420mg |
