The Nofuss Fudge Peanut Butter Bomb Cake
- Unveiling the Decadent Peanut Butter Bomb Cake Phenomenon
- Why This Recipe Replaces Every Other Chocolate Dessert
- Essential Components for Peak Flavor Saturation
- Sourcing Your Superior Peanut Butter Components
- Mastering the Technique: Step-by-Step Assembly Guide
- Baking and Cooling Protocols for Structural Integrity
- Optimizing Your Peanut Butter Bomb Cake Experience
- Storage Strategies to Preserve Day-One Freshness
- Recipe FAQs
- 📝 Recipe Card
Unveiling the Decadent Peanut Butter Bomb Cake Phenomenon
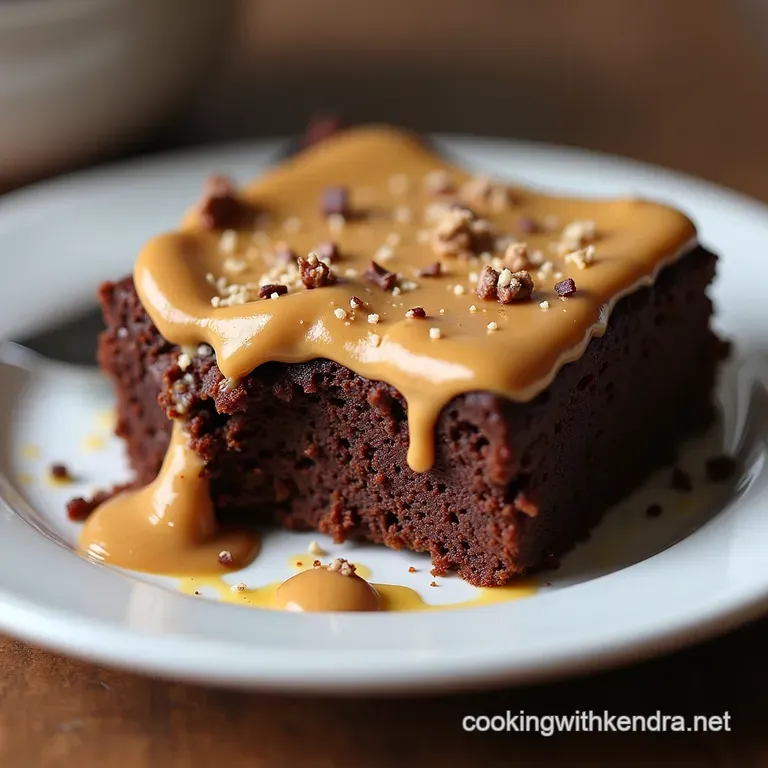
There are certain desserts that tap directly into our deepest cravings the rich, salty sweet intersection that only a perfect peanut butter creation can achieve. Today, we are diving headfirst into crafting what I confidently call the Peanut Butter Bomb Cake .
This isn't just a layered cake; it's an experience, a monument to indulgence built upon a foundation of deep, moist chocolate. Forget everything you thought you knew about standard peanut butter squares; this is the ultimate evolution, turning familiar comfort into a truly Showstopper Peanut Butter Cake .
We’ve refined the process to ensure you achieve that spectacular result without needing professional pastry training.
Why This Recipe Replaces Every Other Chocolate Dessert
What sets this particular iteration apart is its textural layering. It achieves a harmony of soft, rich chocolate cake, an intensely flavoured, almost fudge like peanut butter core, and a smooth, sharp chocolate topping.
It promises an unforgettable flavour profile that moves beyond the simple sweetness of standard grocery store sheet cakes. This Chocolate Peanut Butter Bomb Cake delivers intensity in every bite.
The Nostalgia Factor: Elevated for Today's Palate
Many of us grew up with simple peanut butter treats, often dense and heavily reliant on powdered sugar. This Peanut Butter Explosion Cake Recipe , however, respects that nostalgia while elevating the quality.
We use Dutch processed cocoa for a deeper chocolate note and balance the filling with high-quality peanut butter, ensuring the final product is sophisticated, not childish. It’s a tribute to those classic flavours, executed with modern precision.
A Showstopper That Won't Keep You Trapped in the Kitchen
Despite its impressive presentation, achieving this cake is far more accessible than it appears. While it involves three distinct phases the cake, the filling, and the glaze each step is straightforward and designed for efficiency.
Our goal is to deliver a Decadent Peanut Butter Dessert that appears complex but respects the home baker’s time, making the 45 minutes of active prep time well worth the stunning final reward.
Defining the 'Bomb' in Peanut Butter Bomb Cake Texture
The 'Bomb' nomenclature refers primarily to the filling. It’s not a light frosting; it’s a dense, creamy, intensely flavoured layer that holds its structure beautifully against the tender cake.
When you bite into this Easy Peanut Butter Bomb Cake , the richness of the filling should provide a delightful, almost solid counterpoint to the airy sponge below. This specific texture is achieved through careful whipping and the precise ratio of fats to dry ingredients in the filling stage.
Essential Components for Peak Flavor Saturation
To ensure your cake lives up to its bombastic name, sourcing the right Peanut Butter Bomb Ingredients is crucial. We’re not just throwing things together; we are strategically selecting elements that cooperate to create a supremely moist final product.
From the depth of the cocoa to the tang of the buttermilk in the cake base, every choice matters in creating one of those truly Yummy Peanut Butter Sweets .
Sourcing Your Superior Peanut Butter Components

The star ingredient demands attention. For the filling, we rely on creamy peanut butter ideally one that is smooth and rich, not overly oily or brittle after refrigeration. While specific brand loyalty is personal, consistency is key here.
For the best results in our Homemade Peanut Butter Recipes , avoid natural, separated peanut butters for the filling, as their higher oil content can cause separation when beaten with the butter and sugar.
The Dry Goods Checklist: Foundation of the Chocolate Base
The cake itself needs to be robust enough to support the heavy filling without collapsing. This means balancing leavening agents carefully. You'll be combining all-purpose flour with granulated sugar, ensuring the sweetness is integrated evenly.
Crucially, the combination of baking soda and baking powder must be fresh, as they react with the buttermilk and hot coffee to give the cake its lift and signature open crumb. Don't skimp on the unsweetened cocoa powder; Dutch processed cocoa provides a smoother, darker background flavour that allows the peanut butter to truly shine in this Peanut Butter Bomb Cake Recipe .
Creamy Fats and Sweeteners: Achieving the Perfect Ratio
In the filling, the marriage between softened unsalted butter and the main peanut butter component establishes the texture. The confectioners' sugar must be sifted meticulously. If it’s lumpy, your creamy layer will be gritty, not smooth.
The small addition of cold heavy cream helps bind the mixture into a spreadable consistency without making it too soft before chilling.
Specialized Tools to Guarantee Cake Perfection
While you can mix by hand, this Peanut Butter Bomb Cake Recipe benefits significantly from the power of an electric mixer for the filling. Whipping the peanut butter and butter mixture correctly introduces air, making the filling lighter and less overwhelmingly dense.
On top of that,, having a 9 inch round cake pan with deep sides is highly recommended, as the batter will be quite thin once the hot coffee is added.
Related Recipes Worth Trying
- Ultimate Pumpkin Pie Swirl Coffee Cake with Crunchy Streusel — Forget pie crusts This Pumpkin Pie Coffee Cake recipe swirls spiced filling into a tender crumb topped with a buttery streusel Perfect for your best...
- The Secretly Moist Pudding Poke Carrot Cake Recipe — Stop serving dry bakes This Carrot Poke Cake Recipe uses pudding for ultimate moisture topped with classic cream cheese frosting The ultimate sweet treat
- Showstopper Almond Joy Cake Recipe Chocolate Coconut Bliss — Make the ultimate Homemade Almond Joy Cake from scratch This moist chocolate cake features creamy coconut filling and rich ganache Easy to assemble
Mastering the Technique: step-by-step Assembly Guide
Organisation is your best friend when tackling a multi component bake. We divide this into three distinct, manageable phases: baking the base, preparing the filling while the cake cools, and finally, the assembly and glazing.
Following these steps sequentially ensures that each layer is at the correct temperature and consistency before the next layer is added.
Baking and Cooling Protocols for Structural Integrity
The integrity of this cake relies heavily on the correct baking and cooling phases. Rushing either part can lead to a dome top, sinking centres, or crumbling edges, which complicate the final frosting stage.
Whipping Up the Tender Chocolate Cake Batter
The process begins by combining the dry elements, followed by the liquid components, ensuring the eggs and buttermilk are at room temperature for seamless emulsification. The secret weapon here is the hot, strong coffee.
Adding this boiling liquid last thins the batter considerably, leading to an exceptionally moist crumb structure. Do not be alarmed by the thinness; it’s exactly what we want for a tender base to support the heavy Peanut Butter Bomb Cake .
Constructing the Signature Creamy Peanut Butter Layer
As the cake cools, switch your focus to the filling. Beat the softened butter and peanut butter until they lighten considerably. This is where you introduce air. Gradually incorporate the sifted icing sugar, alternating with just enough heavy cream to keep the mixer running smoothly.
This method prevents the sugar from flying out of the bowl and ensures the resulting texture is smooth, rich, and spreadable the very definition of a Peanut Butter Explosion Cake Recipe .
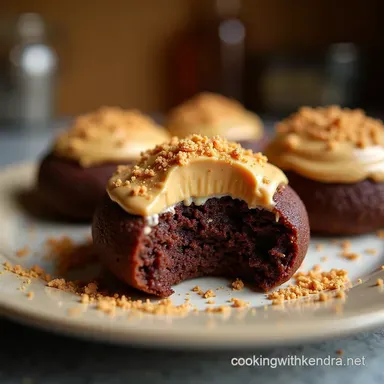
The Final Bomb: Glazing and Chill Time Secrets
Once the cake is cool and generously topped with the peanut butter layer, it must chill. This chilling period at least 30 minutes is non-negotiable. It firms up that creamy layer so it doesn't yield or melt when the warm chocolate glaze hits it.
The glaze itself is a simple ganache structure, slightly thickened with an extra tablespoon of butter for sheen. Pour it evenly, allowing gravity to guide the drips, then allow the entire structure to set in the refrigerator for at least an hour so that the final slices cut cleanly.
Optimizing Your Peanut Butter Bomb Cake Experience
Once assembled, your cake is a masterpiece, but a few final considerations will enhance its lifespan and presentation. Think of these as the finishing touches that elevate a great cake to an unforgettable one.
Storage Strategies to Preserve Day-One Freshness
Because this Peanut Butter Bomb Cake contains a rich, dairy based filling, airtight storage is essential. Keep the cake covered tightly in the refrigerator. Stored properly, it remains perfectly fresh and moist for up to four days.
Always allow slices to sit at room temperature for about 15– 20 minutes before serving, as this allows the chocolate glaze and the filling to soften slightly, maximising flavour release.
Expert Troubleshooting for Common Baking Hurdles
If your cake dome cracked significantly during baking, don’t worry; the dome will be removed when you level the top before filling. If your peanut butter filling seems too stiff after mixing, add an extra teaspoon of cream at a time until it reaches a smooth, spreadable consistency.
If the chocolate glaze sets too quickly in the bowl, gently warm the entire bowl over a pan of hot water for just a few seconds, stirring constantly until it’s fluid enough to pour again.
Flavor Twists: Adding Salted Caramel or Coffee Notes
To introduce complexity, consider dissolving a teaspoon of instant espresso powder into the hot coffee used for the cake batter; this deepens the chocolate complexity without adding coffee flavour.
Alternatively, if you are a salted caramel aficionado, drizzle a thin layer of store-bought salted caramel sauce over the peanut butter filling before applying the chocolate glaze. This combination creates a truly next level experience in your Peanut Butter Bomb Cake Recipe .
Approximate Nutritional Snapshot (Per Slice Estimate)
While this is undeniably a rich treat, it's helpful to know where you stand. Based on 14 generous servings, expect this dessert to land around 450 to 500 calories per slice, with significant portions of fat and carbohydrates, reflecting the dense nature of the filling and rich cake base.
This is a celebration bake, perfect for enjoying occasionally!
The Ideal Serving Temperature for Maximum Impact
For the best sensory experience, serve this cake slightly cool, but not straight from the deep chill of the refrigerator. A cake that has rested on the counter for 15 to 20 minutes achieves the perfect state where the chocolate glaze offers a slight snap, the peanut butter filling is creamy and yielding, and the chocolate sponge remains wonderfully tender.
Enjoy every bite of this supreme Peanut Butter Bomb Cake !

Recipe FAQs
I’m not a seasoned baker; is the "Peanut Butter Bomb Cake" too tricky for a beginner?
Not at all! While this recipe has three components cake, filling, and glaze none of the individual steps are terribly complicated. Think of it like a Coronation Street plot: lots going on, but easy enough to follow if you keep track of the different storylines (or layers!).
Just ensure you let everything cool properly, and you'll smash it.
My peanut butter filling seems a bit stiff after chilling; how can I soften it before serving?
That’s perfectly normal; that filling sets up beautifully firm, which is why it holds the glaze so well. To serve, just take the cake out of the fridge about 45 minutes before you plan to slice it.
This brief resting period at room temperature allows the butter in the filling to soften just enough so it spreads beautifully when cut, rather than crumbling.
Can I make this Peanut Butter Bomb Cake ahead of time, and how should I store leftovers?
Absolutely, making it ahead is often best! You can assemble the entire cake a day in advance, provided you keep it covered tightly in the refrigerator. Leftovers are best stored in an airtight container in the fridge for up to four days; it remains moist, though it might firm up slightly like a good fridge cake.
I don't have buttermilk; what's a decent substitute for the chocolate cake base?
Don't panic if you've run out of buttermilk it happens to the best of us! The simplest fix is to create a substitute: measure out 1 cup of whole milk and stir in one tablespoon of white vinegar or fresh lemon juice.
Give it a quick stir and let it sit for about five minutes until it looks slightly curdled; that acidity is key for reacting with the baking soda.
I prefer a less sweet dessert; can I dial down the sugar in the Peanut Butter Bomb Cake?
You certainly can try, but be strategic about where you reduce it. For the chocolate cake base, reducing sugar by about 1/4 cup is usually fine, but don't touch the sugar in the peanut butter filling or glaze too much, as the sugar is crucial for texture there.
Alternatively, using bittersweet chocolate chips in the glaze will naturally cut the overall sweetness nicely.
Peanut Butter Bomb Cake
Ingredients:
Instructions:
Nutrition Facts:
| Calories | 311 kcal |
|---|---|
| Protein | 4.1 g |
| Fat | 23.3 g |
| Carbs | 30.5 g |
| Fiber | 0.8 g |
| Sodium | 187 mg |
