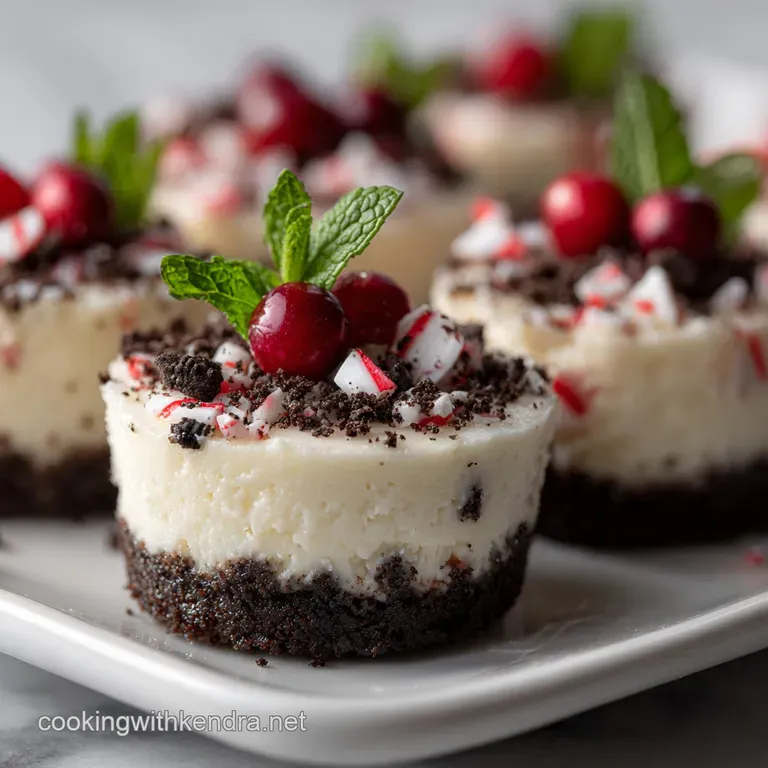
Peppermint Cheesecakes Recipe with Oreo Crust

- Time: Active 20 minutes, Passive 20 minutes, Total 40 minutes
- Flavor/Texture Hook: Shatter crisp chocolate base with a silky, cool mint finish
- Perfect for: Holiday parties, Christmas dessert tables, or small batch weekend treats
- Science Behind The Creamy Texture
- Essential Numbers For Baking Success
- Essential Ingredients For Holiday Flavor
- Kitchen Tools For Smooth Filling
- Master The Simple Baking Steps
- Solving Common Festive Baking Errors
- Creative Swaps For Different Diets
- Storing And Freezing Festive Leftovers
- Garnishes For A Pretty Presentation
- Answering Your Peppermint Baking Questions
- Debunking Common Baking Myths
- Recipe FAQs
- 📝 Recipe Card
Can you smell that? It’s the scent of crushed candy canes and sweet cream filling the kitchen, and honestly, it’s better than any candle you can buy. I used to be so intimidated by cheesecake - the cracks, the water baths, the long waiting times - but this Peppermint Cheesecakes Recipe changed the game for me.
It’s a holiday hug in a cupcake liner, and because they’re individual portions, you don't have to worry about the dreaded "center slump."
I remember the first time I made these for a neighborhood cookie swap. I was so nervous about the texture, but the moment I saw my friends' eyes light up after that first bite, I knew I’d found a winner. The contrast between the dark, slightly salty Oreo base and the bright peppermint is just irresistible.
It’s a Southern style comfort bake that brings out the kid in everyone, reminding us of those peppermint barks we used to sneak from the pantry.
We’re going to walk through this together, step-by-step, so you can skip the mistakes I made (like using cold cream cheese - don't do it!). You’re going to end up with something so much better than a store-bought tray. These little beauties are rich, soulful, and exactly what your holiday spread is missing.
Let's get the oven preheated and get to work.
Science Behind The Creamy Texture
When we talk about the chemistry of this Peppermint Cheesecakes Recipe, we are really talking about managing proteins and fats to create a stable emulsion. The Philadelphia cream cheese provides the fat and bulk, while the large eggs act as the structural glue that holds everything together as the heat rises.
- Protein Coagulation: Eggs contain proteins that uncoil and then link together when heated, turning a liquid batter into a solid, yet tender, dessert.
- Lactic Acid Tenderizing: The sour cream adds acidity which helps to weaken the milk proteins in the cream cheese, resulting in a much softer, more velvety mouthfeel than using cheese alone.
- Emulsification Stability: Fat molecules from the heavy whipping cream and full fat cheese are suspended in water; keeping ingredients at room temperature ensures these molecules don't "crash" or separate during mixing.
- Sugar Hygroscopy: The granulated white sugar doesn't just sweeten the dish, it actually grabs onto water molecules, preventing the cheesecake from drying out and cracking in the oven's dry heat.
Essential Numbers For Baking Success
To get that professional finish on your Peppermint Cheesecakes Recipe, you need to hit specific markers. Baking is a science, and these checkpoints ensure you aren't guessing when the timer beeps.
| Checkpoint | Measurement | Target Outcome |
|---|---|---|
| Internal Temperature | 74°C (165°F) | Ensures eggs are safe and structure is set without overcooking |
| Mixing Speed | Level 2 (Low) | Prevents whipping too much air into the batter, which causes cracks |
| Cooling Time | 2 hours (Minimum) | Allows the fats to re solidify for a clean, non mushy bite |
Stovetop vs Oven Comparison
While some folks try to steam cheesecakes on a stovetop, the oven provides the consistent, dry heat needed for a crisp Oreo base.
| Method | Texture | Effort Level |
|---|---|---|
| Oven Bake | Crispy crust, firm yet creamy center | Low - Set it and forget it |
| Stovetop Steam | Soft, soggy crust, custard like center | High - Requires constant monitoring |
Essential Ingredients For Holiday Flavor
The soul of this dish lies in the quality of your components. Don't reach for the low-fat stuff here, sugar. We want the full fat, rich experience that only high-quality dairy can provide.
Component Analysis
| Ingredient | Science Role | Pro Secret |
|---|---|---|
| Full fat Cream Cheese | Provides the primary structural matrix | Use Philadelphia brand for the most consistent water to fat ratio |
| Large Eggs | Acts as a binding agent via protein denaturation | Add them one at a time to ensure they fully emulsify without streaks |
| Peppermint Extract | Delivers the volatile aromatic compounds | A little goes a long way; measure carefully to avoid a "toothpaste" flavor |
The Building Blocks
- 15 standard Oreo cookies: These provide the dark, cocoa rich base. Why this? The filling in the cookies adds extra sweetness and binding to the crust.
- 3 tbsp Unsalted butter, melted: Holds the crumbs together. Why this? Unsalted allows you to control the exact saltiness with sea salt.
- 1/8 tsp Fine sea salt: Balances the sugar. Why this? Sea salt dissolves faster than kosher salt in fatty batters.
- 16 oz Full fat cream cheese: The heart of the cheesecake. Why this? low-fat versions contain too many fillers and will result in a watery mess.
- 0.5 cup Granulated white sugar: For sweetness and moisture.
- 0.5 cup Full fat sour cream: Adds tang and a velvety finish.
- 2 Large eggs: Provides the lift and set.
- 1 tsp Pure peppermint extract: The star flavor. For a different twist, you could try the Minty Bliss recipe which uses creme de menthe for a deeper green hue.
- 0.5 tsp Vanilla bean paste: Adds warmth. Why this? The little black flecks look beautiful and the flavor is more intense than extract.
- 0.25 cup Candy canes, pulverized: Folded into the batter for bursts of mint.
Kitchen Tools For Smooth Filling
You don't need a professional bakery to make a stunning Peppermint Cheesecakes Recipe, but having the right tools makes the process feel like a breeze instead of a chore.
- KitchenAid Stand Mixer: This is the gold standard for getting a lump free batter. Use the paddle attachment, not the whisk, to avoid adding too much air.
- Nordic Ware Muffin Pan: A heavy gauge aluminum pan ensures the heat distributes evenly so the outer edges don't burn before the centers set.
- Food Processor: Essential for turning those Oreos into a fine, sandy dust. If you don't have one, a rolling pin and a sturdy bag will work, but it’s a bit of a workout!
- Rubber Spatula: You’ll need this to scrape the very bottom of the bowl. Trust me, there’s always a lump of unmixed cheese hiding down there.
Master The Simple Baking Steps
Follow these steps closely, and you'll have a dessert that looks like it came from a high end bistro. We are aiming for layers of flavor, starting from that crunchy base all the way to the fluffy whipped topping.
Pulverizing the Oreo Base
- Pulse the cookies. Place 15 Oreo cookies into your food processor and blend until they look like dark sand. Note: Keep the cream filling in the cookies for better flavor.
- Combine with butter. Stir in 3 tbsp melted butter and 1/8 tsp sea salt until the mixture feels like wet sand.
- Press into liners. Put about one tablespoon into each muffin liner and press down firmly with the bottom of a small glass. until the surface is flat and compacted.
Whipping the Velvety Filling
- Cream the cheese. Beat 16 oz cream cheese and 0.5 cup sugar on medium speed until smooth and shimmering. This usually takes about 3 minutes.
- Add the liquids. Mix in 0.5 cup sour cream, 1 tsp peppermint extract, and 0.5 tsp vanilla bean paste. Note: Scrape the sides of the bowl to ensure no white lumps remain.
- Incorporate eggs slowly. Add 2 eggs one at a time, mixing on the lowest speed until just combined and yellow streaks disappear.
- Fold in candy. Gently stir in 0.25 cup pulverized candy canes by hand. This is similar to the gentle mixing in My Delightfully Fast recipe for a traditional cheesecake.
Mastering the Low and Slow Bake
- Fill the tins. Spoon the batter over the Oreo crusts, filling them almost to the top.
- Bake with care. Bake at 160°C (325°F) for 20 minutes until the edges are set but the centers still jiggle slightly like Jell O.
- Cool and set. Let them sit in the pan for 15 minutes, then move to a wire rack. Chill in the fridge for at least 2 hours until cold and firm to the touch.
- Garnish and serve. Top with whipped cream (made from 0.5 cup heavy cream and 2 tbsp powdered sugar) and sprinkle with peppermint bark and crushed candy canes.
Solving Common Festive Baking Errors
Even the best of us run into trouble sometimes. Cheesecake is temperamental, but most problems have a very simple root cause that we can fix before the next batch.
Preventing The Sunken Center
When your cheesecakes look like little craters, it's usually because you whipped too much air into the batter. That air expands in the heat and then collapses as it cools. Always use low speed once you add the eggs.
Fixing Rubbery Texture
If your Peppermint Cheesecakes Recipe feels more like a bouncy ball than a creamy dream, you've likely overbaked them. Remember the "jiggle" rule! The center should not be solid when you pull them out of the oven; carryover cooking will finish the job as they cool.
Troubleshooting Table
| Problem | Cause | Fix | Pro Tip |
|---|---|---|---|
| Cracked tops | Sudden temp change | Leave oven door ajar 10 mins after baking | Don't peek during the bake! |
| Lumpy batter | Cold ingredients | Use room temp cheese and eggs | Microwave cheese for 15s if desperate |
| Stuck liners | Not enough fat in crust | Use high-quality paper or foil liners | Lightly spray the liners with oil |
Creative Swaps For Different Diets
We want everyone at the table to enjoy a piece of this Peppermint Cheesecakes Recipe, so here are a few ways to tweak things without losing that soulful flavor.
Ingredient Swaps
| Original Ingredient | Substitute | Why It Works |
|---|---|---|
| Oreo Cookies | gluten-free Chocolate Sandwiches | Same cocoa punch. Note: May need 1 tsp extra butter as GF cookies are drier. |
| Sour Cream | Full fat Greek Yogurt | Similar acidity and fat. Note: Adds a slightly sharper tang to the finish. |
| Granulated Sugar | Coconut Sugar | Adds a caramel undertone. Note: Will turn the filling a light tan color. |
Decision Shortcut
- For a lighter feel: Swap the sour cream for Greek yogurt.
- For a kid friendly version: Use double the amount of peppermint bark on top.
- For an elegant twist: Try the Decadent Salted Caramel recipe as a base and add a drop of peppermint oil to the caramel sauce.
Storing And Freezing Festive Leftovers
Cheesecake is the ultimate make-ahead dessert because it actually tastes better after a day in the fridge. The flavors have time to marry, and the peppermint really starts to sing.
- Fridge: Keep these in an airtight container for up to 5 days. The Oreo crust might soften slightly over time, but the flavor remains top notch.
- Freezer: These freeze beautifully! Wrap individual cheesecakes (without the whipped cream topping) in plastic wrap and then foil. They stay fresh for up to 3 months. Thaw in the fridge overnight before serving.
- Zero Waste: If you have leftover Oreo crumbs, don't toss them! Sprinkle them over vanilla ice cream or mix them into your morning yogurt for a little treat. Leftover candy canes can be stirred into hot cocoa for a peppermint mocha vibe.
Garnishes For A Pretty Presentation
Presentation is half the battle during the holidays. You want these to look as good as they taste!
- The Peppermint Bark: Roughly chop 0.5 cup of peppermint bark. The uneven chunks give it a rustic, "homemade with love" look.
- The Whipped Cream: Always use chilled heavy whipping cream. Beat it until stiff peaks form so it can hold the weight of the candy decorations.
- The Final Dusting: Sprinkle the 1 tbsp of crushed candy canes at the very last second. If they sit on the whipped cream too long, they start to bleed red dye into the white cream. It still tastes good, but it won't look as sharp!
Chef's Tip: To get perfectly pulverized candy canes without a mess, place them in a heavy duty freezer bag and crush them with the flat side of a meat tenderizer. It’s a great way to get out any holiday stress!
Answering Your Peppermint Baking Questions
Making Cheesecakes Without Food Processors
If you don't have a processor, just put your Oreos in a large Ziploc bag and go to town with a rolling pin. You want the crumbs to be very fine so the crust doesn't fall apart when you bite into it. It takes a few minutes of elbow grease, but it works perfectly.
Preventing Melting Candy Cane Streaks
Candy canes are mostly sugar, so they dissolve when they touch moisture. If you mix the candy canes into the batter, they will melt slightly during baking, creating beautiful pink swirls. However, for the topping, always add them right before serving to keep that "shatter" crunch.
Using Peppermint Oil Instead Of Extract
Peppermint oil is much more concentrated than extract. If you swap them, use only 2-3 drops of oil for every teaspoon of extract. If you use too much, it will taste like you're eating a tube of toothpaste, and nobody wants that for Christmas dessert!
Knowing When Cream Cheese Is Soft
The "finger test" is your best friend. Press your finger into the wrapped block of cheese. If it goes in easily with zero resistance and stays there, you're ready to go. If it’s still firm in the middle, give it more time. Using cold cheese is the number one reason for lumpy cheesecakes!
Debunking Common Baking Myths
- Myth: You must use a water bath for mini cheesecakes.
- Truth: Because these are small, they bake through very quickly. The muffin tin acts as a shield, and as long as you don't overbake them, they won't crack. Save the water bath for the 9 inch giants.
- Myth: Opening the oven door always ruins a cheesecake.
- Truth: While you shouldn't keep it open, a quick peek at the 18 minute mark to check the jiggle won't hurt. Just be fast!
Honestly, these Peppermint Cheesecakes are the highlight of my December every year. They are simple, elegant, and packed with that nostalgic holiday flavor we all crave. Just remember to keep your ingredients at room temp, don't overbeat those eggs, and give them plenty of time to chill. You've got this, sugar!
Your kitchen is about to smell like a winter wonderland. Happy baking!

Recipe FAQs
How to make peppermint cheesecake?
Yes, you bake it. This recipe uses a standard low and slow baking method in a muffin tin, ensuring the creamy filling sets perfectly around the Oreo crust base.
How to make mint cheesecake without baking?
No, this specific recipe is baked. No-bake versions generally rely heavily on gelatin or stabilizers, which results in a softer texture than the baked Philadelphia style base described here. For a no-bake option, you might explore techniques similar to those used in No-Bake gluten-free Cookie Dough Delights, substituting the mint filling.
How to make peppermint bark cheesecake?
Incorporate crushed bark into the batter and topping. Fold a small amount of crushed peppermint bark into the batter just before filling the cups, and then use larger pieces of bark as the primary garnish on top of the whipped cream.
How to make mint chocolate cheesecake?
Use a chocolate crust and omit most of the peppermint extract. For a mint chocolate variation, ensure your crust is made entirely of chocolate wafers, and consider substituting half the sour cream with melted, slightly cooled dark chocolate.
How to make mint aero cheesecake no bake?
You must adapt the texture significantly. Achieving the airy, bubbly texture of an Aero bar in a no-bake cheesecake requires stabilizing the cream mixture heavily, usually with extra gelatin or whipped cream folded in very gently after chilling begins.
How to make a mint oreo cheesecake?
Use whole Oreos for the crust, not just the crumbs. This recipe already utilizes an Oreo crust; to amplify the flavor, you can finely crush extra Oreos and fold them into the filling, much like how flavor additions are handled when you are mastering various cheesecake decoration methods.
How to make cheesecake mint aero?
This is achieved by incorporating air or using mousse. To mimic the Aero texture, you need to fold very stiffly whipped heavy cream into the set cheesecake base, creating a light, aerated texture rather than a dense custard.
Peppermint Cheesecakes Recipe

Ingredients:
Instructions:
Nutrition Facts:
| Calories | 370 kcal |
|---|---|
| Protein | 4.6 g |
| Fat | 26.8 g |
| Carbs | 28.8 g |
| Fiber | 0.8 g |
| Sugar | 22.4 g |
| Sodium | 183 mg |
