Perfectly Crusty Panini Bread: Your Go-To for Gourmet Sandwiches

- Let’s Talk About Panini Bread!
- A Little History Behind Your New Favorite Bread
- Why You Need to Try Making Your Own Panini Bread
- Your Go-To Essential Ingredients Guide for Perfect Panini Bread
- Cooking Like a Pro: Mastering the Art of Panini Bread
- Pro Tips & Secrets for Panini Bread Mastery
- Perfect Presentation that Pops
- Storage & Make-Ahead Magic
- Creative Variations: Shake Things Up!
- Complete Nutrition Guide to Your Panini Bread
- Conclusion: Get Your Panini On!
- Frequently Asked Questions
- 📝 Recipe Card
Let’s Talk About Panini Bread!
Oh my gosh, do you ever get a craving for a sandwich that’s just outta this world? you know, the kind where every bite is pure bliss? that’s where panini bread steps in, folks!
It’s crunchy on the outside, soft on the inside, and just begging for cheese, meats, or whatever you wanna throw between those slices.
I remember the first time i tried to make panini bread . i was a rookie gluten warrior, armed with nothing but a whisk and some wild ambition.
Spoiler alert: it wasn’t perfect at first, but boy, did it lead to some epic lunchtime experiments!
A Little History Behind Your New Favorite Bread
So, let's dive into this deliciousness. panini bread is rooted in the vibrant culinary traditions of italy. originally, it was just a way to use up leftovers.
But oh, did it catch on fast! now, it’s almost like a royal decree that you must have panini sandwiches for lunch or else.
In modern times, these crunchy delights have exploded onto menus across the country. from fancy delis to your mom's kitchen, everyone has their own take on the best panini recipes .
The charm of panini lies in its flexibility and it fits right into our busy lives. perfect for a quick lunch or a fancy dinner, it’s a total game changer.
Now, making your own panini bread does take a bit of time around an hour and a half from start to finish but most of that is just letting the dough rise.
I mean, who doesn’t have time for that? the fun part is you can whip up about six medium sized loaves with this recipe, which means there’s plenty to share.
..or not! don’t ask how i know. and guess what? the ingredients are pretty cheap. bread flour, yeast, a touch of sugar and olive oil easy peasy!
Why You Need to Try Making Your Own Panini Bread
Let me tell you about the perks of whipping up some toasted sandwich recipes with this bread. first off, it’s a whole grain win! you’ve got your carbs, proteins, and a bit of fats.
Plus, no preservatives or additives! just good ol’ honest ingredients. you can load it up with whatever toppings your heart desires! thick slices of tomatoes, juicy roasted meats, and melty cheese oh man, it’s like a taste symphony in every bite.
Special occasions? you bet! these beauties are perfect for gatherings. think backyard bbqs or family game nights. just set out a spread.
Have your friends customize their sandwiches and fire up the grill. talk about a crowd pleaser! and wait until you see them getting all ooey gooey with the melted cheese you're going to be the hero of snack time.
Compared to other sandwich recipes you might be used to, homemade panini bread brings flavor and texture that store-bought just can’t match.
Seriously, who doesn’t want a crunchy crust with a soft, airy inside? plus, you have the creative freedom to make your own unique panini ideas .
You could even add herbs or cheese directly into the dough for a little extra magic.
So if you’re already salivating thinking about your next breakfast panini , hold that thought. let's get into the ingredients you'll need to create this bread wonder! it’s about to revolutionize how you view sandwiches, my friend.
Trust me, once you bite into your first homemade panini, you’ll wonder why you didn’t start this tasty adventure sooner.
Your Go-To Essential Ingredients Guide for Perfect Panini Bread
Let’s get one thing straight: if you want to whip up some killer panini bread , you need to have the right ingredients on hand.
Seriously, it’s the foundation of any great sandwich. we’re diving into the nitty gritty of what you need to make your toasted sandwich recipes shine! buckle up, we’re about to sauté through the essentials.
Premium Core Components
First off, let’s talk measurements. you don’t want to be guessing if you've got 3 cups or 4. for that perfectly crusty panini bread , you’ll need 3 cups (375g) of bread flour, 1 teaspoon (5g) of active dry yeast, 1 teaspoon (6g) of salt, and some sugar and olive oil to make it sing.
By the way, always check the quality of your flour; fresh flour leads to better bread, no doubt.
When it comes to storage, keep your flour in a cool, dry place. it lasts about 6-8 months in the pantry, but if you toss it in the fridge, you're looking at a year! just remember to seal it tight, or you'll have some unwelcome guests like bugs join the party.
Oh, and fresh ingredients are key! Select fresh yeast if it’s crumbly or has a funny smell, toss it. You want that stuff to bubble and bring your dough to life!
Signature Seasoning Blend
So, what makes your panini sandwich recipes pop? it’s all in the spices, baby! while some folks keep it simple with salt, i’m all about layering flavors.
Oregano, basil, and garlic powder can take your bread to a whole new level.
And don’t get me started on regional variations. have you ever tried a breakfast panini with some caramelized onions and cheddar? yum! the right spice can transport you right to your favorite cozy café.
Smart Substitutions
Let’s be real sometimes life throws you a curveball. don’t have bread flour? no biggie! you can use all-purpose flour; just know your crust might not be quite the same.
Or, if you’re on that gluten-free journey, there are a ton of alternatives that can save the day.
If you’ve got a dietary restriction, swap the sugar for honey or agave syrup. trust me, it works wonders. and if you find yourself in need of emergency replacements , mashed potatoes can work in a pinch to give your dough some moisture.
Genius, right?
Kitchen Equipment Essentials
Alright, moving on to the tools of the trade. you’ll need a large mixing bowl and a good wooden spoon or dough hook.
Kneading is where the magic happens, so don’t skimp on this step! if you've got a stand mixer, use it.
Saves time and gives you a bicep workout at the same time.
And let’s not forget having a parchment paper ready is key for easy cleanup and great baking results. Your bread will thank you, and so will your countertops!
Closing Thoughts
There you have it, my friends! you’ve got the whole essential ingredients guide laid out for you. the next step is taking these ingredients and tools to create scrumptious sandwiches! you’ll find the dough isn’t just about mixing it's about the love you put into it.
And with the right ingredients and equipment, you can make the best panini recipes ever.
So, grab your apron and let’s roll up our sleeves. the next time you're thinking of making panini bread , you’ll be ready to impress everyone around your dinner table.
Get ready to dive into the actual recipe, ‘cause those sandwiches aren’t going to make themselves!
Cooking Like a Pro: Mastering the Art of Panini Bread
Oh my gosh, folks! if you haven't ventured into the world of homemade panini bread , you're totally missing out.
It's not just about the bread; it's about crafting the perfect vessel for all those epic fillings. imagine biting into a crusty yet soft loaf stuffed with gooey cheese and savory meats.
Seriously, who wouldn't want that? let’s dive into this journey of creating the ultimate panini bread while navigating through professional cooking methods.
Essential Preparation Steps
Before we get our hands all doughy, let’s chat about some basic prep steps. first up: mise en place , which is just a fancy way of saying, "let's get everything organized before cooking.
" measure out your ingredients, set them aside, and you'll feel like a total rock star in the kitchen.
Next, time management is key. i’m talking about knowing what to do first activate that yeast! remember: patience is key. give it about 5- 10 minutes to froth up like a happy little cloud.
Now, organization strategies? think of it like making a playlist. have your flour, salt, and other goodies ready to go.
And let’s not forget safety. when baking, be careful around that hot oven. premature burns can ruin your day (and your panini plans!).
Step-by-step Process
Alrighty, let's whip up that panini bread with some clear instructions!
Activate yeast: in a bowl, combine 1 cup of warm water (about 110° f ) with 1 tablespoon of sugar and 1 teaspoon of active dry yeast .
Let it sit for 5- 10 minutes until it's frothy.
Make the dough: mix 3 cups of bread flour with 1 teaspoon of salt in a bowl. create a well in the center and pour in the olive oil and frothy yeast mix.
Combine: Stir it up with a wooden spoon until you get a shaggy dough.
Knead It Out: Time to get physical! Knead that dough on a floured surface for about 8- 10 minutes until it's smooth and elastic.
First Rise: Pop that dough into a lightly oiled bowl, cover it with a towel, and let it rise in a warm spot for 1 hour .
Shape Loaves: Punch it down (yes, take out your frustrations!). Divide it into 6 equal portions and shape those into loaves.
Second Rise: Place those bad boys on a parchment lined baking sheet, cover, and let them rise for another 30 minutes .
Preheat Oven: Crank it up to 425° F while you're waiting.
Bake: Bake those beauties for 15- 20 minutes until they’re golden brown and sound hollow when tapped.
Cool: Let them cool on a rack before slicing. Trust me, slicing too soon makes for gummy bread (and no one wants that).
Expert Techniques
Now that we've got the basics, let's talk about expert techniques! quality checkpoints are crucial. make sure that dough is smooth and not sticking to your hands.
If it is, you might need a little more flour.
Got issues along the way? maybe your dough isn’t rising? it could be that your yeast was too old or the water was too hot.
Just always check the yeast’s life span before using it, folks fresh yeast is your bff in bread making.
Success Strategies
Let’s wrap things up with a solid success strategy. first, avoid common mistakes like rushing through those rises. i’ve done that, and let me tell you, it’s not worth it.
Trust the process!
Quality assurance? sniff that bread as it bakes. nothing says homemade like that toasty aroma wafting through your kitchen. don't forget, you can totally make these in advance.
Freeze them unbaked, and when you’re ready, just pop 'em in the oven straight from the freezer.
Oh, and quick tip: bread flour gives you a better crust and chewy texture compared to all-purpose flour. It’s a game changer.
Homemade panini bread will have your taste buds singing, and the fillings are endless! From classic ham and cheese to extravagant breakfast paninis with egg, bacon, and avocado, the sky's the limit.
If you’re excited about trying your hand at panini grill recipes or discovering the best panini recipes , stay tuned for that magical journey to take your sandwiches to the next level.
Grab some parchment paper and let’s get ready to bake!
Additional Information
Stay tuned as we dive deeper into the world of panini making, explore unique sandwich recipes, and more. Because honestly, you deserve to enjoy every last crumb!
Pro Tips & Secrets for Panini Bread Mastery
Oh my gosh, if you're diving into the world of panini bread , I've got your back! Let me share some of my biggest pro tips that’ll make your bread sing.
For starters, activate your yeast right. mix that warm water, sugar, and yeast and give it about 5- 10 minutes to get frothy.
If it doesn't foam? throw it out and start fresh. no one wants sad, doughy bread! also, don't rush the kneading .
A good 8- 10 minutes on a floured surface is key to a soft, elastic dough. trust me; you'll feel like a bread wizard when you nail this!
Time saving techniques? absolutely! if you’re feeling adventurous (or just lazy), throw your dough into a stand mixer with a dough hook.
Boom! multi tasking at its finest. and for all those flavor ensoiasts out there, add some herbs like rosemary right into your dough mix.
It’s a game changer!
Now, let’s talk presentation . when your panini is baked to golden perfection, it’s time to show it off. slice your loaves into thick, hearty pieces.
Think rustic! drizzle a touch of olive oil before serving, or layer with colorful veggies. it’s all about that visual appeal .
A sprinkle of parsley or basil as a garnish adds that gourmet touch. seriously, your friends will think you’re a chef from top chef !
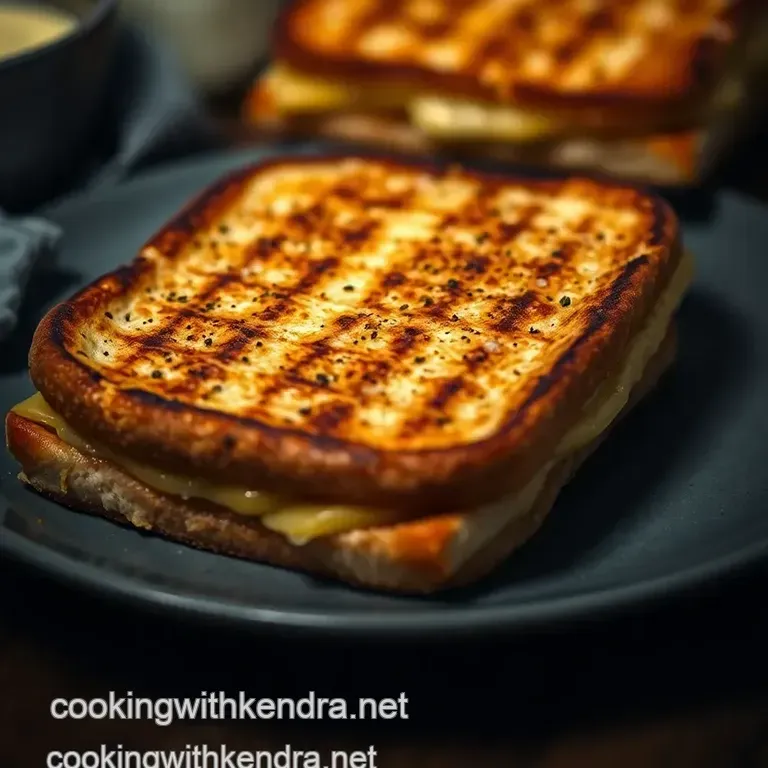
Perfect Presentation that Pops
Plating can make or break your sandwich game, my friends. turn those crusty panini loaves into masterpieces! think color combinations.
You’ve got your golden brown bread, so add some bright greens, juicy reds, and deep yellows. stack your fillings like a pro.
High is attractive!
Garnish ideas? grab a handful of arugula or a few cherry tomatoes. even just a drizzle of balsamic reduction can elevate your presentation from "meh" to "wow.
" when your food looks good, we eat with our eyes first, right?
Storage & make-ahead Magic
Now, if you’re anything like me, you might not finish all your delicious panini bread in one sitting. no worries storing it properly is key! let it cool completely, then wrap in plastic wrap or store in an airtight container.
It's good for about 3-4 days at room temperature. for longer storage, toss it in the freezer. just make sure you double wrap it to avoid freezer burn.
When it comes to reheating, keep it simple: pop it in a toaster oven at 350° f ( 175° c) for a few minutes.
Life's too short to eat stale bread, am i right?
Creative Variations: Shake Things Up!
The fun really begins when you start playing around with your recipes. let’s spice it up a bit! if you’re feelin’ spicy, how about adding bacon bits or jalapeños to your dough? or maybe swap in some whole wheat flour health is wealth, after all!
And, oh boy, seasonal flavors can make every bite unique.
Think grilled veggies in the summer or cozy roasted root veggies in the fall. The world is your sandwich oyster!
Complete Nutrition Guide to Your Panini Bread
Listen up, folks! it’s important to know what we’re munching on. each panini loaf packs about 170 calories and offers a solid dose of carbohydrates to fuel your day.
Pair it with a salad, and bam! you’ve got a complete meal.
But hey, keep an eye on portions and try to balance your meals, especially if you add fillings. some creamy cheese? go for it! but balance it out with fresh veggies.
Your go-to sandwich can still be healthy while hitting those best panini recipes standards.
Conclusion: Get Your Panini On!
So here you have it, my friends. whether you’re whipping up breakfasts, lunches, or even for dinner, this panini bread is your passport to panini paradise .
Have fun with flavors, get a little creative, and don’t be afraid to let your personality shine through your cooking.
Just know that each loaf you create adds a little magic to your table. So go ahead, roll up your sleeves, and let’s get to baking those delicious panini sandwiches !
Frequently Asked Questions
What is panini bread made of?
Panini bread is typically made from a simple combination of bread flour, active dry yeast, salt, sugar, olive oil, and warm water. The use of bread flour is key for achieving that delightful crusty texture. You can experiment with adding herbs or cheese for a unique twist!
How do I ensure my panini bread rises properly?
The trick to a good rise is activating the yeast properly, which involves using warm water (about 110°F/43°C) and letting it sit until frothy. Make sure to place the dough in a warm, draft free area during the rising process, and don’t forget to cover it to keep it cozy just like a good cuppa tea!
Can I make panini bread ahead of time?
Absolutely! You can make the dough ahead of time and refrigerate it after the first rise. Just wrap it tightly in plastic wrap, and when you're ready, let it come back to room temperature before shaping and allowing it to rise again. This is perfect for when you're expecting guests for a delightful dinner or lunch!
What are some delicious variations for panini bread?
You can spice up your panini bread by adding herbs like rosemary or thyme to the dough for extra flavour. For a cheesy twist, mix in shredded cheese directly into the dough or sprinkle some on top before baking. Think of it as jazzing up your classic sarnie!
How should I store leftover panini bread?
To keep your panini bread fresh, store it in a paper bag at room temperature for up to 2 days. If you need to keep it for longer, slice it and freeze in a plastic bag. Just pop it in the toaster or oven when you're ready to enjoy, and it'll taste as good as fresh out of the oven!
Is panini bread healthy?
Panini bread can be a healthy option, especially if you use whole wheat flour and control the ingredients. It’s a good source of carbohydrates, and with the right fillings like veggies and lean meats it can make for a balanced meal.
Pairing it with a salad or soup can elevate your lunch game whilst keeping it nutritious!
This FAQ section aims to address common concerns while providing valuable tips and variations that inspire both beginners and seasoned cooks to enjoy making panini bread!
Perfectly Crusty Panini Bread Your Go To For Gou