Chicken Nuggets: the Proper, Crispy Buttermilk-Brined Takeaway Recipe
- Elevating the Takeaway: Why These Homemade Chicken Nuggets Win
- The Science of Superior Crunch and Tenderness
- Essential Components for Proper Crispy Chicken Nuggets
- Step-by-Step Guide: How to Make Restaurant-Quality Nuggets
- Troubleshooting and Expert Advice for Perfect Nuggets
- Prep Ahead: Freezing and Storing Your Homemade Batch
- Ultimate Pairings: What to Serve With Crispy Chicken Nuggets
- Recipe FAQs
- 📝 Recipe Card
Elevating the Takeaway: Why These Homemade Chicken Nuggets Win
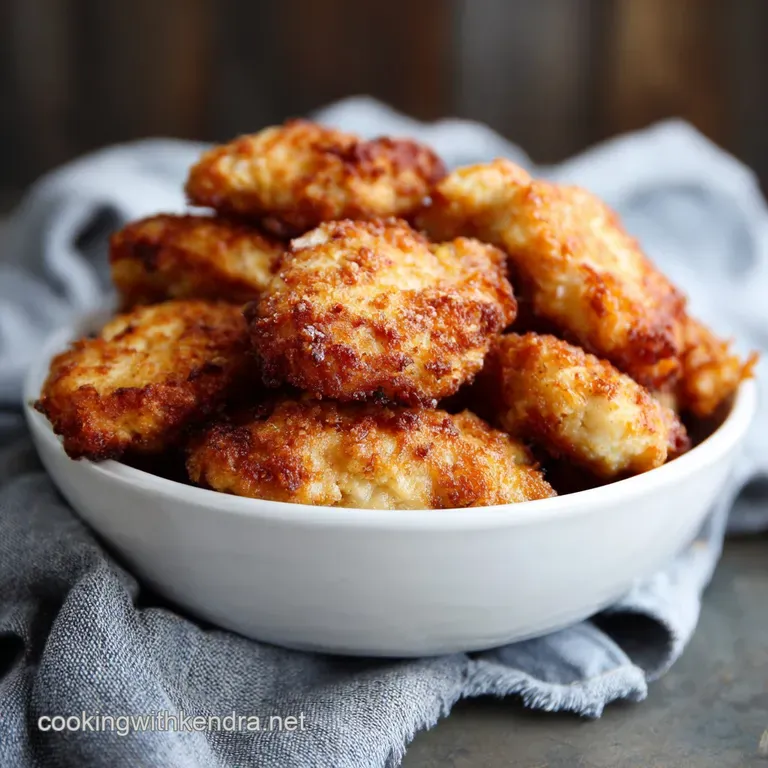
The moment those crispy, golden nuggets hit the hot oil, your kitchen smells like the best Saturday night takeaway imaginable. Seriously, forget the sad, beige discs lurking in your freezer drawer. We are aiming for something outrageously crisp, savoury, and unbelievably tender on the inside.
That shatteringly crunchy exterior, seasoned perfectly with smoked paprika, is exactly what we deserve.
This recipe is a massive lifesaver because it’s so much cheaper than constant drive thru trips, and you control every ingredient. It takes a little effort compared to microwaving, but the active time is quick, and the payoff is enormous.
Plus, making a huge batch of these proper homemade chicken nuggets means you’re prepped for the week.
So, ditch the guilt and stop buying that processed stuff. We're going to dive into the secrets I learned the hard way like why chilling is non-negotiable and how to nail the frying temperature. Trust me, once you master this chicken nuggets recipe from scratch , you are never going back.
The Science of Superior Crunch and Tenderness
Making truly great nuggets isn't about guesswork; it’s about a few simple techniques that guarantee maximum flavour and maximum crunch. We need that juicy, white interior encased in a thick, textured shell.
The Magic of the Buttermilk Soak
Buttermilk is your tenderizing superhero. The mild acidity in buttermilk starts to break down the tough muscle fibers in the chicken, leaving it super moist and ready to absorb flavor. This quick brine ensures the chicken stays incredibly juicy during the high heat of cooking.
I promise, a 30 minute soak changes everything.
Texture Wars: Achieving That Signature Crunch
We achieve that next level crunch through two key moves: Panko breadcrumbs and the double chill. Panko crumbs are bigger and flakier than regular breadcrumbs, which means they absorb less oil and create a far superior, light, airy texture.
Chilling the nuggets twice once after the soak and once after breading is crucial for making the coating adhere perfectly.
Equipment Check: Tools for Nugget Perfection
You don't need a fancy deep fryer, but you absolutely need a thermometer. That's the secret sauce! Using a heavy bottomed Dutch oven and a deep fry thermometer allows you to maintain the precise temperature required for a golden, crisp result without burning or soaking the nuggets in grease.
How Brining Ensures the Juiciest Interior
Beyond the tenderizing, the buttermilk brine acts as a binder. It’s sticky enough that the first layer of flour adheres tightly, keeping the seasoned juices inside the nugget while it cooks. This step separates a decent nugget from an absolutely sensational one.
The Double Dredge Method for Ultimate Coating Adhesion
We use a standard three step breading station, but we are generous and insistent about pressing the coating on. This multi layer approach ensures maximum coverage and flavour delivery. I once tried just dipping them once, and half the coating fell off in the oil. Never again.
Optimizing Frying Temperatures for Golden Results
The sweet spot for frying is precisely 350°F (175°C). If the oil is too cold (below 325°F), the nuggets will sit and absorb the oil, leaving them soggy and heavy. If it’s too hot (above 375°F), the outside will burn long before the inside is safely cooked through. Get that thermometer ready!
Essential Components for Proper Crispy Chicken Nuggets
We are keeping this simple and focusing on pantry staples that deliver huge flavour. The seasoning mix is where we build that classic, comforting taste.
Pantry Staples for the Flavor Dredge
The flavour magic happens in the flour and Panko stages, not just the brine. Smoked paprika, garlic powder, and onion powder are the MVP combination. This chicken nugget breading recipe ensures every bite is savoury and deeply aromatic.
Choosing the Right Cut for Optimal Nugget Shape
I prefer using boneless, skinless chicken breast cut into rustic, 1 inch nugget shapes. Breast meat is easy to work with and takes well to the buttermilk soak. If you wanted a slightly richer flavour, you could use boneless thigh meat, but I find the texture of the breast meat is closer to a classic takeaway nugget.
| Ingredient | Substitute |
|---|---|
| Buttermilk | Milk + 1 Tbsp White Vinegar (rest 5 mins) |
| Panko Breadcrumbs | Crushed Corn Flakes (provides a unique crispness) |
| Neutral Frying Oil | Lard or Coconut Oil (if you don't mind the flavor transfer) |
| All-Purpose Flour | Rice Flour or gluten-free Blend |
Buttermilk Alternatives and dairy-free Options
If you don't keep buttermilk on hand, don't sweat it. Just combine regular milk with a tablespoon of vinegar or lemon juice and let it sit for five minutes it will curdle slightly and mimic the necessary acidity.
For a dairy-free version, use unsweetened plain almond milk mixed with lemon juice; the texture difference is negligible once cooked.
Oil Selection: High Smoke Points for Deep Frying
You absolutely need a neutral, high smoke point oil for these fried chicken nuggets . Canola, vegetable, or peanut oil are your best friends here. Don't use olive oil; it burns easily and will taste bitter.
step-by-step Guide: How to Make Restaurant Quality Nuggets
This process works best when you set up your stations before you start breading. Line everything up and wear disposable gloves if you hate sticky hands!
Phase I: Preparing the Tenderizing Brine
- Chop and Soak: Slice your chicken into uniform 1 inch pieces. Whisk together the buttermilk, salt, pepper, and a dash of hot sauce if you like a little subtle warmth. Add the chicken, cover, and chill for a minimum of 30 minutes. I usually go for 45 minutes; it’s enough time to prep the breading stations.
- Drain: Pull the chicken out of the brine mixture. Let the excess liquid drip off, but do not rinse the chicken . The residual buttermilk is what helps the flour adhere.
Phase II: Mastering the Three Part Breading Station
- Setup: Arrange three shallow dishes. Station 1 is your seasoned flour. Station 2 is the whisked egg wash. Station 3 is the Panko, smoked paprika, and salt mix.
- Dredge, Dunk, Press: Take a piece of chicken. Dredge it fully in the flour (shake off the excess). Dunk it quickly in the egg wash (let the excess drip). Then, press it firmly into the Panko mixture, ensuring the crumb covers every single surface. This firm pressing is key to a robust coating.
- The Essential Chill: Place all breaded pieces on a wire rack set over a baking sheet. Refrigerate for another 30 minutes. This is not optional! It gives the coating time to bind, ensuring you don’t end up with naked nuggets floating in the oil.
Phase III: Frying, Baking, or Air-Frying the Nuggets
- Heat Oil: Pour 2 inches of oil into your pot. Clip your thermometer on and heat until it hits 350°F (175°C).
- Fry in Batches: Gently lower 5 or 6 nuggets into the hot oil. Fry for 4– 6 minutes, turning often, until they are deep golden brown and the internal temperature is 165°F (74°C).
- Air Fryer Method: If you’re making a chicken nuggets recipe air fryer style, spray the chilled, breaded nuggets heavily with cooking spray. Cook at 400°F (200°C) for 8– 10 minutes, flipping halfway. They won't be quite as juicy as the fried version, but the crunch is still excellent.
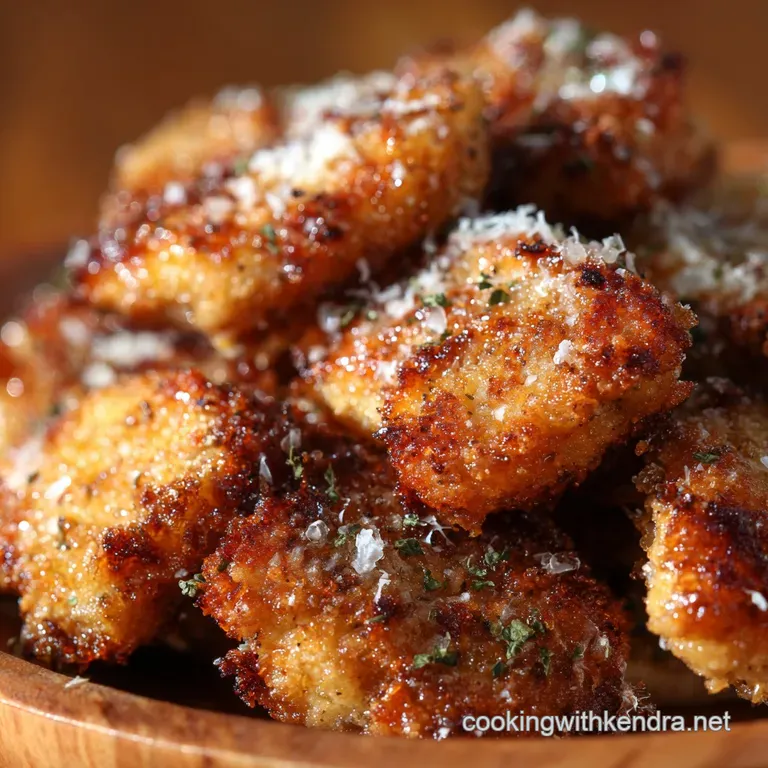
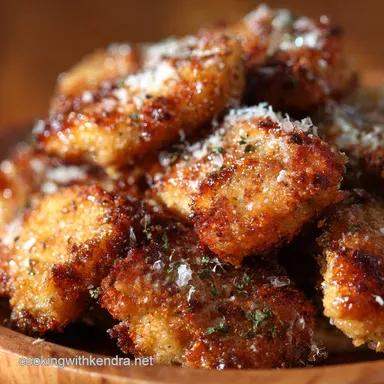
Post Frying Drain and Seasoning Technique
Immediately transfer the finished, golden brown nuggets to a clean wire rack to drain. Do not put them on paper towels if you want maximum crispness. Sprinkle them with a tiny bit of fine sea salt while they are still piping hot.
Chef's Note: If you are cooking multiple batches, put the drained nuggets onto a clean baking tray in a 200°F (95°C) oven. This keeps them hot and ensures they stay incredibly crunchy while you finish the rest.
Troubleshooting and Expert Advice for Perfect Nuggets
I’ve made every nugget mistake in the book, including setting off the smoke alarm (oops). Learn from my early failures!
Preventing the Coating From Falling Off
The number one reason the coating slides off is not chilling the nuggets after breading. The initial brine makes the surface wet; the chilling process lets the flour and Panko dry slightly and physically fuse onto the surface. A 30 minute chill is the minimum required bond time.
Why Overcrowding the Fryer Ruins the Texture
Resist the urge to dump all the nuggets in at once. Overcrowding drops the oil temperature dramatically, causing the nuggets to stew in oil instead of frying quickly. They become oil-logged and greasy. Work in small, controlled batches to maintain that precious 350°F.
Prep Ahead: Freezing and Storing Your Homemade Batch
These are the absolute best make-ahead party food. Why buy mediocre frozen nuggets when you can prep these amazing ones yourself?
The Best Way to Reheat Leftover Nuggets
The Air Fryer is king for reheating. Put leftover, refrigerated nuggets into the air fryer at 350°F (175°C) for 4– 5 minutes. They’ll come out almost as crispy as the first time.
The oven works too, but takes longer (10- 12 minutes at 375°F/190°C).
Flash Freezing Raw Nuggets for Later
Once you’ve breaded and chilled the nuggets, place the tray (still with the wire rack) into the freezer for 1– 2 hours until they are solid. Then, transfer the frozen nuggets to a freezer bag or airtight container. This prevents them from sticking together.
Best Practices for Refrigerating Cooked Nuggets
Cooked nuggets will keep nicely in an airtight container in the fridge for up to 3 days. Just make sure they are completely cool before you pack them up to avoid condensation, which leads to sogginess.
Reheating Instructions from Frozen (Air Fryer vs. Oven)
You can cook the frozen, raw nuggets straight from the freezer! This is the beauty of batch cooking.
- Air Fryer: Preheat to 400°F (200°C). Cook for 12– 15 minutes, shaking halfway, until fully cooked inside (165°F internal temp).
- Oven: Bake at 400°F (200°C) for 20– 25 minutes on a wire rack until heated through and crisp.
Ultimate Pairings: What to Serve With Crispy Chicken Nuggets
Everyone loves a classic dipper, but don't stop there. These incredible chicken nuggets dinner ideas demand great side dishes!
- Sauces: Homemade ranch dressing, spicy sriracha mayo, classic honey mustard, or my personal favorite, a smoky BBQ sauce.
- For Game Day: Pair these crunchy bites with other fantastic party snacks. They go perfectly alongside massive platters of chips, cheese, and perhaps something like those Super Bowl Foods: Easy Ultimate BBQ Pulled Chicken Totchos .
- Side Dish: A simple, vinegary coleslaw provides a much needed acidic counterpoint to the richness of the fried coating.

Recipe FAQs
My nuggets came out soggy, not outrageously crisp. What went wrong?
Crispness depends heavily on oil temperature and batch size. Ensure your frying oil maintains a temperature of 350°F to 375°F; if the oil is too cool, the breading absorbs oil rather than frying.
Avoid overcrowding the pan, as this significantly drops the temperature and steams the nuggets instead of crisping them.
I don't have buttermilk. Is there an acceptable substitute for the brine?
Yes, you can easily create a passable buttermilk substitute. Combine 1 cup of whole milk with 1 tablespoon of white vinegar or lemon juice, stir gently, and let it sit for about 5 to 10 minutes until it visibly curdles. This acidity is crucial for tenderizing the chicken and helping the coating adhere.
The coating keeps falling off when I fry them. How do I fix this adhesion issue?
The secret to strong adhesion is chilling the breaded nuggets before frying. After completing the breading process, place the nuggets on a sheet pan in the refrigerator for at least 30 minutes.
This allows the moisture from the buttermilk to hydrate the flour and crumbs, creating a secure bond when they hit the hot oil.
Can I bake or air fry these nuggets instead of deep frying them?
Absolutely, though the texture will be slightly different than the "ultimate takeaway" version. For baking, spray the breaded nuggets heavily with cooking oil and bake at 425°F (220°C) until golden brown.
For air frying, cook at 380°F (195°C) for 12 15 minutes, flipping halfway, ensuring you use an oil spray to achieve browning.
How far in advance can I prepare these, and what is the best way to freeze them?
You can freeze the nuggets uncooked, which is ideal for maximum freshness later. Lay the breaded nuggets on a sheet pan lined with parchment paper and freeze until solid. Once frozen, transfer them to a freezer safe bag, and they will keep well for up to three months; cook directly from frozen, adding a few extra minutes to the required cooking time.
Why did my homemade nuggets turn out dry despite using a buttermilk soak?
If your nuggets are dry, they are likely overcooked. The buttermilk brine ensures moisture, so the issue is temperature control during frying. Use a quick read thermometer to confirm the internal temperature reaches 165°F (74°C) and remove them promptly, remembering they will carry over cook for a moment after removal.
Can I use chicken thighs instead of breast meat for this recipe?
While you can use chicken thighs, they contain higher fat content and are generally juicier, but they may release more moisture during frying. This extra moisture risks disrupting the coating. If you use thighs, ensure they are well trimmed and pat them extremely dry before proceeding with the buttermilk brine.
Proper Crispy Buttermilk Chicken Nuggets
Ingredients:
Instructions:
Nutrition Facts:
| Calories | 100 kcal |
|---|---|
| Protein | 6.0 g |
| Fat | 7.0 g |
| Carbs | 4.0 g |
