The Velvet Kiss Layered Red Velvet Cheesecake Swirl Cake
- The Ultimate Showstopper: Merging Cake Heaven and Cheesecake Bliss
- Why This Red Velvet Cheesecake Cake Recipe Reigns Supreme
- Gathering the Essentials for Creamy Perfection
- Curating the Components for Optimal Red Velvet Texture
- Step-by-Step Guide to Achieving the Perfect Swirl
- Mastering the Bake: Ensuring Flawless Cheesecake Integration
- Elevating Your Creation: Frosting and Finishing Touches
- Troubleshooting and Long-Term Care for Your Baking Triumph
- Recipe FAQs
- 📝 Recipe Card
The Ultimate Showstopper: Merging Cake Heaven and Cheesecake Bliss
Prepare yourself for a baking adventure that transcends the ordinary dessert experience. We are diving headfirst into crafting the Red Velvet Cheesecake Cake , a confection so luxurious and visually stunning, it demands the spotlight at any gathering.
This isn't just two separate desserts placed side-by-side; it's a deliberate, elegant fusion where the slightly tangy, cocoa kissed moisture of the classic Southern Red Velvet Cake meets the dense, velvety richness of a New York style baked cheesecake.
This recipe, which we call "The Velvet Kiss," promises a duality of texture and flavour that elevates it beyond standard Yummy Sweets . Mastering this layered wonder is a milestone for any dedicated baker, delivering a true showstopper that utilizes a perfectly executed water bath technique to ensure creamy perfection.
Why This Red Velvet Cheesecake Cake Recipe Reigns Supreme
This particular iteration of the Cheesecake Cake stands out because it integrates the cheesecake directly into the structure, rather than simply layering a baked cake with a no-bake topping.
The result is a cohesive, multi layered experience requiring meticulous attention to detail, yielding truly superior results.
Unveiling the Dual Texture Magic
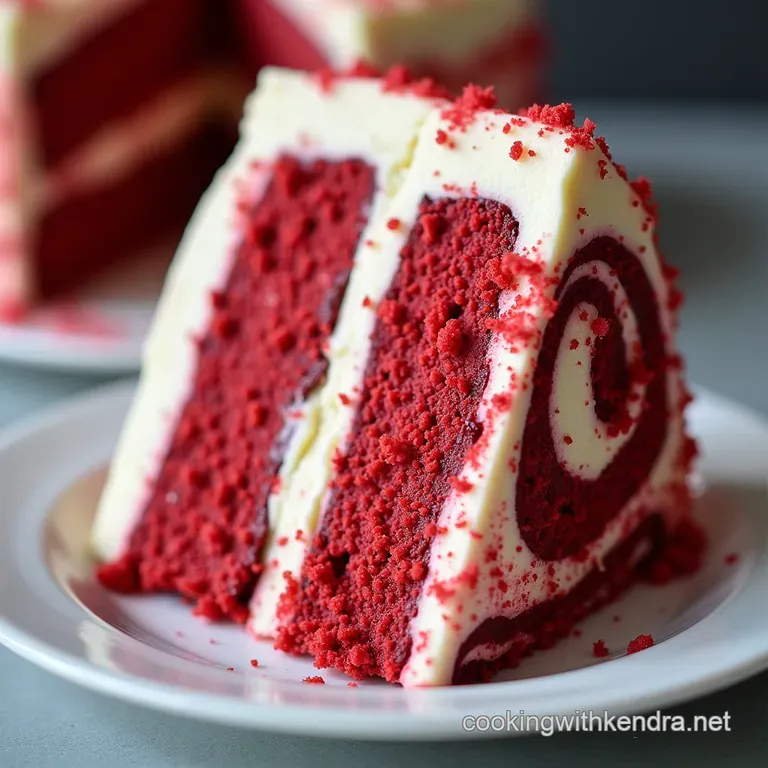
The beauty of this bake lies in the contrast. The bottom layer provides the familiar, tender crumb, vibrant red hue, and slight acidity characteristic of quality red velvet. This is immediately contrasted by the centrepiece: a smooth, luscious baked cheesecake layer infused with vanilla and just the right amount of tang from full fat cream cheese.
The structural integrity gained from baking the cheesecake layer onto the cake base means you get a slice where every component supports the other, offering both soft cake and firm filling in a single, magnificent bite.
A Culinary Symphony: More Than Just a Dessert
This Red Velvet Cheesecake creation is a celebration in itself. While the prep time requires focus we estimate about 45 minutes of active work the payoff is immense.
This is the kind of indulgent bake that firmly belongs in the realm of Cheat Day Recipes . It’s inherently rich, deeply satisfying, and designed to impress everyone lucky enough to receive a slice of this incredible Gateaux Cake .
Setting Expectations for Your Bake Day Masterpiece
To successfully execute this recipe, patience is paramount. With an active prep time of 45 minutes, the total time stretches to around three hours of active baking and cooling, but the mandatory minimum chilling time is six hours, preferably overnight.
Understanding that this is a medium difficulty bake, primarily due to the necessity of the water bath and careful layering, will set you up for success. The resulting 10 12 generous slices confirm that this is a project worth every minute invested.
Gathering the Essentials for Creamy Perfection
Before we begin the mixing marathon, ensuring you have the right tools and ingredients prepared at the correct temperature is half the battle won. For the cheesecake filling specifically, the rule of room temperature applies strictly.
This means your 16 ounces (two full blocks) of cream cheese, the single large egg, and the ¼ cup of sour cream or Greek yogurt must be softened completely. Using cold ingredients here guarantees lumps, which is the enemy of that signature smooth texture we are aiming for in this Red Velvet Cheesecake Cake Recipe .
Curating the Components for Optimal Red Velvet Texture
We need two distinct sets of ingredients: those for the base cake layers and those for the creamy filling. When combining these, think of balance the slight acidity of the buttermilk in the cake cuts through the richness of the cheesecake beautifully.
The Foundation: Cheesecake Filling Requirements
The cheesecake filling relies on 16 ounces of full fat cream cheese, ¾ cup of granulated sugar, one large egg, ¼ cup of full fat sour cream or Greek yogurt, and ½ teaspoon of pure vanilla extract. The key here is minimal mixing once the egg is added; we want creamy, not airy.
This lean filling ensures the cheesecake sets densely without puffing up excessively and cracking during the cooling phase.
Secret Weapon Ingredients for Vibrant Red Velvet Crumb
The cake base requires 1 ½ cups of sifted all-purpose flour and 1 ½ cups of granulated sugar to form the structure and sweetness. For that classic depth, we use just 1 tablespoon of unsweetened (natural, not Dutch processed) cocoa powder.
Crucially, the moisture comes from 1 cup of room temperature buttermilk, balanced by the chemical reaction between the baking soda and 1 teaspoon of white vinegar, which enhances the tender crumb.
And of course, the signature vibrant hue is achieved using 1 ½ teaspoons of high-quality gel food colouring mixed into the wet components.
Essential Equipment Checklist Before You Start Mixing
The most specialized piece of equipment required for this magnificent Red Velvet Cream Cheese Cake is the 9 inch springform pan, which will cradle the cake and filling structure. You will also need two standard 8 inch round cake pans for baking the cake portions.
Remember to secure heavy duty aluminium foil for wrapping the springform pan securely this waterproof barrier is essential for the success of the water bath, or bain marie , which is non-negotiable for achieving a flawless cheesecake top.
Related Recipes Worth Trying
- Velvety Creamy Salmon Piccata Quick Lemon Caper Fish — Elevate weeknights with this Easy Creamy Salmon Piccata Panseared fillets draped in a restaurantquality lemon garlic cream sauce Ready in 30 mins
- The Ultimate Oreo Pudding Poke Cake Recipe Easy Decadent — Need an easy Oreo Pudding Poke Cake This Cookies and Cream version soaks a rich chocolate base in condensed milk for ultimate flavour Ready to bake
- Easy Strawberry Shortcake Trifles Recipe No Fuss Assembly — Need a showstopper This Easy Strawberry Shortcake Trifle delivers all the classic flavour in elegant layers Perfect for a British summer garden party Get...
step-by-step Guide to Achieving the Perfect Swirl
The process begins with preparing the two 8 inch red velvet cake layers. After preheating your oven to 350° F ( 175° C), you will whisk the dry ingredients (flour, sugar, cocoa, soda, salt) and then combine the wet (oil, buttermilk, eggs, colouring, vanilla).
Gently combine these two mixtures until just uniform overmixing develops gluten, leading to a tough cake that won't complement the tender cheesecake. Bake these layers for 25– 30 minutes, allow them to cool fully, and prepare your two 8 inch pans by greasing and lining them.
Next, focus shifts to the 9 inch springform pan. You must grease only the bottom and line it with parchment paper; the sides must remain ungreased to allow the cheesecake to cling and set correctly.
Once the cheesecake batter is mixed until smooth, place one fully cooled red velvet cake round into the base of the springform pan. Pour the entire, smooth cheesecake filling directly over this cake layer. This forms the primary base for our layered creation.
Mastering the Bake: Ensuring Flawless Cheesecake Integration
Baking this composite dessert requires a different approach than baking a standard cake, mainly due to the delicate nature of the cheesecake component.
Preparing the Tangy Cheesecake Layer First
After layering the cake base with the cheesecake batter in the springform pan, we move immediately to preparing the water bath. Place the foil wrapped springform pan inside a large roasting pan. This setup requires careful handling, as boiling water will soon be added.
Techniques for Layering the Moist Red Velvet Batter
Wait! In this specific layered design, we are actually using one cake layer as the base and planning to layer the second cake layer over the cheesecake filling, creating a "sandwich" effect, although many prefer the cheesecake on top.
For the classic swirled version we are describing here, we place the first cake layer on the bottom, pour the cheesecake filling over it, and then bake. If you were aiming for a full swirl, you would alternate dollops of both batters, but for this structured Red Velvet Cheesecake Cake , we are using the cake as a solid foundation for the cheesecake.
(For the purpose of this definitive Red Velvet Cheesecake Cake Recipe , we proceed with the cheesecake baked on top of the first cake layer, resulting in the cheesecake being the 'top' layer once inverted.)
Water Bath Wisdom: Preventing Cracks in Your Cheesecake Top
With the roasting pan positioned in the oven, carefully pour boiling water into the outer roasting pan until it reaches about halfway up the sides of the springform pan. This steam environment is the key to gentle, even cooking.
Bake at a slightly reduced temperature of 325° F ( 160° C) for approximately 55 to 65 minutes. You are looking for set edges but a distinct, gentle wobble in the absolute centre.
The Crucial Cooling Process for Setting Your Swirl Cake
Once baking time is complete, do not remove the cake from the oven immediately. Turn the heat off, prop the oven door open slightly (a wooden spoon works well), and allow the Red Velvet Cheesecake to cool gradually inside the ambient warmth for a full hour.
This gradual decrease in temperature is critical in preventing the drastic temperature shift that causes cracking. Once cooled inside, remove it from the water bath, let it come to room temperature on the counter, then cover and refrigerate for a minimum of six hours, though overnight ensures the best texture for slicing.
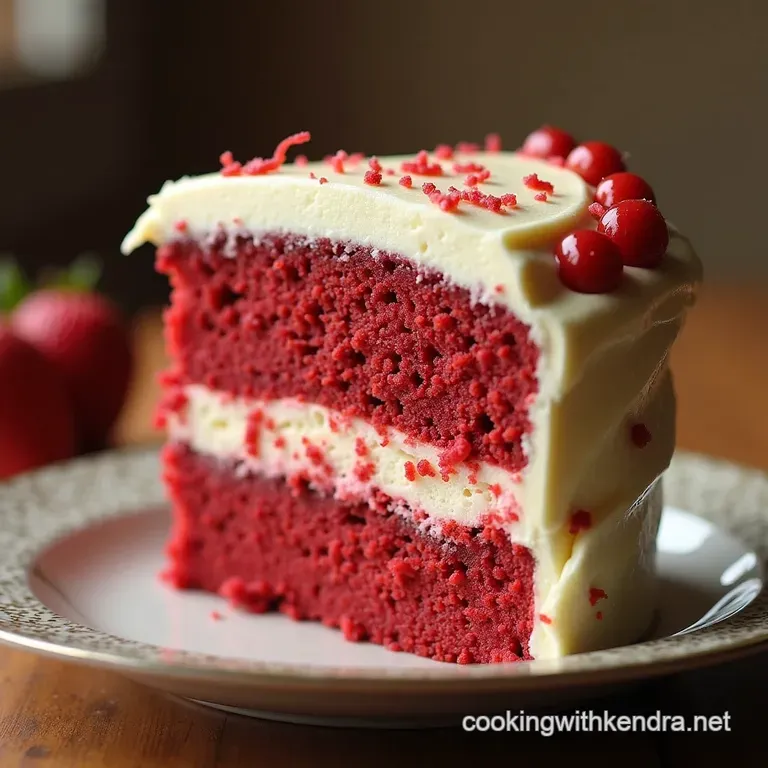
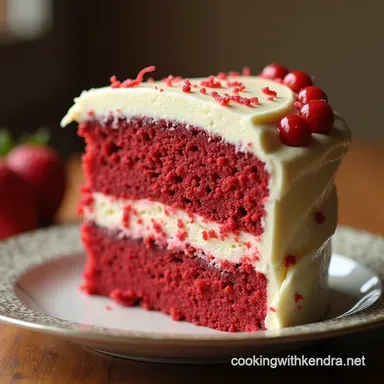
Elevating Your Creation: Frosting and Finishing Touches
Once your Red Velvet Cheesecake has chilled and firmed up completely, it's time for the crowning glory: the classic Cream Cheese Frosting. This topping harmonizes the tang of the cheesecake with the sweetness of the cake base.
To craft this, beat 8 ounces of cold cream cheese with ½ cup of softened, unsalted butter until perfectly light and fluffy. Gradually introduce 3 to 4 cups of sifted powdered sugar along with 1 teaspoon of vanilla extract. Beat until absolutely smooth and pipeable.
Carefully release the cheesecake from the springform pan sides a gentle run of a thin knife around the edge helps immensely and generously frost the cooled top and sides.
Troubleshooting and Long Term Care for Your Baking Triumph
Even the best bakers encounter hiccups, but the structure of this Red Velvet Cheesecake Cake Recipe allows for easy remedies.
Crafting the Signature Cream Cheese Topping
If your frosting appears too soft, simply chill the bowl of frosting for 15 minutes before beating again. If it seems too stiff, add a teaspoon of milk or sour cream until the desired spreading consistency is achieved.
This topping provides the necessary sweetness and visual appeal to finish your Red Velvet Cake .
Variations: Exploring Alternative Flavors Beyond Classic Red Velvet Cheesecake Cake
While the classic pairing is unbeatable, consider the Mocha Swirl variation by adding instant espresso powder to the cheesecake filling to complement the cocoa notes. Alternatively, for a textural surprise, try substituting the cake base with a rich chocolate cookie crumb base pressed into the springform pan, effectively turning it into a pure, glorious cheesecake studded with red velvet flavour elements.
Optimal Storage Methods to Maintain Freshness
Because of the dairy heavy components both the cake and the cheesecake this Red Velvet Cheesecake must be stored airtight in the refrigerator. It holds its texture beautifully for up to four days when kept cool.
Avoid freezing, as the texture of the baked cheesecake filling can become grainy upon thawing.
Expert Tips for Slicing and Serving This Layered Wonder
To achieve those perfect, clean slices essential for showcasing the layers of your Cheesecake Cake —use a long, thin, sharp knife dipped in hot water and wiped dry between every single cut.
Serving this magnificent confection slightly chilled, perhaps alongside a strong cup of coffee or a glass of Amaretto, ensures that every guest fully appreciates the complex textures of this spectacular creation.

Recipe FAQs
My Red Velvet Cheesecake Cake cracked during cooling; what did I do wrong?
Ah, the dreaded crack! This usually happens because the cheesecake cooled down too quickly after baking, causing the centre to seize up and pull away from the edges. Make sure you turn the oven off, prop the door open slightly, and let the cake temper inside for at least an hour before moving it to the counter.
Patience is key to a perfect, crack free top!
How far in advance can I make this Red Velvet Cheesecake Cake, and how should I store it?
This dessert actually improves with a good chill, so making it the day before serving is ideal aim for a minimum of 6 hours of refrigeration time. Store the fully frosted cake, covered loosely with foil or a cake dome, in the fridge.
It should keep beautifully for up to four days, though frankly, it rarely lasts that long in our house!
Do I really need that water bath (bain marie) for the cheesecake portion? I'm in a hurry!
If you want that luxurious, creamy texture that defines a good cheesecake, then yes, the water bath is absolutely non-negotiable it’s the secret weapon here! It creates a moist, even environment in the oven, preventing the edges from overbaking while the centre is still raw, which is what causes dryness and cracking.
Skip it, and you risk a rather tough result.
Can I bake the Red Velvet Cake layers separately and then assemble it like a standard layer cake instead of swirling?
Absolutely, you can! That’s a perfectly valid way to approach it if you prefer distinct layers over the swirl effect. Simply bake your two red velvet layers fully, let them cool completely, and then assemble them as you would a regular cake, using the chilled cheesecake layer as the filling between the two cake rounds, followed by the cream cheese frosting on top.
The red velvet colour seems dull; any tips for making it truly vibrant next time?
For that proper, show stopping crimson hue, ditch the liquid food colouring and invest in a high-quality gel paste colouring, like Americolor Super Red or Chefmaster No-Taste Red. Use a little more than you think you need, mixing it thoroughly with the wet ingredients before combining them with the dry.
Remember, the cocoa powder dulls the colour slightly, so don't be shy!
Red Velvet Cheesecake Cake
Ingredients:
Instructions:
Nutrition Facts:
| Calories | 769 kcal |
|---|---|
| Protein | 4.2 g |
| Fat | 21.5 g |
| Carbs | 57.3 g |
| Fiber | 3.9 g |
| Sodium | 6768 mg |
