The Teacup Tiffin Bitesized Cinnamon Swirls
- Why These Teacup Tiffins Redefine Cozy Baking
- The Allure of the Perfectly Portable Cinnamon Swirl
- Assembling Your Arsenal: Components for Fluffy Dough Perfection
- Crafting the Signature Gooey Cinnamon Filling
- From Simple Dough to Rolled Masterpiece: The Method
- Baking and Glazing: Achieving Golden-Brown Bliss
- Elevating Your Minis: Next-Level Variations and Toppings
- Storing Your Beloved Bite-Sized Treats
- Recipe FAQs
- 📝 Recipe Card
Why These Teacup Tiffins Redefine Cozy Baking
There is a magic inherent in the aroma of freshly baked goods, and few scents capture that feeling of domestic warmth quite like cinnamon. As someone deeply entrenched in the world of baking, I’ve seen plenty of massive, show stopping Cinnamon Rolls , but sometimes, the grandeur gets in the way of pure, simple enjoyment.
That’s where this recipe The Teacup Tiffin, our ultimate CinnaMinis —comes into play. These aren't just small versions of a classic; they are a thoughtfully designed bite sized indulgence, perfect for sharing (or not!) without the commitment of an entire giant coil.
They tap directly into that nostalgic sweet spot, reminiscent of the best Country Cooking Recipes that prioritize flavour over sheer volume. This recipe bridges the gap between an elaborate weekend project and a spontaneous treat, delivering incredible softness and that signature sticky swirl every single time.
The Allure of the Perfectly Portable Cinnamon Swirl
The beauty of the miniature format cannot be overstated. When you have a collection of small, perfectly formed Mini Cinnamon Rolls , portion control becomes irrelevant you simply reach for another one.
They bake faster, they cool faster, and they are infinitely easier to handle, making them ideal for brunch spreads, coffee breaks, or even as a delightful addition to your Breakfast Pastries repertoire.
Escaping the Tyranny of the Giant Roll: Introducing CinnaMinis
We all know the struggle: you pull a giant cinnamon roll from the oven, and while the outside is perfectly browned, the center remains slightly underdone, or worse, overly doughy. By scaling down the size, we control the heat distribution, ensuring that every single one of these CinnaMinis achieves an even, fluffy texture from edge to center.
This attention to detail transforms a simple pastry into an elevated experience, perfect for when you need Small Batch Cinnamon Rolls that still feel utterly luxurious.
A Sunday Morning Staple, Ready in Under an Hour
While true yeast baking requires patience, these treats are surprisingly swift. With only one dedicated proofing period required for the dough after which we shape, slice, and give them a brief final puff you can have these ready to devour in roughly two hours total time, with about 30 minutes of active involvement.
This efficiency makes the CinnaMinis Recipe a genuinely realistic choice, even for those slightly busier mornings when you still crave that satisfying bake. They are fantastic Mini Cinnamon Rolls For Breakfast when you want something more special than toast.
The Essential Flavor Profile: Sweetness Meets Spice
The heart of any great roll lies in the balance of its components. For these minis, we rely on a rich, tender dough, a filling boasting deep notes of dark caramel from brown sugar, and the assertive warmth of high-quality spice.
The final flourish, a decadent cream cheese glaze, melts beautifully into the warm crevices, delivering a tangy counterpoint to the intense sweetness, creating that unforgettable "gooey" sensation that makes Homemade Mini Cinnamon Rolls Easy and addictive.
Assembling Your Arsenal: Components for Fluffy Dough Perfection
The foundation of any spectacular roll is the dough itself. For these CinnaMinis , we aim for maximum tenderness. Start by warming one cup of whole milk until it reaches about 105° F– 115° F this is crucial for waking up the two and a quarter teaspoons of active dry yeast.
Stir in one teaspoon of granulated sugar to feed the yeast, letting it bloom for about ten minutes until foamy. Once activated, mix this lively yeast mixture with half a cup of melted, slightly cooled unsalted butter and two room temperature eggs.
In a separate bowl, combine three and a half to four cups of all-purpose flour with one teaspoon of fine sea salt. Gradually introduce the wet ingredients to the dry, mixing until a shaggy dough forms.
Kneading, either by a stand mixer with a dough hook or vigorously by hand for about five to seven minutes, develops the gluten structure, resulting in that desirable elasticity. The final dough should feel soft and slightly tacky, but manageable enough to work with.
Crafting the Signature Gooey Cinnamon Filling
While the dough undertakes its initial rise a process that takes between one to one and a half hours in a warm spot until doubled we prepare the star component. This filling needs to be spreadable yet robust enough not to leak out excessively during baking.
Take half a cup (one full stick) of softened, room temperature unsalted butter. Cream this thoroughly with three quarters of a cup of tightly packed light brown sugar until you achieve a sandy, homogenous paste. Then, stir in two full tablespoons of ground cinnamon.
This generous amount of spice is what ensures that glorious aromatic punch in every bite of your CinnaMinis .
Yeast Activation Secrets for Maximum Rise
The secret to that light, airy texture often debated in Homemade Mini Cinnamon Rolls Easy tutorials really hinges on yeast health. If your milk is too hot, you kill the delicate organisms; if it’s too cool, they sleep too long. Aim for that pleasant, barely warm temperature.
If you are unsure about your yeast’s viability, bloom it first in water instead of milk; if it foams vigorously, you are good to go. A healthy bloom guarantees that signature airy crumb we seek in all fine Breakfast Pastries .
The Best Types of Cinnamon to Maximize Aromatic Depth
Do not underestimate the quality of your cinnamon here; it’s a primary flavour driver. While standard ground cinnamon works, exploring Ceylon cinnamon (often called "true cinnamon") provides a more subtle, floral note, whereas Cassia cinnamon offers that bold, familiar intensity we associate with classic American baking.
For these CinnaMinis , I lean towards a robust Cassia blend to really ensure the spice cuts through the sweetness of the glaze.
Mandatory Tools for Miniature Baking Success
While you can certainly craft these rolls by hand, a stand mixer streamlines the kneading process significantly, giving you more time to tidy up! For the actual slicing, the most important tool isn't a knife; it's unflavored dental floss.
This allows you to achieve perfectly clean vertical cuts without compressing the delicate layers you so carefully built up during rolling, preserving the integrity of your Mini Cinnamon Rolls .
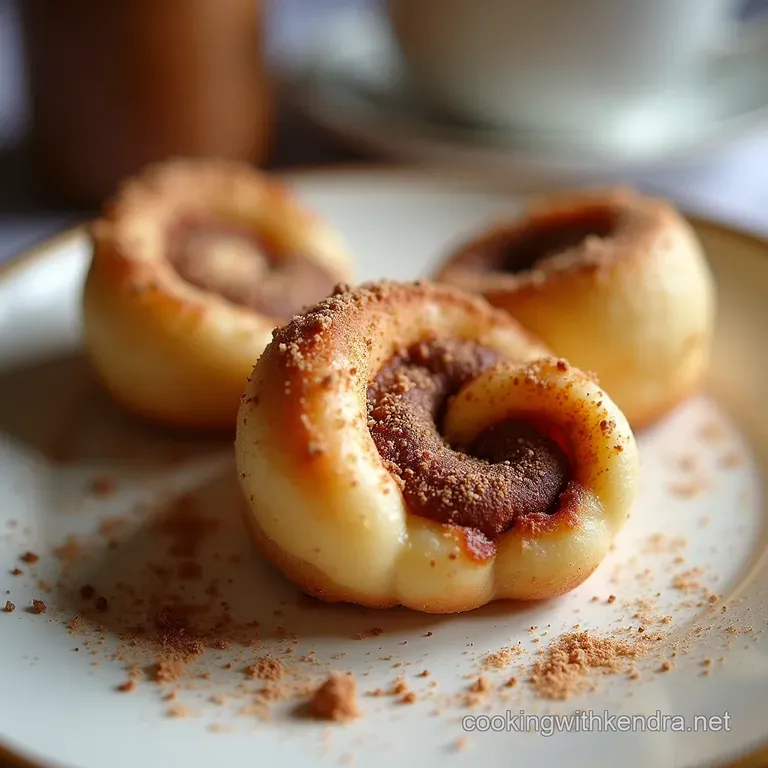
From Simple Dough to Rolled Masterpiece: The Method
Once the dough has doubled, gently punch it down to release the gases and turn it out onto a lightly floured surface. Using a rolling pin, work the dough into a large rectangle, aiming for about 12 by 18 inches. It’s essential to keep the thickness relatively even across the entire surface.
Next, take your prepared cinnamon butter filling and spread it evenly across the dough, making sure to leave a half inch border along one of the long edges bare this "seam" helps seal the log. Starting from the opposite long edge, roll the dough up tightly, creating a uniform cylinder.
Remember, a tight initial roll prevents gaps in your finished CinnaMinis . Now, grab that dental floss or a very sharp knife, and slice the log into 18 to 20 equal pieces, each about three quarters of an inch thick. Arrange these spirals snugly in a lightly greased 9x13 baking pan.
Cover them loosely and allow them one final proof for about 30 to 40 minutes until they look puffy and just touching. Preheat your oven to 375° F ( 190° C) during the last ten minutes of this second rise.
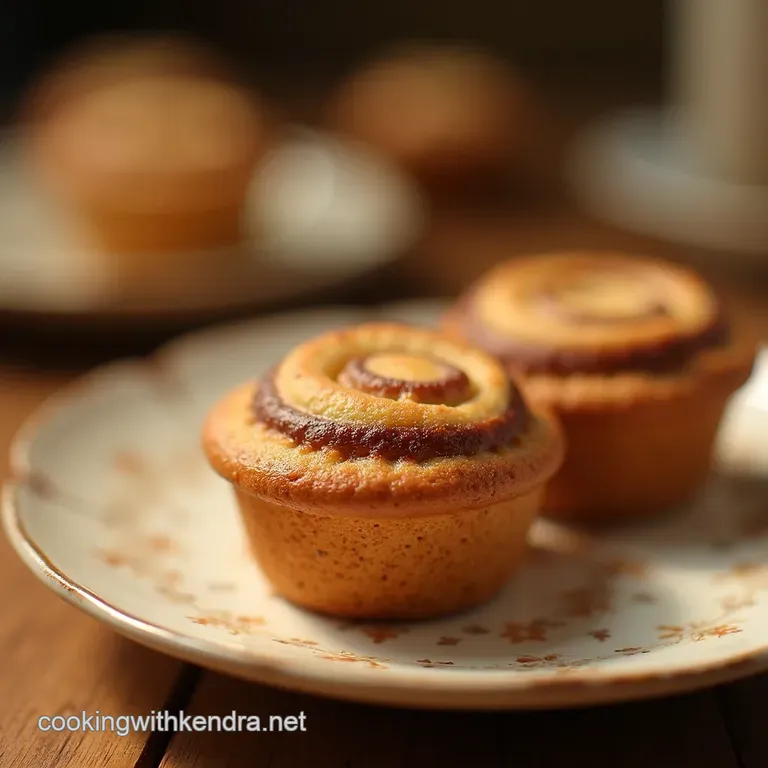
Baking and Glazing: Achieving Golden Brown Bliss
Bake the rolls for 15 to 18 minutes. To ensure even cooking, especially since these are Small Batch Cinnamon Rolls , consider rotating the pan halfway through the baking time.
They are done when the tops achieve a light golden brown hue, but crucially, do not overbake them.
Techniques for Achieving Featherlight Dough Texture
The final lightness comes from two factors: proper kneading and the second proof. That final 30-minute rest allows the yeast to create just enough lift to make the rolls soft, but not so much that they collapse in the oven.
The melted butter in the dough mixture also contributes significantly, coating the flour strands and inhibiting tough gluten development, leading to that melt-in-your mouth quality.
The Art of the Tight Swirl in Your CinnaMinis Dough
The tighter you roll the log, the more distinct and beautiful your swirl will be, offering more surface area for the gooey filling. If you roll loosely, you might end up with a more "crescent" shape rather than a tight spiral.
Press down firmly as you begin the roll, ensuring the first layer adheres well to the next, but avoid squashing the dough flat.
Determining Doneness Without Overbaking the Center
Since these are smaller, they cook faster than large versions. The visual cue light golden brown is your primary indicator. If you gently press the top of a roll, it should spring back slightly.
If you are concerned about the interior, a thermometer inserted into the center of the largest roll should register around 200° F ( 93° C). Immediately upon pulling them from the oven, prepare your glaze.
Elevating Your Minis: Next Level Variations and Toppings
While perfect on their own, these CinnaMinis welcome inventive twists. These small sizes mean they are excellent vehicles for incorporating other flavours without overwhelming the pastry itself.
Incorporating Bananas or Honey for Moisture Retention
For an extra layer of moisture and depth, consider using honey instead of some of the granulated sugar in the dough mixture (substituting about half the sugar content). Alternatively, for a flavour variation that also aids moisture, dice half a cup of very ripe banana and mash it gently into the softened butter before mixing with the brown sugar and cinnamon for the filling.
This introduces a subtle tropical sweetness that pairs wonderfully with the spice, making them an even richer addition to your repertoire of Breakfast Pastries .
Troubleshooting: Why Your Rolls Might Be Dense
A dense result usually points to one of two issues: inactive yeast (see above) or insufficient rising time. If the dough doesn't double, the final product won't either. Another common mistake is adding too much flour during the rolling stage; if the dough sticks, use a light dusting, not a heavy coating.
Remember, these are meant to be slightly tacky before filling. Over kneading can also lead to overly tough rolls, so stop once the dough is smooth and elastic, not after it becomes stiff.
The Definitive Guide to Freezing and Reheating for Freshness
These freeze beautifully! After baking and cooling completely , arrange the CinnaMinis in a freezer safe container, separating layers with parchment paper. They can be frozen for up to three months. To reheat, unthaw them overnight in the refrigerator.
Place the desired amount in a microwave safe dish and microwave for 15 30 seconds, or place them on a baking sheet at 350° F ( 175° C) for about 5 minutes until warmed through. Glaze fresh before serving.
Impressing Guests: Savory Twists on the Classic Roll
For a sophisticated brunch offering that contrasts the sweetness of other items, you can adapt this recipe for savory enjoyment. Omit the sugar from the filling and instead use softened butter mixed with grated Parmesan cheese, finely chopped rosemary, black pepper, and perhaps a touch of garlic powder.
These savory swirls make for an unexpected and incredibly impressive offering alongside other Country Cooking Recipes .
Storing Your Beloved Bite Sized Treats
Keep any leftover CinnaMinis stored in an airtight container at room temperature for up to three days. If you glazed them immediately after baking, they will stay softest. If you prefer to add the glaze just before serving the next day, store the unglazed rolls tightly wrapped.
The cream cheese glaze itself, due to its dairy content, should be refrigerated if storing for more than 24 hours, and then allowed to warm slightly before serving alongside the rolls.

Recipe FAQs
Why are my Cinna Minis not rising properly?
This is usually down to the yeast, bless its little heart! Make sure your milk was warm think bathwater temperature (105°F 115°F), not piping hot, as heat kills the yeast.
Also, ensure your yeast packet wasn't past its 'best by' date; it needs to be active to give your dough that proper lift we’re after.
How can I get the perfect swirl shape when cutting the Cinna Minis?
The secret weapon for a clean cut that doesn't squash your beautiful log is unflavored dental floss or a very sharp, thin knife. Wrap the floss under the dough log, cross the ends over the top, and pull gently but firmly. This stops the knife from dragging the filling and messing up your swirl.
Can I make these Cinna Minis ahead of time?
Absolutely, they're grand for prepping ahead! You can assemble the rolls, place them in the pan, cover them tightly, and refrigerate them overnight for a slow proof. In the morning, let them sit on the counter for about an hour while the oven preheats, then bake as directed you'll have fresh rolls ready for brunch!
My glaze is too runny/too thick; how do I fix the consistency?
If your cream cheese glaze is too thin, just whisk in a tablespoon or two more of sifted powdered sugar until it thickens up nicely. If it’s too stiff, add milk or cream, just a teaspoon at a time, until you achieve that perfect thick but pourable consistency you want it to drape elegantly, not sit like cement!
How should I store any leftover Cinna Minis so they don't go stale?
Store leftovers in an airtight container at room temperature for up to three days; keeping them in the fridge tends to dry them out faster, which is a tragedy. For the best experience, microwave a single serving for about 15 20 seconds before eating it brings that lovely gooey softness right back, just like fresh from the oven!
Teacup Cinnaminis Recipe

Ingredients:
Instructions:
Nutrition Facts:
| Calories | 398 kcal |
|---|---|
| Protein | 5.8 g |
| Fat | 19.9 g |
| Carbs | 31.4 g |
| Fiber | 4.6 g |
| Sodium | 2307 mg |
