Mac and Cheese Cups: Crispy Panko Bites Recipe
- Introducing the Perfect, Portable Macaroni Bake
- The Science of Structure: Achieving a Creamy Center and Solid Shape
- Pantry Checklist: Ingredients for Ultimate Macaroni Bites
- Baking Brilliance: Step-by-Step Method for Assembly and Baking
- Achieving Perfection: Expert Tips and Troubleshooting
- Making Ahead: Storage, Freezing, and Reheating Guide
- Presentation and Pairings: How to Serve Your Cheesy Nibs
- Recipe FAQs
- 📝 Recipe Card
Introducing the Perfect, Portable Macaroni Bake
That aroma, that crispy, buttery warmth filling your entire kitchen that’s how you know you’re about to achieve pure, cheesy nirvana. We’re taking the ultimate comfort food, the beloved macaroni and cheese, and transforming it into perfectly portable little bites with these glorious Mac and Cheese Cups .
Look, I absolutely love a giant, bubbling casserole dish of baked mac, but sometimes life demands structure, especially if you’re feeding a crowd or trying to pack a fuss free lunch. This easy Mac and Cheese Cups recipe is truly a lifesaver.
They are fast, shockingly affordable, and they look ridiculously professional, even though they’re dead easy to execute once you master the sauce.
I’ve spent years figuring out the precise ratio and method to ensure these little cheesy bundles are firm on the outside and unbelievably creamy on the inside. We are aiming for zero falling apart and zero sticking to the tin.
Forget the box mix; let’s dive into making the very best, crispiest Baked Mac and Cheese Cups you’ve ever tasted.
The Science of Structure: Achieving a Creamy Center and Solid Shape
Why do these Mac and Cheese Cups work where traditional recipes fail to hold their shape? It’s all down to three critical structural components: the binder, the base, and the cheese blend.
We are maximizing flavor while ensuring these little cups don't disintegrate the second they hit the plate.
The Magic of Muffin Tin Macaroni
Using a muffin tin isn't just about presentation; it’s about controlled baking. The smaller surface area allows the mixture to set quickly and evenly. The trick here is compaction.
When you press the mac mixture lightly into the tin, you’re essentially creating a stable, dense framework that allows the binder to do its job without oozing everywhere.
Why Mac and Cheese Cups are the Ultimate Party Appetizer
Seriously, who doesn't love individualized servings? Serving Mac and Cheese Cups means no serving spoons, no messy spills, and minimal dish cleanup just perfect, sturdy portions. When I host a party, I always include these alongside other easy handheld foods, maybe a great sandwich like my Crispy Panko Chicken Cutlet Sandwich for a full spread.
Understanding the Crispy Panko Edge
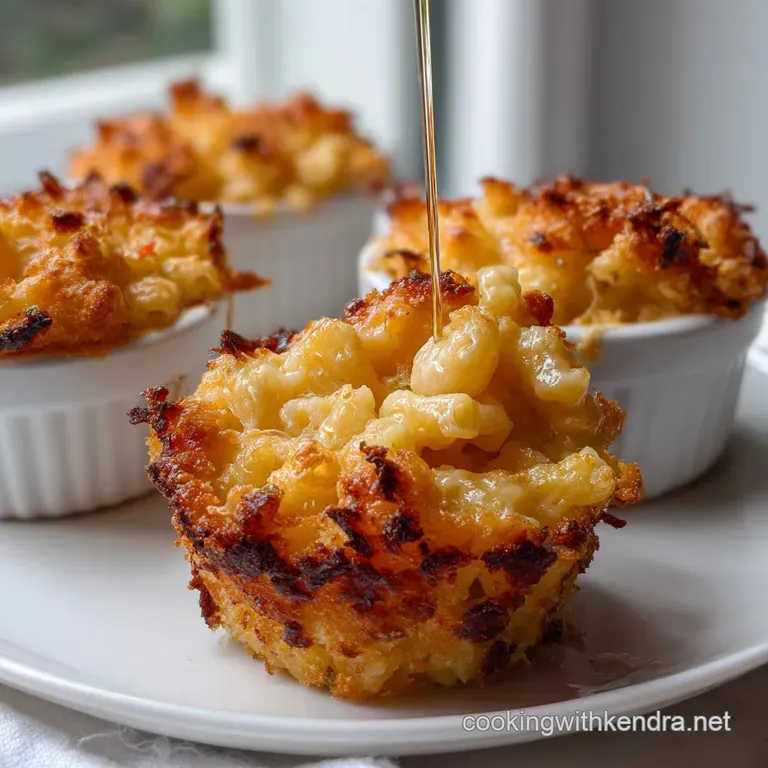
We aren't just lining the tin; we are creating a buttery, sturdy, flavor packed crust. Panko breadcrumbs are essential here because they are coarser and absorb less moisture than regular breadcrumbs, allowing them to remain crunchy even against the wet cheese filling.
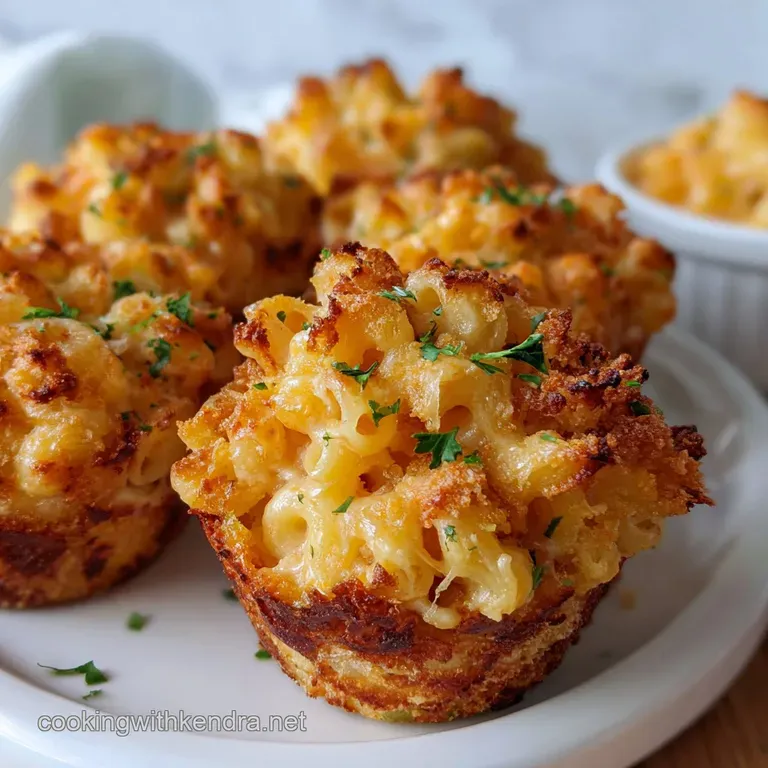
This crust provides the perfect audible "shatter" when you bite into the finished Mini Mac and Cheese Bites .
The Binder Breakdown: Key to Non-Crumbly Cups
This is the secret sauce. The béchamel (the butter/flour/milk base) is the initial glue, but the single large egg whisked into the cooled mixture is the non-negotiable binder.
That egg denatures meaning it cooks and stiffens during the final bake, ensuring that each Mac and Cheese Muffin Recipe holds its perfect cylindrical shape when you unmold it. Don’t skip the egg, or face the consequences of crumbly sadness.
Maximizing Cheesy Flavor: Combining Sharp and Melty Cheeses
To get that rich flavor, we use sharp cheddar, which provides the necessary bite. But sharp cheddar alone can sometimes turn greasy or stringy. I always stir in a couple of tablespoons of softened cream cheese.
It melts beautifully into the béchamel, adding a luxurious, velvety texture that keeps the finished Mac and Cheese Cups incredibly creamy on the inside, even after baking.
The Essential Role of the Buttered Panko Crumbs
You must use melted butter to coat those Panko crumbs until they look damp, like wet sand. This coating ensures that the crust crisps up beautifully in the oven rather than drying out. Plus, the fat content prevents the mac and cheese from welding itself permanently to your muffin tin!
Pantry Checklist: Ingredients for Ultimate Macaroni Bites
| Ingredient | Why We Use It | Substitution Notes |
|---|---|---|
| Sharp Cheddar | Flavor intensity and structure | Substitute up to half with Gruyère or Monterey Jack for meltability. |
| Elbow Macaroni | Classic shape, holds sauce well | Use Ditali, small shells, or small rotini. Ensure they are al dente . |
| Whole Milk | Richness for the béchamel | Use half and half or heavy cream for ultra richness, or a 2% milk if necessary (results will be slightly thinner). |
| Panko Crumbs | Structure and maximum crunch | Use crushed Ritz crackers (salty/rich) or standard breadcrumbs (less crispy). |
| Cream Cheese | Velvety binding agent | Substitute with a tablespoon of heavy sour cream, stirred in off-heat. |
Choosing Your Pasta Shape: Why Elbows Reign Supreme
Elbow macaroni is traditional for a reason! Its curved shape perfectly traps the thick, creamy béchamel sauce, ensuring maximum flavor density in every bite. Smaller shapes like ditali or small shells also work wonderfully for these individual portions, but you really want a small, sturdy noodle that won't turn to mush.
Selecting the Dairy Base: Milk vs. Heavy Cream Decisions
I always use whole milk for the béchamel. It’s rich enough to create a beautiful, smooth sauce, but it’s not so heavy that it overwhelms the cheddar. If you're feeling indulgent and want to make these Baked Mac and Cheese Cups truly decadent, swap out one cup of the whole milk for heavy cream.
It requires a little less flour in the roux, but the result is insanely velvety.
Mastering the Cheese Blend: Sharpness and Meltability
Remember my golden rule: Always grate your own cheese. Pre-shredded cheese is coated in starches that can make your sauce gritty or prevent proper melting. We combine the sharp cheddar for flavor and the cream cheese for that essential fudgy melt. If you need inspiration on dialing up the creaminess factor, you might enjoy my techniques for the Kraft Macaroni and Cheese Upgrade: Ultra Creamy Grown-Up where we focus purely on texture.
Panko vs. Regular Breadcrumbs: Ensuring Maximum Crunch
Panko is non-negotiable if you want that crisp edge on your Mac and Cheese Cups . Regular breadcrumbs give you a soft, slightly chewy texture, which is fine, but Panko delivers a satisfying snap .
Mix them thoroughly with the melted butter until they look like wet sand; that’s the texture you’re aiming for.
Baking Brilliance: step-by-step Method for Assembly and Baking
This is where the magic happens. Pay close attention to the temperatures and timing they matter immensely when preparing these Individual Mac and Cheese Servings .
Preparing the Foundation: The Buttered Panko Lining
First, preheat your oven to 375°F (190°C) and grease your 12 cup tin meticulously. Next, mix the Panko with the melted butter. Divide the mixture evenly among the cups. Now, this is crucial: use the back of a spoon or your finger to press the crumbs firmly across the bottom and slightly up the sides.
You are building a sturdy little wall. Blind bake them for 5 minutes; this sets the crust and guarantees maximum crispness later.
Building the Bechamel Sauce and Cheese Blend
While the crusts cool slightly, start the béchamel. Melt the butter (3 Tbsp), then whisk in the flour (3 Tbsp). Cook this roux for a full minute over medium heat until it smells slightly nutty, like popcorn. This removes that dreadful raw flour taste!
Gradually whisk in the lukewarm milk, pouring slowly until the sauce thickens and coats the back of a spoon. Remove it from the heat immediately.
Chef’s Note: Never add cold milk to hot roux. It creates instantly stubborn lumps that are impossible to fix. Use lukewarm or room temperature milk.
Stir in your seasonings the mustard, garlic powder, pepper, and that essential pinch of nutmeg then incorporate the grated cheddar and the softened cream cheese until the sauce is smooth, glossy, and intensely yellow.
Mixing, Filling, and Setting the Cups
Toss the cooked, al dente macaroni with the gorgeous cheese sauce until every noodle is drenched. Now, add the lightly beaten egg and mix it through quickly. This is the binder. Scoop the cheesy mixture evenly into the 12 Panko lined cups.
Press lightly to compact the filling; don't smash it down, just ensure there are no huge air pockets.
Oven Time: Achieving the Golden Crust
Bake the Mac and Cheese Cups for 20 to 25 minutes. They are ready when the cheesy filling is bubbling slightly and the tops are beautifully golden brown. The crust will look deep golden brown where it peeks out around the edges.
Pull them out of the oven and admire your work.
Achieving Perfection: Expert Tips and Troubleshooting
The Dreaded Sticking Problem: Proper Muffin Tin Preparation
If your Mac and Cheese Cups stick, it’s 100% due to poor tin prep. Even if you have a non-stick tin, you must grease and flour it. My favorite method is using baking spray combined with a light dusting of flour, or simply buttering and flouring each cup thoroughly.
The buttery Panko crust helps, but maximum lubrication is key to easy removal.
Avoiding a Runny Filling: Temperature Management
A runny filling usually means one of two things: either you didn't cook the béchamel thick enough (needed more flour/cooking time), or you skipped the binding egg. If your sauce feels thin before adding the pasta, return it to the heat and whisk vigorously for an extra minute.
The egg is crucial; it helps solidify the fat in the cheese and prevents the cups from weeping liquid.
Pro Tip: The Chill Time Advantage for Firm Shapes
Do not, under any circumstances, try to remove these hot from the tin. I tried it once, hoping to serve them piping hot, and watched my beautiful Mac and Cheese Cups collapse into sad little cheesy puddles. You must let them cool in the tin for at least 15 minutes.
This allows the egg binder to fully set, creating robust, stand alone portions. Run a small knife around the edge after the cooling time for a clean release.
Making Ahead: Storage, Freezing, and Reheating Guide
These are fantastic for meal prep. One of the best qualities of these Baked Mac and Cheese Cups is how well they store and reheat, making them perfect for lunch boxes.
How Long Do Baked Cups Keep in the Fridge?
Once baked and completely cooled, store the cups in an airtight container in the refrigerator for up to 4 days. I separate layers with wax paper or parchment to prevent sticking. They are actually quite good eaten cold, but reheating is preferred for the best texture.
Freezing Unbaked vs. Baked Macaroni Portions
You can freeze these both baked and unbaked.
- To Freeze Unbaked: Assemble the cups completely, but do not bake. Place the muffin tin into the freezer for 2 hours until the cups are solid. Pop them out, wrap them individually in plastic wrap, and store them in a freezer bag for up to 2 months. To bake from frozen, place them back in a muffin tin and bake at 350°F (175°C) for about 35– 40 minutes until piping hot and golden.
- To Freeze Baked: Cool completely. Flash freeze, then wrap and bag them as above.
Best Method for Reheating While Retaining Crispness
Never use the microwave, unless you enjoy sad, soggy breadcrumbs. The best way to reheat frozen or refrigerated Mac and Cheese Cups is in the oven or an air fryer.
- Oven: Preheat to 350°F (175°C). Place cups on a baking sheet and bake for 10– 12 minutes (or 15- 20 minutes from frozen) until the centers are hot and the crust is revitalized and crispy.
- Air Fryer: Reheat at 325°F (160°C) for about 5– 7 minutes. They come out perfect every single time.
Presentation and Pairings: How to Serve Your Cheesy Nibs
Once those Mac and Cheese Cups are cool enough to unmold, they are ready for their close-up. They stand perfectly on their own and require minimal dressing up. For a beautiful presentation, you can lightly dust them with smoked paprika or top them with a thin sprinkle of chopped chives or parsley right before serving. They pair wonderfully with a simple, tangy side salad or maybe a creamy, rich dip, like my Clam Dip Recipe: Chefs Best Creamy New England Style . Enjoy these portable pockets of cheesy joy!

Recipe FAQs
Why are my Mac and Cheese Cups falling apart when I try to remove them?
The key to structure is binding and cooling. Ensure your cheese sauce is thick enough to fully coat the pasta and not too runny before baking. Most importantly, you must allow the cups to cool in the muffin tin for at least 15 minutes before attempting removal; they firm up significantly as they cool.
Can I assemble these cups ahead of time?
Yes, this recipe is excellent for make-ahead preparation. You can mix the pasta and sauce, fill the muffin tins, cover them tightly, and refrigerate for up to 24 hours before baking. If baking from cold, increase the baking time by 5-8 minutes to ensure they are heated through.
What is the best cheese blend for ultimate flavour and creaminess?
A classic blend utilizes sharp cheddar for depth of flavour, paired with a high moisture melting cheese like Gruyère or Monterey Jack for texture. For a more sophisticated taste, incorporate a tablespoon of smoked Gouda or Pecorino Romano into your base mix.
Why did the inside of my mac and cheese cups turn out dry after baking?
Dryness is usually caused by using insufficient sauce for the amount of pasta or by over baking them. The goal is to bake only until the Panko crust is golden brown and the interior is hot, not until all moisture has evaporated.
Make sure the initial sauce ratio is slightly looser than you would use for traditional baked mac and cheese.
Can I freeze the Mac and Cheese Cups?
Yes, these freeze beautifully. Bake them completely, let them cool, and then place them in a freezer safe container separated by parchment paper; they will keep well for up to three months. To reheat, bake them straight from frozen at 350°F (175°C) until piping hot, usually taking about 15 to 20 minutes.
I don't have Panko breadcrumbs. What is a suitable substitute?
You can substitute Panko with regular dried breadcrumbs, though the resulting texture will be softer, or use finely crushed Ritz crackers for an extra buttery note. If you require a gluten-free crust, crushed gluten-free cornflakes mixed with butter provide an excellent crunch.
Can this recipe be adapted to be dairy-free or vegan?
It can certainly be adapted successfully using high-quality substitutes. Ensure you use a full fat, unsweetened plant based milk (like oat or soy) and high-quality vegan butter and cheese shreds for the roux and sauce base.
You may need a thickener, like nutritional yeast or a touch of potato starch, to help the vegan sauce bind the pasta effectively.
Ultimate Baked Mac And Cheese Cups
Ingredients:
Instructions:
Nutrition Facts:
| Calories | 188 kcal |
|---|---|
| Protein | 8.0 g |
| Fat | 10.0 g |
| Carbs | 15.0 g |
