Baked Stuffed Shells: the Ultimate Cheesy Ricotta Comfort Food
- Welcome to the Ultimate Baked Stuffed Shells Recipe
- The Science of Comfort: Why This Baked Stuffed Shells Recipe Triumphs
- Essential Ingredients for Nonna's Stuffed Shells
- Assembly Line: How to Make Baked Stuffed Shells, Step-by-Step
- Achieving Perfection: Chef's Pro Tips and Troubleshooting
- Prep Ahead: Storage and Freezing Baked Stuffed Shells Guide
- What to Serve Alongside Your Stuffed Shells
- Recipe FAQs
- 📝 Recipe Card
Welcome to the Ultimate Baked Stuffed Shells Recipe
Can we just talk about the sound this dish makes when it comes out of the oven? You hear the enthusiastic bubbling of the tomato sauce, the glorious sizzle of the melting mozzarella, and then that intoxicating aroma hits you rich tomato, earthy basil, and warm, salty cheese.
This is maximum comfort food, friends. It promises sticky fingers and zero regrets.
Honestly, this recipe for Baked Stuffed Shells (or Conchiglioni Ripieni if you want to get fancy) is a weekly lifesaver at my house. It requires basic ingredients, it stretches wonderfully to feed a crowd, and frankly, it’s one of the easiest big-batch meals you can make-ahead.
If you need a guaranteed win that feels fancy but requires minimal skill, stop right here.
I’ve made every mistake possible with stuffed shells over the years watery ricotta, dry pasta, scorched tops. But I've learned the handful of small, crucial steps that elevate this pasta dinner from "okay" to "absolute perfection." Grab your biggest baking dish, because we are making the cheesiest, creamiest, Baked Stuffed Shells with Ricotta you’ve ever tasted.
The Science of Comfort: Why This Baked Stuffed Shells Recipe Triumphs
A truly great stuffed shell isn't just a vehicle for cheese; it’s a delicate balance of moisture, flavor, and texture. We are focused on eliminating the three major shell disasters: watery filling, dry edges, and blandness. This recipe tackles all three head-on with simple logic.
Defining Nonna's Classic Three Cheese Ricotta Filling
The biggest secret to success is managing the moisture in your filling. Ricotta holds a frightening amount of water, which will leach out while baking and turn your beautiful shells into a watery, disappointing mess. You must drain the ricotta for at least 30 minutes.
Trust me, that single step changes the whole game. We use a three cheese blend (ricotta, mozzarella, and Parmesan) for complexity, and the egg acts as a crucial binder so the filling stays plush and structured after baking.
Achieving the Ideal Creaminess and Tang Balance
I swear by two simple additions to make the filling taste like it took you all day. First, a tiny whisper of freshly grated nutmeg is non-negotiable for any good Italian cheese filling; it beautifully enhances the dairy flavor without being overpowering.
Second, the small amount of balsamic vinegar we add to the sauce brings necessary tang and depth, ensuring the dish doesn't taste flat or overly sweet after all that long, slow baking.
Why Pre-Baking the Sauce Matters for Flavor Depth
You might be tempted to just pour cold sauce over everything, but don't. A quick 20 minute simmer for the sauce allows the garlic and oregano to fully hydrate and release their essential oils, building a deep, savory background.
This quick step is what differentiates a jarred flavor from a homemade taste, giving your Stuffed Shells Recipe that restaurant quality foundation.
Chef’s Note: Simmering the sauce means you’re basically flash aging the flavor. If you use good quality crushed tomatoes, that 20 minutes transforms them completely.
Essential Ingredients for Nonna's Stuffed Shells
We use simple pantry staples here, but quality makes a huge difference, especially with the dairy. You need the right pasta shape; look specifically for "Jumbo Shells" (Conchiglioni).
Choosing the Best Ricotta Cheese (Whole Milk vs. Part Skim)
Always reach for whole milk ricotta if you can find it. It has a richer flavor and, perhaps more importantly, its texture is naturally firmer, making it easier to drain and less likely to weep during baking.
Part skim works in a pinch, but you’ll definitely need to drain it longer to avoid a soupy result.
Mastering the Seasoning Blend (Herbs and Spices)
Beyond the essential salt and pepper, we rely on dried oregano in the sauce and fresh parsley in the filling. The grated nutmeg, as mentioned, is your secret weapon. If you happen to have fresh basil on hand, save it to chiffonade and scatter over the top after baking for a gorgeous finish.
Smart Substitutions for the Filling Cheeses
Got a picky eater or a missing ingredient? No sweat! Substitutions are the home cook's superpower.
| Ingredient | Role | Viable Substitution |
|---|---|---|
| Ricotta | Creaminess, Volume | Cottage Cheese (puree first!), or Cashew Ricotta (for vegan) |
| Mozzarella | Melt, Stretch, Goldening | Shredded Fontina or Provolone |
| Parmesan | Salty, Umami Kick | Grated Pecorino Romano (use less, it's saltier!) |
| Spinach | Color, Texture | Finely chopped, sautéed kale or frozen broccoli florets |
Assembly Line: How to Make Baked Stuffed Shells, step-by-step
This is where the magic happens. Getting organized makes the stuffing process feel less like a chore and more like a delightful assembly line.
Preparing the Jumbo Shells (Conchiglioni)
Cook your pasta until it is very al dente . Seriously, check the package directions and shave off 2 full minutes from the suggested time. The shells need to be firm enough to handle without falling apart, since they will continue softening in the hot sauce in the oven.
Drain them immediately, give them a quick cool rinse, and drizzle with a little olive oil to prevent sticking before setting them aside.
Creating the Creamy, Tangy Ricotta Mixture
In a gigantic bowl, combine your properly drained ricotta, the egg, the mozzarella, the Parmesan, and the squeezed dry spinach. Add the salt, pepper, parsley, and that all-important nutmeg. Mix thoroughly until everything is uniform, but don't overmix, or the ricotta can turn pasty.
Now is the time to taste and adjust the seasoning!
The Easiest Way to Fill and Stuff the Shells
Please, for the love of clean countertops, do not use a spoon. I spent years messing up my hands and my kitchen before I realized the genius of this method. Transfer the creamy filling into a large piping bag, or just snip a generous corner off a sturdy Ziploc freezer bag.
Pipe the filling right into the opening of each shell; it’s fast, clean, and ensures every shell gets the same amount of filling.
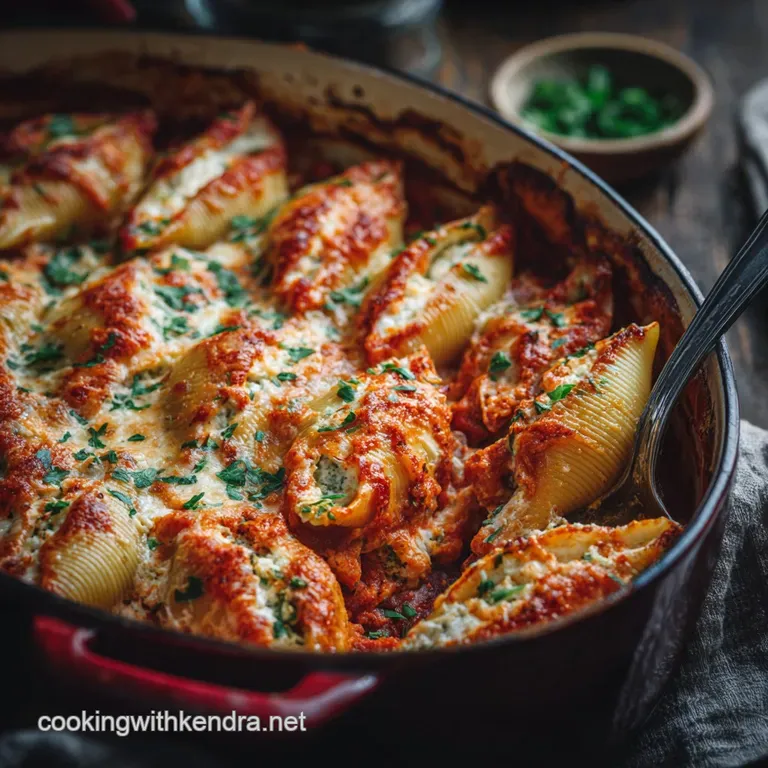
Layering and Baking the Casserole to Golden Perfection
Preheat that oven to 190°C (375°F). First, ladle a generous layer of sauce across the bottom of your baking dish this protects the pasta from sticking. Arrange your stuffed shells tightly, nestled into the sauce.
Pour the remaining sauce over the top, making sure the edges of the shells are covered so they don’t dry out. Finish with the remaining shredded mozzarella and Parmesan. Cover the pan tightly with foil and bake for 25 minutes; this steams the filling through.
Remove the foil and bake for another 10 minutes until the cheese is wonderfully golden and bubbly.
Achieving Perfection: Chef's Pro Tips and Troubleshooting
Preventing Shells from Sticking Together During Boiling
Simple fix: Use a very, very large pot of water, boil them hard, and stir constantly for the first 2 minutes after dropping the shells in. That initial agitation prevents the starch from binding them together. Draining and drizzling with oil post cooking is also vital.
Troubleshooting: Why Is My Ricotta Filling Watery?
You skipped the draining step! Next time, place the ricotta in a fine mesh sieve lined with cheesecloth (or even paper towels) and let it sit over a bowl in the fridge for an hour. If your mixture is already watery, stir in 1 2 tablespoons of flour or breadcrumbs to absorb the excess moisture before stuffing.
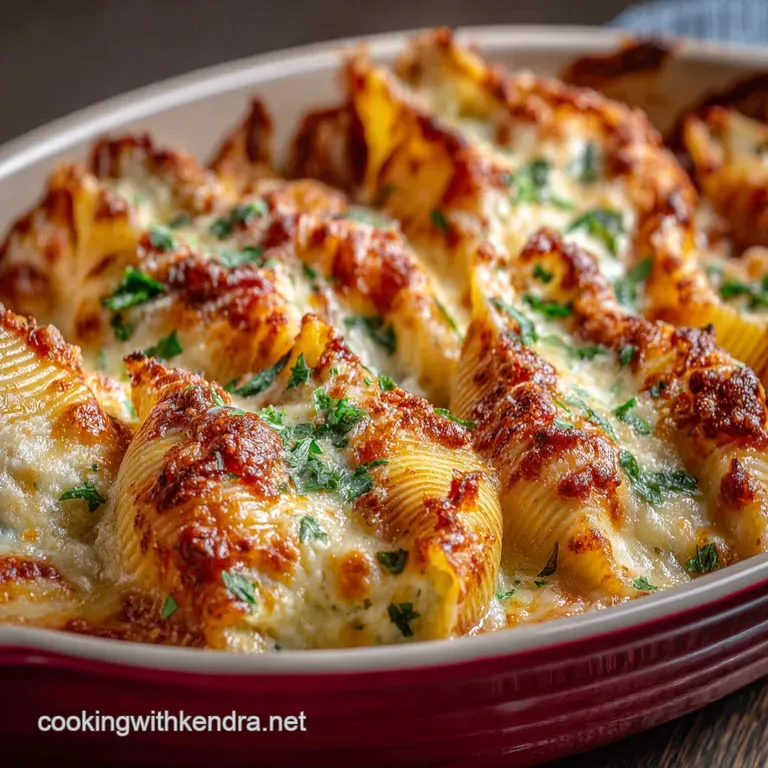
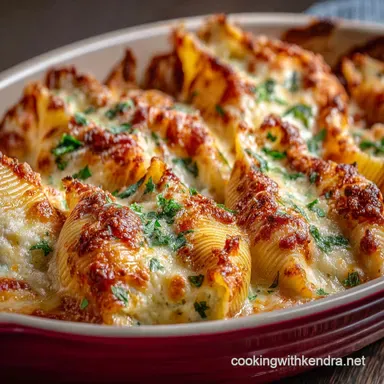
The Secret to a Golden Brown, Bubbly Top (Perfect Mozzarella Melt)
The key is timing. We bake covered first (to cook the pasta and heat the interior) and then we uncover it for the last 10 minutes. If you want next level golden color, turn on the broiler for the last 90 seconds, watching it like a hawk so it doesn't burn.
Can I Assemble the Dish the Day Before? (Refrigeration Prep)
Absolutely, and it’s highly encouraged! You can assemble the entire casserole, cover it tightly with plastic wrap and foil, and refrigerate it for up to 24 hours. When you’re ready to bake, let the dish sit on the counter for 30 minutes to take the chill off before placing it in the oven. You may need to add 5- 10 minutes to the total covered baking time. This is also my favorite strategy for my Vegetarian Baked Ziti: The Ultimate Creamy Crowd Pleaser recipe!
Prep Ahead: Storage and Freezing Baked Stuffed Shells Guide
Freezing Cooked vs. Uncooked Baked Stuffed Shells
I recommend freezing them uncooked . Assemble the whole dish in a freezer safe aluminum pan, cover it tightly with two layers of foil, and label it clearly. It keeps beautifully for up to 3 months.
When you want to bake it, transfer the frozen dish straight into a preheated 190°C (375°F) oven; just plan for 60– 75 minutes of covered cooking time.
If you freeze them cooked , the pasta can sometimes get a slightly mushy texture upon reheating, but it's still totally edible. Cooked shells stored in an airtight container are good in the fridge for 3 4 days.
Reheating Instructions for Maximum Freshness
If you're reheating leftovers from the fridge, the microwave works, but the oven is better. Place the portion in an oven safe dish, add a splash of extra sauce to prevent drying, cover with foil, and bake at 160°C (325°F) for 15– 20 minutes until piping hot.
The cheese will remelt perfectly.
What to Serve Alongside Your Stuffed Shells
You need something light and bright to balance all that creamy richness. A simple, crisp green salad tossed with a sharp vinaigrette is classic and essential. Don't forget the carbohydrate complement a slice of freshly baked garlic bread for mopping up every last bit of sauce is non-negotiable in my kitchen.
For dessert, something cool and contrasting is lovely after this hearty meal. If you're feeling ambitious, try my decadent Tiramisu Cheesecake: The Ultimate Baked Showstopper Recipe — it's the perfect sweet ending.

Recipe FAQs
Can I prepare the Stuffed Shells ahead of time and freeze them?
Yes, this recipe freezes beautifully, making it an excellent make-ahead dish. Assemble the shells completely in a freezer safe baking dish, but do not bake them.
Cover the dish tightly with plastic wrap and then foil, and freeze for up to 3 months. When ready to bake, thaw them overnight in the refrigerator and then bake as directed, potentially adding 10-15 minutes to the cooking time if they are still slightly chilled.
My finished shells look dry around the edges. How do I prevent them from drying out during baking?
Dryness is often caused by insufficient sauce or uncovered baking time. Ensure the baking dish has a generous layer of sauce beneath the shells and that the shells are mostly covered by sauce or the top layer of mozzarella.
For the first 25 minutes of baking, keep the dish covered tightly with foil to trap steam and moisture, removing it only for the last 10 minutes to allow the top layer of cheese to brown and bubble.
How can I prevent the jumbo shells from tearing when I boil or stuff them?
Boil the shells about 1 to 2 minutes less than the package directions suggest, aiming for a firm al dente texture, and drain them immediately.
Shock them quickly with cold water to stop the cooking process and prevent sticking. Handle them gently while stuffing; using a small teaspoon or transferring the filling into a piping bag minimizes damage and speeds up the filling process.
I want to add meat; what protein works best in the filling?
Lean ground beef, Italian sausage (sweet or hot), or a mixture of both works wonderfully to boost the richness of the dish. Brown the meat thoroughly and drain off any excess fat before allowing it to cool completely.
Once cooled, mix the meat directly into the ricotta filling along with the herbs and seasonings. Ensure the meat is cooled before mixing to prevent the ricotta mixture from becoming runny.
What is the best way to reheat leftover stuffed shells without drying them out?
For individual portions, the microwave works well, but always add a splash of extra sauce or water to the plate before heating to introduce moisture.
For larger amounts, cover the baking dish tightly with foil and reheat in an oven set to 325°F (160°C). This steamy environment ensures the shells warm through without hardening, typically taking about 20-30 minutes.
Can this recipe be adapted for a vegan or dairy-free diet?
Yes, it is entirely adaptable. Substitute the ricotta mixture with a seasoned cashew cheese, a blend of firm tofu with nutritional yeast, or a high-quality store-bought vegan ricotta alternative.
Replace the mozzarella and Parmesan with vegan cheese shreds that are specifically known to melt well, often based on starches or coconut oil, to achieve that classic cheesy pull.
Ultimate Baked Stuffed Shells Recipe
Ingredients:
Instructions:
Nutrition Facts:
| Calories | 650 kcal |
|---|---|
| Fat | 32 g |
| Fiber | 5 g |
