Ultimate Homemade Pizza Crust: a Dough to Remember
- The Journey to the Perfect Pizza Crust
- Your Ultimate Essential Ingredients Guide for Homemade Pizza Crust
- Mastering the Professional Cooking Method for Homemade Pizza Crust
- Pro Tips & Secrets for the Ultimate Pizza Crust
- Perfect Presentation: Making Your Pizza Instantly Gorgeous
- Storage & Make-Ahead Tips to Make Life Easier
- Creative Variations: Let’s Mix It Up!
- Complete Nutrition Guide: Keeping It Healthy
- Frequently Asked Questions
- 📝 Recipe Card
The Journey to the Perfect Pizza Crust
Let me take you back to a saturday night not so long ago. picture this: i was sprawled on the couch, lazy after a long week, dreaming about all the delicious pizza options out there.
Suddenly, it hit me. why not make my own pizza crust ? i could have the perfect blend of crispy and chewy, topped with whatever my heart (or stomach) desired.
So, i rolled up my sleeves and jumped into the kitchen. spoiler alert: it was a blast!
The Story of Pizza Crust
Using a traditional pizza crust recipe isn't just about making food; it's about crafting something special. pizza’s roots trace back to italy, where the neapolitan pie reigns supreme.
They knew a thing or two about tasty crust. fast forward to today, and pizza is a food universal comfort on a plate whether you're in new york or la.
When you learn how to make pizza crust , you’re not just whipping up dinner; you’re joining a time honored tradition!
Now, let's be real: making homemade pizza dough can seem like a challenge. but it’s worth it! with some kneading techniques for dough and just a bit of patience, you're on your way.
Most recipes take around 1 hour 15 minutes total, including resting time. and while we’re talking about cost, this hearty recipe is way cheaper than grabbing a slice from your favorite pizzeria plus, you get to make it just the way you like!
What Makes This Crust So Special?
So, why should you whip up your own easy pizza crust from scratch ? for starters, it’s all about health and nutrition.
You control what goes in! want a gluten-free pizza crust recipe ? no problem! just swap the flour. personalize your pizza dough with fresh herbs or garlic for a zing.
Plus, if you want a crispy pizza base , make sure you’re using a hot oven and a preheated pizza stone.
It makes all the difference!
Whether you’re throwing a pizza party or having a cozy dinner, homemade crust always impresses. think about it it’s the spotlight on your table.
What’s more exciting than your creations? plus, this crust pairs well with any toppings. want to try a classic margherita or load it up with veggies? the choice is yours!
Benefits You Can’t Ignore
Here’s a little rundown of the benefits of making your own pizza crust. firstly, the nutritional value can’t be beaten you know exactly what you’re eating! secondly, there’s that satisfaction of kneading dough and watching it rise it's like having a mini science experiment in your kitchen.
Also, consider the potential to impress your friends and family with your artisan pizza techniques . they won’t believe you did it all yourself!
And let’s not forget about pizza dough storage tips take care of your leftovers or freeze those extra portions for next time.
Got extra dough? shape it into balls, freeze it, and you've got a dough waiting to be transformed into delicious pies down the line.
So roll up your sleeves and get ready! the next step is gathering all the ingredients for pizza dough so we can dive into the magic of creating that ultimate homemade pizza crust .
Trust me, once you've tried this, you'll want to keep it as a staple in your kitchen repertoire. let’s get cooking!
Your Ultimate Essential Ingredients Guide for Homemade Pizza Crust
Alright, pizza lovers! if you've ever dreamed about creating your own pizza crust from scratch, you’re in the right place.
Making a crispy pizza base or a chewy pizza dough that rivals your favorite pizzeria isn't just for the pros.
Here’s a simple guide to your pizza essentials, making sure your crust is nothing short of perfection.
Premium Core Components
First off, let's talk ingredients ! To whip up a batch of homemade pizza dough, you'll need some premium stuff. Here's a breakdown of the essentials:
Flour types for pizza: the main player here is 4 cups of all-purpose flour (500g) . this is your go-to for a good balance of texture.
For a chewier feel, you might wanna try bread flour.
Liquid Gold: Use 1 ½ cups of warm water ( 110° F to 115° F or 43° C to 46° C) .
This helps activate yeast . Speaking of yeast...
Yeast activation: you'll need 2 ¼ teaspoons of active dry yeast (1 packet) . make sure it’s fresh check the expiration date.
Mix it with a little sugar and your warm water, and let it sit until it’s frothy, usually 5- 10 minutes.
The Flavor Makers: Don't forget 2 teaspoons of salt (10g) for taste and 2 tablespoons of olive oil (30ml) to give your dough richness.
Quality & Freshness
Pick good quality ingredients. fresh flour and yeast make all the difference. and for storage? keep your flour sealed in a cool, dry place, away from moisture.
An unopened packet of yeast can last for ages, but once opened, keep it in the fridge.
Your Signature Seasoning Blend
Alright, let's kick up the flavor a notch! Your pizza crust recipe can shine with a few herbs. Here’s how to jazz it up:
Herb Selections: A pinch of oregano or thyme can be mixed directly into your dough. This adds a nice Italian vibe.
Flavor Enhancers: Consider adding garlic powder for a kick. It’ll give your crust an aromatic twist!
Regional Variations: If you wanna switch it up, Italian seasoning or even spicy pepper flakes can give it some fun character.
Smart Substitutions
Life happens, and sometimes you’re missing an ingredient. But don't worry! Here are some common alternatives :
Allergic to gluten? Try a gluten-free pizza crust recipe with a great gluten-free flour blend.
Out of olive oil? Any vegetable oil will do.
Emergency yeast fix: If you’re out, try using baking powder instead, but that changes things up a bit.
Kitchen Equipment Essentials
Now let’s talk tools. You don’t need a fancy kitchen; just a few basics will do:
Must Have Tools: A large mixing bowl , wooden spoon , and rolling pin are all you need.
A pizza stone or baking sheet is great for that crispy finish.
Preparation Tips: Make sure your surfaces are floured to avoid dough sticking when you roll it out. And for superb results, keep your tools clean!
Tips for Perfect Homemade Pizza
Proof Your Dough Right: After kneading, let it sit in a warm place, covered, until doubled in size about an hour. This is where the magic happens!
Kneading Techniques for Dough: Knead until it’s smooth, around 8- 10 minutes. A good knead will enhance the texture, giving you that classic traditional pizza crust recipe feel.
Baking Stone vs Baking Sheet: If you're serious about pizza, a baking stone is your best friend for that high heat, yielding a really crispy pizza base .
So, now that you’ve got a solid handle on your pizza essentials, you’re ready to dive into the crafting phase! up next, we’ll walk you through how to make the most glorious homemade pizza dough step by step.
Get ready for a world of delicious toppings and fresh, baked goodness. happy baking, my friend!
Mastering the Professional Cooking Method for Homemade Pizza Crust
Oh my gosh, if there’s one thing we all can agree on, it’s that a delicious pizza crust can make or break your pizza night.
I remember the first time i tried making my own dough it was a little chaotic! but once you nail down the professional cooking method , you'll be slinging homemade pizza like a pro.
Let’s break this down together!
Essential Preparation Steps
Before we dive into making that crispy pizza base , let's chat about the prep work, shall we? Getting organized is key.
Mise en Place: This fancy French term just means “everything in its place.” Gather all your ingredients like flour, yeast, and warm water. Trust me, it makes the process way smoother.
Time management tips: give yourself a good chunk of time. prep time is about 15 minutes with a resting time of 1 hour before cooking.
It feels like forever, but it's worth it!
Organization Strategies: Keep your workspace tidy. A clean kitchen is a happy kitchen. Plus, you won’t lose track of your dough or tools mid-process.
Safety Considerations: If you're using your oven at high temperatures think 475° F to 500° F watch those fingers! Always use oven mitts when handling hot stuff.
Step-by-step Process
Okay, let's get down to business with the actual steps! Here’s how to make that easy pizza crust from scratch :
Activate yeast: in a small bowl, mix 1 ½ cups of warm water (around 110° f to 115° f ) with 2 ¼ teaspoons active dry yeast and a tablespoon of sugar.
Let it sit for about 5- 10 minutes until it’s frothy.
Mix ingredients: grab a large bowl and combine 4 cups of all-purpose flour and 2 teaspoons salt . pour in that bubbly yeast mixture and 2 tablespoons olive oil .
Mix until a rough dough forms.
Knead the dough: dust a surface with flour and knead for about 8- 10 minutes until it’s smooth and stretchy.
This is where those kneading techniques for dough come into play!
First rise: place the dough in an oiled bowl, cover it, and let it rest in a warm spot until it’s doubled in size.
This takes about 1 hour . that’s called proofing!
Shape: Punch down the dough to release any air. Divide it into two portions, shape them into balls, and let them rest again for 10 minutes .
Roll Out: Roll each ball into a circle 12-14 inches wide. You can go rustic and use your hands or use a rolling pin.
Prebake: If you have a baking stone, preheat your oven. If using a baking sheet, sprinkle it with flour. Prebake for 5- 7 minutes .
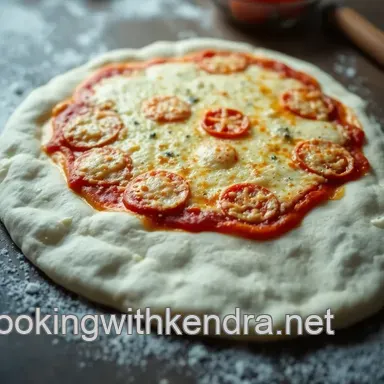
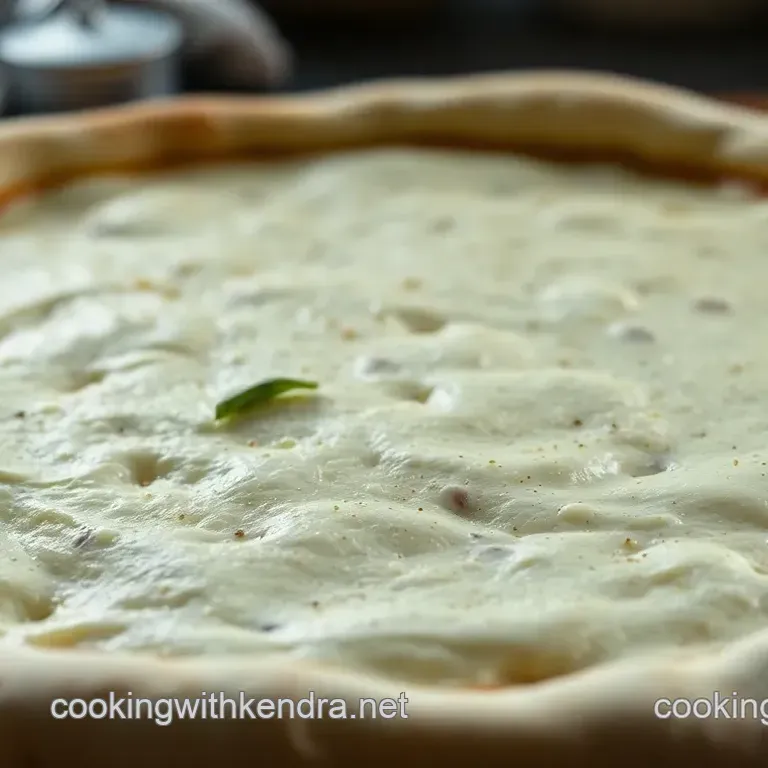
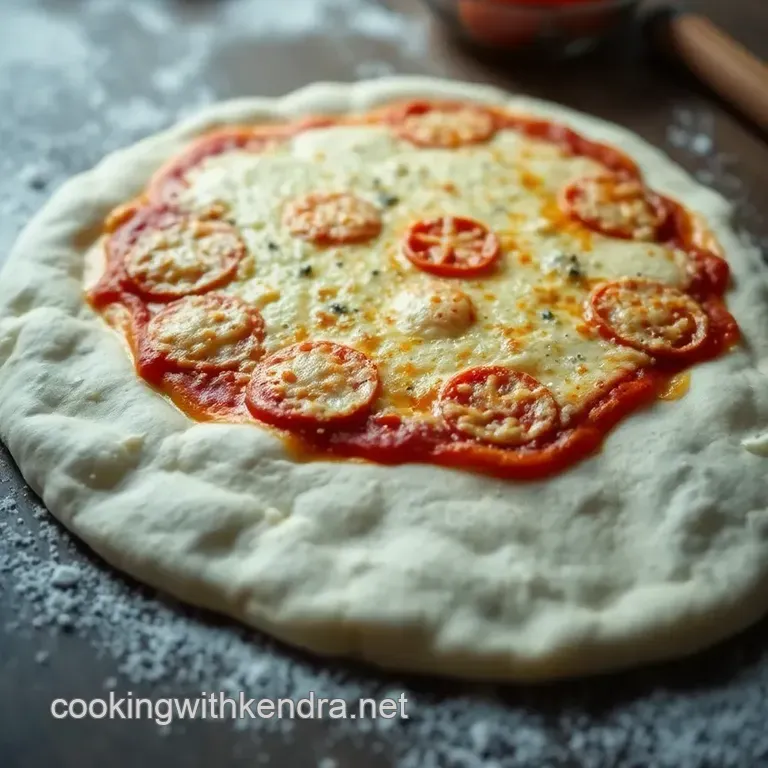
Top and Bake: Add your favorite toppings and bake for another 10- 15 minutes until the edges are golden and the cheese is all melty.
Expert Techniques
So, you’ve gone through the steps but let’s talk finesse!
Professional Methods: You can use a baking stone vs baking sheet ; stones give a way crispier texture, much like those pizza joints you love.
Critical Steps Explained: Timing is crucial here. If you don’t bake it long enough, you’ll get a soggy crust.
Quality Checkpoints: Keep an eye on the cheese; if it's bubbling and the crust is golden, you’re in business!
Troubleshooting Tips: If the crust is tough, you may have over kneaded it. But if it’s too soft, let it rest longer during the pizza dough resting time .
Success Strategies
To ensure your homemade pizza is a hit, avoid these common mistakes:
Don’t Rush the Proofing: Patience is a virtue. Good dough needs its resting time to rise perfectly.
Quality Assurance Tips: Always taste your dough once mixed and adjust salt if needed. It should feel soft yet resilient.
Perfect Results Guide: When trying new pizza crust variations , keep the dough simple. The pizza toppings will shine through!
Make-ahead options: you can even make the dough in advance and store it in the fridge for a day. just remember to take it out and let it come to room temp before rolling it out.
There you have it the secret sauce for whipping up a homemade pizza crust that’ll impress everyone! with a little practice, you’ll be creating gourmet pies in no time.
Next up, let’s explore some additional information on honing your pizza making skills!
Pro Tips & Secrets for the Ultimate Pizza Crust
Okay friends, let’s dive into the secrets that can turn your homemade pizza crust into something legendary. You know, the kind of crust that makes your friends think you’re a pizza making wizard!
Chef’s Personal Insights
First off, i’m all about that easy pizza crust from scratch vibe. the secret? kneading techniques for dough . you wanna knead until the dough feels smooth and silky.
Don’t rush it! imagine you’re giving the dough a nice massage. it really helps develop that gluten for a chewy pizza dough that stands up to toppings.
Time Saving Techniques
So, if you’re in a rush but still want that fresh pizza, try this: proofing pizza dough in a warm area.
Instead of one hour, you can sometimes get away with 30 minutes if your kitchen is toasty. pop it in the microwave with a cup of hot water.
Instant warmth!
Flavor Enhancement Tips
Wanna take things up a notch? add herbs or spices to the dough, like italian seasoning or garlic powder. it’s like giving a little italian ciao to your crust.
You can even make a pizza crust with herbs that’ll blow your mind and friends alike!
Presentation Advice
Lastly, let’s talk looks. Always aim for a colorful mix of toppings, and consider using fresh basil or arugula on top after baking. Trust me, it screams Insta worthy!
Perfect Presentation: Making Your Pizza Instantly Gorgeous
Alright, let’s get real: we eat with our eyes first. A gorgeous pizza is half the battle. Here are a few tips to help you nail that presentation.
Plating Techniques
When it comes to plating, try this: place your pizza on a cutting board, slice it into wedges, and display it like a masterpiece.
Use a pizza peel if you have one to give it that legit pizzeria look.
Garnish Ideas
A sprinkle of freshly grated Parmesan or a drizzle of balsamic glaze can dress up your creation. It’s these little details that’ll elevate your pizza game!
Color Combinations
Balance is key! Get those reds, greens, and yellows in there. Think colorful bell peppers, cherry tomatoes, and green basil. It’s good for the eyes and the soul.
Visual Appeal Tips
Experiment with how the slices are arranged or even layer the toppings differently. A little creativity can turn your pizza into a work of art. You got this!
Storage & make-ahead Tips to Make Life Easier
Let’s be real life is busy! So, let’s talk about how to store that easy homemade pizza dough or crust you’ve put in the time to make.
Storage Guidelines
If you’ve made extra crusts, keep ‘em in an airtight container or wrap them tightly in plastic wrap. They’ll last a few days in the fridge.
Preservation Methods
For longer storage, freeze your rolled out dough for up to three months. Remember, pizza dough storage tips are your friend!
Reheating Instructions
When it’s time to devour, preheat your oven to 375° F and bake for about 10- 12 minutes until warmed through. Keep the crust nice and crispy!
Freshness Duration
Generally, the homemade pizza keeps well for about 3-4 days in the fridge.
Creative Variations: Let’s Mix It Up!
Who says pizza has to be the same every time? Spice things up with these fun variations!
Flavor Adaptations
Mix it up with unique toppings like pear and gorgonzola for a sweet salty mashup. Don’t be scared to get creative!
Dietary Modifications
Got gluten-free friends? No worries try a gluten-free pizza crust recipe . You can find mixes that still deliver a solid crust.
Seasonal Twists
Use seasonal veggies! Zucchini in the summer, pumpkin in the fall. Go with the seasons for fresh flavors.
Regional Variations
Feeling adventurous? Try a Detroit style pizza with a thicker crust or a classic Neapolitan with a rustic pizza crust . Get inspired by the pizza styles around the country!
Complete Nutrition Guide: Keeping It Healthy
Let’s chat about how to make your pizza both delicious and nutritious. Always a good combo!
Detailed Breakdown
Each slice of your homemade pizza could pack about 250 calories (depending on toppings, of course). Check out the nutritional information for pizza to keep tabs.
Health Benefits
Homemade pizza can be healthier than takeout since you control the ingredients. You can load it with veggies and opt for lower fat cheese no more sneaky additives!
Dietary Considerations
If you’re counting carbs or calories, consider using a crispy pizza base made with whole wheat flour.
Portion Guidance
Aim for 1-2 slices as a serving size. Pair with a side salad for a balanced meal!
Overall, making pizza at home can be a fun, creative experience. so, roll up your sleeves, grab your rolling pin, and let’s get to crafting that perfect pie! whether you’re thinking how to make pizza crust for a family dinner or a party with friends, just remember: it’s all about the love you put into it.
Happy baking!
Frequently Asked Questions
How do I know when my pizza dough has risen enough?
Your pizza dough is ready when it has doubled in size, which typically takes about one hour in a warm environment. You can also gently poke the dough; if it springs back slowly, it’s ready to be shaped.
What is the best way to store leftover pizza dough?
To store leftover pizza dough, wrap it tightly in plastic wrap and place it in the refrigerator for up to 3 days. You can also freeze it for longer storage, just make sure to let it thaw in the fridge overnight before using.
Can I make pizza crust without yeast?
Yes! You can make a quick pizza crust using baking powder instead of yeast. Simply combine flour, baking powder, salt, and water for a speedy dough, although the texture will differ from traditional yeast dough.
How to make pizza crust that’s crispier?
For a crispier pizza crust, preheat a pizza stone in your oven and roll the dough thinly. Also, don't overload your crust with toppings, and consider baking at a higher temperature for a shorter time to avoid sogginess.
What tips do you have for making the perfect pizza crust?
Focus on proper hydration of the dough by using warm water and allowing sufficient time for proofing. Knead until the dough is smooth and elastic, and consider adding flavors, such as herbs, directly into the dough. Finally, let the baked crust cool for a few minutes before slicing to maintain its texture.
How can I make a healthier pizza crust?
To make a healthier pizza crust, consider using whole wheat flour instead of all-purpose flour, which offers more fiber and nutrients. You can also add ground flaxseed or oats for added health benefits, and top your pizza with plenty of vegetables!
Ultimate Homemade Pizza Crust A Dough To Remembe