Walking Taco Casserole: Creamy and Crunchy
- Time: Active 15 minutes, Passive 20 minutes, Total 35 minutes
- Flavor/Texture Hook: Velvety cream cheese base topped with crunchy, salty chips
- Perfect for: Busy weeknight dinners or game day family gatherings
- Essential Heat Management and Crunch Protection Methods
- Precise Measurements for a Reliable Family Dinner Success
- Selecting Quality Components for Maximum Savory Flavor Impact
- Minimal Tool Setup for Efficient Weeknight Kitchen Workflow
- Step by Step Transformation from Raw to Radiant
- Preventing Common Texture Pitfalls and Temperature Errors
- Creative Substitutions to Suit Every Family Palate Preference
- Smart Storage and Leftover Repurposing Strategy Guidelines
- Visual Finishing Touches for a Restaurant Quality Appearance
- Myths About Casserole Construction
- Recipe FAQs
- 📝 Recipe Card
Listen for that initial sizzle when the ground beef hits the pan. It is the sound of a great dinner starting. For a long time, I believed that a walking taco was something you only ate out of a crinkled foil bag at a high school football game or a summer fair.
There is a common myth that bringing this concept into a casserole dish results in a soggy, sad mess that loses the spirit of the original. Forget everything you know about those limp, over processed versions. You do not need to settle for mediocre texture just because you want the convenience of a bake.
I remember the first time I tried to make this for my family. I just threw everything in a bowl and hoped for the best. The chips turned into mush within five minutes, and the beef was swimming in grease. It was a disaster, but it taught me a vital lesson about the order of operations.
This recipe is not just about dumping ingredients; it is about building a structure that protects that signature crunch while ensuring every bite is loaded with savory, spiced goodness. We are taking those childhood memories and giving them a serious upgrade that actually works for a Tuesday night at home.
The magic happens in the layering. We are creating a thermal and moisture barrier that keeps the wet ingredients away from the dry ones until the very last second. It is a simple shift in how you think about assembly, but it makes all the difference in the world.
When you pull this out of the oven and hear the cheese bubbling and see those chips standing tall, you will know exactly what I mean. Right then, let's get into why this method is the one you will keep on your fridge for years to come.
Essential Heat Management and Crunch Protection Methods
Thermal Fat Barrier: Placing a layer of shredded cheese directly on top of the beef mixture acts as a shield, preventing the steam from the meat from migrating into the corn chips and making them soft.
Moisture Reduction: Simmering the taco seasoning and water until the liquid mostly evaporates ensures the beef is flavored deeply without leaving a puddle of water at the bottom of the dish.
Emulsification Stability: Integrating softened Neufchâtel cream cheese creates a cohesive, velvety sauce that binds the beef and beans together, preventing the separation of fats during the baking process.
Starch Gelatinization: Preheating the oven to exactly 190°C (375°F) allows the chips to toast and the cheese to melt rapidly before the internal moisture can compromise the structural integrity of the corn chips.
| Cooking Method | Total Time | Texture Result | Best For |
|---|---|---|---|
| Stovetop Only | 20 minutes | Softer chips, gooey cheese | Quickest meal possible |
| Oven Baked | 35 minutes | Shatter crisp chips, toasted edges | Family dinner quality |
| Slow Cooker | 4 hours | Fully soft, dip like consistency | Large parties or potlucks |
The choice between stovetop and oven really comes down to how much you value that toasted chip flavor. While the stovetop is faster, the oven creates a specific browning on the cheese and a crunch in the corn chips that you simply cannot replicate in a pan.
If you are in a massive rush, the stovetop version works, but you lose that "shatter" factor that defines the walking taco casserole 2 experience.
Precise Measurements for a Reliable Family Dinner Success
When we talk about making a walking taco casserole 2, precision matters more than you might think for such a casual dish. We are aiming for a specific ratio of protein to crunch. If you use too much beef, the dish becomes heavy and greasy; too many chips, and it feels like you are just eating a bag of snacks for dinner.
I have found that 1.5 lbs (680g) of lean ground beef is the sweet spot for a standard 9x13-inch baking dish. This provides enough substance to feed seven people without overwhelming the other layers.
The timing is also a crucial numeric checkpoint. You want exactly 20 minutes in the oven. Any less, and the cheese in the middle won't be fully molten; any more, and you risk burning the delicate tips of the corn chips.
I always set a timer for 15 minutes and then start hovering near the oven door. You are looking for those chips to take on a slightly darker, golden hue and for the cheese to be frantically bubbling around the edges.
Weight also plays a role in the consistency of the base. Using exactly 4 oz (113g) of cream cheese provides that "velvety" mouthfeel without making the dish taste like a cheesecake. It is a background player that adds body and helps the taco seasoning cling to every single grain of beef.
Trust me, skipping the drain step on the beef will ruin these ratios, as the excess fat will break the emulsion of the cream cheese and leave you with a separated sauce.
Selecting Quality Components for Maximum Savory Flavor Impact
| Ingredient | Science Role | Pro Secret |
|---|---|---|
| Lean Ground Beef (93/7) | Protein Structure | Pat the meat dry before browning to get a better sear and more flavor development. |
| Neufchâtel Cream Cheese | Emulsifier | Ensure it is fully softened at room temperature to avoid white clumps in your sauce. |
| Corn Chips | Starch & Texture | Use the standard thickness chips; thin "restaurant style" chips will dissolve under the heat. |
| Black Beans | Fiber & Bulk | Rinse them thoroughly until the water runs clear to remove excess salt and metallic can flavor. |
Using the right beef is the foundation here. I always opt for a 93/7 blend. Some folks think you need the fat of an 80/20 for flavor, but in a casserole where we are adding cream cheese and cheddar, that extra fat just turns into a lake at the bottom of your pan. The 93/7 stays beefy and firm.
If you only have higher fat beef, you must be aggressive with your draining. I actually use a paper towel to blot the pan after browning just to be sure.
The taco seasoning choice is another place where you can really improve the outcome. I prefer a low sodium version because it allows the salt from the corn chips and the sharp cheddar to shine without making the whole dish a salt bomb.
If you have the time, making your own blend with smoked paprika, cumin, and onion powder gives you way more control over the "robust" profile of the meat.
For the chips, don't even think about using the thin, airy ones. You need the structural integrity of a classic, thick corn chip. They act as the "rebar" of your casserole. When they hit the oven, the oils in the chips actually help them fry slightly against the cheese, creating a texture that is both tender and crisp.
It is a beautiful thing when that starch interacts with the heat correctly.
Minimal Tool Setup for Efficient Weeknight Kitchen Workflow
You really don't need a kitchen full of gadgets for this one. A solid 12 inch skillet is your best friend here. I prefer a heavy bottomed stainless steel or cast iron pan because they hold heat better, which means your beef will brown instead of steam.
If the pan is too small, you'll end up crowding the meat, and it won't get that nice brown crust that adds so much depth to the flavor.
Aside from the skillet, a standard 9x13-inch baking dish is the only other major requirement. I like glass or ceramic for this because they distribute heat evenly. If you use a thin metal cake pan, keep a close eye on the bottom, as it can overcook the beef layer before the chips are toasted.
You’ll also want a sturdy spatula for breaking up the meat and a colander for those black beans.
Chef's Tip: Use a potato masher to break up your ground beef in the skillet. It creates a much finer, more uniform crumble than a spoon or spatula ever could, ensuring the taco seasoning coats every single bit of protein.
Keeping your tools minimal isn't just about saving time on dishes; it is about focus. When you aren't juggling five different pans, you can pay attention to the smell of the garlic and the consistency of the sauce. It makes the whole process feel less like a chore and more like a quick win for the evening.
step-by-step Transformation from Raw to Radiant
- Preheat your oven to 375°F (190°C). While the oven reaches temperature, prepare your baking dish by lightly greasing it, though the fat from the beef usually prevents sticking.
- Brown the beef and onions. In a large skillet over medium high heat, cook the 1.5 lbs of ground beef and diced onion. Break the meat apart constantly until no pink remains and the onions are translucent.
- Remove excess moisture. Drain any fat from the skillet. This is the step most people rush, but taking an extra minute here prevents a greasy finished product.
- Infuse the aromatics. Stir in the minced garlic, 2 tbsp of taco seasoning, and 1/4 cup of water. Simmer for 3 minutes until the liquid has reduced and the meat looks glossy.
- Create the creamy base. Lower the heat to a minimum. Fold in the 4 oz of softened Neufchâtel cream cheese and the drained black beans. Stir gently until the mixture is velvety and uniform in color.
- Build the foundation. Transfer the beef mixture into your baking dish, spreading it into an even layer with the back of a spoon.
- Apply the first shield. Sprinkle 1 cup of the shredded sharp cheddar cheese over the meat. This layer is your moisture barrier for the chips.
- Add the crunch. Layer the 4 cups of corn chips over the cheese. Don't worry about being too neat; a bit of overlapping is good for texture.
- Seal with cheese. Top the chips with the remaining 1 cup of shredded cheddar. This will hold the chips in place and create those toasted cheese pockets.
- Bake to perfection. Place in the oven for 15-20 minutes until the cheese is bubbling and the chips are lightly toasted.
The visual cues are everything in the final stages. When you see the cheese starting to turn a dark gold at the corners and the aroma of toasted corn fills the kitchen, you are ready. Let it sit for about 2 minutes after pulling it out of the oven.
This allows the internal heat to settle so you can scoop out clean portions without the whole thing collapsing.
Preventing Common Texture Pitfalls and Temperature Errors
Why Your Casserole Base Is Watery
If you find a pool of liquid at the bottom of your dish, it is usually because the black beans weren't drained well enough or the water added with the taco seasoning didn't simmer down. The black bean liquid is full of starches that can turn slimy when baked. Always rinse them until the bubbles disappear.
If the beef looks "soupy" before you add the cream cheese, keep simmering it for another minute or two.
The Problem of Soggy Corn Chips
Soggy chips are the enemy of a walking taco casserole 2. This usually happens if you skip the middle layer of cheese or if you let the casserole sit too long before baking. The cheese acts as a fat based barrier that water cannot easily penetrate. Also, make sure your oven is fully preheated.
A slow to heat oven will steam the chips rather than toasting them.
| Problem | Root Cause | Solution |
|---|---|---|
| Greasy surface | Low quality beef or poor draining | Use 93/7 beef and blot the pan with paper towels after browning. |
| Clumpy sauce | Cold cream cheese | Ensure the Neufchâtel is at room temperature before stirring it into the beef. |
| Burnt chip tips | Rack too high in oven | Bake on the center rack and check at the 15 minute mark. |
Common Mistakes Checklist:
- ✓ Avoid "taco" style shredded cheese blends that contain anti clumping agents; grate your own sharp cheddar for a better melt.
- ✓ Don't overwork the meat after adding the cream cheese - you want to fold it, not mash it.
- ✓ Make sure the black beans are completely dry before they hit the skillet.
- ✓ Resist the urge to add the cold toppings (lettuce/tomatoes) before baking; they should only be added to individual servings.
Creative Substitutions to Suit Every Family Palate Preference
| Original Ingredient | Substitute | Why It Works |
|---|---|---|
| Ground Beef (1.5 lbs) | Ground Turkey (93/7) | Similar protein structure. Note: Turkey is leaner, so you might need a teaspoon of oil for browning. |
| Black Beans | Pinto Beans | Provides a creamier, softer texture that blends well with the cheese. |
| Corn Chips | Tortilla Chips (Thick) | Similar crunch, though tortilla chips are usually less salty and more corn forward. |
| Sharp Cheddar | Pepper Jack | Adds a spicy kick and melts beautifully. |
If you want to keep the "shatter" of the chips but need a change, try using the spicy flavored corn chips. It adds a whole new dimension to the dish without changing the cooking method. If you are looking for a way to use up leftovers, this Taco Salad with Ground Beef is a fantastic way to repurpose the beef base if you end up making too much of the meat mixture.
For a version that feels a bit "lighter" (though let's be honest, this is comfort food), you can swap the Greek yogurt garnish for sour cream. It provides the same tang and cooling effect but with a bit more protein and less fat.
I actually prefer the thickness of Greek yogurt here as it holds its shape better on top of the warm casserole.
Decision Shortcut: If you want X, do Y If you want it extra spicy, add 1/4 cup of chopped canned green chiles to the beef mixture during the simmering stage.
If you want it kid friendly, swap the sharp cheddar for a mild Monterey Jack and leave the jalapeños on the side. If you want a smokier flavor, add a teaspoon of liquid smoke or smoked paprika to the beef while browning.
Smart Storage and Leftover Repurposing Strategy Guidelines
Storage for a walking taco casserole 2 is a bit of a strategic challenge because of the chips. In the fridge, the casserole will stay safe to eat for up to 3 days. However, the chips will inevitably lose their crunch as they absorb moisture from the beef and cheese.
To mitigate this, I recommend storing the beef base separately if you know you won't finish the whole tray in one sitting.
If you have already baked the whole thing, the best way to reheat it is in the oven or an air fryer. Avoid the microwave if you can; it will turn the chips into rubber. Put a portion in the air fryer at 175°C for about 5 minutes.
This will crisp up the chips again and melt the cheese without drying out the meat.
For zero waste, those leftover broken chips at the bottom of the bag are actually perfect for this recipe. You don't need whole chips for the topping. Also, if you have leftover beef mixture but no chips, it makes an incredible filling for stuffed bell peppers or even as a topping for a baked potato.
The cream cheese in the base makes it much more versatile than just standard taco meat.
Visual Finishing Touches for a Restaurant Quality Appearance
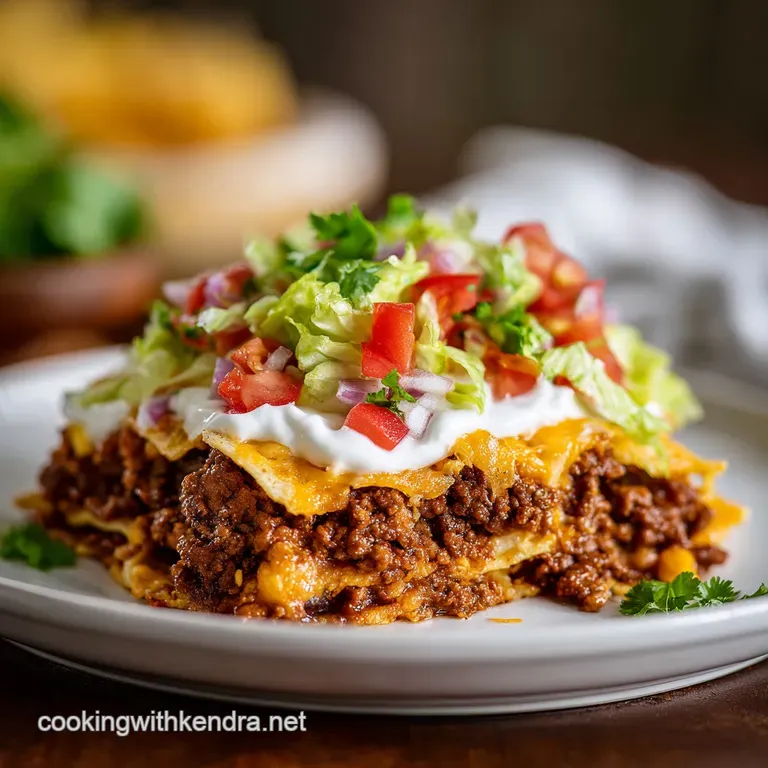
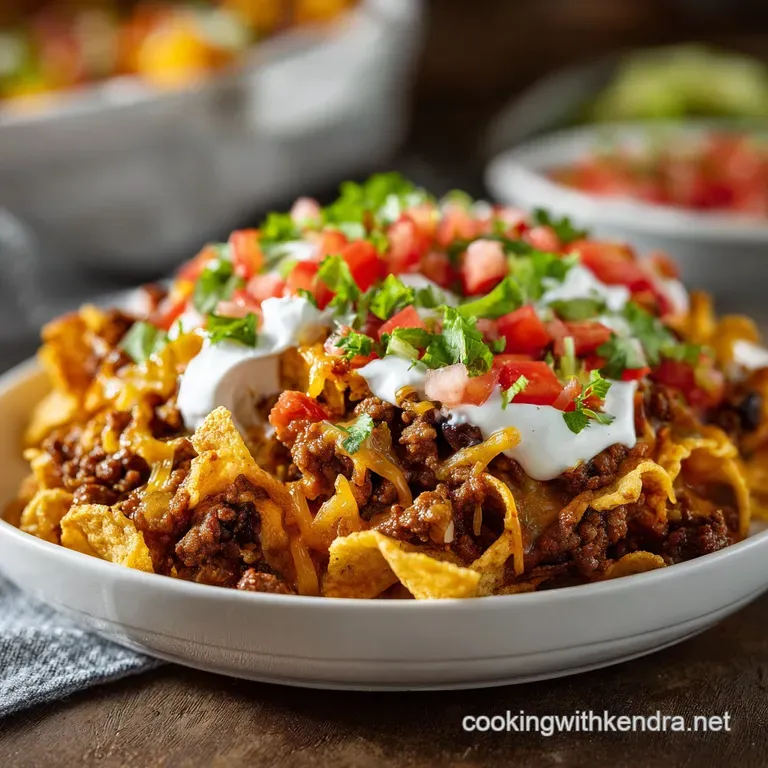
Presentation is where the walking taco casserole 2 goes from a "brown bake" to a centerpiece. The contrast between the golden brown chips and the vibrant green of the romaine lettuce is what makes it look appetizing. Always wait to add the fresh toppings until the very moment of serving.
If you put cold lettuce on a hot casserole, it will wilt into nothingness within minutes.
I like to set up a "taco bar" style station. Place the hot casserole in the middle of the table and have small bowls of the diced Roma tomatoes, pickled jalapeños, and the Greek yogurt ready to go. This allows everyone to customize their plate and keeps the "fresh" elements truly fresh. For a complete spread, serving this alongside a Corn Casserole recipe balances the spice with a bit of creamy sweetness.
Don't forget the acid. A squeeze of fresh lime juice over the top just before you eat cuts through the richness of the cheese and beef, making every flavor pop. It is that little bit of brightness that takes a heavy comfort dish and makes it feel balanced.
The pickled jalapeños also provide this acidic hit, so don't skip them if you can handle a tiny bit of heat!
Myths About Casserole Construction
One common myth is that you need to "seal" the meat by searing it on high heat to keep it juicy. In reality, the juiciness of the meat in a casserole comes from the fat content and the sauce it is cooked in. Searing provides flavor through browning, but it doesn't actually act as a physical seal for moisture.
The cream cheese we add is actually doing the work of moisture retention here.
Another misconception is that you should use "taco cheese" from a bag for the best melt. Pre shredded cheeses are coated in potato starch or cellulose to keep them from sticking together in the package. This coating prevents the cheese from melting into a smooth, velvety layer.
Taking two minutes to grate a block of sharp cheddar will give you a significantly better "cheese pull" and a more robust flavor.
Finally, some people think that more liquid in the meat makes for a better casserole. This is the quickest way to a soggy bottom. A walking taco casserole 2 should have a thick, almost paste like meat base. The moisture should come from the fats and the cream cheese, not from water or tomato juice.
If your meat base is runny, it will migrate upward into your chips, ruining the texture you worked so hard to achieve.

Recipe FAQs
How to prevent the corn chips from becoming soggy?
Spread the first cup of cheddar cheese directly over the meat to create a thermal fat barrier. This layer acts as a buffer between the moisture heavy beef mixture and the corn chips during the 15-20 minute bake.
Can I prepare this casserole ahead of time?
Yes, you can assemble the base early. Simply combine the meat, onions, beans, and cream cheese, then refrigerate; if you need to organize your kitchen workflow for multiple meals, learn more about efficient batch preparation before you add the chips and cheese topping.
Is it necessary to drain the beef fat before adding the cream cheese?
Yes, drain the fat thoroughly to maintain the proper texture. Excess grease prevents the Neufchâtel cream cheese from binding correctly with the meat, which will lead to a separated, oily casserole rather than a creamy one.
How to tell when the casserole is finished baking?
Look for bubbling cheese and lightly toasted chips. Bake at 375°F for 15-20 minutes, ensuring the top layer of shredded cheddar has fully melted and the edges of the corn chips show a slight golden color.
Can I use a different type of cheese for the topping?
No, sticking to sharp cheddar is recommended for the best flavor profile. Other cheeses may not possess the correct meltability or sharpness required to stand up to the seasoned ground beef and taco spices.
How to ensure the Neufchâtel cream cheese incorporates smoothly?
Soften the cream cheese to room temperature before folding it into the skillet. Once the heat is reduced to low, stir constantly until the cheese is completely emulsified into the meat and black bean mixture.
Should I add the fresh garnishes before or after baking?
Always add the romaine lettuce, tomatoes, jalapeños, and Greek yogurt after the baking process. Adding these cold, fresh toppings before the oven would cause the lettuce to wilt and the yogurt to separate unpleasantly.
Walking Taco Casserole

Ingredients:
Instructions:
Nutrition Facts:
| Calories | 473 kcal |
|---|---|
| Protein | 33.8 g |
| Fat | 26.4 g |
| Carbs | 28.2 g |
| Fiber | 4.1 g |
| Sugar | 3.2 g |
| Sodium | 714 mg |
