Winter Layer Cake Delight
- The delicious history of winter layer cake delight
- Secrets behind the perfect winter layer cake delight
- The magic behind this recipe
- Health & nutrition highlights
- Recipe at a glance
- Premium ingredients guide
- Essential preparation steps for winter layer cake delight
- Professional cooking method for perfect cake layers
- Expert techniques for frosting and decorating
- Success strategies for a flawless finish
- Game - changing tips for your winter layer cake delight
- Perfect presentation : plating like a pro
- Storage & make - ahead tips
- Creative variations for the cake
- Expert faq solutions : troubleshooting your cake
- Complete nutrition guide
- 📝 Recipe Card
The delicious history of winter layer cake delight
Let’s talk about one of those desserts that just feels like a big, cozy hug on a plate : the winter layer cake delight, this cake isn’t just any old dessert; it’s a celebration of rich culinary traditions steeped in history and brimming with joy, can...
Beyond its rich backstory, this cake serves as a perfect centerpiece for any winter gathering, think of the delighted faces as you cut into your beautifully frosted creation, it’s a showstopper for birthdays, holidays, or even just a way to brighten a gray winter day, what’s more, with the exquisite flavor
Combinations of butter, vanilla, and almond, you’re bound to impress, the magic truly lies in the way each bite melds together, creating a flavorful experience that’s not just about filling your belly but also about filling your heart with memories .
Secrets behind the perfect winter layer cake delight
Are you curious about the secrets behind this delightful recipe ? well, let me share a few. it all starts with the rich culinary heritage this cake springs from, layer cakes like these have roots in various cultures, evolving over time, each layer symbolically represents depth, creativity, and, oh my goodness, deliciousness.
Personally, i love to imagine the chatter and laughter that fills the air while baking this cake, a true representation of togetherness .
Speaking of origins, the fascinating story behind layer cakes makes them even more special, they gained popularity as baking technology improved, allowing for lighter, fluffier cakes, isn’t it cool how this seemingly simple dessert has evolved into such an iconic recipe ?
This cake holds cultural significance in many households, serving as both a centerpiece and a comfort food .
Nowadays, the winter layer cake delight has become a modern classic, cherished not only in homes but also in bakeries across the country, from holiday parties to family get - togethers, it stands tall, becoming a symbol of warmth and cheer, reminding us of the delightful times shared with loved ones, and trust me, once
You serve this beauty, it’ll leave everyone clamoring for a second slice.
The magic behind this recipe
Alright, let's dive into the magic. one of the unique aspects of this winter layer cake delight is its flavor combination, by harmonizing the buttery richness with hints of almond and vanilla, you create a cake that dances on your palate, it’s not just sweet; it’s a lovely medley of flavors that will keep you coming back for more .
What i adore most about this recipe are the foolproof techniques, seriously, i’ve had my fair share of baking disasters, but this method is a winner, with careful steps, you can nail the texture and taste every time.
Plus, i’ve gathered a few expert - tested methods over the years, like making sure your ingredients are at room temperature trust me; it makes a world of difference.
And let’s not forget the time - saving tips. you can whip this up in just an hour, which is astounding for something so impressive, you can even bake the layers a day ahead, leaving you with time to focus on other holiday preparations .
Health & nutrition highlights
Now, let’s talk about health because, yes, even in baking, we can find some positives. the winter layer cake delight has key nutritional benefits, with butter providing essential fats and eggs delivering protein, while it’s more of a treat than a health food, serving it alongside some fresh berries can add a delightful nutritional punch.
Also, considering dietary options is essential, this recipe can be easily adapted for gluten - free or dairy - free diets, so everyone can enjoy a slice, whether you’re hosting special dietary requirements or simply want to experiment with alternatives, this cake accommodates various needs, allowing you to share
The joy of baking with all your friends and family .
Recipe at a glance
So, what’s the scoop ? let’s break it down.
- preparation time : 30 minutes
- cooking time : 30 minutes
- total time : 1 hour
- serving size : 12 slices
Isn’t that fantastic ? whether you’re an amateur baker or seasoned pro, the skill level required is medium; so it’s manageable yet impressive, plus, considering the cost, you’ll find that this cake is a budget - friendly way to create a memorable dessert that serves a crowd.
As i wrap this up, i can’t help but feel a little nostalgic about layers of cake tucked between moments of laughter and love, the winter layer cake delight is not just a recipe; it’s a sweet tradition fed by shared experiences, so gather your ingredients, unleash your creativity, and let’s bring some joy into our kitchens this winter.
After all, with the right recipe like this one for riley blake winter layer cakes you’re bound to create not just a cake, but a mountain of memories.
Premium ingredients guide
Premium core ingredients
When it comes to baking the perfect winter layer cake delight, using premium ingredients can really elevate the flavor and texture, here’s a breakdown of the core ingredients you'll need :
- all - purpose flour (2 ½ cups) : look for flour that feels smooth and powdery, high - quality brands often specify a protein content of around 10 - 12%, if you can, buy it in smaller packages to ensure freshness .
- baking powder (2 ½ tsp) : always check the expiration date. fresh baking powder is vital, and if it bubbles when mixed with water, you’re good to go .
- salt (½ tsp) : regular table salt works just fine, but if you can get your hands on sea salt or himalayan salt, those add a nice flavor boost .
- unsalted butter (1 cup) : this is where it gets fancy. go for a good quality european - style butter that has a higher fat content, giving you that rich, velvety texture .
- granulated sugar (2 cups) : look for pure cane sugar, if it feels clumpy, that might be a sign of moisture; always sift if you’re in doubt .
To store, keep dry ingredients like flour and sugar in airtight containers to maintain their freshness, butter should always be refrigerated but can be brought to room temperature before using .
Signature seasoning blend
Now, let’s talk about those yummy flavor additions, layered cakes are all about taste, and your unique blend of spices and herbs can set yours apart :
- vanilla extract (1 tsp) : make sure it’s pure vanilla, not imitation, it makes a world of difference.
- almond extract (1 tsp) : this lends a lovely nutty flavor, if you're feeling adventurous, consider experimenting with orange or lemon extracts too .
- a pinch of salt : this will subtly enhance sweetness, balancing the flavors perfectly .
When it comes to aromatics, adding colored sprinkles is a fun way to personalize your cake, it’s like throwing a little party on top.
Smart substitutions
You might hit a snag and realize you're missing an ingredient that's totally normal. here are some handy substitutions to keep in your back pocket :
- all - purpose flour : if you're going for gluten - free, there are some fabulous blends available, just ensure they include xanthan gum for texture.
- butter : you can swap it for coconut oil if you're in a hurry or allergic, just remember it might add a slight coconut flavor yum.
- heavy cream : in a pinch, milk with a sprinkle of cornstarch can work too, it won’t whip up the same, but it’ll do in a cake batter.
Kitchen equipment essentials
Before we dive back into the cake - baking glee, let's double - check you have the right tools :
- electric mixer : a good one really makes life easier, trust me. if you’ve ever tried to beat butter manually, you’ll know what i mean .
- measuring cups and spoons : don’t skimp on these, accurate measurements can save you from a cake disaster later.
- baking pans (three 9 inch round) : if you don't have three, you can always bake in batches, just be ready to wait a bit .
I highly recommend investing in some quality silicone spatulas; they’re fantastic for scraping every last drop of batter from the bowl.
Pro ingredient tips
To wrap our ingredient tour with advice that’s proven useful during my baking adventures :
- stay fresh : always check your pantry, old ingredients can steal the show but not in a good way ...
- quality markers : when buying butter or eggs, look for grass - fed or organic labels, it’s worth it for the flavor .
- storage solutions : keeping your ingredients in a cool, dark place will prolong their life, just don’t forget about that half - used bag of flour hiding at the back.
By honing in on high - quality ingredients and the right tools, you can make a show - stopping winter layer cake that’s not just beautiful but utterly delicious. remember, good baking is all about the heart you put into it, happy baking. 🍰
Essential preparation steps for winter layer cake delight
Before diving into baking, let’s get our kitchen organized trust me, this will save you some serious headaches, first things first, gather all your ingredients, we’re talking flour, sugar, eggs, and all the good stuff, it makes things easier when everything is within arm's reach, that's the essence of mise
En place, a fancy term for "everything in its place ."
Next, i always find it helpful to do a little prep work, pre - measure your ingredients, and maybe even set out your baking pans and tools, you’ll feel like a pro. and keep an eye on that timer; things can get a bit chaotic, like when you realize you still have to whisk the eggs while the butter is creaming away, oh, and don’t forget to set your oven to 350°f (175°c) early on .
For timing management, consider how long each step will take, the cake layers will need about 30 minutes of baking time, plus cooling, so, as those cakes are baking, use the downtime to whip up the frosting, organizing like this makes your whole baking experience smoother .
Professional cooking method for perfect cake layers
Alright, now we’re rolling. with your oven preheated, let’s make that scrumptious cake batter, start by combining the dry ingredients flour, baking powder, and salt in a bowl, this is what i call the dry mix dance; it sets the stage for all the fluffy goodness .
In another bowl, cream the butter and granulated sugar until it’s light and fluffy think 3 to 4 minutes of mixing bliss, then, add the eggs, one by one, it might feel like a protein party, but i promise, it's necessary, next comes the fun part mixing in the milk and flavors, remember, the key to professional
Baking is to alternate the dry and wet while ending with the dry for that oh - so - perfect texture .
Once your batter is lovingly mixed, distribute it evenly among your prepared pans, bake them for 25 - 30 minutes, i can’t stress enough how crucial it is to check with a toothpick; it’s like the crystal ball of baking. if it comes out clean, your cake is ready .
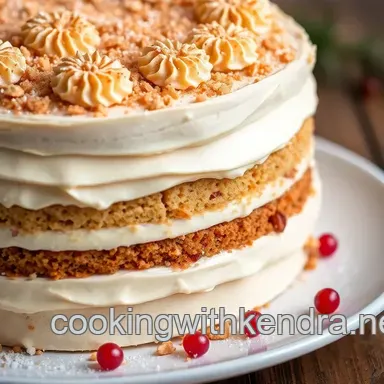
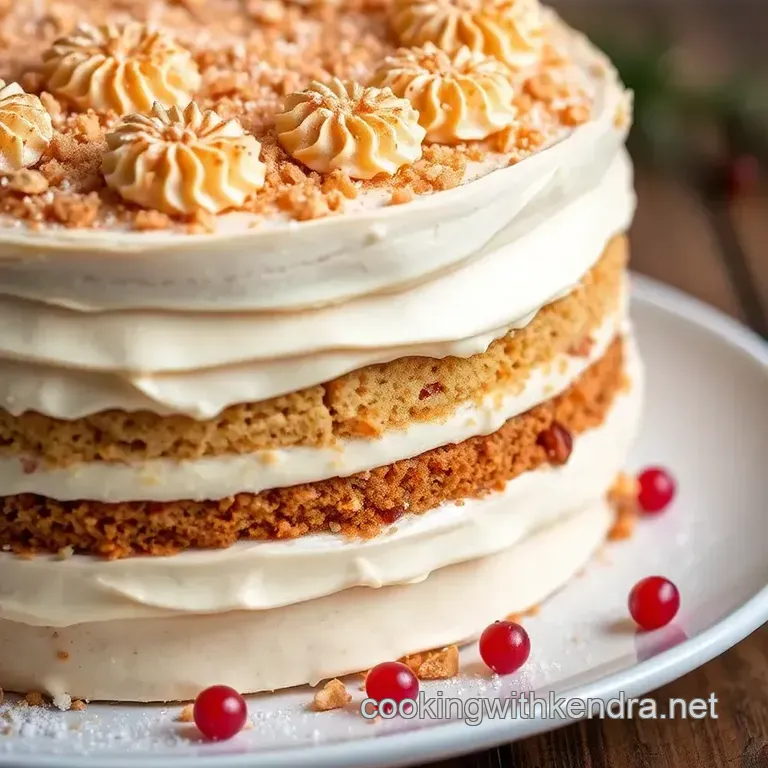
Expert techniques for frosting and decorating
Now that those cakes are cooling, let’s focus on the frosting, this part can be a little tricky if you don’t take your time, beat the softened butter until it’s creamy, then, add in the powdered sugar slowly, this is where things can get messy, so mix on low at first unless you want a kitchen that
Looks like it was hit by a sugar explosion.
Add the heavy cream, vanilla, and a pinch of salt, and beat until it’s fluffy, pro tip : if you want it a little colorful, throw in some food coloring. just remember less is more, especially if it’s a shade of red or blue .
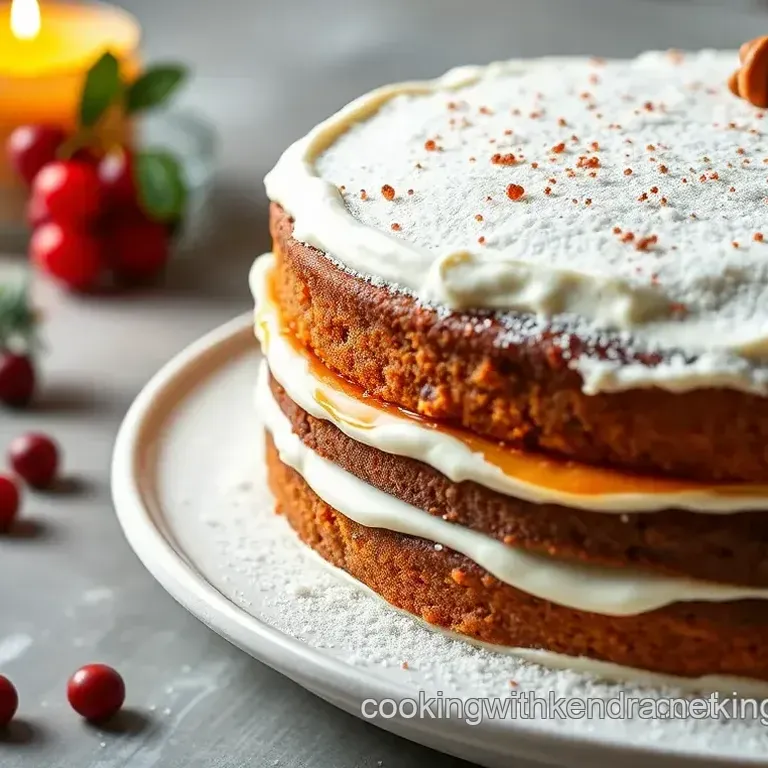
When it’s time to assemble, place the first layer on your cake stand, go ahead and slather on that frosting, and then repeat with the second layer, once you stack the third, cover the whole cake in a generous coat of frosting, remember, it doesn’t have to be perfect.
Success strategies for a flawless finish
Now, when it comes to finishing touches, feel free to get creative. shredded coconut adds texture, and edible glitter ? total game changer, serve it up with some fresh berries on the side, and you’ve got a showstopper .
Always, and i mean always, trust your instincts, if something feels off like the frosting isn’t as fluffy as it should be take a moment to season it right, and if you have leftover frosting (which honestly never happens in my house), use it to decorate whatever dessert you fancy .
So, slice your winter layer cake delight and dive into those sweet layers, trust me, everyone is going to love this cake, and you’ll soon be collecting compliments left and right, happy baking, friends.
And remember, creating those riley blake winter layer cakes isn’t just about following a recipe; it's about making sweet, delicious memories in the kitchen, enjoy.
Game - changing tips for your winter layer cake delight
When it comes to baking, there are a few pro tips that can totally lift your winter layer cake delight from good to spectacular, first, remember : room temperature ingredients are a must - have, using cold butter or eggs can create a dense cake, and trust me, no one wants that.
Don’t hesitate to cream your butter and sugar for a good 4 minutes, i learned the hard way short changing this step results in a less fluffy cake, it’s like giving it a spa day.
Also, when combining wet and dry ingredients, be gentle, overmixing can lead to a chewy cake instead of a light one, i’ve been there, and it's not pretty .
Perfect presentation : plating like a pro
Now let’s talk about showing off that cake. a lovely layer cake deserves a beautiful plate, for plating, i like to use a cake stand to elevate the dessert and create height because who doesn’t love a bit of drama on their table ?
For garnishing, add playful sprinkles on top or even some edible glitter to shimmer things up, fresh berries can add color and freshness, too, when serving, always slice with a heated knife for neat, clean cuts, you wouldn’t believe how many times i’ve snagged the cake with a dull knife, oops.
Storage & make - ahead tips
Timing is everything. if you’re baking ahead of time, let your cake layers cool completely before wrapping them in plastic wrap, this will keep them fresh for days, you can even freeze the layers if you want to make them well in advance, just remember to thaw them overnight in the fridge before frosting .
For storage, i usually keep the cake in an airtight container at room temperature for up to three days, if you’ve got frosting left, store it in the fridge, it’s like a little surprise treat for you later.
Creative variations for the cake
One of my favorite parts of baking is experimenting with flavors. for your winter layer cake delight, consider swapping out almond extract for peppermint or orange zest for a citrusy twist, seasonal adaptations can make your cake feel fresh year - round .
If you’re in the mood for something a little different, try a spiced version by adding cinnamon or nutmeg to the batter, oh, that warmth is just heavenly.
Expert faq solutions : troubleshooting your cake
Got questions ? you’re not alone. a common concern is dealing with a sunken cake, this can happen if your oven temperature is too low make sure to check with an oven thermometer .
If your cake is too dry, it might’ve baked too long or had too much flour, pro tip : always spoon flour into your measuring cup rather than scooping it, you’d be surprised how easy it is to end up with extra flour otherwise .
Complete nutrition guide
Now, i know desserts aren’t usually the poster child for healthy eating, but your winter layer cake can still be part of a balanced diet, each slice contains about 350 calories, with healthy fats from butter and some protein from eggs .
It's essential to enjoy treats in moderation, as for portion guidance, i find that a slice paired with fresh fruit makes it feel just a tad lighter call it a balance, right ?
The key to nailing the riley blake winter layer cakes is to remember that baking is an art, with each cake, you’re not just following a recipe, you’re creating a moment, whether it's for a holiday get - together or simply a cozy night in, have fun, embrace imperfections, and savor every delightful bite.
Bake A Festive Layer Cake In 1 Hour