Cast Iron Cornbread: Honey Sweetened
- Time: Active 10 minutes, Passive 20 minutes, Total 30 minutes
- Flavor/Texture Hook: Honey sweetened crumb with a buttery, sizzled crisp bottom
- Perfect for: Soulful Sunday dinners, chili nights, or beginner bakers
- Achieving the Perfect Golden Crust with Cast Iron Cornbread
- A Soulful Journey Through Sweet and Savory Textures
- The Chemistry of the Skillet Sear
- Precise Checkpoints for Baking Success
- Component Analysis and Ingredient Roles
- Essential Tools for the Bake
- From Prep to Plate: Step-by-Step
- Troubleshooting Your Skillet Bread
- Scaling for a Crowd
- Variations and Substitutions
- Freezing and Reheating Guide
- Ideas for the Perfect Spread
- Cast Iron Cornbread FAQs
- 📝 Recipe Card
Achieving the Perfect Golden Crust with Cast Iron Cornbread
The first time I really nailed this, I remember the sound more than the taste. It was that aggressive, angry hiss as the thick, pale yellow batter hit the shimmering pool of oil in my 10 inch Lodge.
I’d spent years pulling dry, sad, crumbly squares out of glass baking dishes, wondering why mine never had that soul satisfying crunch I found at the best roadside diners in the South. The secret wasn't just the buttermilk it was the metal.
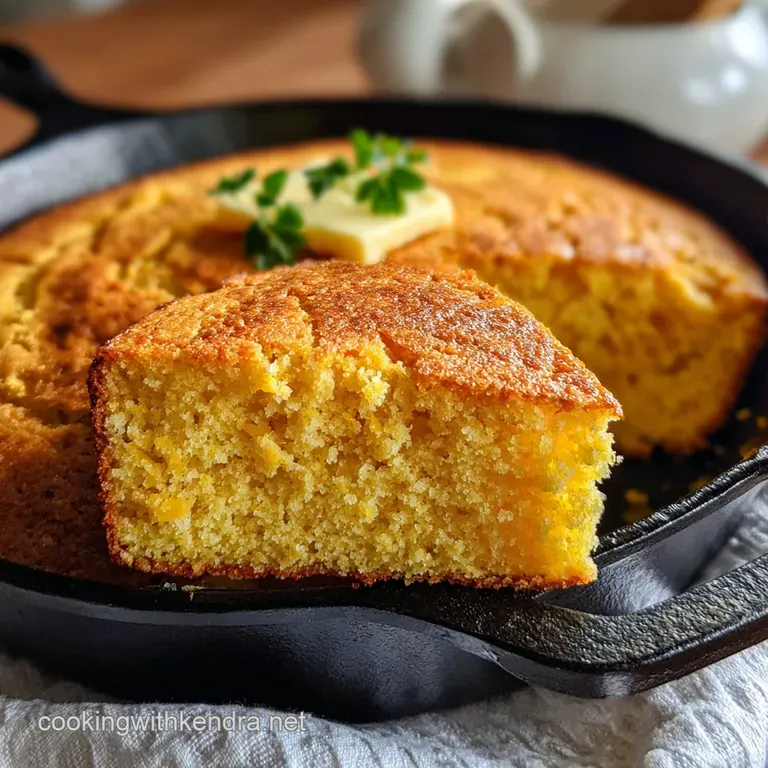
We're going for a specific contrast here: a bottom so crispy it nearly shatters when your fork hits it, hiding a middle that’s tender, moist, and just sweet enough to make you reach for another wedge.
I’ve made the mistake of using a cold pan, and trust me, you end up with a pale, greasy mess every single time. This method is about high heat, heavy iron, and zero compromises on fat.
Today, we are moving past the "box mix" era. You’re going to learn how to time your preheat so the iron acts like a searing station for your bread. It's a quick process only 10 minutes of hands on work but the result tastes like you’ve spent all afternoon hovering over the stove.
Let's get that oven cranked up and talk about what actually makes this magic happen.
A Soulful Journey Through Sweet and Savory Textures
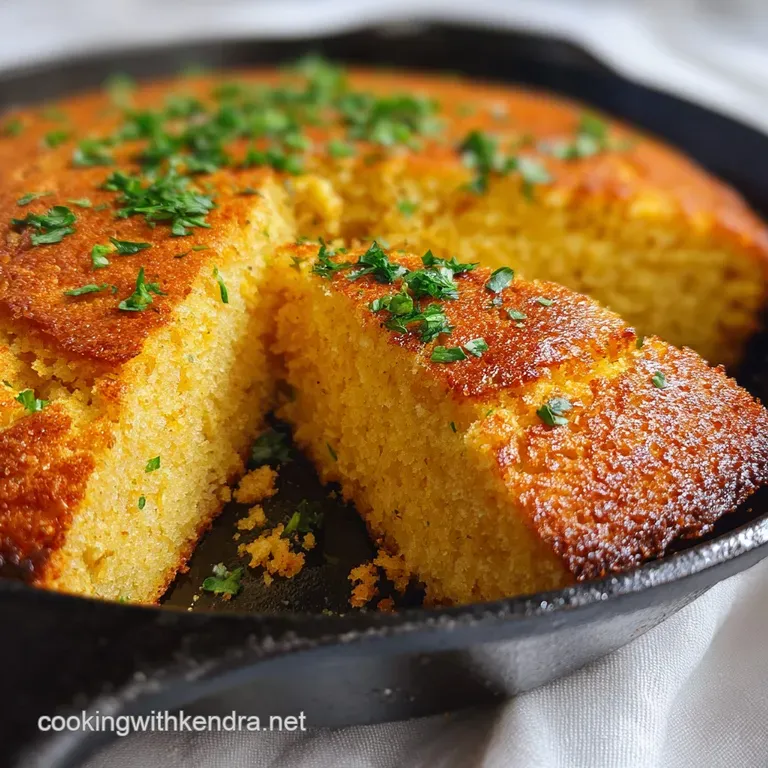
This isn't your average side dish; it’s a centerpiece of comfort. When you pull this skillet out of the oven, the aroma of toasted corn and browned butter fills the kitchen in a way that feels like a warm hug.
The top should look like a topographic map of golden brown ridges, while the honey provides a floral sweetness that cuts right through the richness of the full fat buttermilk.
If you're a fan of Southern soul food, you know that the texture of the cornmeal matters just as much as the flavor. We use yellow cornmeal for that vibrant color and gritty, authentic mouthfeel, balanced with all purpose flour to keep things from becoming a leaden brick.
It’s light, it’s airy, and it’s designed to soak up every last drop of honey butter or pot likker from a bowl of greens.
For those who crave even more variety in their kitchen, this dish pairs beautifully with hearty mains. I often serve it alongside Cast Iron Skillet Recipes like my chicken chorizo bake, where the spicy oils from the sausage find a perfect home against the sweet corn crumb. It's all about that balance of heat and honey.
The Chemistry of the Skillet Sear
The Thermal Battery Effect: Cast iron retains an immense amount of heat energy, which instantly fries the bottom of the batter upon contact to create a Maillard rich crust. This rapid heat transfer also forces the baking powder to react quickly, creating a lofty, airy rise before the structure sets.
| Method | Time | Texture | Best For |
|---|---|---|---|
| Preheated Skillet | 20 minutes | Shatter crisp bottom, moist center | Authentic Southern style |
| Cold Skillet | 25 minutes | Soft, pale crust, dense crumb | Quick snacks, less cleanup |
| Muffin Tin | 15 minutes | All around golden, slightly drier | Meal prep and kids |
While the preheated skillet method is my absolute go to for that signature crunch, some people prefer the ease of muffins. Just remember that the iron is doing the heavy lifting here. If you want a more traditional fried version without the oven, you might want to look at a Crispy Hot Water recipe which uses a different hydration technique entirely.
Precise Checkpoints for Baking Success
- Skillet Temperature:425°F (The iron must be in the oven for at least 10 minutes during the preheat).
- Internal Temperature:195°F to 200°F (Measured in the center with a digital probe for a moist, non gummy finish).
- Batter Consistency: Thick but pourable (Think heavy Greek yogurt, not pancake batter).
Component Analysis and Ingredient Roles
| Ingredient | Science Role | Pro Secret |
|---|---|---|
| Full Fat Buttermilk | Acid reacts with soda for lift | Never use low-fat; the fat protects the crumb from drying out |
| Yellow Cornmeal | Provides structural grit | Store in the freezer to keep the natural corn oils from going rancid |
| Honey | Hygroscopic (retains moisture) | Spray your measuring spoon with oil first so the honey slides right off |
| Baking Powder & Soda | Dual phase leavening | Freshness matters; if it's over 6 months old, toss it for better rise |
For the Dry Base
The foundation of any great Cast Iron Cornbread starts with the ratio of cornmeal to flour. I use 1.5 cups yellow cornmeal and 1 cup all purpose flour. This specific 1.5:1 ratio ensures you get that classic corn flavor without the bread falling apart into a pile of sand the moment you slice it.
The 1 tsp fine sea salt is non negotiable it wakes up the corn's natural sugars.
For the Liquid Gold
This is where the moisture lives. We're whisking 1.5 cups full fat buttermilk with 2 large eggs and 3 tbsp honey. The buttermilk provides that signature tang and works with the 0.5 tsp baking soda to create tiny air pockets.
Note: If you don't have buttermilk, don't just use plain milk; the lack of acid will leave your bread flat and sad.
Chef's Tip: Freeze your 4 tbsp unsalted butter for 10 minutes before melting it. This slight temperature shock when combined with the cold buttermilk creates tiny clumps of fat that bloom in the oven, leading to a much more velvety interior.
Essential Tools for the Bake
You really only need one piece of "special" equipment here: a 10 inch cast iron skillet. A Lodge is the gold standard for most home cooks because of its seasoning and weight. The heavy walls of the iron prevent the edges from burning before the center is cooked, which is a common nightmare with thin aluminum pans.
Aside from the skillet, grab two mixing bowls one for dry, one for wet. I’m a big advocate for using a whisk for the liquids to get those eggs fully emulsified, but switch to a rubber spatula when combining the two.
Over mixing is the fastest way to turn a fluffy bread into a rubbery puck, and we definitely don't want that.
From Prep to Plate: step-by-step
- Place your 10 inch cast iron skillet in the oven and preheat to 425°F. Note: Heating the pan empty is the key to the crust.
- Whisk 1.5 cups yellow cornmeal, 1 cup all purpose flour, 1 tbsp baking powder, 0.5 tsp baking soda, and 1 tsp fine sea salt in a large bowl.
- Combine 1.5 cups full fat buttermilk, 3 tbsp honey, and 2 large eggs in a separate bowl until smooth.
- Stir in 4 tbsp melted unsalted butter into the wet mixture.
- Pour the wet ingredients into the dry ingredients.
- Fold gently until no large streaks of flour remain. Note: A few small lumps are perfectly fine.
- Carefully remove the hot skillet and add 2 tbsp avocado oil, swirling to coat the bottom and sides.
- Pour the batter into the skillet; it should sizzle loudly and immediately.
- Bake 20 minutes until the top is golden and a toothpick comes out clean.
- Let it rest in the pan for 5 minutes before slicing into wedges.
Troubleshooting Your Skillet Bread
Why Your Bread Is Too Dry
If your slice feels more like sawdust than cake, you likely over baked it or used a low-fat buttermilk. Oven temperatures vary wildly, so start checking the center at the 18 minute mark.
Also, remember that carryover cooking is real; the iron stays hot for a long time, so pull it out just as it hits that 200°F internal mark.
Why the Bottom Is Soggy
A soggy bottom usually means the pan wasn't hot enough when the batter went in. If you don't hear that aggressive sizzle, the oil hasn't had the chance to "flash fry" the exterior. Next time, wait until the oil is just barely starting to shimmer or show a tiny wisp of smoke before pouring the batter.
| Problem | Root Cause | Solution |
|---|---|---|
| Crumbly texture | Too much cornmeal, not enough flour | Stick to the 1.5:1 ratio and don't skip the eggs |
| No golden crust | Pan wasn't preheated long enough | Preheat skillet for a full 10-15 minutes at 425°F |
| Metallic taste | Skillet seasoning is stripped | Re season your pan with a thin layer of oil before use |
Common Mistakes Checklist:
- ✓ Never over mix the batter; stop as soon as the flour disappears to prevent gluten development.
- ✓ Don't use a cold skillet; the thermal shock is what creates the crispy edges.
- ✓ Always use full fat buttermilk; "lite" versions lack the fat needed for a velvety crumb.
- ✓ Ensure your baking powder is fresh; test it in a splash of water to see if it bubbles.
- ✓ Let the bread rest for at least 5 minutes; this allows the steam to redistribute so it doesn't fall apart.
Scaling for a Crowd
If you're feeding a massive group, you might be tempted to just double everything and put it in a 12 inch skillet. Be careful! A 12 inch skillet has significantly more surface area.
You’ll want to increase the ingredients by about 1.5x rather than 2x for a standard 12 inch pan, or the bread will be way too thick and the center will stay raw while the edges burn.
For scaling down, you can use an 8 inch skillet and halve the recipe. Just beat one egg, use half of it, and reduce the bake time by about 5 minutes. The thickness of the Cast Iron Cornbread is what dictates the time more than the total volume of the batter.
Variations and Substitutions
| Original Ingredient | Substitute | Why It Works |
|---|---|---|
| Full Fat Buttermilk | Plain Greek Yogurt + Milk | Similar acidity and fat content. Note: Crumb will be slightly denser. |
| Honey | Maple Syrup | Provides sweetness. Note: Adds a distinct autumnal flavor profile. |
| Avocado Oil | Bacon Drippings | High smoke point. Note: Adds a massive smoky, savory punch to the crust. |
If you're looking for something even more decadent, you might try a Honey Cornbread recipe which leans into the sweetness even more. For those who like a little fire, folding in 1/2 cup of sharp cheddar and a diced jalapeño is a classic move that never fails at a BBQ.
Freezing and Reheating Guide
Cornbread is surprisingly resilient in the freezer. Wrap individual wedges tightly in plastic wrap and then store them in a heavy duty freezer bag for up to 3 months. To reheat, don't use the microwave unless you want a rubbery mess.
Instead, wrap the wedge in foil and pop it into a 350°F oven for 10 minutes.
For daily storage, keep it in an airtight container at room temperature for up to 2 days. If you find it's starting to dry out, it makes the world's best "cornbread croutons." Just cube it, toss with a little melted butter, and toast in a skillet until extra crunchy.
Zero Waste Tip: If you have leftover crumbs or broken pieces, don't toss them! Dry them out in a low oven and pulse them in a blender to make "cornbread crumbs." Use these instead of breadcrumbs to coat fried chicken or fish for a Southern inspired breading.
Ideas for the Perfect Spread
While this bread is a star on its own, it really shines when paired with high acid or over high heat dishes. The sweetness of the honey in this recipe acts as a bridge for spicy chilis or vinegary collard greens.
I also love splitting a warm wedge down the middle and slathering it with a compound butter made of honey and smoked paprika.
If you’re planning a full spread, consider serving this alongside a bowl of slow simmered beans or a roasted chicken. The iron cornbread acts as the perfect vessel for soaking up juices.
Honestly, there is nothing quite like a cold piece of cornbread crumbled into a glass of cold buttermilk a true old-fashioned Southern snack that my grandfather used to swear by. It sounds strange, but the contrast is actually incredible.
Let's be real, once you master the "sizzle" of the cast iron, you'll never go back to a standard baking dish. There’s something so primal and satisfying about flipping that skillet over and seeing a perfectly browned, uniform crust.
It’s the kind of cooking that makes you feel like a pro, even on a busy Tuesday night. Trust me on the preheat it’s the difference between "good" and "where has this been all my life?" Happy baking!

Cast Iron Cornbread FAQs
Can I cook my cornbread in a cast iron skillet instead of a baking pan?
Yes, absolutely. Using cast iron is the preferred method because its thermal mass creates a superior, shatteringly crisp bottom crust through intense, immediate heat transfer.
Do I need to preheat my cast iron skillet before pouring in the cornbread batter?
Yes, preheating is essential for the signature crust. Place the empty skillet in the oven while it preheats to 425°F for at least 10 minutes so the metal is scorching hot before adding the oil and batter.
How do I stop cornbread from sticking to a cast iron skillet?
Use enough fat and ensure the skillet is fully preheated. Add 2 tablespoons of high smoke point oil or bacon drippings to the hot skillet right before pouring in the batter; the immediate sizzle ensures the batter fries rather than sticks.
What are common mistakes people make when baking cornbread in cast iron?
The most common error is not preheating the pan or overmixing the batter. A cold pan results in a pale, greasy bottom, and overmixing develops gluten, leading to a tough, rubbery crumb instead of a light one.
Can I substitute regular milk if I don't have buttermilk?
No, substituting plain milk will result in a flatter bread. Buttermilk’s acid is necessary to activate the baking soda, providing lift; you can create a substitute by adding 1 tablespoon of white vinegar to 1 cup of regular milk and letting it sit for 5 minutes.
My cornbread is too crumbly; how do I achieve a moister texture?
Increase the amount of fat or add corn kernels for moisture retention. The honey in this recipe helps, but adding a small amount of creamed corn or using melted bacon drippings instead of plain oil adds richness that combats dryness. If you want more flavor variety, try our Mexican Cornbread Recipe for a spicier, moister alternative.
Is it true that the color of the cornmeal affects the final flavor and texture?
Yes, the color directly correlates with the grind and flavor profile. Yellow cornmeal provides a stronger corn flavor and denser texture, while white cornmeal yields a softer, milder result; mastering this balance is key to great Southern baking, similar to how balancing heat and acid works in other comfort dishes like our Sweetcorn Sunshine recipe.
Cast Iron Cornbread Skillet

Ingredients:
Instructions:
Nutrition Facts:
| Calories | 253 kcal |
|---|---|
| Protein | 5.7 g |
| Fat | 10.5 g |
| Carbs | 35.1 g |
| Fiber | 2.1 g |
| Sugar | 6.6 g |
| Sodium | 322 mg |
