Chocolate Raspberry Truffle Cake: Fudgy and Rich
- Time:30 minutes active + 4 hours 35 mins chilling/baking = Total 5 hours 5 mins
- Flavor/Texture Hook: Fudgy, moist crumb with a tart raspberry center and a silky, glossy finish
- Perfect for: Anniversary dinners, birthday celebrations, or when you need a serious chocolate fix
- The Best Chocolate Raspberry Truffle Cake
- Hidden Secrets for Better Layers
- Component Analysis
- Ingredients for the Cake
- Step by Step Baking Guide
- Fixing Common Baking Glitches
- Troubleshooting Common Issues
- Adjusting the Batch Size
- Debunking Dessert Myths
- Storage and Waste Tips
- Serving and Presentation Ideas
- Recipe FAQs
- 📝 Recipe Card
The smell of hot coffee hitting raw cocoa powder is something I can't get enough of. It's that instant, heady aroma that fills the kitchen and tells you that something seriously indulgent is happening.
I remember the first time I tried to make a version of this, I ignored the jam "glue" and just tossed fresh raspberries into the batter. It was a disaster. The berries sank to the bottom, creating a soggy, fruit filled graveyard at the base of the cake while the top stayed dry.
That mistake taught me that you need a barrier. By using a layer of seedless jam mixed with a bit of lemon, you create a tacky surface that holds the fresh berries in place and keeps the moisture from seeping into the sponge. This Chocolate Raspberry Truffle Cake is the result of that lesson.
It's not just about piling flavors on top of each other, it's about building them in layers so every bite has that specific balance of bittersweet chocolate and bright, zesty fruit.
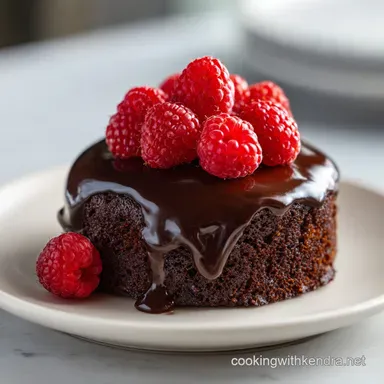
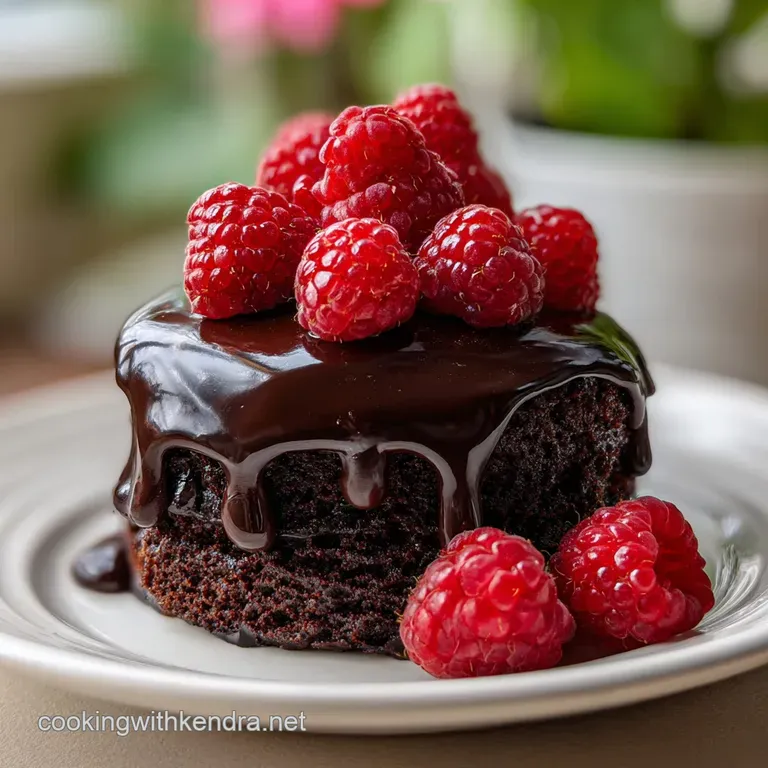
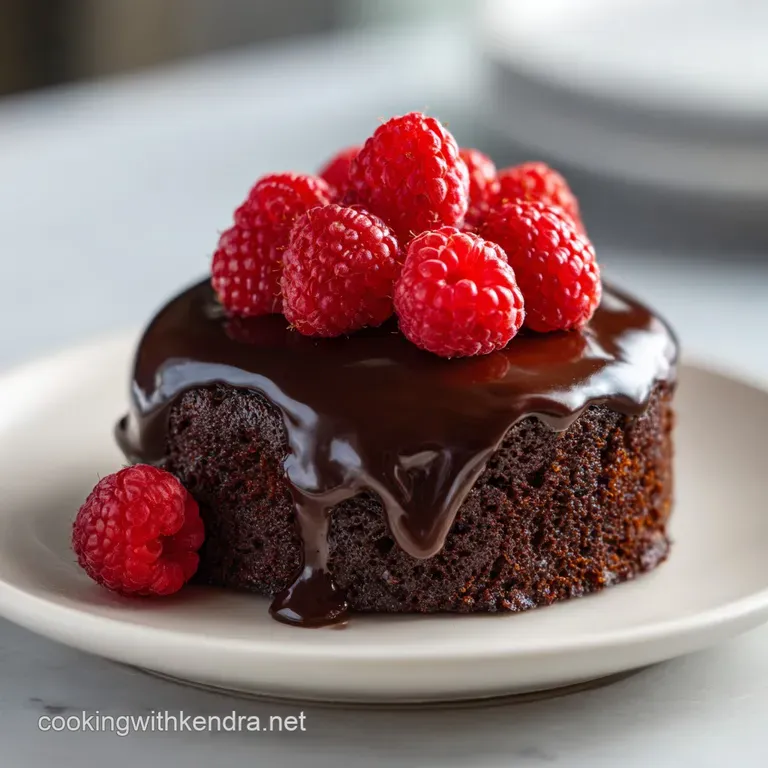
You can expect a cake that is deeply dark and moist, almost like a truffle itself, but with the structural integrity to hold a heavy glaze. We aren't going for a light, airy sponge here. We want something dense and velvety that melts in your mouth.
Trust me, once you see that glossy truffle glaze drip down the sides, you'll understand why we take the time to let it set.
The Best Chocolate Raspberry Truffle Cake
Right then, let's get into the guts of this thing. The real magic of this recipe is the contrast. You have the heavy, earthy chocolate hitting that sharp, acidic raspberry, and then the buttery richness of the truffle glaze tying it all together. It's a bit like a gourmet candy bar in cake form.
When I first started baking, I thought more chocolate always meant a better cake. But I learned that if you go too heavy on the cocoa without enough fat or acidity, the cake ends up tasting like cardboard. That's why we use buttermilk and oil.
The oil keeps the crumb moist even after a few days in the fridge, and the buttermilk provides the tang that cuts through the sugar.
If you love these kinds of flavor profiles, you might also enjoy my Raspberry Ruffles recipe, which plays with that same fruity sweet dynamic. For this cake, though, the goal is a specific kind of decadence. We want the chocolate to feel expensive, even if we're just using standard semi sweet chips from the store.
Hidden Secrets for Better Layers
I've spent a lot of time wondering why some chocolate cakes taste "flat" while others taste like a professional bakery. It usually comes down to how the cocoa is treated.
Cocoa Blooming: Adding hot coffee to the cocoa powder dissolves lumps and releases flavor compounds that stay locked away in cold liquids. According to Serious Eats, this process, known as blooming, intensifies the chocolate profile without making the cake taste like coffee.
Acid Base Balance: The reaction between the buttermilk and baking soda creates tiny carbon dioxide bubbles. This ensures the cake rises enough to be fluffy but stays dense enough to be "truffle like."
Fat Distribution: Using oil instead of butter in the sponge ensures the cake doesn't dry out when chilled. Oil stays liquid at lower temperatures, meaning the cake feels moist even after a night in the fridge.
Truffle Emulsion: Heating the cream just until it simmers before pouring it over chocolate creates a stable emulsion. This is what gives the glaze that mirror like shine and prevents it from cracking when you slice into it.
| Method | Time | Texture | Best For |
|---|---|---|---|
| Stovetop (Ganache) | 10 mins | Silky/Pourable | Glazing the top |
| Oven (Sponge) | 35 mins | Fudgy/Moist | The structural base |
| Chilled (Set) | 4 hours | Firm/Velvety | Slicing clean pieces |
Component Analysis
Before we start mixing, it's worth looking at why these specific ingredients are non negotiable. If you swap these out without a plan, you'll change the whole vibe of the cake.
| Ingredient | Science Role | Pro Secret |
|---|---|---|
| Dutch process Cocoa | Deep color & mellow flavor | Use King Arthur Baking brands for consistent alkalinity |
| Buttermilk | Tenderizes the gluten | Room temperature prevents the batter from curdling |
| Hot Coffee | Blooms the chocolate | Use strong brew, but decaf works just as well |
| Heavy Cream | Provides fat for emulsion | Do not let it boil or the fat will separate |
Ingredients for the Cake
I've listed everything you'll need below. Please make sure your eggs and buttermilk are at room temperature. If they're cold, they won't emulsify with the oil, and you'll end up with a streaky batter.
For the Chocolate Base
- 2 cups (250g) all purpose flourWhy this? Provides the necessary structure for the layers
- 2 cups (400g) granulated sugarWhy this? Balances the bitterness of the cocoa
- ¾ cup (75g) Dutch process cocoa powderWhy this? Darker color and smoother taste than natural cocoa
- 2 tsp (10g) baking soda
- 1 tsp (5g) baking powder
- 1 tsp (5g) salt
- 1 cup (240ml) buttermilk, room temperatureWhy this? Adds moisture and a slight tang
- ½ cup (120ml) vegetable oilWhy this? Ensures a moist crumb even when cold
- 2 large eggs, room temperature
- 2 tsp (10ml) vanilla extract
- 1 cup (240ml) hot coffeeWhy this? Intensifies the chocolate flavor
For the Raspberry Filling
- ½ cup (120ml) seedless raspberry jamWhy this? Acts as a "glue" for the berries
- 2 tbsp (30ml) fresh lemon juiceWhy this? Cuts the sweetness of the jam
- 1 cup (150g) fresh raspberries, halvedWhy this? Adds bursts of fresh acidity
For the Truffle Glaze
- 8 oz (225g) semi sweet chocolate, finely choppedWhy this? Creates the signature truffle texture
- 1 cup (240ml) heavy creamWhy this? High fat content for a velvety finish
- 2 tbsp (28g) unsalted butter, room temperatureWhy this? Adds a glossy, professional sheen
| Original Ingredient | Substitute | Why It Works |
|---|---|---|
| Buttermilk (1 cup) | 1 cup milk + 1 tbsp lemon juice | Mimics acidity. Note: Slightly thinner consistency |
| Vegetable Oil (1/2 cup) | Melted unsalted butter (1/2 cup) | Richer flavor. Note: Cake will be denser and firm up more in fridge |
| Semi sweet Chocolate | Dark chocolate (60% cocoa) | Bolder taste. Note: Less sweet, more intense bitterness |
| Fresh Raspberries | Frozen raspberries (thawed/drained) | Similar flavor. Note: Can release more liquid, making filling runnier |
Step by step Baking Guide
Right then, let's crack on. Take your time with the assembly, as the glazing part is where the visual magic happens.
- Preheat your oven to 350°F (175°C) and grease two 8 inch round pans. Note: Use parchment paper on the bottom to prevent sticking.
- Whisk together the flour, sugar, cocoa, baking soda, baking powder, and salt in a large bowl. Until no large cocoa lumps remain.
- Add the buttermilk, oil, eggs, and vanilla to the dry ingredients. Beat on medium speed until the batter is smooth and glossy.
- Stir in the hot coffee by hand using a whisk. Note: The batter will be very thin, almost like a crepe batter. Don't panic, this is exactly what we want.
- Divide the batter evenly between your prepared pans. Bake for 30-35 minutes until a toothpick comes out with just a few moist crumbs.
- Let the cakes cool completely. Once cold, use a serrated knife to level the tops. Note: Save the scraps for snacking!
- Whisk the raspberry jam and lemon juice together in a small bowl until the mixture is smooth and spreadable.
- Spread a thick layer of the jam mixture on the first cake layer. Note: Leave a tiny margin at the edge to prevent leaking.
- Press the halved fresh raspberries into the jam, spacing them evenly.
- Place the second cake layer on top and press down gently to set the berries.
- Heat the heavy cream in a small pot until it just begins to simmer. Pour it over the chopped chocolate and butter. Let it sit for 5 mins, then whisk until the glaze is velvety and dark. Drape the glaze over the cake, letting it run down the sides.
Chef's Tip: To get that professional mirror finish on your glaze, avoid over whisking. If you incorporate too many air bubbles, the glaze will look foamy rather than sleek. Use a slow, circular motion with your whisk.
Fixing Common Baking Glitches
Even the best of us hit a snag now and then. Most cake issues are just a matter of temperature or timing.
Troubleshooting Common Issues
| Issue | Solution |
|---|---|
| Why Your Cake Sunk | If the center of your cake dipped, it's usually because the oven door was opened too early or the baking soda was expired. This causes the air bubbles to collapse before the flour structure has set. |
| Why Ganache Separated | A grainy or oily glaze happens when the cream was too hot (boiled) or the chocolate was added too quickly. This breaks the emulsion, leaving you with pools of fat on top. |
| Why Filling Leaked | If your raspberry jam is running down the sides, you likely applied too much or didn't leave a "dam" of cake around the edge. The lemon juice also thins the jam, so keep the layer reasonable. |
Common Mistakes Checklist
- ✓ Did you use room temperature eggs? (Cold eggs break the emulsion)
- ✓ Did you avoid over mixing after adding the flour? (Too much mixing = tough cake)
- ✓ Is the coffee actually hot? (Cold coffee won't bloom the cocoa)
- ✓ Did you let the cakes cool completely before filling? (Hot cakes melt the jam)
- ✓ Did you chop the chocolate finely? (Large chunks won't melt evenly in the cream)
Adjusting the Batch Size
You don't always need a massive cake. Whether you're feeding a crowd or just yourself, you can tweak the numbers.
Going Smaller (1/2 Batch) If you're using 6 inch pans, halve everything. For the egg, crack one into a bowl, beat it, and use half by weight or volume. Reduce the baking time by about 20% and start checking at 25 minutes.
Going Bigger (2x Batch) For a larger party, you can double the recipe. However, don't double the salt and baking soda fully - go for about 1.5x. This prevents the cake from tasting "soapy." Work in batches if your mixer is small.
Baking Large Sheets If you use a 9x13 pan instead of rounds, lower the oven temp to 325°F and extend the time by 10-15 minutes. This ensures the edges don't burn before the middle is set.
| Variation | Change | Impact |
|---|---|---|
| Darker Profile | Use 70% Dark Chocolate | Less sweet, more sophisticated bitterness |
| Lighter Base | Replace cocoa with 1/2 white chocolate | Creamier, sweeter, less intense |
| gluten-free | Use 1:1 GF Flour Blend | Slightly denser crumb, may need 5 more mins baking |
Debunking Dessert Myths
There's a lot of "old wives' tales" in baking that just don't hold up. Let's clear a few things up.
Myth: Searing the pan with butter is the only way. Actually, a combination of oil and flour, or just parchment paper, is far more reliable. Butter can burn at 350°F, which might leave a bitter taste on the edges of your crust.
Myth: You must use expensive couverture chocolate. While high end chocolate is great, for a truffle glaze, a good quality semi sweet chip works perfectly. The addition of butter and heavy cream provides the fat and smoothness that you'd otherwise get from expensive chocolate.
Myth: Adding coffee makes the cake taste like mocha. Not at all. The coffee acts as a flavor enhancer for the chocolate. It makes the "chocolatey ness" pop without adding a noticeable coffee flavor. It's a secret weapon, not a main ingredient.
Storage and Waste Tips
This cake actually tastes better on day two because the raspberry jam has time to seep slightly into the chocolate sponge.
Storage Guidelines Keep the cake in the fridge in an airtight container. It will stay fresh for up to 5 days. Because of the fresh berries and the cream in the glaze, it absolutely must be refrigerated.
For the best experience, take a slice out 30 minutes before eating so the truffle glaze softens back to a velvety texture.
Freezing Instructions You can freeze the cake layers individually, wrapped tightly in plastic and foil, for up to 3 months. I don't recommend freezing the fully assembled cake with the glaze, as the berries can become mushy and the glaze may lose its shine upon thawing.
Zero Waste Kitchen Don't throw away those cake leveling scraps! You can crumble them up and mix them with a bit of leftover glaze to make "cake pops" or use them as a topping for vanilla ice cream.
If you have extra raspberry jam, whisk it into some Greek yogurt for a quick breakfast that echoes the flavors of the cake.
Serving and Presentation Ideas
To get those clean, professional slices, dip your knife in hot water and wipe it dry between every single cut. This prevents the truffle glaze from dragging across the cake layers.
If you're serving this for a special occasion, pair it with a dollop of unsweetened whipped cream. The airiness of the cream contrasts the density of the Chocolate Raspberry Truffle Cake beautifully. For an extra touch, garnish the plate with a few fresh raspberries and a sprig of mint.
For those who love a variety of decadent treats, this pairs well with a glass of cold milk or a tart espresso. If you're looking for another rich experience, you might try my Chocolate Marble Gooey Butter Cake, which brings a different kind of buttery texture to the table.
This cake is all about the experience of the bite - the snap of the glaze, the tartness of the berry, and the deep, dark chocolate. It's a labor of love, but seeing the look on people's faces when they see the interior is worth every minute of the 5 hours and 5 minutes of total time.
Now, go get your apron on and let's make some magic.
Recipe FAQs
What is the difference between chocolate cake and truffle cake?
Truffle cake features a rich ganache glaze. While standard chocolate cakes often use buttercream, a truffle cake is coated in an emulsified blend of chocolate and cream for a denser, more luxurious finish.
What is special about truffle cake?
The high fat content of the glaze. Combining semi sweet chocolate with heavy cream and butter creates a velvety texture that is significantly richer than traditional frosting.
Why is the batter so thin?
The hot coffee creates this consistency. This liquid blooms the cocoa powder and thins the batter, which is necessary for a moist, tender crumb.
How to prevent raspberry jam from leaking?
Apply a boundary of truffle glaze around the edge. This creates a seal that prevents the raspberry jam and fresh berries from running down the sides.
How to fix a grainy truffle glaze?
Avoid boiling the heavy cream. Heat the cream only until simmering before adding chocolate to maintain a stable emulsion. If you mastered the emulsion for the glaze here, apply the same chocolate handling technique to these chocolate cups.
Is it true this cake can be stored at room temperature?
No, this is a common misconception. The fresh raspberries and cream based glaze require refrigeration to prevent spoilage.
How to level the cake tops?
Slice the domes off with a serrated knife. Use a gentle sawing motion on completely cooled cakes to ensure the layers stack securely.
Chocolate Raspberry Truffle Cake