Boston Cream Cake: the Layered Masterpiece
- Mastering the Boston Cream Cake: A Culinary Introduction
- The Science of Success: Why Our Method Guarantees Perfection
- Gather Your Components: Essential Ingredients and Smart Swaps
- Assembly Line: Step-by-Step Guide to the Layered Delight
- Troubleshooting and Pro Tips from the Pastry Kitchen
- Keeping Your Boston Cream Cake Fresh: Storage and Longevity
- The Finishing Touch: Serving and Pairing Suggestions
- Recipe FAQs
- 📝 Recipe Card
Mastering the Boston Cream Cake: A Culinary Introduction
You know that smell, right? That intoxicating mix of warm vanilla cake and rich, slightly bitter dark chocolate? That’s the aroma of a truly perfect Boston Cream Cake .
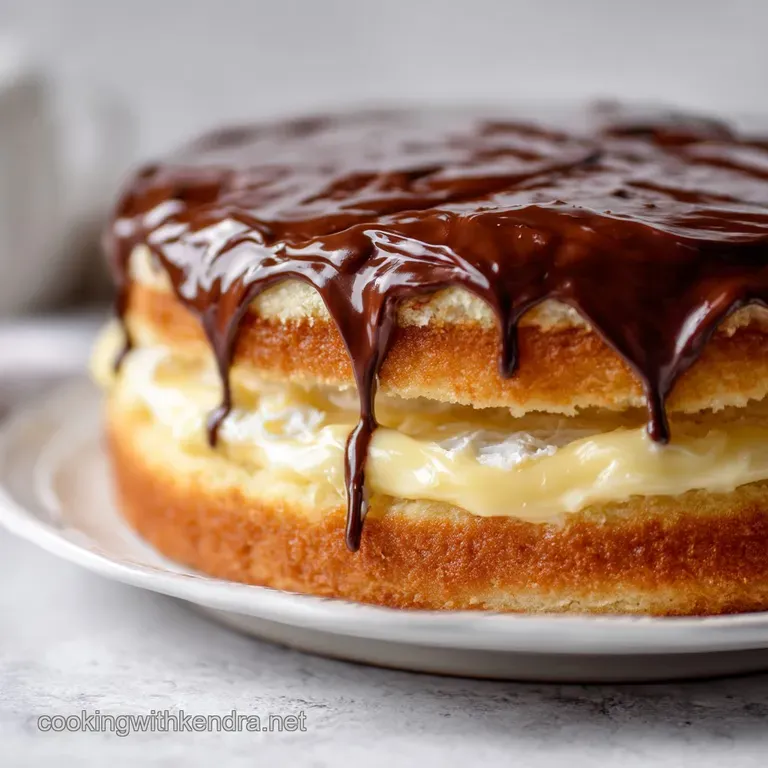
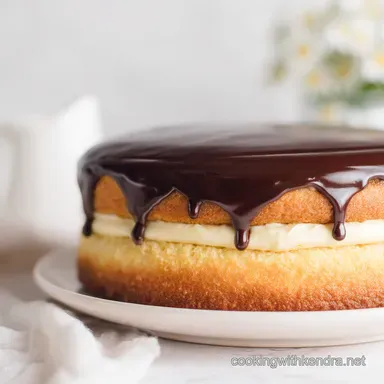
This dessert is a masterpiece of textural contradiction: an impossibly light sponge sandwiching the silkiest, coolest vanilla cream, all topped with a shiny, decadent mirror glaze. It’s heaven on a plate, honestly.
I used to think making a proper Boston Cream Cake at home was reserved for pastry school grads. But trust me, once you break it down, it’s just three straightforward components.
It’s fast enough to whip up for a weekend dinner party and cheap enough that you won't feel guilty about mastering the recipe a few times until it’s perfect. Plus, homemade pastry cream beats the pants off any store-bought vanilla pudding used in sad imitations.
Today, we are ditching the boxed mix and the shortcut vanilla pudding. We're going to build an incredible, high ranking Boston Cream Cake from scratch, mastering each layer along the way. Get your whisk ready, because we’re about to bake a legend.
The Science of Success: Why Our Method Guarantees Perfection
The secret to this recipe’s success isn’t a single step; it’s the thoughtful balance between the three major textures. You need the cake to be structurally sound enough to hold the generous filling, but delicate enough to compress easily when you take a bite.
The vanilla filling must be dense and chilled, and the chocolate glaze has to set beautifully without cracking or running all over the place.
The History: Why a Cake is Called a 'Pie'
It's one of those delightful culinary quirks that makes cooking fun, isn't it? The original "Boston Cream Pie" was born in the 1850s at the Parker House Hotel. Back then, there weren't standard round cake pans everything was baked in shallow pie tins.
So, even though it was layered with sponge and cream, the container dictated the name. We now refer to it correctly as Boston Cream Cake , acknowledging its true identity as a filled, layered cake, not a fruit- or custard based pie.
Deconstructing the Cake: Three Essential Layers of Texture
If you nail these three elements, you’ve won. First, we need an airy sponge this recipe uses a hot milk sponge method which guarantees incredible tenderness. Second, the Pastry Cream (crème pâtissière) must be rich, smooth, and firm enough to slice cleanly without squishing out when you cut the Boston Cream Cake .
Third, the shiny chocolate ganache glaze needs high-quality dark chocolate for the best flavor contrast.
The Ultimate Ratio Check: Balancing Sponge Volume and Cream Filling Depth
The goal here is harmony. Too much cream and your cake will collapse; too little and it feels dry. We are shooting for a 1:1 ratio between the height of the finished baked cake and the depth of the pastry cream filling. To achieve this, we use four egg yolks in the filling, which adds incredible richness and stability.
This ensures every slice of this homemade Boston Cream Cake delivers a satisfying blend of textures.
Achieving the Feather Light Sponge Texture
The key to that delicate crumb is twofold: whipping the eggs properly and using warm liquid. The volume of air you whip into the eggs and sugar (the ribbon stage) is your primary leavener; the baking powder is just backup. Don't skimp on the whipping time.
When you gently fold in the warm melted butter and milk mixture at the end, you are ensuring the fat is evenly dispersed without deflating the painstakingly incorporated air.
The Secret to Silky, Lump Free Pastry Cream (Crème Pâtissière)
Pastry cream is what separates a truly great Boston Cream Cake from an average one. The common pitfall is lumpy starch or scrambled eggs. We temper the yolks slowly with the hot milk, which is crucial.
Then, we cook the cream until it boils vigorously for a full minute, which is the only way to activate the cornstarch fully and prevent that chalky taste. I learned this the hard way after one batch looked perfect but tasted like raw flour.
Chef's Note: If you want to dive deeper into ultra creamy, stable fillings, the technique for making the perfect pastry cream is very similar to preparing Cannoli Filling: Chef Marcuss Authentic, Creamy Ricotta Recipe — it’s all about heat, temper, and patience.
Balancing Sweetness: The Role of the Glossy Mirror Glaze
The cake and the filling are quite sweet, so we use high-quality dark chocolate (55 60%) for the glaze. This provides the necessary bitter contrast. Using a bit of corn syrup in the glaze is my little secret; it stabilizes the ganache and gives it that professional, mirror like sheen that slides perfectly over the curved dome of the Boston Cream Cake .
Gather Your Components: Essential Ingredients and Smart Swaps
Always measure precisely when baking; it’s a science experiment, darling. But sometimes life happens, and you need to improvise. Here are the key components and how to swap them in a pinch, ensuring your homemade Boston Cream Cake is still stellar.
For the Tender Sponge Layer: Key Flour and Leavening Notes
| Ingredient | Why It Matters | Smart Swaps |
|---|---|---|
| Cake Flour | Low protein creates a tender crumb. | Use 1 cup AP flour minus 2 Tbsp, plus 2 Tbsp cornstarch. Sift well. |
| Whole Milk | Adds moisture and richness. | Any dairy or non-dairy milk works, but whole milk yields the best flavor. |
| Large Eggs (Room Temp) | Incorporates maximum air for volume. | If cold, place eggs in a bowl of warm (not hot) water for 5 minutes. |
| Baking Powder | Insurance for lift. | Ensure yours isn't expired! It’s the backup for your whipped eggs. |
Building the Rich Vanilla Filling: Dairy and Egg Yolk Requirements
We need whole milk and pure vanilla for the classic taste of a perfect Boston Cream Cake Filling . Using only yolks, not whole eggs, keeps the custard incredibly rich and helps it set firmer when chilled.
| Ingredient | Why It Matters | Smart Swaps |
|---|---|---|
| Egg Yolks | Richness, color, and stability (emulsifiers). | Cannot be substituted if using this traditional recipe. |
| Cornstarch | Primary thickener. | Can substitute 2 Tbsp of AP flour for every 1 Tbsp of cornstarch, but cornstarch is safer for avoiding lumps. |
| Vanilla Bean Paste | Intense flavor and visual flecks. | Use 2 tsp vanilla extract, or scrape the seeds from half a vanilla bean. |
Crafting the Luxurious Chocolate Ganache
Don't use chocolate chips unless you absolutely have to; their stabilizers prevent them from melting into the super smooth, glossy finish we want for the final Boston Cream Cake . Grab a high-quality bar.
Handling Ingredient Temperature: Why It Matters for Emulsification
This is a rookie mistake I made constantly when I first started baking: ignoring temperature. For the cake, those room temperature eggs are critical for volume. For the pastry cream, the cold butter whisked in at the end adds gloss and richness as it melts and the cream itself must be fully chilled before assembly.
If you try to fill a warm cake with warm cream, your Boston Cream Cake will turn into a soggy, slippery mess. It’s not worth the impatience.
Assembly Line: step-by-step Guide to the Layered Delight

Let's break this down into manageable chunks. Remember, the pastry cream needs the longest time investment, so start there!
Phase 1: Baking the Perfect Golden Cake Rounds
Preheat your oven correctly and make sure your pan is prepped with parchment paper. This prevents sticking, which is the last thing you want when you are maneuvering a delicate sponge.
- Aerate: Cream the room temperature eggs and sugar on high for a solid five to eight minutes. The mixture must triple in size and be very pale, falling off the whisk in thick ribbons. Seriously, this step is everything for the texture of your homemade Boston Cream Cake .
- Fold Gently: Sift the dry ingredients and fold them into the egg mixture quickly and lightly. Use a spatula, not a mixer.
- Liquids Last: Warm the milk and melted butter slightly; it should be just warm to the touch. Gently fold this in until no streaks remain. Overmixing here kills the air and gives you a rubbery cake.
- Bake: Pour into the prepared pan and bake until golden. It’s done when it springs back lightly when pressed in the center. Cool completely on a wire rack.
Phase 2: Cooking and Chilling the Pastry Cream Filling
This is the most technical part, but it's totally manageable.
- Temper: Heat the milk/sugar mix. Whisk the yolks/cornstarch mix separately. Slowly drizzle the hot milk into the yolks while whisking like crazy. This brings the yolks up to temperature without scrambling them, preparing them for their role in the Boston Cream Cake .
- Cook: Return the mixture to the pot and cook over medium low heat, whisking constantly (I mean CONSTANTLY), until it thickens dramatically. Let it bubble gently for 60 seconds.
- Strain and Chill: Remove from heat, stir in vanilla and cold butter, then immediately press the cream through a sieve. Cover the surface directly with plastic wrap to avoid that gross, rubbery skin. Chill for at least two hours; it needs to be FIRM.
Phase 3: Creating the Luxurious Mirror Glaze
The simple chocolate ganache is the perfect crown for your impressive Boston Cream Cake .
- Melt: Chop your chocolate finely. Place it in a heatproof bowl with the butter.
- Heat Cream: Heat the heavy cream and corn syrup until steaming hot but not boiling aggressively.
- Emulsify: Pour the hot cream over the chocolate and butter. Let it sit for five minutes to ensure the chocolate melts through. Then, whisk gently starting from the center and working outwards until you have a perfectly smooth, glossy glaze. Let it cool until it’s noticeably thicker (about 90°F or slightly cooler than body temperature).
Phase 4: Careful Layering and Final Cake Assembly
We are in the home stretch! This step requires a steady hand.
- Slice: Once the cake is fully cooled, use a long serrated knife to slice the cake horizontally into two even layers. Don't rush this, and turn the cake slowly while slicing.
- Fill: Place the bottom layer on your serving plate. Spoon the fully chilled pastry cream onto the layer and spread it out evenly. Stop spreading about half an inch from the edge.
- Top: Gently place the top layer of the cake over the filling. Press lightly to ensure contact.
- Glaze: Pour the slightly cooled glaze directly onto the center of the top cake layer. Allow the glaze to flow slowly toward the edges. If it needs help, use an offset spatula to gently guide it to coat the sides halfway down.
- Set: Refrigerate your finished Boston Cream Cake for another 30 minutes to ensure the glaze sets up into a firm, mirror finish.
Troubleshooting and Pro Tips from the Pastry Kitchen
If you’re anything like me, you learned baking by messing up. Let’s preempt some common disasters so your homemade Boston Cream Cake comes out perfect the first time.
Preventing the Sponge from Sinking or Drying Out
Sponge cake is notorious for sinking, usually because the batter was overmixed or underbaked. Fix this by ensuring you stop mixing as soon as the flour is incorporated. Also, do not open the oven door during the first 20 minutes of baking.
If you wait until the cake is fully golden and springs back easily, you should get a wonderful texture for your Easy Boston Cream Cake .
Fixing a Curdled or Too-Thin Vanilla Pastry Cream
If your pastry cream looks thin after cooking, it’s usually because you didn't cook it long enough to activate the starch. Return it to the heat and whisk continuously until it bubbles for a full minute. If it curdled (lumpy, separating), it means you cooked the eggs too fast or didn't temper them correctly.
You might be able to save it by blitzing it with an immersion blender, or if it’s too far gone, you might need to try again. I’ve been there; it happens!
Ensuring a Smooth, Crack Free Chocolate Topping
If your chocolate glaze is too thick when you pour it, it won't spread easily, resulting in a dull, thick coating instead of a glossy sheen. If it is too hot, it will melt the pastry cream underneath.
The trick here is patience; wait for the glaze to cool slightly until it looks like thick paint that’s the perfect time to pour it over the final Boston Cream Cake .
Timing the Chill: The Essential Resting Period Before Serving
I know you want to dig in right away, but the assembled Boston Cream Cake needs time for the cream to fully integrate with the cake layers. An additional 30 minutes in the fridge post glazing makes all the difference for clean slices.
This also ensures the chocolate sets hard enough not to drag the knife through the cream.
Keeping Your Boston Cream Cake Fresh: Storage and Longevity
Because this is a dairy intensive, cream filled dessert, proper storage is non-negotiable. Don't leave this classic Boston Cream Cake sitting out on the counter.
Optimal Refrigerator Storage for Cream Filled Desserts
Store the cake in an airtight container in the refrigerator. It is best eaten within 3 to 4 days of assembly. If you cut into the cake, gently press a piece of plastic wrap against the exposed cream layer before sealing the container; this prevents the cake edges from drying out and the cream from developing a strange crust.
Freezing the Cake Components Separately
While freezing the full, assembled Boston Cream Cake is risky (the pastry cream tends to weep and become grainy upon thawing), you can absolutely freeze the components. The sponge cake freezes beautifully wrapped tightly in plastic wrap and foil for up to 3 months.
Thaw it overnight in the fridge before slicing and assembling with fresh cream and glaze. You can also freeze the finished chocolate glaze and reheat it gently.
The Finishing Touch: Serving and Pairing Suggestions
This dessert is rich, creamy, and fundamentally elegant. I like to serve this rich Boston Cream Cake From Scratch with something sharp or acidic to cut through all that cream.
I often serve this simple, divine dessert with a side of tart fruit. A small dollop of homemade Blueberry Compote: Easy Recipe for Cheesecake Pancakes would provide a great color contrast and much needed acidity.
Pair it with robust coffee, espresso, or even a glass of chilled, slightly dry Prosecco. The bubbles and acidity of the wine are surprisingly perfect with the decadent chocolate layer of the classic Chocolate Boston Cream Cake . It truly is a cake worthy of celebrating. Go ahead, take a slice!

Recipe FAQs
Why did my pastry cream (crème pâtissière) turn out lumpy or too thin?
Lumps usually occur if the eggs were not tempered properly or if the cornstarch was not fully dissolved before heating the mixture. If lumps appear, push the hot cream immediately through a fine mesh sieve into a clean bowl to achieve a smooth texture.
If the cream is too thin after cooling, whisk in a slurry of cold milk and cornstarch, and reheat the mixture gently until it thickens sufficiently.
How should I store the finished Boston Cream Cake, and how long does it last?
Due to the dairy and egg-based pastry cream filling, the assembled cake must be stored in an airtight container in the refrigerator. The cake is best consumed within 3 to 4 days of assembly for optimal quality.
Note that the sponge cake texture will stiffen slightly when chilled, so allow it to sit at room temperature for 20 minutes before serving.
My sponge cake layers sank after cooling. What caused this?
Cake sinking is often caused by excess leavening agents, inaccurate flour measurements, or opening the oven door too early before the structure is set. Ensure your oven temperature is accurate and always check for doneness using a toothpick; it should come out clean before the cake is removed from the heat.
Can I make the pastry cream and cake layers ahead of time?
Yes, preparing components in advance is highly recommended for ease of assembly. The pastry cream is best made a day ahead; this allows it to chill and set up firmly, which prevents the cream from squeezing out when the cake layers are placed on top.
The cooled sponge layers can be tightly wrapped in plastic wrap and stored at room temperature for up to two days.
What is the secret to getting a deep, glossy chocolate glaze?
For a high shine finish, use high-quality semisweet chocolate and incorporate a small amount of corn syrup or glucose into your glaze mixture, which stabilizes the emulsion. Apply the glaze while it is still slightly warm (around 95°F) but not hot, pouring it quickly over the center of the cake and allowing it to spread evenly without excessive manipulation.
Can I freeze Boston Cream Cake?
Freezing the fully assembled and filled cake is generally not recommended because the high moisture content of the pastry cream will cause it to separate and become watery upon thawing.
However, you may freeze the unfrosted, cooled sponge cake layers, wrapped tightly, for up to one month; thaw them overnight before assembly.
Can I use heavy cream instead of whole milk for the pastry cream?
While you can use heavy cream, it will result in an exceptionally rich and dense pastry cream that might feel too heavy for the delicate sponge cake. If you desire a slightly richer texture without sacrificing the classic light mouthfeel, use a mixture of whole milk and half and-half, or whisk in a tablespoon of unsalted butter at the very end.
Classic Boston Cream Cake Recipe
Ingredients:
Instructions:
Nutrition Facts:
| Calories | 900 kcal |
|---|---|
| Protein | 19.3 g |
| Fat | 53.6 g |
| Carbs | 85.2 g |
