Chicken Enchiladas: Creamy and Comforting
- Time: Active 15 minutes, Passive 20 minutes, Total 35 minutes
- Flavor/Texture Hook: Velvety sour cream filling with a cheesy, golden brown finish
- Perfect for: Busy weeknight dinners, family gatherings, or beginner friendly meal prep
Honestly, there is nothing quite like the sound of that first sizzle when the cold sour cream hits the warm shredded chicken in the mixing bowl. You know that specific aroma? It’s that earthy, punchy hit of ground cumin mixed with the mild tang of green chilies that instantly makes my kitchen feel like the best Tex Mex spot in town.
I used to think making these from scratch was a massive production, involving hours of simmering sauce and fussy rolling techniques that always ended with my tortillas snapping in half.
But let’s be real none of us have time for that on a Tuesday when the kids are asking about dinner every five minutes. I’ve spent way too many nights trying to balance authentic flavor with the reality of a 6:00 PM deadline, and this version is the one I always come back to.
It’s reliable, it’s fast, and it hits that exact "velvety" note we all want from a great plate of enchiladas. We’re going to skip the complicated stuff and focus on what actually makes this dish work: the moisture balance.
I’m telling you, once you see how easy it is to get that perfect "seam side down" tuck without the mess, you'll never go back to the frozen stuff. We are talking about a 35 minute total turnaround that yields a pan of bubbling, golden goodness that honestly looks like it took you all afternoon.
Grab your 9x13 inch baking dish, and let’s get into the details of why this specific method is such a win for busy families.
Quick Win Results You Can Expect
When we talk about a "quick win" in the kitchen, we’re looking for that sweet spot where minimal effort meets high impact flavor. This recipe is designed for those days when your brain is fried but you still want a "proper" meal.
The magic here lies in the contrast: you have the soft, sauce soaked tortillas providing a sturdy wrap for a filling that is incredibly rich and moist thanks to that full cup of sour cream.
The best part? Because we’re using pre cooked chicken, the 20 minute bake time isn't actually about "cooking" the meat it’s about the transformation. It’s when the starches in the tortillas begin to meld with the red sauce and the cheese reaches that glorious state of being both melted and slightly browned at the edges.
You’re aiming for a dish that feels cohesive, not like separate components thrown together.
| Method | Total Time | Texture | Best For |
|---|---|---|---|
| Oven Bake (Classic) | 35 minutes | Crispy edges, melted cheese | Authentic family dinner feel |
| Toaster Oven | 30 minutes | More browning on top | Small batches (2-3 servings) |
| Air Fryer | 15 minutes | Extra crispy tortillas | Reheating or single portions |
Choosing the right approach depends on how much of a "crunch" you want on those corners. While the oven is the gold standard for getting that even heat across the whole 9x13 dish, don't sleep on the air fryer for leftovers. It brings that "shatter" back to the tortilla edges in a way the microwave just can't.
If you’re looking for more ways to use up that shredded chicken you’ve got in the fridge, you might want to check out my Cheesy Chicken Casserole which uses a similar flavor profile but in a layered format. It’s another one of those lifesavers for when you don't even want to bother with rolling tortillas.
The Essential Pantry Pull List
Before we start mixing, let’s talk about what’s actually going into the bowl. We aren't just throwing things together; we're building layers of flavor. The 3 cups (420g) of cooked chicken breast is the backbone, and while you can certainly poach your own, this is the perfect place to use a rotisserie chicken from the store.
It’s already seasoned and usually stays quite tender.
The "sauce" inside the enchilada is where the personality lives. By combining 1 cup (245g) of sour cream with a 4oz (113g) can of diced green chilies, we create a built in moisture barrier. This prevents the chicken from drying out during the bake.
The green chilies add a subtle, vinegary brightness that cuts through the richness of the 2.5 cups (250g) of Mexican cheese blend.
Component Analysis
| Ingredient | Science Role | Pro Secret |
|---|---|---|
| Sour Cream | Acidic Tenderizer | Use full fat for a velvety mouthfeel that won't break in the heat. |
| Red Sauce | Hydration Agent | Coat the bottom of the pan first to prevent the tortillas from sticking. |
| Green Chilies | Flavor Catalyst | Keep the liquid in the can; it’s packed with concentrated "zing." |
| Tortillas | Structural Base | Warming them first makes the gluten flexible so they won't crack. |
The interaction between the acidic sour cream and the proteins in the chicken is fascinating. Even though the chicken is already cooked, the acid helps keep the fibers "loose," which is why every bite feels so tender.
If you ever find your enchiladas feel "tight" or dry inside, it’s usually because there wasn't enough fat or acid in the filling to protect the meat from the oven’s dry heat.
For the tortillas, you have a choice: flour or corn. Flour is the "busy friendly" option because it’s naturally more pliable and creates a softer, more casserole like finish. Corn is more traditional and offers a wonderful toasted corn aroma, but it requires a bit more care (more on that in the instructions).
Either way, you'll need 10 of them to perfectly fit a standard 9x13 dish.
Chef's Tip: To deepen the flavor of your red enchilada sauce, whisk in a tiny pinch of cocoa powder or a half teaspoon of instant espresso. It doesn't make it taste like dessert; it just adds a dark, savory "umami" that mimics a sauce that's been simmering for hours.
Minimal Gear for Easy Cleanup
One of the reasons I love this recipe for my family is that I don't end up with a mountain of dishes. You really only need one large mixing bowl, a 9x13 inch baking dish, and a skillet if you're doing the corn tortilla flash fry method.
If you're going the flour route, you can even skip the skillet and use the microwave.
I’m a huge fan of the "one bowl" approach. We mix the chicken, spices, sour cream, and a portion of the cheese all in that one bowl. It makes cleanup a breeze. When you’re spreading that 1/4 cup of sauce on the bottom of the pan, use the back of a spoon don't bother getting a brush dirty.
If you find yourself making these often, investing in a good quality ceramic baking dish is a game changer. They hold heat much more evenly than thin metal pans, which means you get that "bubbling" action all the way to the center without burning the edges.
It’s those little things that help you avoid the "soupy" center that can sometimes plague home baked enchiladas.
Rolling and Baking for Success
Right then, let's get into the actual process. The timing here is crucial: 15 minutes of prep followed by exactly 20 minutes in the oven. If you go much longer than 20 minutes, the tortillas can start to lose their structural integrity and turn into a mushy (though still tasty) mess.
1. Build the Flavor Base
Start by preheating that oven to 375°F (190°C). In your big bowl, toss in the 3 cups of shredded chicken, 1 cup of sour cream, the whole can of green chilies (don't drain them!), 1 tsp cumin, 1/2 tsp garlic powder, 0.5 tsp salt, and 0.25 tsp black pepper.
Now, add just 1 cup of your shredded Mexican cheese blend. Mix it until every piece of chicken is coated in that velvety white sauce. This is the secret to the best chicken enchiladas that cheese inside the roll creates a "glue" that keeps the filling from falling out when you cut into it.
2. The Soften and Roll Technique
You have to warm those tortillas! If you skip this, they will snap, and your filling will leak everywhere. For flour, a stack in damp paper towels for 30 seconds in the microwave works like a charm. For corn, heat 1 tbsp of neutral oil in a skillet and give them 10 seconds per side. They should feel "floppy."
3. The Sauce and Bake Phase
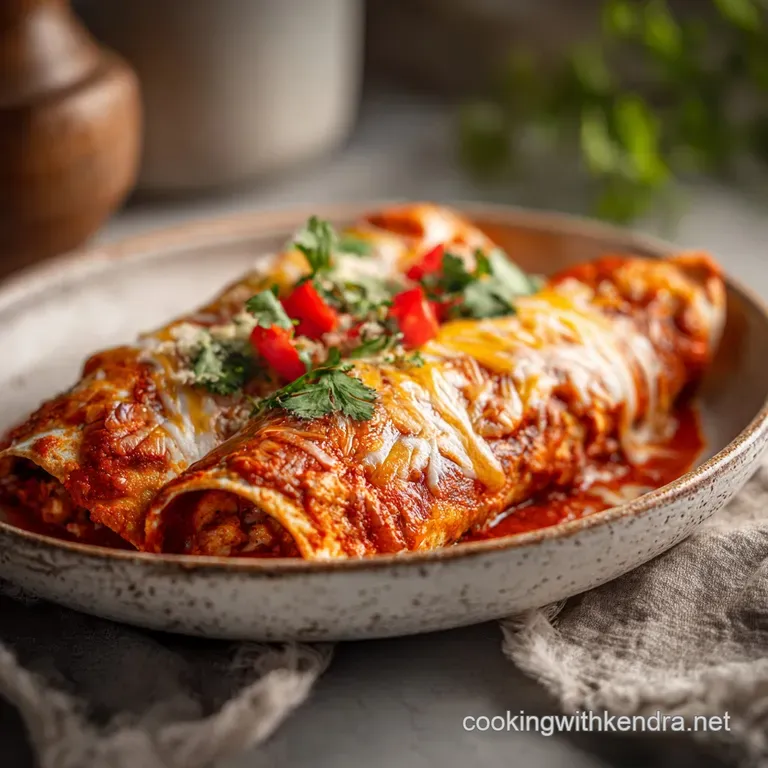
Spread 1/4 cup of your red enchilada sauce on the bottom of the 9x13 dish. This creates a "slip" so your enchiladas don't bond to the pan. Take a tortilla, plop about 1/3 cup of the chicken mix in the center, and roll it tight. Place it seam side down in the pan.
Repeat until all 10 are snuggled in like little sleeping bags. Pour the rest of the sauce over the top, then hit it with the remaining 1.5 cups of cheese.
Bake for 20 minutes until the cheese is melted and bubbling. You want to see those little golden spots on the cheese that's where the flavor is! If the edges look a little "crackly" and the sauce is thickened, you’re in business.
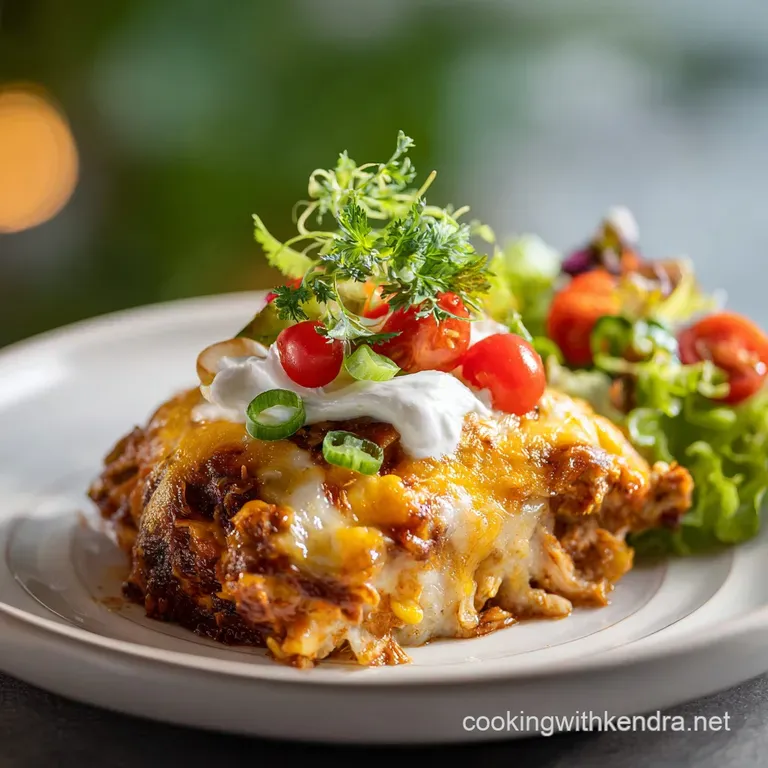
Once they're out, let them sit for 5 minutes. This "resting" time allows the sauce to thicken slightly so they stay together when you lift them out. Garnish with your sliced avocado, red onion, and fresh cilantro right before you serve.
If you love the comfort of a creamy, stew like dinner but want a different vibe for tomorrow, you should definitely try my Chicken and Dumplings recipe. It’s another family favorite that uses that same principle of "low effort, high reward" with a focus on velvety textures.
Fixes for Common Kitchen Fails
Even with a simple recipe, things can go sideways. We've all been there you pull the dish out and it’s either a puddle of sauce or the tortillas are as tough as cardboard. Most of these issues come down to temperature and moisture control.
Why Your Tortillas Are Soggy
If your enchiladas turn out "mushy," it’s usually because of one of two things: either the sauce was too thin, or you didn't "seal" the tortillas. For corn tortillas, that quick 10 second fry in oil isn't just for flexibility; it creates a fat barrier that prevents the sauce from soaking into the grain too quickly.
If you're using flour and they're too soft, try using slightly less sauce on the bottom of the pan next time.
To Avoid a "Soupy" Mess
Sometimes the sour cream can release a bit of liquid as it heats up. To fix this, make sure you aren't using "light" or "low-fat" sour cream, which has a higher water content and is more likely to break. Stick with the full fat version for that silky, stable finish.
Also, make sure your chicken is well shredded; large chunks of meat don't hold onto the sauce as well as fine shreds do.
| Problem | Root Cause | Solution |
|---|---|---|
| Tortillas Cracked | Tortillas were too cold or dry | Microwave in damp towels for 30 seconds before rolling. |
| Filling is Dry | Not enough sour cream/fat | Ensure you use a full cup (245g) of full fat sour cream. |
| Cheese Didn't Brown | Oven temp too low/top too far from heat | Move rack to top third of oven for the last 5 mins. |
Common Mistakes Checklist
- ✓ Don't forget to grease the pan or add that bottom layer of sauce (prevents a sticky nightmare).
- ✓ Never use cold tortillas straight from the fridge (they will break instantly).
- ✓ Avoid "drowning" the tortillas in sauce; they only need a thin, even coat.
- ✓ Always place them seam side down so they don't unfurl like a blooming onion in the oven.
- ✓ Let them rest for 5 minutes after baking; this "sets" the internal temperature and the sauce.
Smart Twists and Creative Swaps
Once you’ve mastered the basic homemade chicken enchiladas, you can start playing with the components. My family sometimes likes a bit more heat, so I’ll swap the red sauce for a spicy verde version.
Or, if I’m feeling like I need a bit more "crunch" in my life, I'll add some corn or black beans to the filling.
If you want a different protein: Use shredded pork carnitas or even ground beef (just drain the grease well!). For a vegetarian version, use a mix of black beans, corn, and sautéed spinach.
If you want to save some cash:Premium: Freshly grilled chicken breast | Budget: Canned chicken breast (drained) | Impact: Slightly softer texture | Savings: $4-6 Premium: Artisanal Mexican cheese |
Budget: Block of sharp cheddar (hand shredded) | Impact: Sharper flavor | Savings: $2-3
For those looking for a "Green Chicken Enchiladas" vibe, simply swap the red enchilada sauce for a jar of salsa verde. The green sauce tends to be a bit more "tangy" and less "earthy" than the red, which pairs beautifully with the sour cream in the filling.
If you're doing a low carb swap, you can use large cabbage leaves or even zucchini boats instead of tortillas, though you’ll need to increase the bake time by about 10 minutes to ensure the vegetables are tender.
Saving Your Leftovers for Later
One of the best things about this dish is that it actually tastes better the next day. As it sits in the fridge, those flavors continue to marry, and the spices in the cumin and green chilies become even more pronounced.
Storage: You can keep these in an airtight container in the fridge for up to 4 days. When you go to reheat them, I highly recommend the oven or an air fryer. The microwave tends to make the tortillas a bit rubbery, whereas 10 minutes at 350°F (180°C) in the oven will bring back that "bubbling" glory.
Freezing: These are excellent freezer prep meals. You can freeze the entire dish before baking. Just wrap the dish tightly in plastic wrap and then foil. They will stay good for up to 3 months.
To bake from frozen, just add an extra 15-20 minutes to the cook time and keep them covered with foil for the first half of the bake to prevent the cheese from burning before the middle is thawed.
Zero Waste Tip: If you have leftover filling but ran out of tortillas, don't throw it out! It makes an incredible "enchilada dip." Just put it in a small oven safe bowl, top with a little extra cheese, and bake it until bubbly. Serve it with tortilla chips for a high protein snack the next day.
You can also use any leftover cilantro stems finely chop them and mix them into your rice or a quick salsa; they have even more flavor than the leaves!
Topping Your Plate with Style
Presentation matters, even on a busy Wednesday. We eat with our eyes first, and a pan of brown and red enchiladas can look a bit "flat" without some fresh contrast. The garnish isn't just for show; it adds essential texture and temperature differences that make each bite exciting.
The cold, creamy avocado slices contrast perfectly with the hot, bubbling cheese. The red onion provides a much needed "crunch" and a bite of sharp acidity that cuts through the rich sour cream. And please, don't skip the cilantro! It adds that floral, fresh finish that defines authentic chicken enchiladas.
If you're serving these for a crowd, I like to put all the toppings in little bowls in the center of the table. It lets everyone customize their heat level and "freshness" factor. A squeeze of fresh lime juice over the top right before eating "wakes up" all the spices and makes the red sauce really pop.
Trust me, that tiny bit of citrus is the "restaurant secret" that most home cooks forget. It’s the difference between a good meal and one that has everyone asking for the recipe. Enjoy your dinner you've earned this win!

Very High in Sodium
1380 mg 1380 mg of sodium per serving (60% 60% of daily value)
The American Heart Association recommends limiting sodium intake to less than 2,300 mg per day, with an ideal limit of less than 1,500 mg per day for most adults.
Tips to Reduce Sodium
-
Choose Low-Sodium Enchilada Sauce-20%
Opt for a low-sodium or no-salt added red enchilada sauce. This is a significant contributor to sodium.
-
Select Lower Sodium Cheese-15%
Use a reduced sodium Mexican cheese blend or a naturally lower sodium cheese like Monterey Jack. Some shredded cheese blends can be very high in sodium.
-
Rinse Canned Green Chilies-20%
Drain and rinse the canned diced green chilies thoroughly under cold water before adding them to your recipe. This can remove a considerable amount of added sodium.
-
Halve the Added Salt-15%
Reduce the added salt to 1/4 teaspoon. You can always add more salt at the table if needed, but starting with less is key.
-
Boost Flavor with Herbs and Spices
Enhance the flavor of your dish by generously using fresh cilantro, red onion, cumin, and garlic powder. These provide flavor without adding sodium.
Recipe FAQs
What is the secret to good enchiladas?
The secret is resting the dish for five minutes after baking. This crucial pause allows the internal structure to set so they hold their shape perfectly when plated.
What goes in chicken enchiladas?
You need shredded chicken breast, sour cream, green chilies, cumin, garlic powder, salt, pepper, Mexican cheese blend, and red enchilada sauce. These are rolled into tortillas and topped with extra cheese, onion, cilantro, and avocado slices.
What is the secret ingredient in enchiladas?
Sour cream is the secret to a rich, cohesive filling. It binds the shredded chicken and spices together, creating a creamy texture that pairs beautifully with the tangy red sauce.
Can a diabetic eat enchiladas?
Consult your doctor regarding your specific dietary needs. This recipe uses a portion controlled approach with 10 tortillas, and you can focus on the high protein chicken and avocado filling to help balance your meal.
How to keep tortillas from cracking?
Warm your tortillas before rolling them. Microwave flour tortillas between damp paper towels for 30 seconds or flash fry corn tortillas in a skillet for 10 seconds per side to ensure they remain pliable.
How to ensure the bottom of the dish doesn't stick?
Spread 1/4 cup of enchilada sauce on the bottom of the baking dish before adding the tortillas. This simple barrier prevents the shells from drying out or fusing to the pan, much like the sauce layering method used to keep pasta moist in other casseroles.
How to bake perfectly every time?
Preheat your oven to 375°F and bake for exactly 20 minutes. This timing ensures the cheese is melted and bubbling while the edges achieve a slight, delicious golden hue.
Creamy Chicken Enchiladas 2

Ingredients:
Instructions:
Nutrition Facts:
| Calories | 812 kcal |
|---|---|
| Protein | 48 g |
| Fat | 44 g |
| Carbs | 56 g |
| Fiber | 7 g |
| Sugar | 5 g |
| Sodium | 1380 mg |
