Crispy Chicken Caesar Sandwich: Golden and Zesty
- Time:20 minutes prep + 10 minutes cook = Total 30 minutes
- Flavor/Texture Hook: Shatter crisp chicken with a velvety, zesty salad crunch
- Perfect for: A high end weeknight dinner or a crowd-pleasing weekend lunch
- The Best Crispy Chicken Caesar Sandwich
- Fast and Easy Recipe Specs
- Essential Ingredients and Swaps
- Gear for the Perfect Crunch
- Step by Step Cooking Guide
- Troubleshooting for Better Sandwiches
- Customizing Your Caesar Build
- Storage and Zero Waste Tips
- Perfect Pairings and Side Dishes
- Recipe FAQs
- 📝 Recipe Card
The Best Crispy Chicken Caesar Sandwich
That first crackle when the chicken hits the hot oil is the sound of victory. I remember the first time I tried to make this at home, I did everything "by the book" but I made one fatal error.
I dressed the Romaine and piled it onto the chicken while the bread was still steaming, and within three minutes, the whole thing had turned into a soggy mess. It was a disaster, honestly, but it taught me the most important lesson about this sandwich: timing is everything.
Since then, I've tweaked the breading and the assembly order to make sure you get that distinct contrast between the hot, crispy protein and the cold, bright salad. We aren't just making a sandwich; we're balancing temperatures and textures.
You want the bread to be a sturdy, buttery barrier that keeps the juices in and the dressing from soaking through. Once you get the flow down, it's a quick win that feels like something you'd pay 20 bucks for at a bistro.
Right then, let's get into it. This isn't about being fancy or using professional gear. It's about using a few home cook tricks, like cornstarch and a meat mallet, to get a result that actually holds up.
Trust me on this, once you taste the difference a properly toasted garlic bun makes, you'll never go back to plain toasted bread. Let's crack on.
Fast and Easy Recipe Specs
When you're staring at the clock on a Tuesday night, you need a plan that actually works. This recipe is designed for a fast flow. The prep takes about 20 minutes, mostly because of the dredging station, but the actual frying time is incredibly short.
Because we pound the chicken thin, it cooks through in a flash without drying out.
The total time of 30 minutes is honest. You won't find any hidden "resting" periods that add an hour to your night. The goal here is a high impact meal that doesn't require you to spend the entire evening scrubbing pans.
It's comfort food that fits into a busy schedule, provided you have your station set up before you turn on the heat.
For those who prefer a different vibe, you might like my Caesar Chicken Bake, which is a bit more hands off. But for that specific, shatter crisp texture, the stovetop method used here is the way to go.
| Method | Time | Texture | Best For |
|---|---|---|---|
| Stovetop | 30 min | Shatter crisp | Quick weeknight |
| Air Fryer | 40 min | Lightly crisp | Healthier option |
| Oven Bake | 50 min | Soft crisp | Large batches |
Essential Ingredients and Swaps
Getting the ingredients right is half the battle. I'm a big fan of Panko because it's larger and airier than standard breadcrumbs, which gives you more surface area for that crunch. The cornstarch is the secret weapon here, as it prevents the flour from absorbing too much oil and keeps the crust from getting heavy.
For the bread, I suggest ciabatta or brioche. Ciabatta gives you a rustic, chewy contrast, while brioche is more buttery and soft. Either way, the garlic butter brush is non negotiable. It adds a layer of flavor that ties the savory chicken and the tangy dressing together.
I've listed everything you need below. If you're missing something, don't panic. Most of these have easy swaps that still taste great.
For the Crispy Chicken
- 1.5 lb chicken breasts, sliced into thin cutletsWhy this? Fast cooking and even browning
- 1/2 cup all purpose flourWhy this? Helps the egg stick to the meat
- 1/2 cup cornstarchWhy this? Ensures a long lasting crunch
- 1 tsp garlic powderWhy this? Deep savory base layer
- 1 tsp smoked paprikaWhy this? Adds a hint of woodsy color
- 1 tsp saltWhy this? Essential for flavor penetration
- 1/2 tsp black pepperWhy this? Subtle heat contrast
- 2 large eggs, beatenWhy this? The "glue" for the Panko
- 1 1/2 cups Panko breadcrumbsWhy this? Superior crunch over regular crumbs
- 1/2 cup neutral oilWhy this? High smoke point for frying
For the Assembly
- 4 cups chopped Romaine lettuceWhy this? Classic crunch and water content
- 1/2 cup Caesar dressingWhy this? Umami rich creamy binder
- 1/3 cup shaved Parmesan cheeseWhy this? Salty, nutty finish
- 1 tbsp fresh lemon juiceWhy this? Brightens the whole sandwich
- 4 ciabatta rolls or brioche buns, halvedWhy this? Sturdy enough to hold the fillings
- 2 tbsp unsalted butter, meltedWhy this? For the golden toast
- 2 cloves garlic, mincedWhy this? Fresh aromatic punch
| Original Ingredient | Substitute | Why It Works |
|---|---|---|
| Panko Breadcrumbs | Regular Breadcrumbs | Similar crunch. Note: Result is denser and less "airy" |
| Cornstarch | Rice Flour | gluten-free and very crisp. Note: Slightly different flavor |
| Ciabatta Rolls | Sourdough Slices | Great structure. Note: Less buttery than brioche |
| Romaine Lettuce | Kale | More hearty. Note: Needs more dressing to soften leaves |
Gear for the Perfect Crunch
You don't need a professional kitchen, but a few specific tools make this a lot easier. A meat mallet is probably the most important thing here. If your chicken is uneven, the thin parts will overcook and get rubbery before the thick parts are safe to eat.
Pounding them to a consistent 1/2 inch is what makes this recipe work.
A wide skillet is also key. If you crowd the pan, the chicken releases steam instead of searing, and you'll end up with a soggy crust. If you only have a small pan, just work in batches. It takes an extra few minutes, but the crunch is worth it.
I usually use a cast iron skillet (like Lodge) because it holds heat so well. When you add the chicken, the temperature doesn't drop as much, meaning the Panko sears instantly. If you're using a non stick pan, just make sure your oil is shimmering before you drop the cutlets in.
Step by step Cooking Guide
Let's get into the flow. The key here is the "dredging station." I set up three bowls in a row so I can move the chicken from one to the next without touching anything else. This keeps the process clean and ensures every piece is coated perfectly.
Prepping the Protein
First, get your chicken ready. Place the chicken breasts between two sheets of plastic wrap. This stops the meat from tearing while you work. Use your meat mallet to pound them to an even 1/2 inch thickness. Season them lightly with salt and pepper.
Don't go overboard with the salt here, as the Parmesan and Caesar dressing are already quite salty.
Executing the Quick Coat
Now, set up your bowls. Bowl one gets the flour, cornstarch, garlic powder, smoked paprika, salt, and pepper. Whisk these together so the spices are evenly distributed. Bowl two is just your beaten eggs. Bowl three is your Panko.
Dip each chicken cutlet in the flour mixture first, shaking off the excess. Then, let it take a bath in the egg, and finally, press it firmly into the Panko. I mean really press it in. This prevents the breading from sloughing off in the pan.
Searing for Maximum Golden Color
Heat your neutral oil in the skillet over medium high heat. To check if it's ready, drop a single Panko crumb in; if it sizzles immediately, you're good to go. Fry the chicken for 3-5 minutes per side.
You're looking for a deep golden brown color and an internal temperature of 165°F. Once done, set them on a wire rack or a paper towel lined plate.
Chef Note: Using a wire rack instead of a plate prevents the bottom of the chicken from steaming and getting soft. It keeps the crunch consistent on all sides.
Toasting the Foundation
While the chicken rests for a minute, mix your minced garlic into the melted butter. Brush this generously onto the cut sides of your rolls. Toss them into the same skillet you used for the chicken (no need to clean it!) or pop them under the broiler.
Toast them until they are golden brown and smell like garlic heaven.
Assembling for Structural Integrity
In a mixing bowl, toss your chopped romaine, shaved Parmesan, and lemon juice with the Caesar dressing. Do this right before you build. If you dress the salad too early, the salt in the dressing will draw water out of the lettuce, making it limp.
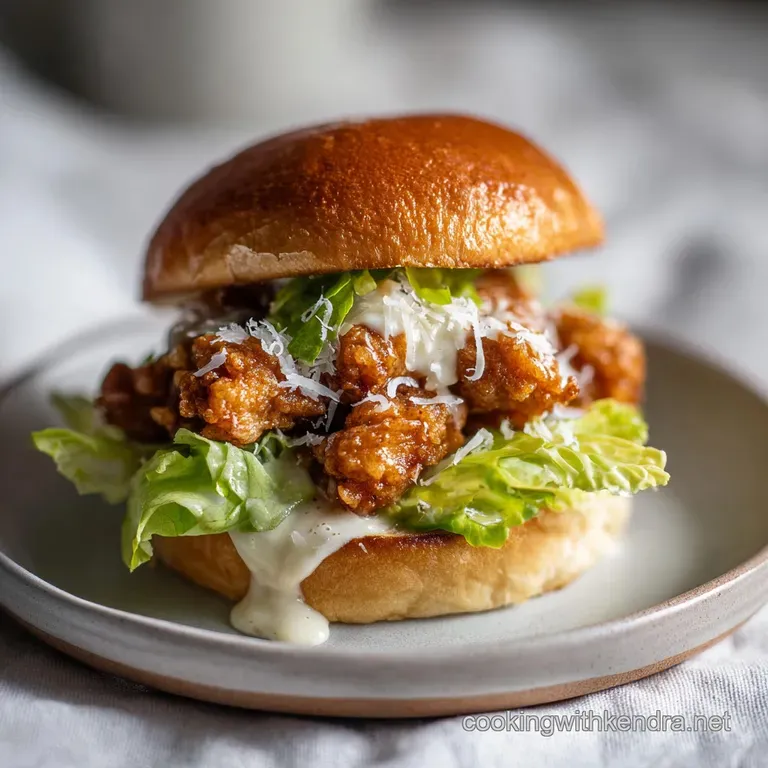
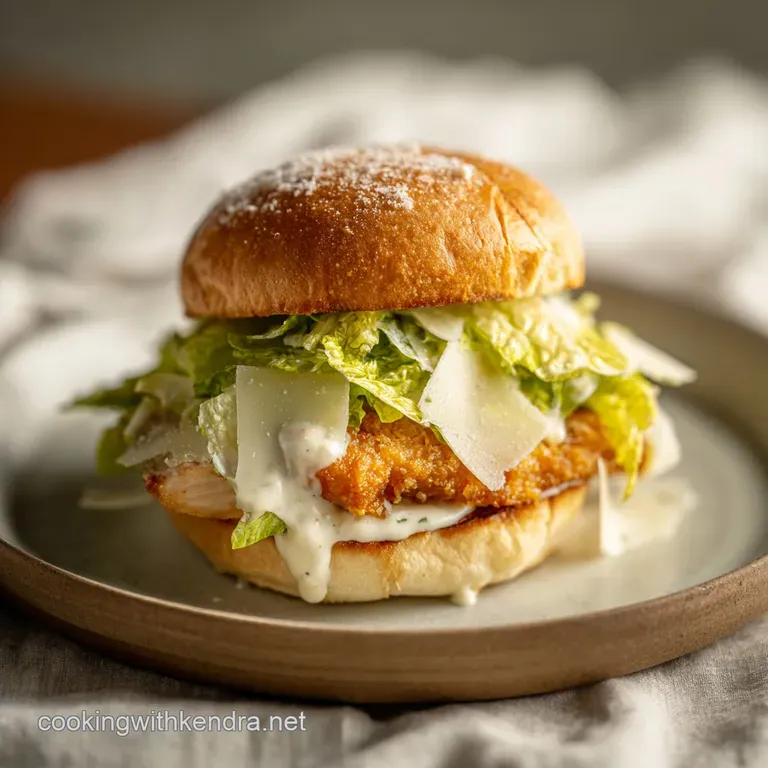
Place the crispy chicken on the bottom toasted roll. Pile the dressed Caesar salad on top. Close the sandwich and press down slightly to set everything in place. The result is a velvety sauce, a sharp cheese hit, and a chicken breast that practically shatters when you bite into it.
Troubleshooting for Better Sandwiches
Even the best of us have a "fail" moment in the kitchen. Usually, with this recipe, the problem is either moisture or temperature. If your chicken isn't crispy, it's almost always because the oil wasn't hot enough or the pan was too crowded.
Why Your Breading Sloughs Off
If you see the Panko falling off in the pan, it's usually because the flour layer was too thick or the egg didn't coat the meat fully. The flour acts as the primer, the egg as the glue, and the Panko as the finish. If the primer is too thick, the glue can't reach the meat.
| Problem | Root Cause | Solution |
|---|---|---|
| Breading falling off | Too much flour/dry powder | Shake off excess flour before egg dip |
| Soggy Bread | Dressing added too early | Mix salad and assemble immediately before eating |
| Rubber chicken | Cooked too long/too thick | Pound chicken to exactly 1/2 inch thickness |
Why Your Bread Gets Soggy
This happens when the heat from the chicken meets the moisture from the salad. The best fix is the garlic butter toast. That fat creates a seal on the bread, making it harder for the dressing to soak in. Also, make sure you're using a sturdy roll like ciabatta.
A soft white bun will collapse under the weight of a dressed salad.
Common Mistakes Checklist
To make sure your next batch is a total winner, keep these points in mind:
- ✓ Pat the chicken completely dry with paper towels before the first flour dip.
- ✓ Ensure the oil is shimmering (about 350°F/180°C) before adding the chicken.
- ✓ Don't overcrowd the pan; fry in two batches if necessary.
- ✓ Always use a meat mallet for consistent thickness to avoid overcooking.
- ✓ Toss the salad in the dressing only seconds before assembling.
Customizing Your Caesar Build
One of the best things about a chicken Caesar sandwich is how easy it is to tweak. If you want to lean into the gourmet side, you can swap the standard dressing for a homemade version with fresh anchovies and egg yolks. Or, if you're looking for a bit more kick, I highly recommend adding some heat.
Adding a Spicy Kick
For a "Spicy Caesar," add a teaspoon of sriracha or chopped jalapeños to your Caesar dressing. You can also add a pinch of cayenne pepper to the flour mixture. The heat cuts through the richness of the Parmesan and butter beautifully.
If you're feeling bold, try a drizzle of honey hot sauce over the chicken before adding the salad.
The Zesty Twist
If you find the sandwich too heavy, increase the lemon juice. I sometimes add a bit of lemon zest to the Panko breadcrumbs as well. This adds a bright, citrusy aroma that makes the whole thing feel lighter. For another twist, try adding a few thin slices of cucumber to the salad for an extra cooling crunch.
The Low Carb Swap
If you're cutting back on carbs, you can swap the Panko for almond flour or crushed pork rinds. While you'll lose that specific "shatter" texture, you still get a great crunch. Instead of a bun, use large collard green leaves or a thick slice of grilled halloumi cheese as the base. If you're doing this, you might also enjoy my Chicken Florentine recipe for a low carb, high flavor alternative.
Storage and Zero Waste Tips
Since this sandwich relies on the contrast of textures, it's best eaten immediately. However, if you have leftovers, there's a right way and a wrong way to handle them. Never store the sandwich fully assembled. The dressing will turn the bread and the chicken into a sponge overnight.
Storage Guidelines Store the cooked chicken in an airtight container in the fridge for up to 3 days. Keep the dressed salad in a separate container (though it's better to dress it fresh). The toasted buns can be kept in a paper bag at room temperature for 24 hours.
Reheating for Maximum Crunch Don't use the microwave for the chicken; it will make it rubbery. Instead, pop the chicken in an air fryer for 3-4 minutes at 375°F (190°C) or a hot oven for 5-7 minutes.
Once the chicken is sizzling again, re toast your bun and assemble fresh.
Zero Waste Kitchen Don't throw away the chicken trimmings! If you have small bits of chicken left over from pounding or slicing, toss them in the flour/egg/Panko mix and fry them up as "Caesar Pops." They make a great snack or a topping for a side salad.
Also, if you have leftover garlic butter, use it to sauté some spinach or toss with some pasta for a quick side dish.
Perfect Pairings and Side Dishes
Because this sandwich is so rich and savory, you want sides that provide a sharp or refreshing contrast. Something acidic or crisp will cleanse the palate between bites of that buttery bread and creamy dressing.
The Balanced Side
A simple side of sweet potato fries with a spicy aioli is a classic choice. The sweetness of the potato balances the saltiness of the Parmesan. If you want something lighter, a vinegar based coleslaw without mayo is the way to go. The tanginess of the vinegar cuts right through the richness of the fried chicken.
The Classic Pairing
If you're serving this for a crowd, a bowl of homemade tomato bisque is a fantastic partner. The creamy, acidic tomato soup complements the savory, crunchy sandwich perfectly. It's a bit of a "comfort food overload," but that's exactly why it works.
Decision Shortcut
If you're unsure how to serve this, follow these quick guides:
- If you want it light → Serve with a side of chilled cucumber and radish salad.
- If you want a feast → Pair with truffle fries and a cold lemonade.
- If you're meal prepping → Keep chicken and salad separate; toast bun on the spot.
Right then, you've got everything you need to nail this Crispy Chicken Caesar Sandwich. Just remember: pound the chicken, get the oil hot, and dress the salad at the very last second. It's a simple process, but those small details are what turn a basic sandwich into something truly special. Enjoy the crunch!
Recipe FAQs
Can I use brioche buns instead of ciabatta?
Yes, brioche buns are an excellent alternative. Their buttery sweetness provides a great contrast to the salty Caesar dressing and tangy lemon juice.
Why must I pound the chicken to a 1/2 inch thickness?
It guarantees an even cook. Pounding ensures the chicken breasts reach the safe internal temperature of 165°F without the thinner edges drying out.
How to keep the Panko breading from falling off?
Press the chicken firmly into the Panko. After the egg dip, use your palms to push the crumbs into the meat to create a secure, tight seal.
Is it true that flour alone is sufficient for the dredging station?
No, this is a common misconception. Combining flour with cornstarch creates a much crispier crust that holds up better under the weight of the salad.
Can I store the fully assembled sandwich in the fridge?
No, keep the components separate. Storing them together allows the Caesar dressing to soak into the bread and chicken, making the sandwich soggy.
How to know when the chicken is fully cooked?
Check for an internal temperature of 165°F. Use a meat thermometer in the thickest part of the breast to ensure it is safe and juicy.
How to prevent the chicken from absorbing too much oil?
Ensure the neutral oil is hot over medium high heat before adding the meat. If you enjoyed mastering texture control here, see how the same principle works in our gourmet treat.
Crispy Chicken Caesar Sandwich

