Country Fried Chicken with Cream Gravy
- Time: Active 15 minutes, Passive 15 minutes, Total 30 minutes
- Flavor/Texture Hook: Shatteringly crisp exterior with a velvety, pepper flecked gravy
- Perfect for: Sunday family dinner or ultimate comfort food cravings
- Perfectly Golden and Crispy Country Fried Chicken
- The Physics of the Aerated Crust
- The Essential Recipe Specifications
- Components of the Perfect Coating
- Tools for Southern Frying Success
- Steps for the Ultimate Fry
- Fixing Common Breading Problems
- Customizing Your Classic Southern Comfort Plate
- Storage and Waste Management
- Plating and Service Style
- HIGH in Sodium (⚠️)
- Recipe FAQs
- 📝 Recipe Card
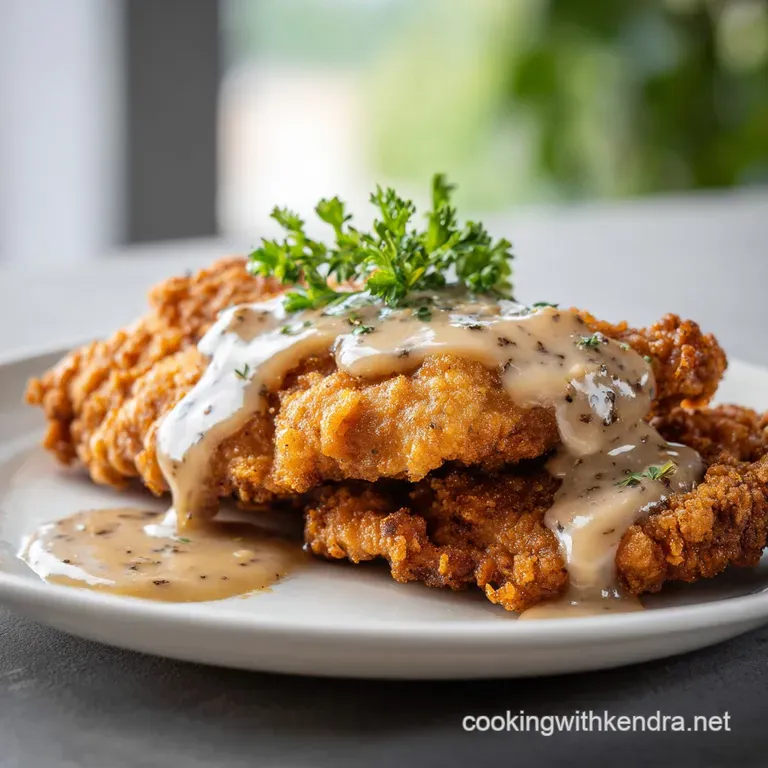
Perfectly Golden and Crispy Country Fried Chicken
The sizzle of a cast iron skillet hitting the flame is a sound that lives in my bones. I remember standing on a wooden stool in my grandmother's kitchen, watching her clouds of flour drift through the morning light like dust motes.
She didn’t use a thermometer; she just flicked a drop of water into the oil, and if it danced and popped, it was time. That first piece of chicken hitting the fat that violent, rhythmic hiss is the exact moment I fell in love with cooking.
We aren't just making dinner here; we’re building a memory. This isn't the heavy, greasy bird you find under heat lamps at the grocery store. This version has a crust that shatters like glass when you bite into it, giving way to meat so tender you could almost cut it with a spoon.
It’s about that beautiful contrast between the jagged, mahogany edges of the breading and the silkiness of a proper white gravy. Trust me, once you nail the rhythm of the dredge and the fry, you'll never go back to the frozen stuff.
The secret I learned after years of trial and error (and a few soggy disasters) is all in the chemistry of the coating. Most people just use flour, but we're going to be a bit smarter than that. We want crags, we want ripples, and we want a crunch that can be heard from the next room.
It’s about treating the chicken with respect, pounding it to a uniform thickness, and letting the buttermilk work its magic. Grab your skillet, let's get into the details of why this actually works.
The Physics of the Aerated Crust
Carbon Dioxide Expansion: The 1 tsp of baking powder reacts with the lactic acid in the buttermilk to create tiny CO2 bubbles, which puff the breading away from the meat for a lighter texture. This ensures the crust doesn't become a dense, leaden shell but rather a series of delicate, crispy layers.
Starch Cross Linking: Using 0.5 cup of cornstarch alongside the flour prevents gluten from over developing, which results in a brittle, "shatter style" crunch rather than a chewy one. The cornstarch also absorbs less oil than pure flour, keeping the final result feeling light on the palate.
Fresh vs Shortcut Comparison
| Method | Texture Result | Flavor Depth | Time Investment |
|---|---|---|---|
| Fresh Pounded & Dredged | Shattering, jagged crags | High (buttermilk & spices) | 30 minutes |
| store-bought Breaded | Uniform, sandy coating | Low (processed salt) | 15 minutes |
| Batter Dipped | Smooth, thick shell | Medium (bready) | 40 minutes |
The Essential Recipe Specifications
Getting the timing right is the difference between a golden masterpiece and a burnt offering. When you’re working with shallow frying, heat management is your best friend. You want that oil hot enough to seal the breading instantly, but not so aggressive that it scorches the spices before the chicken is cooked through.
The 4 large chicken breasts (approximately 1.5 lbs) need to be handled with care. If they're straight out of the fridge, the cold meat will drop the oil temperature too fast, leading to greasy breading. I always let mine sit on the counter for about ten minutes while I prep the flour station.
It’s these tiny, "in between" moments that elevate a simple meal into something truly special.
| Thickness | Internal Temp | Rest Time | Visual Cue |
|---|---|---|---|
| 0.5 inch | 165°F | 3 minutes | Juices run clear |
| 0.75 inch | 165°F | 5 minutes | Coating is deep mahogany |
| 1 inch | 165°F | 7 minutes | No pink near the center |
Chef Tip: Whisk a tablespoon of the hot frying oil into your buttermilk and egg mixture before dipping the chicken. This creates "pre cooked" fat particles that help the breading bond to the protein, virtually guaranteeing it won't fall off in the pan.
Components of the Perfect Coating
Understanding your ingredients is like knowing the personalities of your friends you need to know who does what to keep the party going. In this recipe, the 1.5 cups of all purpose flour provides the structure, but it’s the supporting cast that does the heavy lifting.
The 1 tbsp of smoked paprika doesn't just add a subtle earthiness; it provides that gorgeous sunset orange hue that deepens into a rich brown in the oil.
Ingredient Deep Dive
| Ingredient | Science Role | Pro Secret |
|---|---|---|
| Cornstarch (0.5 cup) | Moisture Barrier | Acts as a "shield" to prevent the flour from becoming soggy from the chicken's natural juices. |
| Buttermilk (1 cup) | Protein Tenderizer | The mild acidity breaks down tough muscle fibers while providing a "sticky" base for the flour. |
| Baking Powder (1 tsp) | Leavening Agent | Creates micro pockets of air in the breading, making it significantly crispier. |
We also use 2.5 cups of whole milk for the gravy. Don't even think about using skim or 1% here. We need the fat solids to emulsify with the 0.25 cup of reserved frying drippings to create that velvety mouthfeel. The 1 tsp of extra coarse cracked black pepper is non negotiable it's the soul of the dish.
Tools for Southern Frying Success
You don't need a kitchen full of gadgets, but a few specific pieces of gear will make your life much easier. First and foremost: a heavy bottomed skillet. A cast iron pan is the gold standard because it holds heat like a champion.
When you drop that cold chicken into the oil, a thin aluminum pan will lose its temperature instantly, but cast iron stays steady.
You’ll also want a solid meat mallet. Pounding the chicken isn't just about aggression; it’s about geometry. We want a flat, even surface so every square inch of that chicken hits the oil at the same time.
If one side is thick and the other is thin, you’ll end up with one half dry and the other half raw.
- Cast Iron Skillet (12 inch): Essential for heat retention and even browning.
- Meat Mallet: For evening out those 4 large chicken breasts to a consistent 1/2 inch thickness.
- Wire Cooling Rack: To rest the fried chicken so air circulates, preventing a soggy bottom.
- Flat Whisk: Best for stirring the 0.25 cup of flour into the drippings for a lump free gravy.
Steps for the Ultimate Fry

Phase 1: Prepping the Protein
Start by placing your 4 large chicken breasts between two sheets of plastic wrap. Using the flat side of your mallet, pound them gently but firmly until they are an even 0.5 inches thick. This ensures they cook quickly and remain juicy.
Season both sides with a pinch of the 2 tsp kosher salt and 2 tsp coarse black pepper.
Phase 2: The Double Dredge Station
In one shallow bowl, whisk together the 1 cup buttermilk and 1 large egg. In a second bowl, combine the 1.5 cups all purpose flour, 0.5 cup cornstarch, 1 tsp baking powder, 1 tbsp smoked paprika, 1 tbsp garlic powder, and 1 tsp onion powder. Use a fork to mix this well so the spices are evenly distributed.
Phase 3: Coating the Chicken
Take a piece of chicken and coat it lightly in the flour mixture, shaking off the excess. Dip it into the buttermilk mixture, ensuring it's completely submerged, then return it to the flour. Press the flour into the meat firmly to create those craggy bits.
Note: These crags are what catch the gravy later, so don't be afraid to get messy.
Phase 4: The Sizzle
Heat the 0.5 cup vegetable oil in your skillet over medium high heat. Once the oil reaches about 350°F (or a pinch of flour sizzles immediately), add two pieces of chicken.
Fry for 4 to 5 minutes per side until the crust is a deep mahogany brown and the internal temperature hits 165°F.
Phase 5: The Rest
Remove the chicken and place it on a wire rack set over a baking sheet. This is crucial if you put it on a paper towel, the steam will trap under the chicken and soften that beautiful crust we just worked so hard to build. Let it rest while you make the sauce.
Phase 6: Building the Roux
Carefully pour off all but 0.25 cup of the frying drippings, making sure to keep those flavorful brown bits (fond) in the pan. Sprinkle in 0.25 cup of all purpose flour. Cook this over medium heat for about 2 minutes, whisking constantly, until it smells slightly nutty and looks like wet sand.
Phase 7: The Gravy Finish
Slowly pour in the 2.5 cups of whole milk while whisking vigorously. It will thicken almost instantly, so keep that whisk moving to avoid lumps. Add the 1 tsp extra coarse cracked black pepper and 0.5 tsp salt.
Simmer for 3 to 5 minutes until the gravy coats the back of a spoon in a thick, velvety layer.
Phase 8: Serving
Plate the chicken immediately while it's hot. If you're serving this alongside a vegetable dish, it pairs beautifully with the flavors found in a Chicken Florentine recipe, especially if you want to swap the spinach for some Southern style collard greens. Pour a generous amount of the gravy over half of the chicken, leaving some of that crispy crust exposed for contrast.
Fixing Common Breading Problems
One of the most frustrating things is watching that perfect crust slide off the chicken like a wet blanket the moment you flip it. This usually happens because the surface of the meat was too wet before the first flour dip, or the oil wasn't hot enough to set the proteins.
If your breading feels "gummy," it’s likely a temperature issue.
Why Your Gravy is Lumpy
Lumpy gravy is the bane of many home cooks. This happens when the milk is added too quickly to the roux, causing the flour particles to clump together rather than suspending in the liquid. To fix this, always add your milk in a slow, steady stream while whisking like your life depends on it.
If it’s already lumpy, you can save it by pouring the gravy through a fine mesh sieve into a clean pot.
| Problem | Root Cause | Solution |
|---|---|---|
| Breading falling off | Surface moisture on meat | Pat chicken dry with paper towels before the first dredge |
| Soggy crust | Crowded pan / Low heat | Fry in batches and ensure oil stays at 350°F |
| Bland gravy | Under toasted roux | Cook the flour/fat mixture until it smells toasted and turns light tan |
Common Mistakes Checklist
- ✓ Never skip the cornstarch; it's the key to the long lasting crunch.
- ✓ Don't use cold milk for the gravy; room temperature milk emulsifies much smoother.
- ✓ Avoid over pounding the chicken; if it's too thin, it will dry out before the crust browns.
- ✓ Resist the urge to flip the chicken more than once; let that crust develop undisturbed.
- ✓ Always scrape the bottom of the pan when making gravy to incorporate the flavor packed brown bits.
Customizing Your Classic Southern Comfort Plate
While the traditional version is hard to beat, sometimes you want to mix things up. If you're looking for a different vibe, you could adapt the seasoning profile to mirror the aromatics in The Homemade Chicken recipe by adding a touch of dried oregano and lemon zest to the flour. It sounds wild, but that citrus lift cuts through the richness of the fried coating beautifully.
If you want a "Spicy Country" version:
- Add 1 tablespoon of cayenne pepper to the flour dredge.
- Whisk 2 tablespoons of hot sauce into the buttermilk mixture.
- The result will be a Nashville adjacent heat that lingers perfectly.
| Original Ingredient | Substitute | Why It Works |
|---|---|---|
| Buttermilk (1 cup) | Milk (1 cup) + 1 tbsp Lemon Juice | Acidifies the milk to mimic buttermilk's tenderizing properties. |
| Vegetable Oil | Lard or Shortening | Higher smoke point and adds an old-fashioned, savory depth to the crust. |
| Chicken Breast | Boneless Chicken Thighs | Higher fat content results in a more succulent, though slightly less traditional, bite. |
Storage and Waste Management
If you have leftovers (which is a rare occurrence in my house), the fridge is your best bet for 3 to 4 days. Keep the chicken and gravy in separate containers. If you store them together, the chicken will absorb the moisture from the gravy and turn into a mushy mess by morning.
To reheat, avoid the microwave at all costs it will ruin the texture. Instead, pop the chicken into a 375°F oven for about 8 to 10 minutes until the oil starts to sizzle again.
For zero waste, don't throw away those leftover buttermilk and flour scraps. If you have any extra, you can whisk them together with a little more milk to make a quick "hoe cake" batter or use the seasoned flour to coat some sliced green tomatoes or okra for a side dish.
Any leftover gravy is essentially a thick Béchamel; it can be thinned out with a bit of stock and used as a base for a pot pie the next day.
Plating and Service Style
Country fried chicken is a rustic dish, but that doesn't mean it can't look elegant. I love serving this on a wide, shallow pasta bowl. A mound of skin on mashed potatoes acts as the perfect anchor for the chicken. When you pour that gravy, do it with intention.
Don't drown the whole piece leave about a third of the chicken uncovered so the guest can see that beautiful, craggy, mahogany crust.
Finish the plate with a heavy dusting of more cracked black pepper and maybe a sprinkle of fresh parsley or chives for a pop of color. The green against the creamy white gravy and golden chicken makes the whole dish look vibrant.
Serve it with a sharp, vinegar based coleslaw or some garlicky green beans to provide a necessary acid hit to balance the heavy fats. It's a meal that feels like a hug, and honestly, we all need more of those.
Right then, you're ready to tackle this! Just remember: keep that oil hot, pound that chicken even, and don't skimp on the pepper. You've got this! Let's get frying.

HIGH in Sodium (⚠️)
915 mg mg of sodium per serving (40% % of daily value)
The American Heart Association recommends limiting sodium intake to about 2,300mg per day for overall cardiovascular health.
Sodium Reduction Tips for this Recipe
-
Reduce Added Salt-25%
Decrease the amount of kosher salt in the breading and salt in the gravy by half. This simple change can significantly lower the sodium content. Start with a quarter reduction and taste it first.
-
Low Sodium Buttermilk-15%
Ensure you're using a low-sodium buttermilk. Some brands add significant amounts of salt. Check the nutrition label and select one with the lowest sodium content.
-
Brine Chicken Carefully-10%
If you brine your chicken, ensure the brine's sodium concentration is minimal. Ideally, skip the brining step or use a very diluted brine for a shorter period.
-
Fresh over Powdered-5%
Consider using freshly minced garlic instead of garlic powder in the breading. While it won't drastically reduce sodium, it adds a fresher flavor and avoids any potential sodium added to the powder. Use 2-3 cloves of fresh garlic.
-
Spice it Up!
Experiment with other herbs and spices like smoked sweet paprika, cayenne pepper, or oregano to enhance the flavor of the chicken and gravy, reducing the need for salt. Herbs and spices provide flavor without adding sodium.
Recipe FAQs
What is the difference between fried chicken and country fried chicken?
Country fried chicken is pan-fried and typically served with a gravy. Classic Southern fried chicken is usually deep fried, resulting in a thicker, often crunchier crust meant to be eaten plain or with sauce on the side.
What is national fried chicken?
No single dish is nationally recognized as the definitive "national fried chicken." The concept is heavily associated with Southern American cuisine, but many regions claim distinct, superior preparation methods.
What is a Southern fried chicken?
A Southern fried chicken is traditionally prepared by pan-frying chicken pieces that have been marinated in buttermilk. The key technique involves dredging the meat in seasoned flour and frying it in a cast iron skillet until deeply browned and crispy.
What kind of gravy goes on country fried chicken?
A thick, white, peppered gravy, known as sausage gravy or sawmill gravy, is traditional. This gravy is made directly in the skillet using the reserved chicken drippings (the roux base) and milk to ensure maximum flavor integration.
How do I ensure the crust stays attached during frying?
Press the flour coating firmly into the meat during the second dredge. The acidic buttermilk helps the coating adhere, but physical pressure creates a stronger bond between the meat and the dredging mixture.
Is it true I must use chicken breasts for this recipe?
No, this is a common misconception. While breasts are quick cooking, bone-in thighs or legs offer richer flavor; if you master the temperature control for breasts here, you will excel at thicker cuts like those used in our Chicken Noodle Casserole recipe.
How to avoid making the gravy lumpy?
Whisk room temperature milk into the roux slowly. Adding cold or warm milk too fast to the hot flour and fat mixture shocks the flour particles, causing them to seize up and form lumps; whisking constantly prevents this reaction.
Crispy Country Fried Chicken

Ingredients:
Instructions:
Nutrition Facts:
| Calories | 848 kcal |
|---|---|
| Protein | 66.4 g |
| Fat | 34.2 g |
| Carbs | 65.8 g |
| Fiber | 2.1 g |
| Sugar | 8.4 g |
| Sodium | 915 mg |
