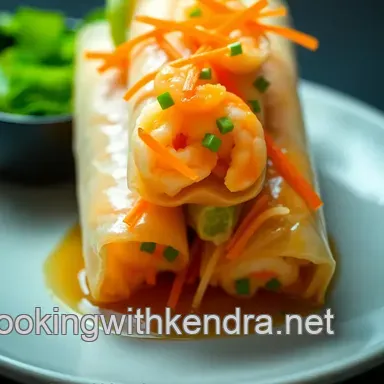
Crispy Thai Spring Rolls with Fresh Herbs and Dipping Sauce
- Essential Ingredients Guide to Making Thai Spring Rolls
- Mastering the Professional Cooking Method: Get Those Thai Spring Rolls Right!
- Pro Tips & Secrets for Perfect Thai Spring Rolls
- Perfect Presentation that Wows
- Storage & Make-Ahead Magic
- Creative Variations for All Tastes
- Complete Nutrition Breakdown
- Frequently Asked Questions
- 📝 Recipe Card
Oh my gosh, the first time i tried thai spring rolls was an absolute game changer! i was visiting a street market in bangkok, and let me tell you, the aroma hit me like a warm hug on a chilly day.
Just thinking about it brings back memories of standing in front of a little stall, watching a vendor whip up those crispy rolls , and feeling giddy with anticipation.
Food has that special power to make us feel connected, right?
These little parcels, packed full of fresh veggies and sometimes shrimp, rolled up in delicate rice paper, are just perfect for an appetizer or a light meal.
Seriously, every bite is like a fiesta in your mouth! whether you’re whipping them up for a cozy dinner or impressing friends at a party, these spring rolls bring joy to any table.
So, let’s dive right into this delicious journey!
Recipe Overview
Now, a little history lesson! thai spring rolls, or “poh pia tod,” have been around for ages, deeply rooted in thailand’s vibrant street food culture.
They’ve earned their fame for being versatile stuff them with whatever tickles your fancy, whether it's fresh veggies or some shrimp and chicken.
Today, they’re a hit not just in thailand but all over the globe. seriously, have you seen how popular they are? these days, you’ll find them on menus everywhere, from hipster cafes to your favorite takeout joint.
Plus, they’re pretty easy to make just a medium level challenge for most home cooks. and don’t sweat the costs; this recipe can feed a small crowd, and it's budget friendly too.
Key Benefits
Let's talk about why you need to make these thai spring rolls right now. first off, they're super healthy! packed with fresh veggies, they give you a nice dose of fiber and vitamins.
If you're looking for light meals , these are right up your alley.
They’re also incredibly versatile. got leftover beef from last night's dinner? time to roll it up! you can mix and match fillings based on what you have on hand.
And cookies are great and all, but when you've got a gathering, serving these light bites can elevate the vibe of the whole occasion!
Plus, if you’re planning a party, these little guys are perfect for impressing the crowd. people love them. they're crunchy, flavorful, and pair perfectly with that tangy lime sauce that’s just begging to be dipped in.
Just imagine serving these crispy delights at your next get-together, and everyone raving about how amazing they are! plus, they're a great alternative to heavier dishes.
You can make them ahead and just fry them up when your guests arrive total lifesaver!
With all that said, let’s get into the nitty gritty: the ingredients . Here’s what you need to gather for your Crispy Thai Spring Rolls with Fresh Herbs and Dipping Sauce !
You'll be amazed at how simple yet delicious they are trust me, you need to try this recipe! from the colorful crunch of fresh veggies to that savory twist of soy sauce and the fresh zing of lime, it’s sure to become a favorite.
Ready to roll? let’s get cooking!
Essential Ingredients Guide to Making Thai Spring Rolls
If you’re like me, the thought of crispy thai spring rolls takes you right to the streets of bangkok, right? it’s that crunch, the fresh herbs, and the zing of lime sauce that makes every bite a celebration!
But before you dive into making this delightful street food, let's chat about the essential ingredients you'll need to pull off this gordon ramsay inspired recipe.
Premium Core Components
Alright, let's get to the nitty gritty. When it comes to your core ingredients , quality matters!
Detailed measurements: for the perfect mix, you’re looking at 1 cup (150g) of carrots, bell peppers, cabbage, and bean sprouts.
Got shrimp? that's an optional 1 cup (150g) , too. these ingredients keep the rolls fresh and crunchy!
Quality indicators: Fresh is best! Make sure your veggies are vibrant, firm, and not wilting. If you spot any brown spots on your herbs, toss ‘em!
Storage guidelines: Keep those veggies in the fridge crisper, and they’ll last around a week. Rice paper will hold up just fine in a cool, dry place maybe in the pantry.
Freshness tips: Choose veggies that are in season for the best taste. And remember, herbs like cilantro and mint should be treated like delicate flowers hydrated and cared for!
Signature Seasoning Blend
Now, let’s spice things up.
Essential spice combinations: A dash of soy sauce and sugar brings your ingredients alive. Mix that with some 1 tablespoon (15ml) lime juice for a tangy twist, and you’re golden.
Herbs that shine: Fresh cilantro and mint are your besties here. They add that Asian flair and refreshment that makes your spring rolls pop!
Flavor enhancers: Sweet chili sauce is your emergency flavor boost! It’s like the cherry on top of your dessert totally transforms your dipping experience.
Regional variations: Not feeling traditional? You could swap in some Thai basil or even go Tex-Mex with a hint of lime and cilantro!
Smart Substitutions
We’ve all been there halfway through a recipe and realize you’re missing something. No worries, I’ve got your back!
Common alternatives: If you’re out of cabbage, grab a little kale or even some crunchy lettuce. They work like a charm!
Dietary modifications: Wanna try a vegan version? Skip the shrimp and load up on more veggies. You won’t miss a thing trust me!
Emergency replacements: No rice paper? Try thin zucchini slices. It’ll be different, but sometimes, those surprises are the best part of cooking!
Seasonal options: Count on seasonal veggies like butternut squash in the fall or asparagus in the spring these can bring exciting new flavors to your spring rolls.
Kitchen Equipment Essentials
Okay, time to gather your gear. Here’s what you're gonna need:
Must have tools: A frying pan or wok is key for that crispy goodness. And don’t forget your mixing bowl; it’s where the magic begins!
Alternative equipment: If you don’t have a wok, don’t sweat! A large skillet will do just fine.
Preparation tips: For your rice paper, soak it in warm water just long enough around 15-20 seconds —because soggy wrappers are the enemy!
Storage solutions: Make sure you cover your finished spring rolls with a damp cloth until fry time. They don’t like to dry out!
When you take these spring rolls to your next gathering, it’s safe to say they’ll be the mvp of the appetizers! get ready to roll up your sleeves, because in the next section, we’ll dive into the step-by-step instructions for crafting these delightful crispy thai spring rolls with fresh herbs and dipping sauce .
Let's do this!
Mastering the Professional Cooking Method: Get Those Thai Spring Rolls Right!
Alright, my friends, let's chat about one of the most essential cooking techniques that can elevate your kitchen game yes, we’re diving into those crispy thai spring rolls you've been dreaming about!
If you can master these babies, you’ll impress everyone, from your cozy dinner crew to that friend who thinks they’re the gordon ramsay of their kitchen (you know the one!).
Essential Preparation Steps
First things first, mise en place . this fancy term just means getting all your ingredients ready before you start. trust me, it saves your bacon.
Have everything chopped and measured carrots, bell peppers, you name it so you’re not scrambling like a chicken with its head cut off while trying to wrap those spring rolls.
Time management? oh, it's a dealbreaker. you may think cooking is like a casual stroll, but it’s more like a dance! have a timer handy.
You’ll need around 20 minutes to prep the filling, 30 minutes for chilling, and when you're frying? 10- 15 minutes should do just keep an eye out!
Now, organization strategies, my pals. lay out your station like you’re getting ready for a photo shoot! you want the filling on one side, wrappers nearby, and your frying oil prepped.
And don't skip safety! when you're frying, watch out for hot oil and be sure that your oil's about 350° f too hot, and you’ll burn those lovely rolls.
Step-by-step Process
So here’s how you dive into those spring rolls like a pro:
Prepare the filling : mix up all your colorful veggies carrots, cabbage, bean sprouts, and if you’re in the mood for some flavor, toss in shrimp or chicken too.
A splash of lime juice and soy sauce, and you’re golden!
Soak the rice paper : Grab a large bowl of warm water. Soak one wrapper for about 15-20 seconds until it’s soft. It’s like a cozy bath for your spring roll!
Fill and roll : Now, lay that softened wrapper on a clean surface. Spoon a couple of tablespoons of your filling towards the bottom, fold the sides in, and roll it up tightly! Voilà, a future crispy delight!
Heat the oil : For frying, put your vegetable oil in a pan and heat it until it’s shimmering remember that 350° F rule? That’s the magic temp for crispy perfection.
Fry those rolls : gently slide them into the oil. you want them fried for about 3- 4 minutes per side until they’re a beautiful golden brown.
Use a slotted spoon to pull them out and drain on paper towels.
Make the dipping sauce : Mix sweet chili sauce with lime juice in a small bowl. YUM!
Serve hot : Get those crispy rolls on a plate with that tangy sauce. Your stomach's gonna thank you for this!
Expert Techniques
Now let's get into the nitty gritty. when you’re frying, keep an eye on them the bubbles should be popping but not violently splattering everywhere.
That’s a classic spring roll move! if they don’t float, your oil isn’t hot enough, and if they burn immediately, well turn the heat down a notch.
Also, here’s a little insider hack: don’t overfill those wrappers! it’s like a party; too many guests, and things get awkward.
Aim for balance just enough filling to keep it flavorful but not so much that they tear.
Success Strategies
Listen up! here are some common mistakes i’ve made that you should definitely avoid. first, forgetting to keep the rolls covered with a damp cloth can dry out those beauties like an unseasoned potato.
For quality assurance, look for that perfect color golden brown. and if you feel like these can’t get any better, try making them ahead.
Assemble them, cover, and the fridge for a few hours before frying. you’ll be the efficient chef of the kitchen!
So there you have it your complete guide to making crispy thai spring rolls with fresh herbs . honestly, this recipe not only brings the flavors of thailand right to your kitchen but also makes for the perfect light meal that has folks coming back for seconds.
And hey, if you ever find yourself facing a tricky culinary challenge, remember: practice makes perfect. Once you get the hang of this spring roll recipe, you’ll be inventing your own beef spring rolls and other Asian delights in no time!
Stay tuned for additional information that can deepen your culinary journey and expand your experience in the kitchen!
Pro Tips & Secrets for Perfect Thai Spring Rolls
So, you’re diving into the world of thai spring rolls , huh? that’s awesome! i remember my first attempt i ended up with a kitchen covered in flour and rice paper shreds.
But hey, practice makes perfect! here are some pro tips that i’ve picked up along the way to make your spring rolls the star of the show.
First off, don’t overload your wrappers. i mean, i get it; you want a spring roll explosion, but stuffing too much in there will lead to disaster.
Just a couple of tablespoons of filling will do the trick. it keeps the wraps intact, and trust me, no one wants a sad, soggy spring roll.
Also, keep a damp towel over your finished rolls to avoid any drying out while you’re frying them up.
Now, on to that frying magic you'll want the oil to be hot, but not smoking. a good test is to drop a small piece of rice paper into the oil.
If it sizzles and starts to bubble, you're golden. this way, your rolls won’t absorb too much oil and will stay crispy and delicious.
And let's talk about flavor. so, if you want to kick things up a notch, try adding some lime zest or even a bit of ginger to your filling.
It gives an extra zing that pairs perfectly with that sweet chili sauce you're about to dip into.
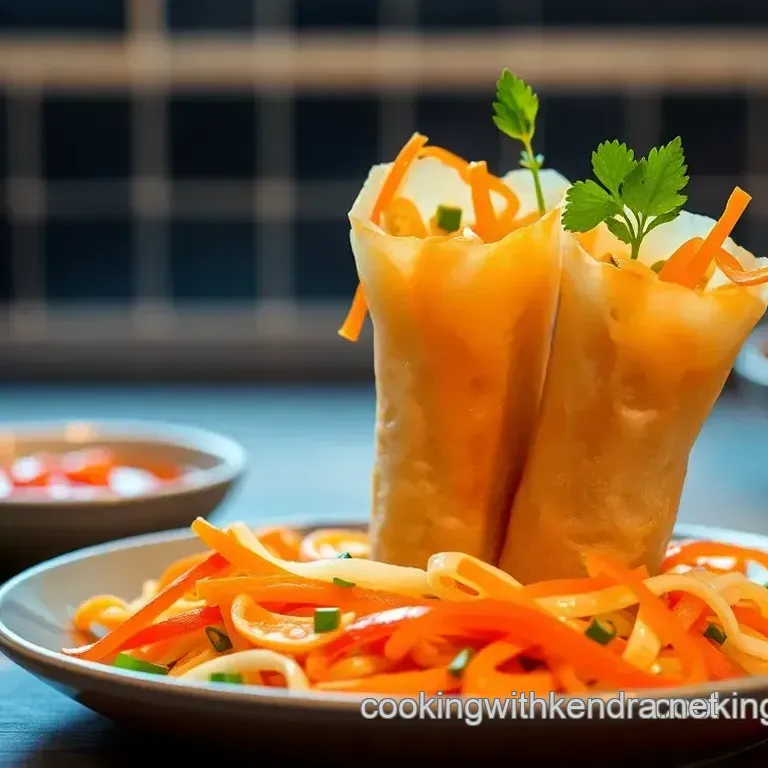
Perfect Presentation that Wows
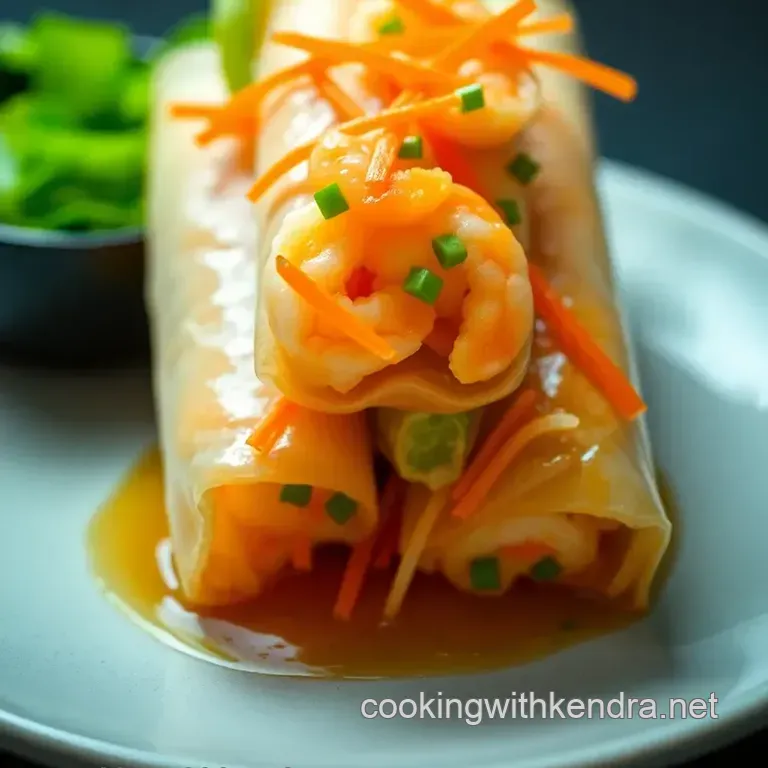
When it comes to plating, think about your colors! a vibrant contrast can turn your crispy rolls into a work of art on the plate.
Arrange your spring rolls neatly, and don’t shy away from garnishing. a sprinkle of fresh cilantro or a few mint leaves really elevate the whole look.
As for dipping sauce, serve it in a cute little bowl on the side. you could even jazz it up with a slice of lime resting on the rim.
It’s all about making that first impression count!
Storage & make-ahead Magic
If you end up with extras (or, let's be honest, you want to prep ahead because adulting is hard), you can store your rolls! to keep them fresh, place them in airtight containers, separating layers with parchment paper.
They’ll last a couple of days in the fridge but try to eat them within 48 hours for optimum crunchiness.
When you're ready to feast on your easy beef or veggie rolls, just pop them back in hot oil for a quick fry.
They'll be good as new! i usually do this instead of microwaving trust me, no one likes a soggy spring roll.
Creative Variations for All Tastes
Can we talk about variations ? the spring roll recipe can really be your playground. love beef? why not make some beef spring rolls ? ground beef with some chopped scallions and a splash of soy makes a hearty filling.
If you’re all about that plant based life, toss in some mushrooms or tofu for a delightful vegetarian twist. you could even go adventurous with seasonal veggies; think crisp asparagus in the spring or roasted carrots in the fall.
The world (or should i say, your kitchen) is your oyster!
Complete Nutrition Breakdown
Now, let's get real for a second. these crispy thai spring rolls make a great snack, but you want to make sure they fit your lifestyle.
When it comes to calories around 150 per serving they're relatively light, especially if you bake instead of fry. add extra veggies, and you amp up the fiber and nutrients without compromising on flavor.
Feeling guilty about the deep frying? Don’t! Enjoy responsibly, or whip up a batch for a gathering. Sharing is caring, my friends!
In Conclusion
Get ready to impress your friends with these homemade thai spring rolls. whether you keep it classic or put your own spin on it, they’re sure to be a hit.
Remember, it's all about having fun in the kitchen! look, we all have our mess ups and fails that's part of the process.
Just get yourself some fresh ingredients, roll up your sleeves, and dive in. before you know it, you’ll be a spring roll pro! so, let’s roll!
Frequently Asked Questions
What are the main ingredients in Thai spring rolls?
Thai spring rolls typically include a mixture of fresh vegetables such as carrots, bell peppers, and cabbage, along with herbs like cilantro and mint. You can also add proteins like shrimp or chicken, depending on your preference. All of this is wrapped in rice paper for that signature crunchy texture.
Can I make Thai spring rolls ahead of time?
Absolutely! You can prepare the spring rolls ahead of time by assembling them and then covering them with a damp cloth to prevent them from drying out. Just wait to fry them until you’re ready to serve, which helps maintain their crispy texture.
What kind of dipping sauce goes well with Thai spring rolls?
A classic pairing is sweet chili sauce mixed with a splash of lime juice for some extra tang. This adds a fantastic burst of flavor that complements the crispy spring rolls perfectly. You can also try peanut sauce or even a spicy soy sauce for a different take!
What are some tips for frying Thai spring rolls to ensure they are crispy?
To achieve the perfect crunch, make sure your oil is hot enough before adding the spring rolls this should be around 350°F (175°C). Fry them in small batches to prevent overcrowding, which can lower the oil temperature and result in soggy rolls.
Also, allow them to drain on paper towels post frying to remove excess oil.
Can I use different vegetables or proteins in my Thai spring rolls?
Definitely! Feel free to get creative with your fillings. Seasonal vegetables like zucchini, mushrooms, or even bean curd make great substitutes. For proteins, you can use tofu for a vegetarian option or swap in crab or pork for a different flavour profile.
How should I store leftover Thai spring rolls?
Leftover spring rolls can be stored in an airtight container in the fridge for a day or two. However, to keep them crispy, it's best to reheat them in a hot oven or air fryer rather than the microwave. This helps retain that delightful crunch!
Crispy Thai Spring Rolls With Fresh Herbs And Di