Cheesecake Cupcakes Recipe the Ultimate Guide to Smooth Classic Bites
- The Magic of Miniatures: Why Cupcakes Conquer the Whole Cheesecake
- Unlocking the Secret to Velvety Smooth Cheesecake Cupcakes
- Gathering Your Supplies: Essential Elements for the Perfect Bake
- The Equipment Checklist: Tools for Taming the Cheesecake Batter
- Mastering the Method: Step-by-Step Baking Guide
- Expert Tips and Troubleshooting for Home Bakers
- Beyond the Basics: Serving Suggestions and Flavour Variations
- Recipe FAQs
- 📝 Recipe Card
The Magic of Miniatures: Why Cupcakes Conquer the Whole Cheesecake
I love cheesecake. I mean, who doesn't? But the sheer stress of baking a giant, perfect, crack free New York slab? Forget about it. You spend half a day in the kitchen, wait six hours for it to cool, then you try to slice it and the whole thing looks like an earthquake hit the plate. And the clean-up. Ugh.
These individual Cheesecake Cupcakes? They solve all that. They are perfectly portioned. They bake faster. They chill faster. And frankly, they look much tidier when you serve them up. No more wobbly slices or arguing over who gets the corner piece.
You get twelve perfect, tidy, portable servings, which makes this Cheesecake Cupcakes Recipe Easy my absolute weeknight hero. These individual portions of creamy heaven are truly a pudding that punches above its weight.
Unlocking the Secret to Velvety Smooth Cheesecake Cupcakes
The dream is that silky, smooth texture that melts on your tongue. The reality, sadly, is often grainy, dense, or lumpy batter leading to a sad little cake. The secret isn’t some fancy ingredient you can only buy at a specialty shop. It’s control. Specifically, control over temperature and mixing speed.
Cold cream cheese is the devil when it comes to cheesecake. If your ingredients aren't thoroughly at room temperature, you will have to over mix the batter trying to get the lumps out. And over mixing traps air. Trapped air causes massive expansion during baking, then rapid contraction when cooling. Bam!
Cracked tops and a spongy texture. We want dense, velvety smooth.
A Quick History of the Lemon Vanilla Pairing
Why lemon and vanilla? It's the ultimate classic power couple, especially in classic baked goods. Vanilla brings that warm, comforting sweetness, right? But pure cheesecake, especially when it’s super rich (which ours is, unapologetically), can be a little too heavy.
Lemon zest and a tiny splash of juice cut through that richness like a knife. They provide an acidic little lift that stops the whole thing from feeling like a dairy brick. It’s what makes New York style Cheesecake Cupcakes so iconic and universally loved.
The Texture Challenge: Avoiding Cracks and Graininess
Let’s be blunt: Graininess happens when cold ingredients meet a warm mixer. Always bring your ingredients to temperature. But cracks? Cracks are usually caused by two things: too much air, or too rapid a temperature change.
The absolute moment you introduce the eggs, your mixer speed needs to drop to the absolute minimum. You’re just trying to combine them, not beat them into submission. And that crucial cooling step (leaving them in the cooling oven) is non-negotiable. Don’t skip it unless you genuinely enjoy disappointment.
Beyond the Crumb: What Makes the Perfect Digestive Base
A soggy crust ruins everything. It’s the truth. If you follow this Cheesecake Cupcakes Recipe using Graham Cracker Crust (or digestive biscuits, as I use), you need to think density first. The key is packing it down hard. I mean really hard. Use the base of a small glass, or your thumb if you have strong hands.
We also pre-bake the crust for five minutes. This serves two vital purposes: it locks the structure in so it doesn't float up into your creamy filling, and it slightly evaporates some of the butter, which massively helps prevent sogginess once the cold, creamy filling hits it. Genius, right?
Gathering Your Supplies: Essential Elements for the Perfect Bake
Okay, let’s talk prep. Before you even think about turning on the mixer, pull out everything that lives in the fridge. Seriously. Three bricks of full fat cream cheese, the eggs, and that little tub of sour cream. Put them on the counter. Set a timer for at least one hour.
If you try to rush the process with even slightly chilly ingredients, you will end up with lumps, and then you’ll be angry at me. We are aiming for perfect, Individual Cheesecake Recipes, so patience is absolutely key right now.
Related Recipes Worth Trying
- German Chocolate Cheesecake Cake The Ultimate Decadent Showstopper — German Chocolate Cheesecake Cake is the ultimate celebration dessert This showstopper features a creamy New Yorkstyle German Chocolate Cheesecake center and...
- Luxurious Lavender Cupcakes with Vanilla Bean Frosting Recipe — These delicate Lavender Cupcakes with Vanilla Bean Frosting are the perfect centrepiece for any summer tea party Learn the secret to light moist sponge and...
- Foolproof Sopapilla Cheesecake Bars Golden Cinnamon Crunch — This easy Sopapilla Cheesecake recipe delivers creamy filling sandwiched between buttery golden crescent crusts A proper cinnamon sugar dessertno faff...
The Equipment Checklist: Tools for Taming the Cheesecake Batter
You don't need a professional pastry kitchen, thankfully. But a few things make life way easier:
| Tool | Why You Need It |
|---|---|
| Rubber Spatula | Must be used constantly to scrape bowl sides. |
| Ice Cream Scoop | For perfect, equal portions of filling. |
| Electric Mixer | Ensures smooth creaming, but must be set to LOW. |
Cream Cheese Selection: Full Fat vs. low-fat Considerations
Look, if you want a healthy snack, make a salad. If you want proper cheesecake, you must use full fat cream cheese. Full stop.
low-fat varieties have a higher water content and often have gums and stabilizers that throw off the texture and increase the risk of cracking. They bake differently, and they taste... well, they taste like disappointment. Stick to the good stuff. This is a treat, not a diet food.
Zest and Juice: Maximizing That Bright Lemon Flavour
You want the brightness of lemon without the acidity wrecking the structure of the dairy. How do we get that? Zest.
Zesting the lemon over the granulated sugar before mixing releases the oils into the sugar crystals. It’s a trick I picked up years ago, and it makes the flavour way more intense than if you just toss the zest into the liquid batter later. It’s all about infusing that flavour early.
Choosing the Right Muffin Liner for Easy Release
This is another one of those annoying little details that totally matters. You know those flimsy, colourful paper cupcake liners that stick like superglue? We hate those. Use a thicker, sturdier, parchment style liner, or foil liners if you can find them.
The sturdier the liner, the less chance you have of the beautiful crust tearing away when you try to serve your Vanilla Cheesecake Cupcakes. Good liners are worth the extra few cents.
The Water Bath Method Explained
A traditional water bath usually stresses people out, especially for a full cake. But for these individual portions, we can hack it. We aren't setting the muffin tin in the water. That's too much effort.
Instead, just place a shallow baking dish (like a small roasting pan) filled with about an inch of hot water on the rack below the muffin tin during the bake. The steam adds humidity to the oven environment, which slows the cooking process and keeps the surface moist and less likely to split. It’s a game changer.
Mastering the Method: step-by-step Baking Guide
Right then, let’s crack on. We’ve done all the hard thinking, now we just need to execute the steps cleanly. Remember, fast is fine, but accuracy is everything when aiming for those perfect Cheesecake Cupcakes Bake Time results.
Pressing the Biscuit Base: Density and Depth
Once the butter, sugar, and crushed biscuits are combined, you need roughly 15 grams per liner. If you don't have a scale handy, that’s about one very heaping tablespoon. Press it down with the force of someone trying to win an argument. A solid base is a happy base.
Pre-bake for 5 minutes and let it chill slightly before adding the wet filling.
Mixing the Filling: Avoiding Overbeating at All Costs
Start with the cream cheese, beating it alone on low until it’s like silky velvet. Then add the sugar, scraping down the sides constantly. Once the sugar is dissolved and the batter is smooth, mix in the sour cream and flavourings. Here comes the moment of truth: the eggs.
CRUCIAL WARNING: Add the eggs one at a time. Mix only until the yellow yolk streaks disappear. Stop the mixer immediately. Do not walk away. Do not check your phone. If you mix beyond this point, you are introducing air, and air is your enemy.
The Gentle Bake: Controlling Temperature for Texture
Keep that oven temperature steady at 325°F (160°C). Our total bake time is quick, usually about 22 to 25 minutes. How do you know they are done? Look for the texture. The edges should be set and look opaque.
If you gently jiggle the pan (carefully!), the very center should still have a slight wobble, like firm gelatin. They will finish setting completely during the cooling process.
The Critical Cooling Phase: From Oven to Fridge
This is where most home bakers mess up, myself included, way back when I first started making Easy Dessert Recipes. When the timer goes off, you must resist the urge to pull them out. Turn the oven off. Crack the door open (I use a wooden spoon handle to prop it).
Let the cupcakes sit there and gradually adjust to the outside temperature for 30 minutes. Then, remove them to the counter for another 30 minutes before finally sending them to the fridge for their long nap. They need a minimum of three hours chilling time.
Expert Tips and Troubleshooting for Home Bakers
- The Lumpy Batter Fix: If you discover lumps late in the game (oops), do not beat faster. Instead, gently warm your bowl over a pan of steaming water for 30 seconds, then use your rubber spatula to manually press out the lumps. Heat helps soften the cold cheese quickly.
- Preventing Sticking: Always chill the cupcakes thoroughly before attempting to peel away the paper liner. If they are even slightly warm, the cheese will stick and tear your beautiful dessert.
- The Sour Cream Bonus: Don't skip the sour cream! It adds that wonderful tang and ensures the creamiest possible texture thanks to its high fat content.
Beyond the Basics: Serving Suggestions and Flavour Variations
Once you master the basic cheesecake structure, the fun begins!
Solving the Cracking Mystery: Why Fillings Split
Okay, let’s summarize the crack culprits once and for all:
- Too much air introduced during mixing (see low speed instructions).
- Too rapid a temperature change (see slow cooling instructions).
- Over baking. Over baking dries out the edges, causing them to pull inward dramatically as they cool, forcing a crack in the center. Look for the gentle wobble!
Optimal Storage and Shelf Life for Baked Desserts
These need to stay cold. Keep them stored in an airtight container in the refrigerator. They are absolutely fantastic on day two and day three (the flavour deepens nicely). I wouldn't push past five days, personally. Yes, you can freeze them!
Wrap cooled, unfrosted cupcakes individually in plastic wrap, then foil, and freeze for up to two months. Thaw overnight in the fridge.
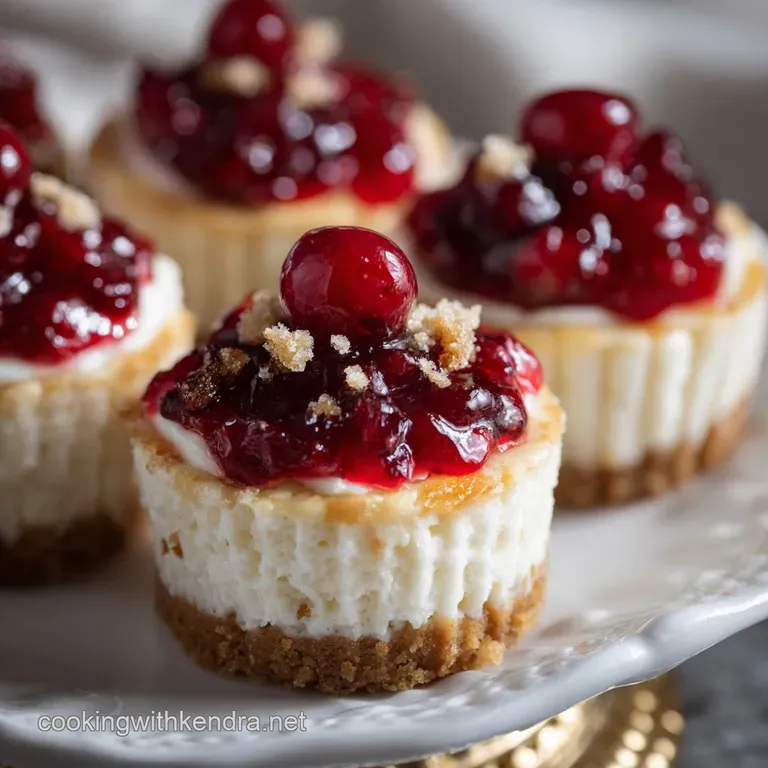
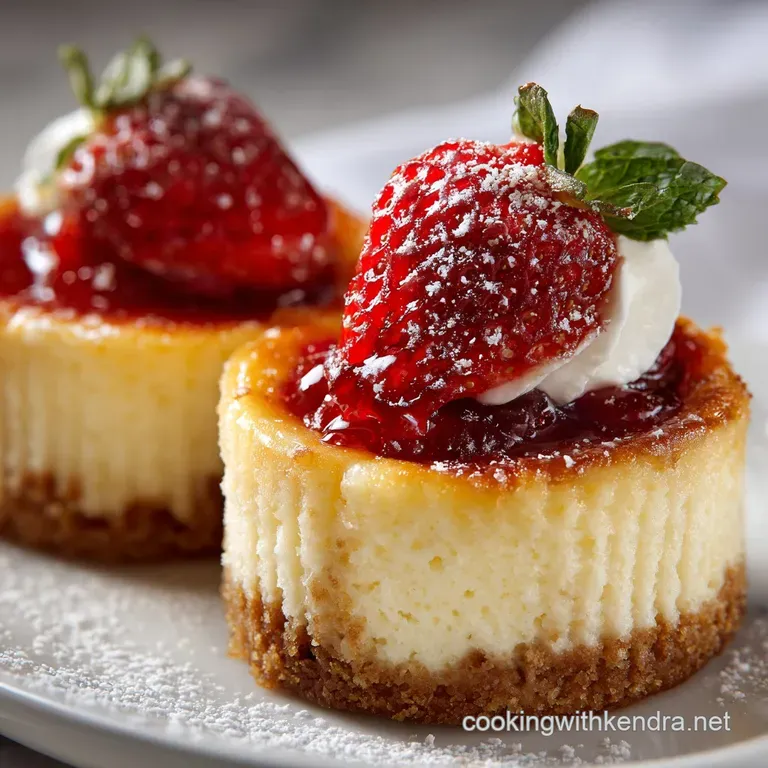
Presentation Perfection: Simple Toppings for Your Cheesecake Cupcakes
Don't overdo it. The star should always be the creamy filling.
- A simple dusting of icing sugar (powdered sugar).
- A dollop of lightly sweetened whipped cream or Crème Fraîche topped with one perfect raspberry.
- A quick drizzle of dark chocolate ganache after they are fully chilled, if you’re feeling fancy.
Nutritional Overview (Per Serving Estimate)
(Based on a serving size of 1 cupcake. Estimates only, calculated without toppings.)
| Component | Estimate per Serving |
|---|---|
| Calories | 280 310 kcal |
| Protein | 6 g |
| Total Fat | 20 g |
| Saturated Fat | 12 g |
| Total Carbohydrates | 22 g |
| Sugar | 16 g |
| Sodium | 150 mg |
Seasonal Swaps: Raspberry or Chocolate Variations
If you want to change up the flavour profile, it’s actually really simple. For a summer vibe, swirl 1 tsp of good quality raspberry jam or puree over the top of the filling before baking. The fruit settles beautifully into the top.
For a richer winter dessert, try folding in a couple of tablespoons of mini chocolate chips into the batter before portioning, or make that simple chocolate swirl using cocoa powder. The Cheesecake Cupcakes Bake Time remains exactly the same, which is nice and easy!

Recipe FAQs
Why did my creamy filling crack? It’s a bit of a nightmare!
Cracking is usually caused by incorporating too much air when mixing, or by a sudden temperature change the dreaded cheesecake wobble. To avoid this baking blunder, ensure your mixer is set to the absolute lowest speed, and strictly follow the slow cooling instructions inside the propped open oven.
Can I whip up these scrumptious Cheesecake Cupcakes ahead of time, and how long do they last?
They are excellent candidates for making ahead, as the flavour improves after a day! Store the finished, chilled cupcakes in an airtight container in the refrigerator for up to 4 days, or freeze them without toppings for up to one month, thawing slowly in the fridge when needed.
I fancy a change; what are some easy swaps for the digestive biscuit base or filling?
You can easily swap the digestive biscuits for crushed gingersnaps for a lovely spiced warmth, or shortbread for an extra buttery, crumbly texture. For the filling, if you don't have sour cream, full fat Greek yoghurt works perfectly as a 1:1 substitute to maintain that crucial tang and creamy texture.
How can I tell if these little beauties are properly baked without drying them out?
The perfect bake requires removing them when the edges are set and slightly puffed, but the centre still shows a slight, gentle wobble, like firm jelly. This technique ensures they finish cooking as they cool, avoiding the dry texture caused by overbaking.
Easy Classic Cheesecake Cupcakes

Ingredients:
Instructions:
Nutrition Facts:
| Calories | 1385 kcal |
|---|---|
| Protein | 25.0 g |
| Fat | 16.9 g |
| Carbs | 42.5 g |
| Fiber | 6.3 g |
| Sodium | 83 mg |
