How to Cook Chuck Roast: Fork Tender Masterpiece
- Time: Active 20 minutes, Passive 2 hours 30 mins, Total 2 hours 50 mins
- Flavor/Texture Hook: Savory, melt in-your mouth beef with a rich, silky reduction
- Perfect for: Sunday family dinner or stress free weekend meal prep
- Master the Art of How to Cook Chuck Roast
- Essential Recipe Specs and Numbers
- The Science of the Melt
- Pantry Staples and Fresh Aromatics
- Kitchen Tools for Perfect Braising
- Kitchen Instructions and Searing Steps
- Solving Common Pot Roast Problems
- Tweaks for Every Dietary Preference
- Smart Storage and Leftover Ideas
- Debunking Braising Kitchen Myths
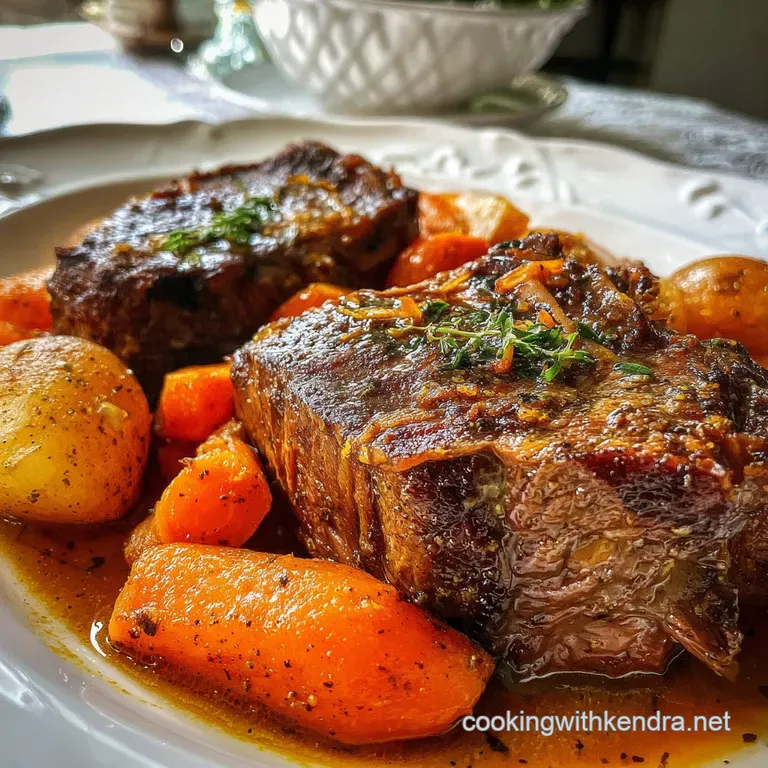
- Final Plating and Presentation Ideas
- Critical High in Sodium
- Recipe FAQs
- 📝 Recipe Card
Master the Art of How to Cook Chuck Roast
The house is quiet, but the kitchen is alive. There is a specific, heavy sizzle that happens when 3.5 lbs of cold beef hits a ripping hot cast iron pot. It’s a rhythmic, aggressive crackle that promises a deep, dark crust. I remember the first time I tried to rush this.
I was a busy parent trying to get dinner on the table in forty minutes, treating a chuck roast like a steak. It was a disaster tough, grey, and completely inedible. I realized then that you cannot bully a chuck roast into submission; you have to coax it.
Now, when that aroma of rosemary, thyme, and red wine starts drifting through the hallways, my kids know exactly what’s happening. It’s that cozy, enveloping scent that makes a house feel like a home. This isn't just a recipe; it's a process of transformation.
We’re taking the hardworking shoulder muscle of the cow, filled with stubborn gristle, and turning it into something so tender it practically falls apart if you look at it too hard.
We are going to focus on the oven method today because it provides the most consistent, surround sound heat. While I love my gadgets, nothing beats the way a heavy lid and a steady 325°F oven can turn a cheap cut of meat into a luxury meal.
We’ll skip the shortcuts and focus on the techniques that actually build flavor like the hard sear and the vegetable deglaze so you can serve a meal that feels like a hug in a bowl.
Essential Recipe Specs and Numbers
Before we get our hands messy, let's look at the hard data. When you're learning how to cook chuck roast, precision in the beginning saves you from disappointment at the end. We are looking for that specific window where the meat transitions from "done" to "succulent."
| Roast Thickness | Target Internal Temp | Total Cook Time | Visual Doneness Cue |
|---|---|---|---|
| 2 Inches | 203°F - 205°F | 2 hours 15 mins | Meat shreds with light fork pressure |
| 3 Inches | 203°F - 205°F | 2 hours 45 mins | Fat cap has completely softened |
| 4+ Inches | 203°F - 205°F | 3 hours 15 mins | Bone (if present) pulls away clean |
Cooking is rarely a straight line, but these benchmarks give you a roadmap. If you pull the beef at 145°F like a steak, it will be tough as a tire. We need to push past the "safe" zone into the "collagen breakdown" zone, which usually happens north of 200°F.
The Science of the Melt
Understanding the "why" makes you a better cook than any list of steps ever could. Here is what is actually happening inside that pot while you're relaxing on the couch.
- Collagen Transformation: This cut is packed with connective tissue. At 160°F, collagen begins to denature, but at 190°F-205°F, it physically turns into gelatin, which provides that velvety mouthfeel.
- The Maillard Reaction: Searing the meat at high heat creates hundreds of different flavor compounds. Without this initial brown crust, your roast will taste "boiled" rather than "braised."
- Thermal Inertia: The heavy pot (like a Dutch oven) holds heat and releases it slowly. This prevents the liquid from boiling aggressively, which would toughen the protein fibers.
- Atmospheric Pressure: Keeping the lid tight creates a small amount of steam pressure, which helps drive moisture back into the meat even as it cooks.
Chef's Tip: Freeze your butter for 10 minutes before the final sauce stage, then whisk in a cold tablespoon right before serving. It creates a "shatter" of glossiness on the sauce that looks professional.
Pantry Staples and Fresh Aromatics
For this recipe, we are using the official quantities to ensure the balance of acid, salt, and fat is exactly right. Don't skimp on the aromatics; they are the soul of the dish.
- 3.5 lb beef chuck roast: Why this? The high fat and connective tissue content is essential for long braising. (Substitute: Bottom round, though it is leaner and drier).
- 2 tbsp neutral oil: Why this? High smoke point allows for a hard sear without burning. (Substitute: Grapeseed oil or beef tallow).
- 1 tbsp kosher salt: Essential for drawing out moisture for the sear.
- 1 tsp coarse black pepper: Adds a necessary bite to the rich fat.
- 1 large yellow onion, thick wedges: Provides sweetness and body to the sauce. (Substitute: 3 large shallots).
- 3 large carrots, 2 inch chunks: These hold their shape during the long cook.
- 2 stalks celery, 1 inch chunks: Part of the classic mirepoix flavor base.
- 4 cloves garlic, smashed: Releases oils slowly into the broth.
- 2 tbsp tomato paste: Why this? Adds concentrated umami and helps thicken the liquid. (Substitute: 1 tbsp tomato sauce plus 1 tsp sugar).
- 2 cups beef bone broth: Richer than standard stock. (Substitute: Chicken stock in a pinch).
- 1 cup dry red wine: Why this? The acidity cuts through the heavy beef fat. (Substitute: 1 cup beef broth + 1 tbsp red wine vinegar).
- 2 sprigs fresh rosemary & 4 sprigs fresh thyme: Classic woody herbs for depth.
- 2 dried bay leaves: Adds a subtle floral note that balances the salt.
| Component | Science Role | Pro Secret |
|---|---|---|
| Red Wine | Acid Catalyst | Use a Cabernet; the tannins help tenderize the meat fibers. |
| Tomato Paste | Glutamate Bomb | Sauté until it turns brick red to remove the raw metallic taste. |
| Chuck Roast | Fat Reservoir | Look for "Choice" grade with white flecks of intramuscular fat. |
Finding the right cut is half the battle. If you're looking for a quicker steak style meal, you might want to check out my How to Cook recipe for flank steak, which handles high heat much differently than this roast does.
Kitchen Tools for Perfect Braising
You don't need a kitchen full of gadgets, but a few specific items make learning how to cook chuck roast much easier. A heavy bottomed pot is non negotiable for even heat distribution.
- Dutch Oven: A 6 quart enameled cast iron pot (like a Lodge or Le Creuset) is the gold standard for braising.
- Tongs: Long handled tongs give you the leverage to flip 3.5 lbs of meat without splashing hot oil.
- Fat Separator: This is a budget smart tool that allows you to keep the liquid and ditch the excess grease.
- Instant Read Thermometer: Takes the guesswork out of "is it tender yet?"
Kitchen Instructions and Searing Steps

Follow these steps closely. The order of operations matters because we are building layers of flavor that can't be added at the end.
- Prep the meat. Remove the 3.5 lb beef chuck roast from the fridge 30 minutes before cooking. Note: Tempering the meat ensures a more even sear and prevents the pan temperature from crashing.
- Season aggressively. Pat the meat bone dry with paper towels. Rub the 1 tbsp kosher salt and 1 tsp black pepper into every nook and cranny.
- Execute the sear. Heat 2 tbsp neutral oil in your Dutch oven over medium high heat. Sear the roast for 5-6 minutes per side until a deep brown crust forms.
- Sauté aromatics. Remove meat to a plate. Add the onion, carrots, and celery to the pot. Cook for 5 minutes until edges are slightly charred and softened.
- Bloom the paste. Stir in the 4 cloves smashed garlic and 2 tbsp tomato paste. Cook for 2 minutes until the paste smells sweet and looks dark.
- Deglaze the pan. Pour in the 1 cup dry red wine. Use a wooden spoon to scrape all the brown bits (fond) off the bottom. Note: This is where the concentrated flavor lives.
- Build the braise. Return the meat and any juices to the pot. Add 2 cups beef bone broth, rosemary, thyme, and bay leaves. The liquid should come halfway up the meat.
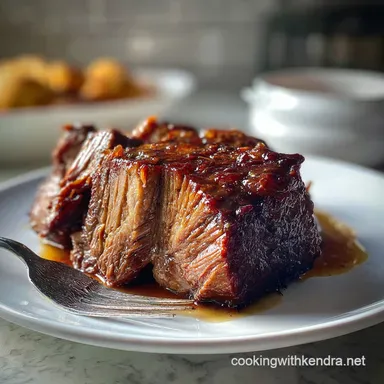
- The long wait. Cover tightly and place in a 325°F oven. Bake for 2 hours 30 mins until the meat is tender and yields to a fork.
- Rest the beef. Move the roast to a cutting board and tent loosely with foil for 15 minutes. Note: This allows the fibers to reabsorb the juices.
- Finish the sauce. Strain the liquid into a small saucepan (optional) and simmer for 5 minutes to thicken before serving over the beef and vegetables.
If you love the technique of browning meat then simmering it in a rich sauce, you will absolutely enjoy the flavors in this Creamy Mushroom Chicken recipe. It uses a similar deglazing method to build a complex, restaurant quality base.
Solving Common Pot Roast Problems
Even the most seasoned home cooks run into trouble. Chuck roast is a forgiving cut, but it isn't invincible. The most common issue is usually timing or temperature.
Meat is Tough and Rubbery
If your meat is difficult to chew, it’s almost always undercooked. Collagen only turns into gelatin with time and heat. If you hit 2 hours and it’s still tough, it simply needs more time. Give it another 30 minutes.
The Sauce is Greasy
Chuck roast is a fatty cut. If you don't trim the large external fat caps or use a fat separator, your gravy will have an oily film. You can also use a slice of bread to "blot" the top of the liquid in a pinch.
| Problem | Root Cause | Solution |
|---|---|---|
| Dry/Stringy Meat | Oven temp was too high | Keep oven at 325°F or lower; check liquid level. |
| Bland Flavor | Not enough salt/sear | Ensure meat is browned dark; adjust salt at the very end. |
| Mushy Veggies | Added too early | Cut carrots and onions into larger chunks (2 inches). |
Common Mistakes Checklist
- ✓ Never skip the searing step; it’s the only chance to add "roasted" flavor.
- ✓ Don't boil the meat; a gentle simmer in the oven is the goal.
- ✓ Use a heavy lid; if it's loose, cover the pot with foil before putting the lid on.
- ✓ Avoid using "cooking wine" which is loaded with salt; use a bottle you’d actually drink.
- ✓ Let the meat rest before shredding, or the juices will run right out onto the board.
Tweaks for Every Dietary Preference
Learning how to cook chuck roast is great because it's naturally gluten-free and keto friendly if you watch your thickeners. Here is how to adapt it for your specific needs without losing that comfort food vibe.
- Keto/Low Carb: Omit the carrots if you are strict, and use extra celery or radishes (they taste like potatoes when braised!). Ensure your bone broth has no added sugars.
- gluten-free: This recipe is naturally GF! Just ensure your beef broth is certified. If you want to thicken the sauce, use a cornstarch slurry instead of a flour roux.
- Alcohol Free: Replace the wine with an equal amount of beef broth and add 2 tablespoons of balsamic vinegar for that missing acidity.
Adjusting the Recipe Size
If you are scaling down for two people, you can use a 1.5 lb roast. Reduce the liquid by 30%, but keep the aromatics the same. The cook time will drop to about 1 hour 45 mins. If you are scaling up for a crowd (7+ lbs), you will likely need two Dutch ovens. Spices only need to be increased by 1.5x, not doubled, or they can become overwhelming. For a different take on oven braised beef, you might also like my How to Cook recipe for chuck steak which is perfect for smaller portions.
Smart Storage and Leftover Ideas
One of the best things about this dish is that it actually tastes better the next day. As it sits, the flavors in the sauce meld and the beef continues to absorb the seasoned liquid.
- Fridge: Store in an airtight container with the juices for up to 4 days. The fat will solidify on top; just scrape it off before reheating.
- Freezer: This freezes beautifully. Place shredded meat and sauce in a freezer bag, press the air out, and store for up to 3 months.
- Reheating: Avoid the microwave if possible. Reheat in a covered skillet over low heat with a splash of water or broth to keep it moist.
- Zero Waste: Don't throw away those herb stems! Put them in a bag in the freezer to make your own beef stock later. Leftover shredded beef makes the world's best tacos or French dip sandwiches the next day.
Debunking Braising Kitchen Myths
There is a lot of misinformation about how to cook chuck roast. Let's set the record straight so you can cook with confidence.
Myth: Searing "seals in" the juices. This is scientifically false. Searing actually dries out the exterior of the meat. However, we do it for the flavor (Maillard reaction), not for moisture retention. The moisture comes from the low and slow breakdown of fats and collagen.
Myth: You must cover the meat completely in liquid. If you submerge the meat, you are boiling it. This leads to a grey, flavorless roast. By filling the liquid only halfway, the top half of the meat roasts in the ambient heat while the bottom half braises, giving you the best of both worlds.
Myth: The "High" setting on a slow cooker is the same as the oven. "High" on a slow cooker often gets too hot, too fast, which can cause the protein fibers to seize up before the collagen has a chance to melt. The oven provides a more consistent, gentle heat from all sides.
Final Plating and Presentation Ideas
You've spent three hours waiting, so don't just dump it on a plate! A little effort goes a long way. Use a wide, shallow bowl rather than a flat plate to keep the sauce contained.
- The Foundation: Serve over a bed of buttery mashed potatoes, creamy polenta, or thick egg noodles.
- Visual Pop: Add a sprinkle of fresh parsley or chives at the very end. The bright green contrast against the deep brown beef makes the dish look vibrant.
- The Sauce: Always pour the sauce over the meat at the last second so it glistens under the dining room lights.
If you’re looking for a more elegant beef presentation for a holiday, my Roast Beef with recipe featuring a blue cheese sauce is a showstopper. But for a Tuesday or a rainy Sunday, this chuck roast is the king of the kitchen. Trust the process, don't rush the sear, and let the oven do what it does best. You've got this!

Critical High in Sodium
1280 mg mg of sodium per serving (56% % of daily value)
The American Heart Association recommends limiting sodium intake to no more than 2,300mg per day for most adults.
Sodium Reduction Tips for Your Pot Roast
-
Low-Sodium Broth-30%
Swap regular beef bone broth with a low-sodium or no-salt added variety. This significantly cuts down the sodium content without sacrificing flavor.
-
Reduce Salt-25%
Decrease the amount of kosher salt used from 1 tbsp to 1.5 tsp. Taste and adjust seasoning at the end, if needed.
-
Salt Free Wine-20%
Ensure the dry red wine you are using is labeled 'salt free', otherwise omit the ingredient entirely and substitute with additional broth.
-
Boost Flavor-10%
Enhance the natural flavors by browning the beef and caramelizing the onions well. This adds depth and richness, reducing the need for excessive salt.
-
Herb Power
Don't underestimate the power of fresh herbs! Use generous amounts of rosemary and thyme, and consider adding other herbs and spices like garlic powder, onion powder, or smoked paprika, to enhance flavor without adding sodium. Salt free seasoning blends can also be very effective.
Recipe FAQs
Which cooking method is best for a chuck roast?
The oven is generally best for chuck roast. It provides consistent, even heat for tenderizing the tough connective tissues over a long period.
What's the best way to cook chuck roast in the oven?
Sear the roast deeply on all sides, then braise it covered in a Dutch oven at 325°F. This method ensures a rich crust and allows the meat to break down into fork tender perfection over 2.5-3 hours.
Is chuck roast better in the oven or crockpot?
The oven typically yields a better result for chuck roast. While a crockpot can tenderize, oven braising offers more control over temperature and allows for a superior sear, leading to deeper flavor development.
How many hours to cook chuck roast?
Cook a 3-4 lb chuck roast for 2.5 to 3.5 hours at 325°F. The exact time depends on the roast's thickness, aiming for an internal temperature of 203-205°F for maximum tenderness.
How do I sear a chuck roast for best flavor?
Pat the roast completely dry, season generously with salt and pepper, and sear it in a very hot Dutch oven with oil until a deep, dark brown crust forms on all sides. This Maillard reaction is crucial for developing rich, complex flavor that defines a great braise.
Can I make a rich sauce from the chuck roast drippings?
Yes, the drippings are perfect for making a rich sauce. After searing and sautéing your aromatics, deglaze the pot with red wine or broth to capture all the flavorful browned bits (fond) from the bottom.
What liquid should I use for braising chuck roast?
Use a combination of beef broth and red wine for optimal flavor. The wine's acidity cuts through the richness of the beef, while the broth provides a savory base, similar to how acidity balances flavors in my Ultimate Baked Penne Recipe Cheesy Classic with SlowSimmered Ragu.
How To Cook Chuck Roast
Ingredients:
Instructions:
Nutrition Facts:
| Calories | 724 kcal |
|---|---|
| Protein | 52.8 g |
| Fat | 48.2 g |
| Carbs | 8.4 g |
| Fiber | 2.1 g |
| Sugar | 3.2 g |
| Sodium | 1280 mg |
