The Decadent Nobake Midnight Kiss Hershey Pie
- The Magic of Minimum Effort: Why This Hershey Pie Wins Dessert
- Velvet and Crunch: Decoding the Ultimate No-Bake Chocolate Experience
- Gathering the Goods: Essential Supplies for Your Hershey Pie
- The Chocolate Lineup: Building Flavor with Just Five Key Items
- The Assembly Line: Step-by-Step Guide to the Perfect Pie
- Mixing Mastery: Transforming Simple Ingredients into Silky Filling
- Serving Suggestions and Customizations for Your Hershey Pie Creation
- Troubleshooting and Longevity: Keeping Your No-Bake Masterpiece Fresh
- Recipe FAQs
- 📝 Recipe Card
The Magic of Minimum Effort: Why This Hershey Pie Wins Dessert
This specific Hershey Pie recipe offers unparalleled decadence without ever requiring you to turn on the oven. It is the definitive definition of high reward for minimal effort, making it the perfect dessert for weeknights or large gatherings.
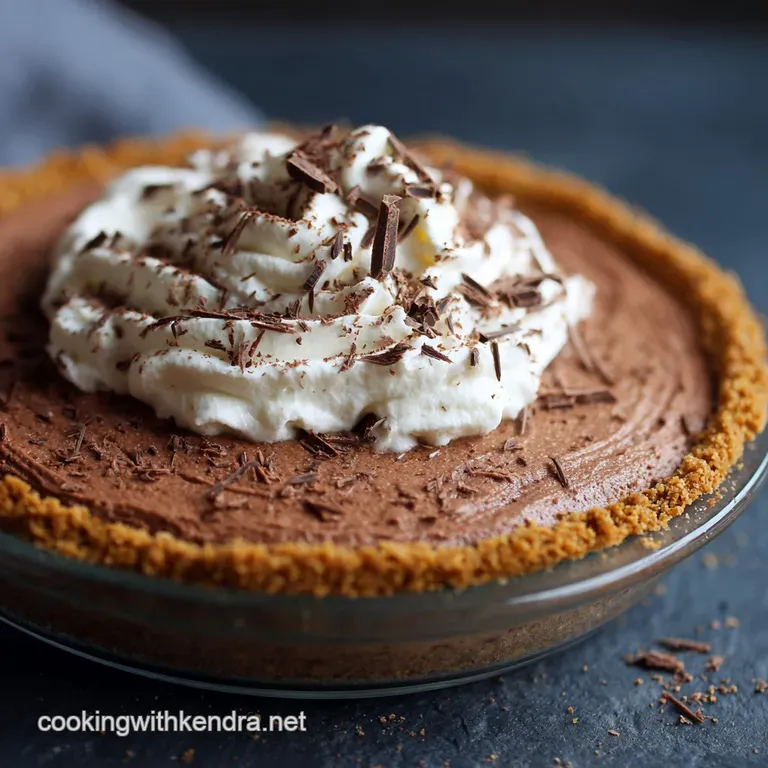
This classic Hersheys Chocolate Pie delivers deep, intense chocolate flavor set against a backdrop of crisp, dark Chocolate Pie Crust. The result is a refined take on beloved comfort food, reminiscent of the best traditional Country Cooking.
Velvet and Crunch: Decoding the Ultimate No-Bake Chocolate Experience
The harmony of texture is what elevates this simple dessert from basic pudding pie to a true culinary achievement. We pair a deeply satisfying, crunchy Oreo base with a filling that is impossibly airy yet structurally sound.
This balance captures the essence of a Vintage Hershey's Chocolate Cream Pie, providing nostalgic flavor through modern, precise technique.
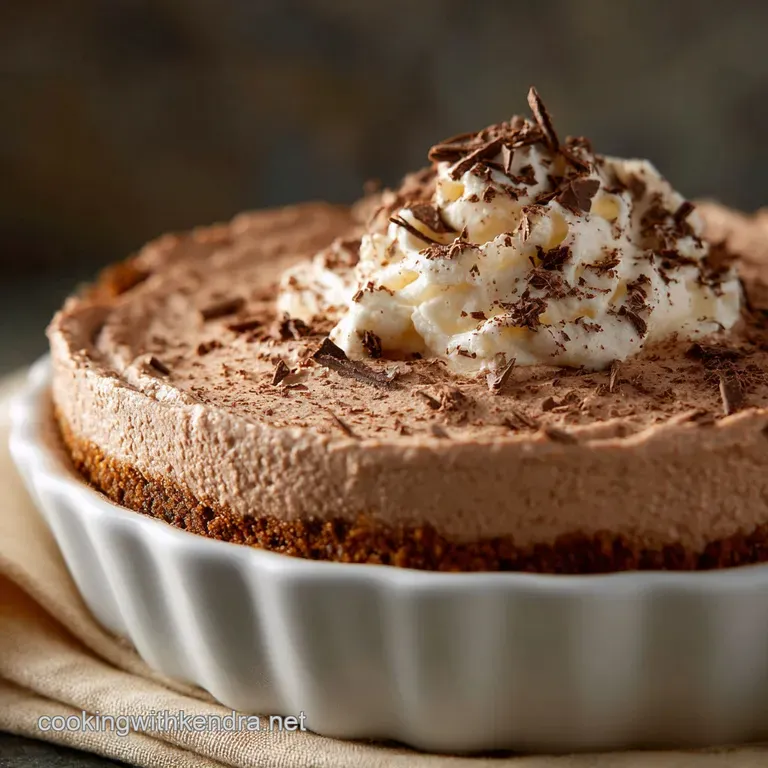
Unlike dense, traditional baked custard pies, this preparation focuses on aeration and chilling. The final product should slice cleanly, maintaining its towering height while melting instantly upon tasting.
This combination ensures a far superior experience compared to simple, grocery store Hersheys Chocolate Pudding Pie kits.
The True American Chocolate Dream: Taste Notes
This pie achieves a complex flavor profile by balancing the intense bitterness of high-quality cocoa with tangy cream cheese and natural vanilla. It is remarkably rich yet surprisingly light, thanks to the incorporated air in the mousse like filling.
The deep, dark cocoa used ensures the finished Hersheys Chocolate Pie avoids being overly sweet or cloying, appealing to sophisticated adult palates.
When the Oven Stays Off: The Joy of Zero Baking
The beauty of a no-bake dessert is the immediate elimination of common baking failures, such as cracked crusts or undercooked custard. This simplicity makes the Hershey Pie recipe incredibly accessible even to novice cooks.
The only real requirement is patience while the dessert sets, which is entirely passive time perfect for busy schedules.
Cream Cheese vs. Cool Whip: Our Stabilizing Secret
We intentionally use softened cream cheese as the anchor ingredient, differentiating this recipe from lighter, fluffier versions. The cream cheese provides essential fat and structure, preventing the filling from weeping or collapsing when sliced.
Beyond that,, it introduces a subtle, welcome tanginess that cuts through the intense sweetness of the chocolate and powdered sugar.
Showstopper Dessert Assembly in Under 20 Minutes
While the minimum required chilling time is four hours, the active preparation time is genuinely rapid. Crushing the crust and mixing the filling should take only about twenty minutes from start to finish.
This speed allows for maximum flexibility, enabling you to prepare a showstopper dessert quickly after a long workday.
Gathering the Goods: Essential Supplies for Your Hershey Pie
Creating the perfect no-bake pie depends entirely on having the right foundation ingredients ready before you start mixing. The pantry check should cover the crust binders, the cocoa flavoring, and the key components for aeration and stability.
Gathering everything ensures a smooth process, preventing mid-recipe stops and potential inconsistencies in the filling texture.
The Chocolate Lineup: Building Flavor with Just Five Key Items
This recipe relies on just five core components to create a complex flavor experience, proving that simple elegance is always best. We utilize quality ingredients like full fat cream cheese and high grade unsweetened cocoa powder to achieve both richness and depth.
The interplay between the sweet cookie crust and the semi tart filling is essential for a balanced final taste.
Choosing Your Crust Base: Pre-made vs. Homemade Oreo Crumbs
While a pre-made crust offers speed, making your own chocolate cookie crust yields a far superior texture and freshness. Homemade crumbs, bound with melted butter, press more firmly and prevent unwanted crumbling when slicing.
We strongly recommend using the specified amount of crushed chocolate sandwich cookies for the deepest flavor foundation.
| Crust Option | Key Benefit |
|---|---|
| Homemade Cookie Crumbs | Superior texture and depth of flavor. |
| store-bought Pre-made | Saves about ten minutes of active prep time. |
Dairy Details: Achieving Peak Creaminess and Stability
The temperature of your cream cheese is non-negotiable for achieving a truly lump free, velvet filling. It must be completely soft to easily incorporate the dry ingredients and create a uniform base texture.
Whether you choose packaged whipped topping or freshly made sweetened cream dictates the final density and sweetness of the Hersheys Chocolate Pie.
Tools of the Trade: Must Have Kitchen Equipment
While this recipe is simple, utilizing the right equipment significantly reduces active time and improves the outcome. An electric hand mixer is crucial for beating the cream cheese until it reaches its ideal smooth consistency.
A large rubber spatula is equally vital for the final folding stage, ensuring the aerated whipped topping isn't knocked flat.
Ingredient Quality Matters: Sourcing the Best Cocoa Powder
The type of cocoa powder you select directly dictates the richness and color of your finished Hershey's Cocoa Chocolate Cream Pie. Using a deep, Dutch process cocoa, such as Hershey's Special Dark, will deliver a profound, almost black color and a smoother, less acidic chocolate flavor.
This quality choice elevates the pie from standard dessert fare to something truly memorable and intense.
Related Recipes Worth Trying
- Flaky Country Tomato Bacon Pie Guaranteed No Soggy Bottom — The ultimate Country Tomato Bacon Pie guaranteed soggybottom free Enjoy this rustic savoury tart layered with sharp cheddar smoky bacon and fresh summer...
- The Dukes Easy Southern Fudge Pie Gooey Fudgy — This easy southern fudge pie recipe is the absolute business Forget complicated bakesthis fudgy rich southern chocolate pie is ready in under an hour Simply...
- Golden Sweet Potato Chicken Pie Family Friendly Fall Dinner Ideas — Searching for easy family friendly dinner ideas for picky eaters This Chicken Sage Pie topped with golden sweet potato mash is pure seasonal comfort
The Assembly Line: step-by-step Guide to the Perfect Pie
The process of assembling this no-bake pie is straightforward, but success relies on executing each stage in the proper order and manner. We start by ensuring the foundation is solid before moving on to preparing the airy filling.
Precision in mixing and folding is far more important here than timing or temperature control during the preparation stage itself.
Mixing Mastery: Transforming Simple Ingredients into Silky Filling
Achieving that signature silky texture requires more than just mixing; it demands careful attention to how the air is incorporated and preserved. The initial beating of the cream cheese provides the necessary structure and density for the base flavor.
We then carefully lighten this rich mixture to transform it into a decadent, mousse like experience suitable for any celebration.
Phase One: Pressing and Setting the Deep Dish Crust
Properly setting the crust prevents it from collapsing when the filling is added or sliced later on. Use the flat bottom of a measuring cup or glass to compact the buttered crumbs tightly into the bottom and up the sides of your deep dish pie plate.
Chilling the crust for the allotted time is mandatory, ensuring the butter solidifies and holds the crust structure firmly in place.
Whipping the Cloud: Achieving Stiff Peaks for Maximum Volume
If using fresh cream instead of packaged topping, it must be whipped to firm, stiff peaks before being folded into the chocolate base. Maximum aeration here provides the lightness that prevents this dessert from tasting heavy like a traditional Hersheys Chocolate Pudding Pie.
This cloud like texture is the secret to the pie's incredible melt-in-your mouth quality.
Folding and Filling: Integrating the Mousse Without Deflation
The folding step is perhaps the most crucial active stage; use a wide rubber spatula and a gentle bottom-up motion to combine the chocolate base and the whipped cloud. Overmixing will cause the air to dissipate, collapsing the volume and resulting in a dense, disappointing filling.
Fold only until streaks of white disappear, then stop immediately.
Expert Tip: For a perfectly airy texture, incorporate the whipped topping in two separate additions. Folding in half first lightens the base, making it easier to gently integrate the remaining half without deflating the mixture.
The Essential Rest Period: Chilling for Flawless Slices
Do not be tempted to serve the pie early; the minimum four hour chill time is vital for the pie to fully set and bond. During this period, the fats solidify, and the cream cheese mixture firms up, allowing for beautifully clean, structural slices.
Serving too soon results in a soft, messy filling that slumps when served.
Serving Suggestions and Customizations for Your Hershey Pie Creation
A fantastic dessert should always be presented beautifully and paired with complementary flavors to balance its richness. This particular creation is a blank canvas for customizing, allowing you to tailor the final presentation to any occasion.
Consider how toppings can introduce textural contrast, elevating the entire experience beyond simple chocolate cream.
Troubleshooting and Longevity: Keeping Your No-Bake Masterpiece Fresh
Handling and storing a no-bake pie requires a different approach than a baked dessert, particularly regarding moisture and temperature fluctuations. We must address common pitfalls, ensuring that the crust stays crisp and the filling remains smooth and stable over several days.
Understanding the general caloric estimate also helps manage portion sizes, especially when considering the richness inherent in cream cheese and whipped topping.
Advanced Toppings: From Chocolate Shavings to Salted Caramel Drizzle
While simple fresh whipped cream is always classic, introducing specialty toppings adds a layer of gourmet sophistication to your Hershey Pie. Fine chocolate shavings or cocoa nibs provide a slightly bitter crunch that contrasts beautifully with the smooth, sweet filling.
Alternatively, a subtle salted caramel drizzle introduces a sophisticated salty sweet flavor complexity that guests will adore.
Storage Secrets: How to Keep Slices Tasting Fresh for Days
The best way to store leftovers is by keeping the pie loosely covered in the refrigerator, ensuring the plastic wrap doesn't touch the filling's surface. A cold, consistent temperature is necessary to maintain the integrity of the dairy based filling.
Properly stored, your homemade Hershey's Chocolate Pie will remain perfectly fresh and delicious for up to three or four days.
Preventing the Soggy Crust Syndrome
Moisture migration from the filling to the cookie base is the primary cause of a soggy chocolate pie crust, which ruins the desired crunch. Ensure the crust is perfectly compacted and adequately chilled before adding the filling, creating a temporary barrier of solidified butter.
If you plan to make the pie more than 24 hours in advance, consider brushing the set crust lightly with melted white chocolate before filling.
Making Ahead: Freezing and Thawing Instructions
Yes, this no-bake pie freezes wonderfully, making it an excellent candidate for advance preparation, unlike the softer texture found in mass produced options like the hershey pie burger king ingredients list might suggest. Wrap the fully set pie tightly in plastic wrap followed by aluminum foil to prevent freezer burn.
When ready to serve, thaw the frozen pie overnight in the refrigerator, which minimizes moisture condensation and preserves the structure, even after factoring in the estimated hershey pie calories.

Recipe FAQs
I followed the instructions, but my pie filling is still a bit soft and messy. What went wrong?
The culprit is usually rushing the chill time; a no-bake filling requires a minimum of four hours, or ideally overnight, for the cream cheese and fats to completely set and provide that perfect, clean slicing structure.
Can I make this Hershey Pie a day ahead of time for a proper gathering or party?
Absolutely, this is a brilliant make-ahead dessert! In fact, preparing the Hershey Pie 12 to 24 hours in advance allows the flavours to meld beautifully and guarantees a perfectly firm, showstopping slice.
I'm not keen on using pre-packaged whipped topping (Cool Whip); can I substitute it with fresh cream?
You certainly can! Just use about 3 cups of freshly whipped heavy cream (sweetened slightly with icing sugar), but make sure you fold it into the cream cheese mixture gently to keep the filling light and airy.
The recipe suggests Hershey's Special Dark cocoa; does using a different brand affect the flavour?
While the pie is named after the style, the brand of cocoa makes a difference; a higher quality, darker cocoa will deliver a deeper, less sweet, more luxurious chocolate flavour, so don’t be afraid to use your favourite Dutch processed powder.
How should I store leftover pie, and how long will it keep fresh?
Store any leftovers tightly covered in the refrigerator where it will remain fresh for 4 5 days; for longer storage, you can slice and freeze individual portions for up to two months, though the texture of the whipped cream topping may change slightly upon thawing.
Nobake Creamy Hershey Pie

Ingredients:
Instructions:
Nutrition Facts:
| Calories | 756 kcal |
|---|---|
| Protein | 4.4 g |
| Fat | 24.0 g |
| Carbs | 30.0 g |
| Fiber | 2.7 g |
| Sugar | 11.2 g |
| Sodium | 196 mg |
