Royal Icing Recipe: Flawless Finish
- Time: Active 10 minutes, Passive 7 minutes, Total 17 minutes
- Flavor/Texture Hook: Flawless, matte satin finish with a crisp shatter
- Perfect for: Holiday cookie decorating, gingerbread houses, and detailed sugar art
- Achieving a Flawless Finish with This Royal Icing Recipe
- Why This Recipe Works
- Breaking Down the Component Analysis
- The Essential Elements List
- Essential Tools for Precision
- Step-by-Step Crafting Instructions
- Troubleshooting Common Icing Issues
- Creative Twists and Swaps
- Preservation Secrets and Zero Waste
- Serving and Decorating Suggestions
- Royal Icing Recipe FAQs
- 📝 Recipe Card
Achieving a Flawless Finish with This Royal Icing Recipe
Imagine the sweet, floral scent of clear vanilla mingling with the snowy aroma of powdered sugar as you whip up a batch of something truly special. There is nothing quite like the moment you lift your whisk and see a glossy, white trail that holds its shape like a stiff ribbon.
If you have ever struggled with icing that stays gummy, looks dull, or crumbles off the cookie before the party even starts, I have been right there with you. I remember one Christmas where my "red" icing looked more like a sad, watery pink and slid right off the edges of my bells.
It was a mess, but it taught me everything about the balance of hydration and protein.
We are looking for that specific, professional grade texture that makes your kitchen feel like a high end bakery. This isn't just about mixing sugar and water; it is about creating a stable emulsion that can withstand the humidity of your kitchen and the delicate touch of a piping bag.
Whether you are prepping for a bake sale or just trying to make the kids' sugar cookies look a bit more polished, this method is your new best friend. We will walk through the science of why meringue powder is a lifesaver and how a tiny bit of glycerin can change the entire mouthfeel of your decorations.
Right then, let's get into the heart of the bowl. You'll find that once you master the consistency, you won't just be decorating; you'll be creating edible art that looks just as good as it tastes. Trust me, once you see that first cookie dry to a smooth, porcelain finish, you'll never go back to the stuff in the tub.
Why This Recipe Works
When we talk about royal icing, we are really talking about a controlled sugar suspension. The magic happens when the proteins in the meringue powder create a structural web that traps the sugar crystals in place.
This prevents the icing from feeling gritty and allows it to dry into a solid state that still has a delicate "shatter" when you take a bite. It is a fascinating bit of kitchen chemistry that turns simple pantry staples into a structural building material for sweets.
- Protein Scaffolding: Meringue powder provides egg white proteins that stretch and bond, creating the "strength" needed for stiff peaks.
- Invert Sugar Stability: Corn syrup acts as an interference agent, preventing the sugar from re crystallizing into large, crunchy chunks.
- Hydro Bonding: Warm water dissolves the sugar faster than cold, ensuring a silky, lump free emulsion from the very first stir.
- Gloss Retention: Glycerin stays liquid at room temperature, which keeps the finished icing from looking chalky or matte gray.
Before we dive into the mixing, it is helpful to decide how you want to handle the drying process. While most people just let their cookies sit on the counter, there are ways to speed things up or change the final look of the icing.
I’ve found that a little bit of airflow can be the difference between a dull finish and a professional shine.
| Drying Method | Time | Finish Texture | Best For |
|---|---|---|---|
| Room Temperature | 6-12 hours | Matte / Satin | Standard decorating |
| Table Fan (Low) | 3-4 hours | High Gloss | Professional flooding |
| Dehydrator (Lowest) | 1-2 hours | Hard Shell | High volume production |
Adding a fan to your drying station isn't just about speed; it actually helps the surface of the icing set quickly, which prevents the sugar from dulling as it dries. It's a trick I learned from a professional pastry chef friend, and it's a total game changer for those late night baking sessions. If you are pairing this with my Classic Christmas Cut recipe, that gloss really makes the designs pop.
Breaking Down the Component Analysis
Understanding the "why" behind each ingredient helps you troubleshoot on the fly. We aren't just adding things for bulk; every gram serves a purpose in the final structure and appearance of the icing.
When you pour that warm water over the sifted sugar, you'll notice a faint, clean sweetness in the air that's the sign of a pure base.
| Ingredient | Science Role | Pro Secret |
|---|---|---|
| Powdered Sugar (500g) | Primary structure and bulk | Always sift to prevent "clogged tip" disasters. |
| Meringue Powder (30g) | Protein stabilizer | high-quality powder smells like vanilla, not dried eggs. |
| Light Corn Syrup (10ml) | Plasticizer for shine | Prevents the "brittle break" and adds a soft bite. |
| Glycerin (1/2 tsp) | Humectant | Keeps the icing from drying out too fast in the bag. |
You might think sifting is a chore you can skip, but in the world of royal icing, one tiny clump of sugar is the enemy. It will lodge itself in your piping tip right when you are doing the most delicate detail work, and that is a heartbreak I want you to avoid.
The Essential Elements List
Having everything measured and ready to go (mise en place, as the pros say) makes the process much more relaxing. Ensure your water is warm to the touch, but not boiling, as extreme heat can actually cook the proteins in the meringue powder prematurely, leading to a weirdly rubbery texture.
- 4 cups (500g) powdered sugar, siftedWhy this? Provides the sweetness and the dense structural body of the icing.
- 3 tbsp (30g) meringue powderWhy this? Essential for safety and stability compared to raw egg whites.
- 1/3 cup + 1 tbsp (90ml) warm waterWhy this? The solvent that hydrates the proteins and dissolves the sugar.
- 2 tsp (10ml) light corn syrupWhy this? This is the secret to that professional, glossy bakery sheen.
- 1/ tsp (5ml) clear vanilla extractWhy this? Adds flavor without tinting your pristine white icing brown.
- 1/2 tsp glycerinWhy this? Keeps the icing slightly supple so it doesn't shatter like glass.
Substitute Options
| Original Ingredient | Substitute | Why It Works |
|---|---|---|
| Meringue Powder | Dried Egg Whites | Similar protein profile. Note: Often requires more whipping time to stabilize. |
| Clear Vanilla | Almond Extract | Provides a beautiful nutty aroma. Note: Will alter the flavor profile significantly. |
| Corn Syrup | Agave Nectar | Similar viscosity. Note: May slightly tint the icing a very pale straw color. |
Speaking of flavor, if you are looking to branch out from the traditional vanilla, try using a tiny drop of peppermint or even a splash of citrus zest. If you're feeling adventurous, this icing also works beautifully as a drizzle for my Pistachio Swirl Fudge recipe, adding a crisp contrast to the creamy fudge.
Essential Tools for Precision

You don't need a lab, but a few specific tools will make this royal icing recipe much easier to manage. I personally prefer a stand mixer because whipping for seven minutes by hand is a workout I'm not looking for on a Sunday afternoon.
- Stand Mixer: Using a paddle attachment is better than a whisk to avoid incorporating too many air bubbles.
- Fine Mesh Sieve: For that mandatory sugar sifting we talked about.
- Airtight Containers: Royal icing dries out the moment it hits the air, so you need good lids.
- Damp Paper Towels: These are your best friend for covering tips and bowls during the decorating process.
- Scribe Tool or Toothpick: To pop those pesky tiny air bubbles in your flooded cookies.
Chef's Tip: Freeze your clean mixing bowl and paddle for 5 minutes before starting. This keeps the friction heat down and results in a more stable, glossy peak.
step-by-step Crafting Instructions
This is where the magic happens. As the mixer runs, keep an eye on the color change it will go from a dull off white to a brilliant, shimmering snow white. The smell of the clear vanilla will intensify, creating a lovely, sugary atmosphere in your kitchen.
- Sift the sugar. Place your 500g of powdered sugar into the bowl of your stand mixer after passing it through a fine mesh sieve. Note: This prevents lumps from clogging your piping tips later.
- Add dry meringue. Whisk the 30g of meringue powder into the sugar until evenly distributed.
- Hydrate slowly. Pour in the 90ml of warm water, the 10ml of corn syrup, the clear vanilla, and the glycerin.
- Start low. Turn the mixer to the lowest setting until the sugar is fully moistened and looks like thick paste.
- Whip it up. Increase the speed to medium low and whip for exactly 7 minutes. Note: Do not go to high speed; we want strength, not a bowl full of air bubbles.
- Check for stiff peaks. Stop the mixer and lift the paddle. The icing should stand straight up without drooping. Check that it looks like thick shaving cream.
- Divide and conquer. Transfer the stiff icing into smaller bowls if you plan to color it.
- Thin for flooding. To reach "flood consistency," add water 1/2 teaspoon at a time until a spoonful dropped back into the bowl disappears in 10 seconds.
- Color the batch. Add gel food coloring using a toothpick. Note: Gel is essential because liquid colors will ruin your carefully balanced consistency.
- Rest the icing. Cover the bowls with a damp paper towel and let them sit for 30 minutes. Look for air bubbles rising to the top and gently stir them out.
Precision Checkpoints
- Time: 7 minutes of total whipping time on medium low speed.
- Temperature: Water should be exactly 40-45°C (warm but comfortable for your skin).
- Weight: Ensure you use 500g of sugar; volume measurements for powdered sugar can vary by up to 20% depending on how it's packed.
Troubleshooting Common Icing Issues
Even the best of us run into trouble sometimes. The most common heartbreak is "color bleed," where your beautiful red detail starts fuzzying into the white background. It usually happens because the base layer wasn't fully dry or the icing was too thin.
| Issue | Solution |
|---|---|
| Why Your Icing Is Dull | If your icing looks chalky once it dries, it usually means the humidity in your kitchen was too high or you skipped the corn syrup. The sugar crystals dry in a way that scatters light instead of refle |
| Why Your Icing Has Tiny Holes | Those "pockmarks" or pits are caused by trapped air bubbles that popped after the icing started to set. This usually happens if you whipped the icing at too high a speed. To prevent this, always use t |
| Why Your Icing Is Runny | If your icing won't hold a line, you've over hydrated it. It's easy to do! If you're at the flooding stage and it's too thin, don't just add more sugar sift in a tablespoon of sugar at a time and stir |
Creative Twists and Swaps
Once you have the base down, you can really start to play. While vanilla is the standard, a "royal icing recipe" can take on many personalities. For a sophisticated twist, I love adding a tiny pinch of espresso powder to the water before mixing it creates a beautiful "mocha" icing that smells incredible and pairs perfectly with chocolate cookies.
If you are looking for a dairy-free or vegan friendly approach, you can actually use aquafaba (the liquid from a can of chickpeas) in place of the water and meringue powder, though the whipping time will double to get the same peak strength.
Royal Icing Recipe Without Meringue Powder
If you can't find meringue powder, you can use fresh egg whites. For this volume, replace the water and powder with 3 large egg whites (about 90ml). However, please note that using raw egg whites carries a small risk of salmonella, so I always recommend using pasteurized whites from a carton if you go this route.
The texture will be slightly more brittle, so the glycerin becomes even more important here.
Natural Color & Flavor Infusions
Instead of clear vanilla, try using a clear almond or peppermint extract. You can also swap the water for strained, room temperature hibiscus tea to get a natural, vibrant pink color and a tart floral aroma.
Just make sure whatever liquid you use is completely fat free; even a tiny drop of oil from a citrus peel can cause royal icing to break and lose its structure.
| Goal | Adjustment | Effect |
|---|---|---|
| Ultra Whiteness | Add a tiny drop of violet gel | Neutralizes yellow tones for a "brilliant white" look. |
| Extra Hardness | Increase sugar by 50g | Best for structural gingerbread house "glue." |
| Softer Bite | Add 1/4 tsp extra glycerin | Stays slightly soft, making it easier to eat on soft cookies. |
Preservation Secrets and Zero Waste
Royal icing is surprisingly hardy if handled correctly. Since this version uses meringue powder instead of raw eggs, it has a much longer shelf life and doesn't need to be rushed.
- Fridge
- Store in an airtight container for up to 1 week. The icing will likely "separate" (water at the bottom, fluff on top). This is normal! Just give it a slow, gentle stir by hand to bring it back together. Do not re whip it in the mixer, or you'll get too many bubbles.
- Freezer
- You can freeze royal icing for up to 2 months. Thaw it overnight in the fridge and let it come to room temperature before stirring and using.
- Room Temp
- Decorated cookies can stay at room temperature in a container for up to 2 weeks.
Zero Waste Tips If you have leftover icing in various colors, don't throw it away! I like to pipe small "royal icing drops" or tiny flowers onto parchment paper. Let them dry completely (about 24 hours), then peel them off and store them in a jar.
They make the cutest homemade sprinkles for future cupcakes or even to stir into a warm bowl of oatmeal for the kids. If you have a lot of white icing left, it's the perfect "glue" for a gingerbread house project.
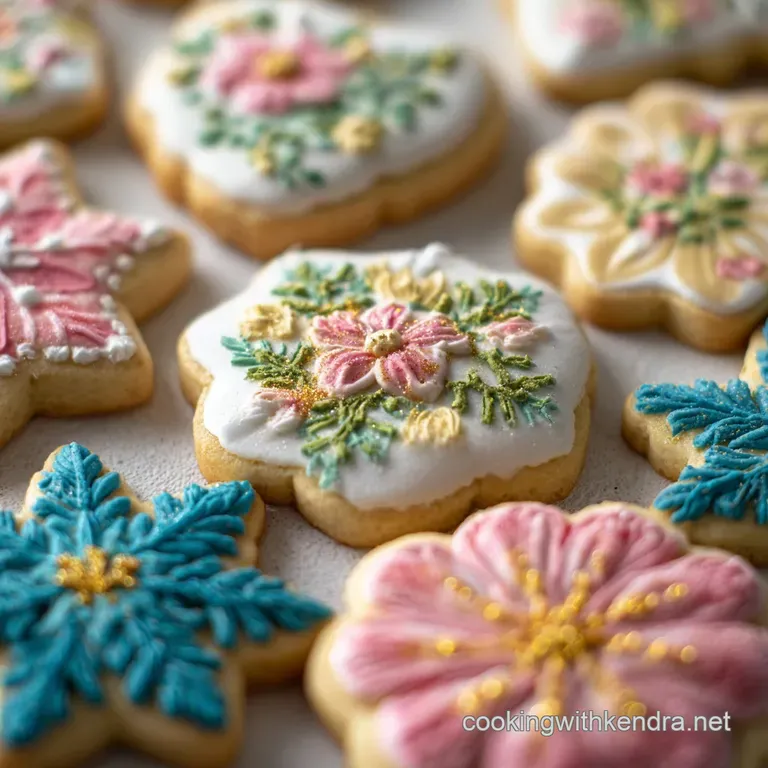
Serving and Decorating Suggestions
The beauty of this royal icing recipe is its versatility. For a classic look, use the "stiff" consistency to pipe borders around your cookies, then go back with the "flood" consistency to fill in the centers. This creates a dam that prevents the icing from running off the sides.
If you want to get fancy, try the "wet on-wet" technique. While your flood icing is still wet, pipe dots or lines of a contrasting color into it. Use a toothpick to drag through the dots to create hearts or a marble effect. The two colors will sink into each other, drying into a perfectly flat, smooth surface.
It’s a technique that always gets a "wow" from friends, but it's actually one of the easiest things to do!
For a more rustic feel, you can use a spatula to swirl the icing onto cakes or cookies, much like you would with buttercream. It will set into a firm crust that protects the cake underneath, keeping it moist for days.
Whatever you choose to do, remember that the best part of baking is the process and maybe licking the spatula just once before it hits the sink. Happy decorating!

Royal Icing Recipe FAQs
What are the ingredients of royal icing?
Powdered sugar, meringue powder, warm water, light corn syrup, clear vanilla extract, and glycerin are the core ingredients. Powdered sugar forms the structure, meringue powder provides stability and safety, corn syrup and glycerin add shine and prevent brittleness, while vanilla is for flavor. If you enjoyed mastering the controlled sugar suspension here, see how the same principles of ingredient balance apply in our Foolproof Whipped Cream Light Fluffy Homemade recipe.
What are the three types of royal icing?
The three main consistencies are stiff, flood, and piping. Stiff icing is like thick shaving cream and ideal for borders or as a "glue." Flood consistency is like thin yogurt and used for filling in areas smoothly. Piping consistency is somewhere in between, perfect for fine details and lettering.
What is the 10 second rule for royal icing?
The 10 second rule determines flood consistency. When you lift a spoonful of icing back into the bowl, it should disappear into the rest of the icing within 10 seconds. This indicates the correct hydration level for smooth, even flooding.
How do you make royal icing for gingerbread?
Start with the base recipe and ensure it's at stiff consistency. For gingerbread houses, you'll want a thicker, "glue like" icing that holds its shape extremely well. This means using less water than for flood icing, ensuring it's very stable to bond the gingerbread pieces.
Can I use fresh egg whites instead of meringue powder?
Yes, but with caution. Fresh egg whites can be used, but they carry a risk of salmonella. It's best to use pasteurized egg whites. You'll likely need to whip them longer to achieve the necessary stability, and the texture might be slightly more brittle, making glycerin crucial.
Why is my royal icing dull and chalky when dry?
This is likely due to high humidity or skipping the corn syrup. Corn syrup acts as a plasticizer, adding shine. If your environment is humid, the sugar crystals can dry in a way that scatters light, leading to a chalky appearance. Ensuring a stable emulsion is key, much like achieving the perfect texture in our Foolproof Cream Puff Dessert Recipe Classic Profiteroles and Ganache.
How do I store leftover royal icing?
Store in an airtight container in the refrigerator for up to one week. It may separate; simply stir gently to recombine. For longer storage, you can freeze it for up to two months, thawing it overnight in the fridge before use. Ensure it comes to room temperature before stirring.
Royal Icing Recipe

Ingredients:
Instructions:
Nutrition Facts:
| Calories | 88 kcal |
|---|---|
| Protein | 0.5 g |
| Fat | 0 g |
| Carbs | 21.9 g |
| Fiber | 0 g |
| Sugar | 21.5 g |
| Sodium | 4 mg |
