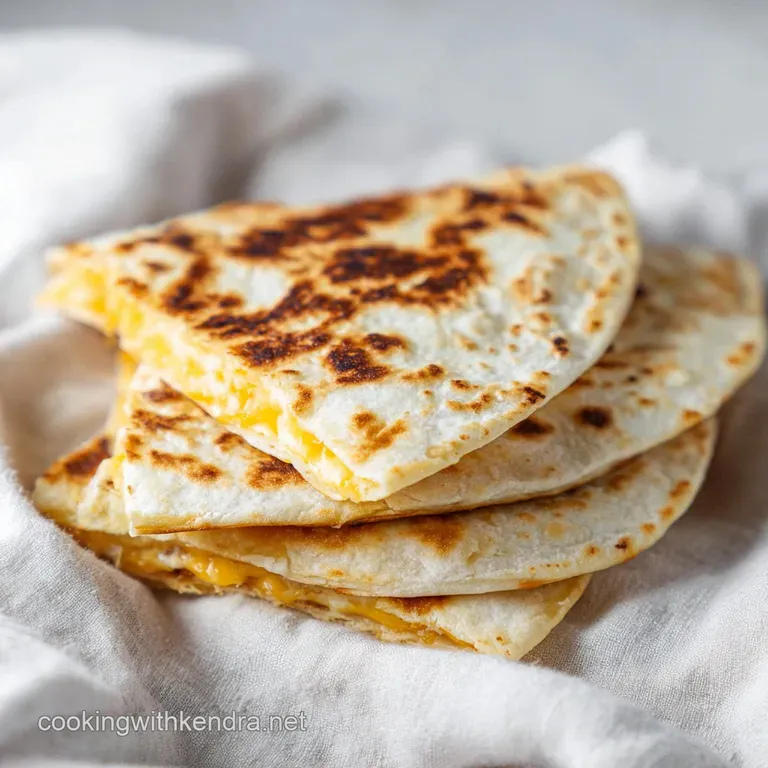
Smashburger Quesadillas: Crispy and Cheesy
- Time: Active 10 minutes, Passive 15 minutes, Total 25 minutes
- Flavor/Texture Hook: Savory beef, sharp melted cheddar, and a shatteringly crispy crust
- Perfect for: Busy weeknights, game day snacks, or a fun family dinner
- The Ultimate Flavor Fusion of Smashburger Quesadillas
- Why the Heat and Pressure Strategy Creates Perfection
- Essential Success Metrics for Your Smashburger Quesadillas
- Selecting High Quality Components for Maximum Flavor
- Choosing the Best Tools for a Crispy Sear
- Step by Step Guide to Making Smashburger Quesadillas
- Professional Solutions for Common Cooking Obstacles
- Smart Ways to Customize Your Flavor Profile
- Best Practices for Preserving Your Leftover Portions
- Creative Pairings to Complete Your Family Dinner
- Very High in Sodium
- Recipe FAQs
- 📝 Recipe Card
The Ultimate Flavor Fusion of Smashburger Quesadillas
The first time I heard the sizzle of raw beef hitting a smoking hot cast iron skillet, I knew I was in for something special. There is a primal, satisfying aroma that fills the kitchen when the Maillard reaction starts doing its thing.
For me, Smashburger Quesadillas aren't just a "hack" or a trend; they are the logical evolution of two of the greatest comfort foods on the planet. I remember sitting in a tiny diner in Kentucky years ago, watching the cook press those patties into the griddle until the edges were thin enough to see through.
That lacy, crispy crust stayed with me, and bringing that technique into a quesadilla format at home changed our Tuesday night dinner rotation forever.
This dish represents a beautiful collision of culinary worlds. You have the classic American diner heritage, born from the need for speed and flavor, meeting the rustic, comforting traditions of Northern Mexican flour tortillas.
When we talk about these quesadillas, we're talking about a technique that prioritizes surface area. The more beef you can get in direct contact with the pan, the more flavor you create.
I’ve made my fair share of mistakes like using meat that was too lean or a pan that wasn't hot enough but those "gray meat" days are over. We're aiming for a deep, mahogany crust that contrasts perfectly with a velvety, melted cheese center.
You’re going to love how the tortilla actually protects the meat while it cooks. It acts as a little lid, trapping the steam and fat, which in turn seasons the tortilla itself.
It’s a self basting system that results in a homemade smash burger quesadilla that is infinitely better than anything you can get at a drive thru. Trust me, once you see that cheese start to bubble and the tortilla turn that perfect golden brown, you'll be as obsessed as I am.
Why the Heat and Pressure Strategy Creates Perfection
- Surface Area Contact: Smashing the 80/20 beef directly against the pan maximizes the contact points, creating a massive amount of savory, browned crust that regular patties can't match.
- Fat Infusion: As the beef renders, the tortilla absorbs a small amount of the flavorful fat, making the bread itself taste like a grilled burger bun but with a much crispier texture.
- Steam Trapping: The tortilla sitting on top of the raw beef acts as a heat barrier, forcing the rising steam back down into the meat to keep it juicy while the bottom sears.
- Moisture Barrier: Using a layer of cheese and paper thin onions between the beef and the folded tortilla prevents the bread from getting soggy, maintaining that essential crunch.
The secret to this recipe is the relationship between the fat in the beef and the heat of the pan. If you use meat that is too lean, you won't get that iconic "smash" crust because there isn't enough fat to fry the edges of the beef.
I always stick with an 80/20 blend because that 20 percent fat is exactly what helps the beef release from the pan when you’re ready to flip.
| Thickness | Internal Temp | Rest Time | Visual Cue |
|---|---|---|---|
| 1/8 inch (smashed) | 160°F | 2 minutes | Dark brown edges with a lacy texture |
| 1/4 inch (thick) | 165°F | 5 minutes | Uniform brown throughout, no pink |
| 1/2 inch (patty) | 165°F | 5 minutes | Plump center, less surface browning |
When you are aiming for that perfect sear, timing is everything. Because the meat is smashed so thin, it cooks incredibly fast. You aren't looking for a medium rare finish here; you are looking for maximum caramelization.
The rest time is short because the quesadilla holds its heat well, but giving it those two minutes allows the cheese to fully set so it doesn't spill out on your first bite.
Essential Success Metrics for Your Smashburger Quesadillas
To really understand why this ground beef quesadilla recipe is so successful, we have to look at the ingredients as functional components. This isn't just about putting food in a pan; it's about managing moisture and heat.
If you've ever had a burger where the bun falls apart, you know how important structural integrity is. The same rules apply here.
| Component | Science Role | Pro Secret |
|---|---|---|
| 80/20 Ground Beef | Fat Source | Keep it cold until the very second it hits the pan to keep the fat solid. |
| Flour Tortilla | Heat Conductor | Use large burrito size tortillas to ensure there’s enough surface for the smash. |
| Sharp Cheddar | Emulsified Binder | Grate it yourself; pre shredded cheese has starch that prevents a smooth melt. |
| White Onion | Moisture Source | Slice them so thin they are translucent; they will steam cook in the beef fat. |
The way the beef reacts to the heat is actually quite fascinating. When that cold meat hits the 400°F (200°C) pan, the proteins immediately begin to contract and brown.
If you don't smash it right away, the meat will pull away and form a dome, which is exactly what we don't want. The pressure from your spatula is what forces the meat to stay flat, ensuring that every square millimeter gets that over high heat treatment.
Speaking of heat, your pan choice is vital. I always reach for my cast iron skillet because it holds onto heat better than anything else in my kitchen. If you use a thin aluminum pan, the temperature will drop the moment you add the cold beef, and you'll end up with steamed, grey meat instead of a crispy smash burger.
It’s all about maintaining that high energy in the metal.
Selecting high-quality Components for Maximum Flavor
When you're shopping for your easy smashburger quesadillas, don't overthink it, but do be intentional. Since this recipe has few ingredients, each one has to pull its weight.
- 1 lb Ground Beef (80/20): Why this? The fat provides the flavor and the "lacy" crispy edges that define a smash burger. (Substitute: Ground turkey with 1 tbsp of butter added for fat content).
- 1 tsp Kosher Salt: Why this? Larger grains provide better coverage and won't make the meat overly salty. (Substitute: Sea salt).
- 1/2 tsp Coarse Black Pepper: Why this? Coarse grind adds a nice bite and texture to the crust. (Substitute: Pre ground pepper).
- 1/2 tsp Garlic Powder: Why this? Adds a savory depth without the risk of burning fresh garlic in the high heat. (Substitute: Onion powder).
- 4 Large Burrito size Flour Tortillas: Why this? Provides enough room to smash the meat and still fold over comfortably. (Substitute: Corn tortillas, though they may crack when folded).
- 2 cups Shredded Sharp Cheddar cheese: Why this? Melts beautifully and provides a punchy contrast to the rich beef. (Substitute: Monterey Jack for a milder, stretchier melt).
- 1/2 White Onion, paper thinly sliced: Why this? The thinness allows them to soften and sweeten in seconds. (Substitute: Red onion for a sharper bite).
- 12 Dill Pickle chips: Why this? Provides the essential acidity to cut through the heavy fats. (Substitute: Pickled jalapeños for heat).
- 1/2 cup Mayonnaise: Why this? The creamy base for our "Big Smash" sauce. (Substitute: Greek yogurt for a tangier, lower fat option).
- 2 tbsp Yellow Mustard: Why this? Adds the classic tang associated with old school diners. (Substitute: Dijon mustard for more spice).
- 1 tbsp Sweet Pickle Relish: Why this? Adds a hint of sweetness to balance the salty beef. (Substitute: Minced dill pickles and a pinch of sugar).
- 1 tsp Smoked Paprika: Why this? Gives the sauce a subtle wood fired flavor and beautiful color. (Substitute: Regular paprika).
Chef's Tip: Put your ground beef in the freezer for 10 minutes before portioning it into balls. This keeps the fat from melting in your hands, ensuring it stays in the meat until it hits the hot pan.
This is one of those small tricks that actually makes a massive difference in the final texture of your cheesy smash burger quesadillas.
Another thing to keep in mind is the tortilla quality. If you can find "raw" or "uncooked" tortillas in the refrigerated section, use those! They puff up and get much crispier than the shelf stable pre cooked ones.
If you're using standard tortillas, just make sure they are fresh so they don't tear when you do the big flip.
Choosing the Best Tools for a Crispy Sear
You don't need a professional kitchen to make homemade smash burger quesadillas, but you do need the right gear for the job. Because we are working with high heat and high pressure, your standard non stick skillet might not be the best choice here.
First and foremost, you need a heavy duty pan. A 12 inch cast iron skillet or a flat top griddle is ideal. These materials have high thermal mass, meaning they don't cool down easily. When you press that beef into the surface, you want the pan to fight back with consistent heat.
If you use a thin pan, the beef will actually suck the heat out of the metal, and you’ll lose that window for a perfect sear.
Next,, you need a sturdy metal spatula. This is not the time for your flexible fish spatula or a plastic turner. You need something rigid that you can put your weight behind. If your spatula has a offset handle, that’s even better it allows you to get a flush, even smash across the entire surface of the meat.
Some people use a dedicated burger press, which is great, but a heavy spatula works just as well if you use your other hand to press down on the head of the spatula.
Finally, have a small mixing bowl and a whisk ready for the sauce. The "Big Smash" sauce is the glue that holds this whole experience together. If you're looking for other ways to use your ground beef, you might enjoy my Inside Outside Burger recipe which uses a similar flavor profile but in a stuffed patty format.
step-by-step Guide to Making Smashburger Quesadillas

- Divide the beef. Form the 1 lb of ground beef into four equal 4 ounce balls. Note: Handle them gently so the meat stays airy; tight balls will be harder to smash thin.
- Whisk the sauce. In a small bowl, combine the mayonnaise, yellow mustard, sweet pickle relish, and smoked paprika. Stir until the color is uniform and the relish is well distributed.
- Heat the pan. Set your cast iron skillet over medium high heat. Wait about 3 to 5 minutes until you see light wisps of smoke rising from the surface.
- The initial smash. Place one beef ball in the center of the dry pan. Immediately place a tortilla on top. Press down firmly with your metal spatula until the meat is smashed into a paper thin layer that covers most of the tortilla's footprint.
- Develop the crust. Cook undisturbed for 2-3 minutes. You'll know it's ready when the edges of the beef sticking out from the tortilla are deep brown and starting to look crispy.
- The flip. Slide your spatula under the beef (it should release easily if the crust has formed) and flip the entire thing over. The tortilla is now on the bottom, and the cooked beef is facing up.
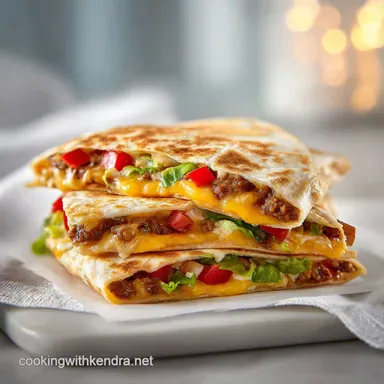
- Layer the fillings. Quickly sprinkle 1/2 cup of shredded cheddar over the hot beef, then add a handful of the thinly sliced onions and 3 pickle chips. Note: The heat from the beef will start melting the cheese from the bottom up.
- Fold and toast. Using your spatula, fold the tortilla in half over the fillings to create a semi circle. Cook for 1-2 minutes per side until the tortilla is golden, crackling, and the cheese is oozing out.
- Repeat and serve. Move the finished quesadilla to a cutting board. Repeat the process with the remaining ingredients.
- Slice and dip. Cut each quesadilla into three wedges and serve hot with a generous side of the "Big Smash" sauce.
It's important to keep the pan "dry" for the first step. You don't need oil because the 80/20 beef has plenty of fat that will render out almost instantly. If you add oil, the meat might slide around instead of gripping the pan, which prevents that beautiful crust from forming.
If you find the meat is sticking too much to your spatula during the smash, you can place a small piece of parchment paper between the spatula and the tortilla, though the tortilla usually provides enough of a barrier.
Watching the cheese melt into the nooks and crannies of the smashed beef is one of the most satisfying parts of this ground beef quesadilla recipe. You want to see those little "cheese skirts" forming where the cheddar hits the pan. Those crispy bits of fried cheese are pure flavor gold.
Professional Solutions for Common Cooking Obstacles
Why Your Meat Stays Gray and Doesn't Sear
If your beef looks boiled or gray rather than brown and crispy, your pan wasn't hot enough or you overcrowded it. The beef releases moisture as it cooks; if the pan can't evaporate that moisture instantly, the meat steams in its own juices.
To fix this, ensure the pan is smoking hot before starting and only cook one quesadilla at a time. Also, make sure your beef is patted dry with a paper towel if it looks particularly wet.
Why the Tortilla Gets Soggy and Limp
Sogginess is usually caused by the onions or the pickles releasing too much water. The fix is in the layering. By putting the cheese directly on the beef, you create a waterproof barrier. Also, make sure those onions are truly paper thin. If they are too thick, they won't cook fast enough and will release water into the bread. If you're struggling with texture, check out my tips in the mini kitchen magic recipe for getting that perfect crunch every time.
| Problem | Root Cause | Solution |
|---|---|---|
| Meat falling out | Smash wasn't thin enough | Press harder; the beef should be almost translucent at the edges. |
| Tortilla burning | Heat is too high after the flip | Turn the burner down to medium once you flip to the tortilla side. |
| Cheese not melting | Shreds are too thick | Use a fine grater or let the quesadilla sit for 60 seconds before slicing. |
Common Mistakes Checklist:
- ✓ Never use extra lean beef; you need that 20% fat for the sear and flavor.
- ✓ Don't skip the "smoking hot" pan stage; a warm pan is the enemy of a smash burger.
- ✓ Avoid pre shredded cheese; the potato starch coating prevents that silky, gooey melt.
- ✓ Don't move the meat once you smash it; let it sit for the full 2 minutes to build the crust.
- ✓ Slice your onions with a mandoline if possible to get them thin enough to "melt" into the fat.
If you find that your tortillas are tearing when you flip them, it might be that they are a bit stale. You can microwave them for 10 seconds under a damp paper towel to make them more pliable before you start the smashing process. It makes a world of difference in how they handle the pressure.
Smart Ways to Customize Your Flavor Profile
One of the best things about this smashburger quesadillas recipe is how adaptable it is. While the classic "Big Smash" flavor is hard to beat, you can easily take this in a different direction depending on what's in your pantry.
If you want a bit of heat, try swapping the cheddar for Pepper Jack and adding some diced jalapeños during the layering step.
If you're looking for a leaner option, you can use ground turkey or chicken, but you'll need to add a teaspoon of oil to the pan first. Since poultry doesn't have the same fat content as 80/20 beef, it won't create that same lacy crust naturally. For a completely different vibe, you could even try a Tex Mex version. For that, I’d recommend looking at my Smoky Fajita Chicken Quesadillas for inspiration on spice blends.
| Original | Shortcut/Variation | Impact on Result |
|---|---|---|
| Homemade Sauce | store-bought Thousand Island | Slightly sweeter; less smoky but very convenient. |
| 80/20 Ground Beef | Ground Bison | Leaner and more "gamey"; needs a lower temp to stay juicy. |
| Flour Tortilla | Low Carb Tortilla | Stays crispy but has a slightly chewier texture. |
- If you want a "Western" burger
- Add bacon bits and use BBQ sauce instead of the Big Smash sauce.
- If you want it extra spicy
- Add 1 tsp of chipotle in adobo to the sauce and use pickled jalapeños.
- If you want a "California" style
- Add slices of fresh avocado right before serving (don't cook the avocado!).
When it comes to the onions, some people find raw white onions too strong. If that's you, try soaking the slices in ice water for 10 minutes before using them. This removes the harsh sulfur compounds, leaving you with a crisp, mild onion flavor that won't overpower the beef.
It’s a classic chef trick for salads that works perfectly here too.
Best Practices for Preserving Your Leftover Portions
Honestly, these are so good that leftovers are a rare occurrence in my house. But if you do find yourself with an extra one, don't just toss it. These hold up surprisingly well if you handle them correctly.
Storage: Keep any leftover quesadillas in an airtight container in the fridge for up to 3 days. I recommend placing a piece of paper towel between the quesadillas to soak up any residual moisture, which helps keep the tortillas from getting gummy.
Reheating: Avoid the microwave at all costs! It will turn your beautiful crispy tortilla into a rubbery mess. Instead, heat a dry skillet over medium low heat and place the quesadilla in for 2-3 minutes per side.
This will re crisp the exterior and melt the cheese without overcooking the beef. If you have an air fryer, 3-4 minutes at 350°F (180°C) is also a fantastic way to bring back that "just cooked" texture.
Zero Waste Tip: If you have leftover "Big Smash" sauce, don't throw it away! It makes an incredible dressing for a wedge salad or a dip for roasted potatoes. The onions and pickles can be stored together in a small jar to use on sandwiches later in the week.
If you have leftover beef but no tortillas, you can just make mini smash patties and serve them over a salad for a "burger bowl" lunch.
Freezing: You can freeze these, though the texture of the pickles and onions will change slightly. Wrap them individually in plastic wrap and then foil. They will stay good for up to 2 months. To eat, thaw them in the fridge overnight and reheat in a skillet or air fryer as mentioned above.
Creative Pairings to Complete Your Family Dinner
While these easy smashburger quesadillas are a meal on their own, the right side dish can turn them into a full blown feast. Since the quesadilla is quite rich and savory, I usually lean toward something bright and acidic or something salty and crunchy.
A simple slaw with a vinegar based dressing is my go to. The crunch of the cabbage and the tang of the vinegar help refresh your palate between bites of the cheesy beef. Alternatively, you can't go wrong with classic fries or tater tots.
If you want to feel a bit better about the meal, a big green salad with a lemon vinaigrette is a perfect counterpoint.
There's a common misconception that you need to cook the onions before adding them to the quesadilla. People think they won't get soft enough in the short cook time. The truth is, because we slice them so thin, they actually "sweat" in the beef fat and steam under the cheese, resulting in a perfect tender crisp texture.
Another myth is that you need a lot of oil to get a crispy tortilla. In reality, the dry heat of the pan and the small amount of beef fat are all you need for that golden brown finish. Adding extra oil often just leads to a greasy, heavy result.
Finally, remember that the "Big Smash" sauce is best served cold. The contrast between the hot, melty quesadilla and the chilled, tangy sauce is what makes each bite pop. I like to put the sauce in a small ramekin on the side of the plate so everyone can dip to their heart's content.
It's a fun, interactive way to eat that kids and adults both seem to love. Enjoy the sizzle, embrace the smash, and get ready for the best quesadilla you've ever had in your own kitchen.

Very High in Sodium
1740 mg 1740 mg of sodium per serving (76% 76% of daily value)
The American Heart Association recommends limiting sodium intake to no more than 2,300mg per day, with an ideal limit of 1,500mg for most adults.
Tips to Reduce Sodium
-
Choose Lower Sodium Cheese-15%
Select a reduced sodium sharp cheddar cheese. This is a significant source of sodium, and switching can make a big difference.
-
Halve the Added Salt-12%
Reduce the Kosher salt by half. You can still achieve good flavor with less salt.
-
Opt for Low-Sodium Pickles & Relish-10%
Replace regular dill pickle chips and sweet pickle relish with low-sodium or no-salt added versions. These can be surprisingly high in sodium.
-
Enhance Flavor with Herbs & Spices
While not reducing sodium, consider adding fresh herbs like cilantro or other spices like cumin to boost flavor without adding salt.
-
Adjust Mayonnaise and Mustard-5%
While not the primary offenders, you can slightly reduce the amount of mayonnaise and use a lower sodium yellow mustard to further cut down on sodium.
Recipe FAQs
How to ensure the beef gets a crispy mahogany crust?
Heat your cast iron skillet over medium high heat until it is smoking hot before adding the beef. Once you smash the beef ball with the tortilla on top, do not move it for at least 2-3 minutes to allow that signature crust to form.
Is it true I should pack the ground beef into tight, firm balls before smashing?
No, this is a common misconception. You must keep the 4-ounce beef portions loose and handle them gently so the fats render easily when smashed into a thin, even layer.
How to keep the tortillas from getting soggy?
Layer the shredded cheese directly over the hot beef immediately after flipping. The cheese acts as a vital moisture barrier, preventing the meat juices from soaking into the tortilla while everything melts together.
How to manage the cooking timing for the best texture?
Sear the beef topped tortilla for 2-3 minutes, then flip and cook the folded quesadilla for another 1-2 minutes per side. This specific timing ensures the beef develops a deep crust while the tortilla turns golden and crispy.
Is it necessary to grease the skillet before adding the beef?
No, the skillet should be dry. Since the recipe uses 80/20 ground beef, there is enough fat in the meat to prevent sticking and facilitate a proper sear on the cast iron surface.
How to assemble the 'Big Smash' sauce for maximum flavor?
Whisk the mayonnaise, yellow mustard, sweet pickle relish, and smoked paprika together until the mixture is completely smooth. Ensure the relish is evenly distributed so every bite of the sauce has the same balance of tang and smoke.
How to store and reheat leftover quesadillas?
Cool any remaining quesadillas completely before storing them in an airtight container in the refrigerator. When ready to eat, reheat them in a dry skillet over medium heat to help restore the crispiness of the tortilla.
Smashburger Quesadillas Recipe
Ingredients:
Instructions:
Nutrition Facts:
| Calories | 946 kcal |
|---|---|
| Protein | 39 g |
| Fat | 61 g |
| Carbs | 42 g |
| Fiber | 2.5 g |
| Sugar | 5 g |
| Sodium | 1740 mg |
