Buckeyes Recipe: No-Bake Peanut Butter Balls
- Time: Active 30 minutes, Passive 15 minutes, Total 45 minutes
- Flavor/Texture Hook: Silky peanut butter fudge with a shattering chocolate shell
- Perfect for: Holiday platters, Southern themed potlucks, and beginner friendly gift giving
- Authentic Tips for a Creamy Southern Buckeyes Recipe
- Understanding the Success Factors
- Recipe Specs for Success
- Choosing Your Essential Ingredients
- Tools for Professional Results
- Mastering the Art of Shaping
- Solving Common Texture Mishaps
- Creative Ways to Customize Your Batch
- Proper Storage and Snap Maintenance
- Pairing Your Confections Perfectly
- Buckeyes Recipe FAQs
- 📝 Recipe Card
Authentic Tips for a Creamy Southern Buckeyes Recipe
You know that smell when you open a fresh jar of peanut butter and the aroma of roasted nuts just fills the whole kitchen? That's exactly where my head goes every time I start making this buckeyes recipe. It is pure Southern comfort in a single bite.
I remember the first time I tried to make these, I didn't sift my sugar and ended up with grainy little balls that were honestly embarrassing. But after years of trial and error in my own kitchen, I've figured out how to get that velvety, professional finish without any fancy equipment.
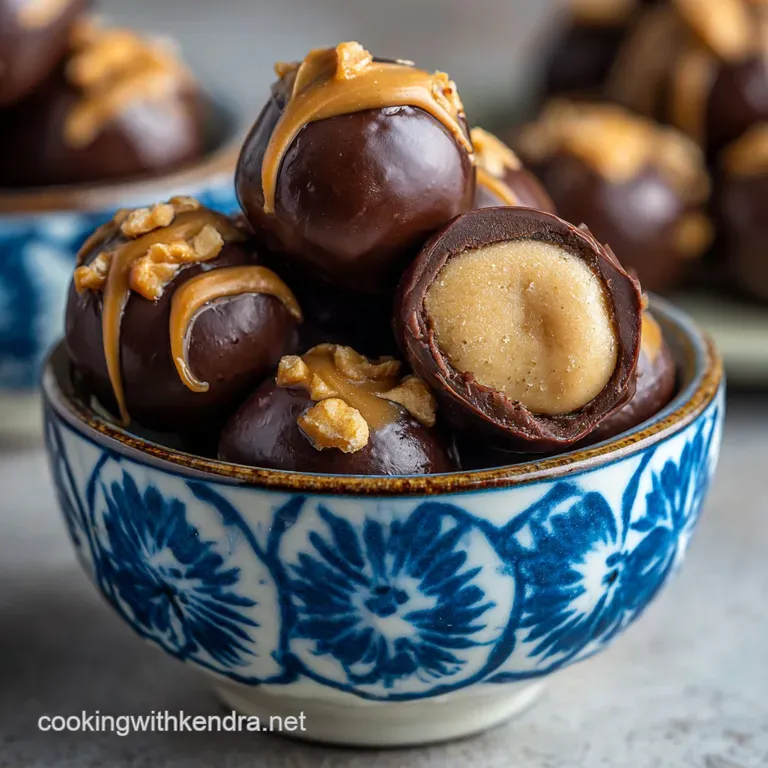
We've all seen those holiday platters where the buckeyes look a bit sad or oily. Trust me, we are not doing that today. This version is about finding that sweet spot between the salty richness of the peanut butter and the deep, slightly bitter snap of semi sweet chocolate.
It's the kind of treat that makes people stop talking the second they take a bite because they're too busy enjoying that incredible texture.
The best part about these is that you don't even have to turn on the oven. We're leaning into the magic of simple ingredients working together. If you're looking for a sweet treat to serve after a big family meal, maybe following a hearty Spaghetti and meatballs recipe, these are the absolute "cherry on top" for your evening. Let's get into the nitty gritty of why this actually works.
Understanding the Success Factors
Fat Saturation: The ratio of solid butter to creamy peanut butter creates a stable emulsion that holds its shape at room temperature. Sugar Suspension: Sifted powdered sugar dissolves into the fat phase rather than clumping, ensuring a smooth, non gritty mouthfeel.
| Method | Time | Texture Outcome | Best For |
|---|---|---|---|
| Double Boiler (Stovetop) | 8 minutes | Ultra glossy, consistent melt | Professional finish and long dipping sessions |
| Microwave (Small Bursts) | 3 minutes | Thick, matte finish | Quick batches when you're short on time |
| Low Temperature Oven | 12 minutes | Dense, very stable melt | Keeping chocolate warm for very large batches |
When we talk about melting chocolate, most folks jump straight to the microwave. But honestly, if you want that professional look, the stovetop method is your best friend. It provides a gentle, indirect heat that prevents the cocoa solids from seizing.
If you've ever had chocolate turn into a clumpy, dry mess, it's likely because it got a "hot spot" in the microwave.
Recipe Specs for Success
When you're aiming for that classic buckeyes recipe look, precision is your best friend. You want every single ball to look like it came out of a high end candy shop, not a chaotic kitchen experiment.
I usually use a small cookie scoop to keep everything uniform because, let's be real, my hands are never consistent on their own.
For a Velvety Base
The foundation of a good buckeye is the peanut butter center. You want it firm enough to hold a toothpick but soft enough to feel like fudge. I’ve found that using 1.5 cups (380g) of creamy peanut butter provides the perfect structural integrity when mixed with 0.5 cup (115g) of softened butter.
For a Shattering Shell
The chocolate shell needs a little help to get that perfect "snap." By adding just 2 tsp (10g) of coconut oil to your 2 cups (340g) of semi sweet chocolate chips, you lower the melting point and add a beautiful sheen. It makes the chocolate behave much better when you're dipping forty individual pieces.
| Component | Science Role | Pro Secret |
|---|---|---|
| Powdered Sugar | Structural Matrix | Always sift it twice to prevent microscopic "crunches" in the fudge. |
| Coconut Oil | Viscosity Modifier | This thins the chocolate so it coats the ball thinly and evenly. |
| Pure Vanilla | Flavor Enhancer | Use high-quality extract; it cuts through the heavy fat of the peanut butter. |
Choosing the right peanut butter is actually a big deal here. Don't go for the "natural" kind where the oil separates at the top. You need the stabilized, creamy stuff (like Jif or Peter Pan) to ensure the dough doesn't turn into an oily puddle on your counter.
Choosing Your Essential Ingredients
- 1.5 cups (380g) Creamy Peanut Butter: Provides the flavor and fat base. Why this? Stabilized brands prevent oil separation for a smoother dough.
- 0.5 cup (115g) Unsalted Butter: Adds richness and structure. Why this? Unsalted allows you to control the exact saltiness of the candy.
- 1 tsp (5ml) Pure Vanilla Extract: Adds aromatic depth. Why this? Real vanilla pairs better with chocolate than imitation flavors.
- 0.25 tsp (1.5g) Fine Sea Salt: Balances the sugar. Why this? Fine grains dissolve instantly into the butter mixture.
- 3.5 cups (420g) Powdered Sugar: The primary thickener. Why this? It provides sweetness without a grainy texture.
- 2 cups (340g) Semi Sweet Chocolate Chips: The dipping medium. Why this? 60% cacao provides a perfect contrast to the sweet center.
- 2 tsp (10g) Coconut Oil: Improves chocolate flow. Why this? It creates a thinner, more professional looking coating.
If you're out of semi sweet chips, you can use dark chocolate bars chopped into small pieces. It will give you a slightly more sophisticated, less sweet result. For the peanut butter, if you only have crunchy on hand, just know the texture will be quite different more like a "crunchy" buckeyes recipe, which some people actually prefer!
Tools for Professional Results
You don't need a professional candy kitchen, but a few specific items make this a whole lot easier. First off, a stand mixer is a total lifesaver. Trying to beat 3.5 cups of powdered sugar into peanut butter by hand is a workout I'm not looking for. If you don't have one, a sturdy hand mixer will do the trick.
You'll also need a couple of baking sheets lined with parchment paper. Don't skip the parchment! If you put these directly on the metal, they will stick, and you'll end up tearing the bottoms off when you try to move them.
A few toothpicks are also essential for the dipping process they're the "secret weapon" that gives these candies their signature look.
Chef Tip: Freeze your peanut butter balls for at least 20 minutes before dipping. If they're room temperature, they'll melt into the warm chocolate and lose their shape, or worse, fall off the toothpick entirely!
Mastering the Art of Shaping
- Cream the fats. Combine 1.5 cups creamy peanut butter and 0.5 cup softened butter in your mixer. Note: Beat until the mixture looks pale and fluffy.
- Add aromatics. Mix in 1 tsp vanilla extract and 0.25 tsp fine sea salt. Note: This ensures the flavor is evenly distributed before the sugar goes in.
- Incorporate sugar. Gradually add 3.5 cups sifted powdered sugar on low speed. Stop when the dough no longer sticks to your fingers.
- Shape the centers. Roll the dough into 1 inch balls (about 40 servings). Note: They should be roughly the size of a large marble.
- Chill thoroughly. Place the balls on parchment and freeze for 15 minutes until firm to the touch.
- Prepare the coating. Melt 2 cups chocolate chips and 2 tsp coconut oil using a double boiler. Note: Keep the water at a bare simmer; steam is the enemy of chocolate.
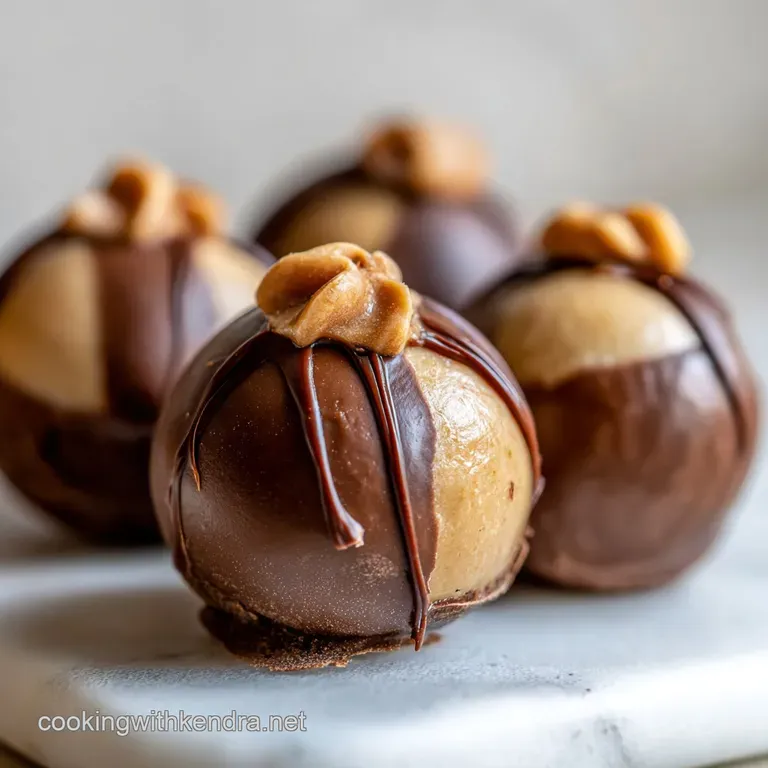
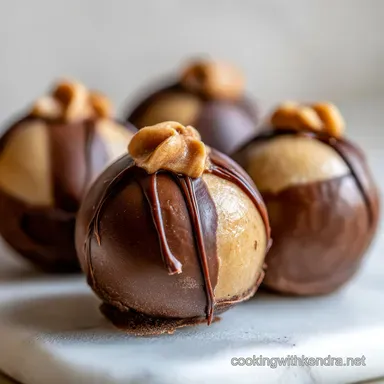
- Dip with care. Insert a toothpick into a ball and dip it into the chocolate, leaving a small circle of peanut butter visible at the top. Look for a smooth, dripping finish.
- Drain the excess. Gently tap the toothpick on the side of the bowl to let extra chocolate fall away. Note: This prevents a "foot" of chocolate from forming at the base.
- Reset the balls. Place back on parchment and carefully remove the toothpick. Note: You can smooth over the hole with your finger or leave it for the traditional look.
- Final set. Refrigerate for 15 minutes until the chocolate is matte and hard.
The smell of the chocolate as it melts is one of my favorite parts of this process. It should smell rich and deep, not burnt. If you start to smell anything "toasty," turn your heat down immediately. Once the balls are dipped, the kitchen takes on this incredible "candy shop" aroma that is honestly hard to resist.
Solving Common Texture Mishaps
Even with a simple recipe, things can go sideways. The most common issue I see is the dough being either too dry or too sticky. This usually happens because of humidity or the specific brand of peanut butter used. Don't panic! It’s an easy fix.
To Fix Dry Centers
If your dough is crumbling when you try to roll it, you likely have a bit too much sugar or your peanut butter was on the drier side. Add one tablespoon of melted butter at a time until the dough holds together. It should feel like soft play dough, not sand.
To Prevent Chocolate Sliding
If your chocolate is sliding off the peanut butter balls, they are likely too cold (causing condensation) or the chocolate is too hot. Let the chocolate cool for 5 minutes after melting before you start dipping.
Also, make sure you pat any moisture off the frozen balls with a paper towel if you see "sweat" on them.
| Problem | Root Cause | Solution |
|---|---|---|
| Grainy Texture | Sugar not sifted | Melt the center dough slightly and stir vigorously, then re chill. |
| Sticky Dough | Too much moisture/fat | Add 1/4 cup more powdered sugar until the tackiness disappears. |
| Chocolate Seizing | Water contact | Add a teaspoon of vegetable oil and stir. If it doesn't smooth out, start over. |
Common Mistakes Checklist
- ✓ Sift the powdered sugar twice to ensure a velvety mouthfeel.
- ✓ Use room temperature butter so it creams perfectly with the peanut butter.
- ✓ Never use a wet spoon or bowl when melting chocolate (one drop of water ruins it!).
- ✓ Chill the balls on a flat surface to prevent them from developing "flat sides."
- ✓ Use a deep, narrow bowl for dipping to make it easier to submerge the balls.
Creative Ways to Customize Your Batch
If you want to branch out from the traditional version, there are so many fun ways to tweak this. For example, if you want a bit of a crunch, try a buckeyes recipe with rice krispies. Just fold in about 1 cup of the cereal after you’ve mixed in the sugar.
It adds a wonderful light texture that reminds me of a certain famous chocolate peanut butter bar.
If you’re hosting a holiday party, these are great because you can make them ahead of time. I love serving them alongside a festive Hoppin John Recipe during New Year celebrations. The salty sweet combo is a crowd pleaser every single time.
For a Salty Twist
Try topping the "eye" of the buckeye with a single grain of flaky sea salt (like Maldon) before the chocolate sets. It draws out the roasted peanut flavor and makes them taste incredibly high end.
For the Holidays
You can swap the semi sweet chocolate for white chocolate and add a drop of peppermint extract to the peanut butter center. It's a completely different flavor profile but equally addictive. You can even roll the finished balls in crushed candy canes for a festive look.
Proper Storage and Snap Maintenance
Storing these correctly is the difference between a "shattering" chocolate shell and a sticky mess. You should always keep them in the refrigerator in an airtight container. If they sit out on a warm counter for too long, the butter in the center will soften and they can lose their structural integrity.
- Fridge: Store for up to 2 weeks. Use parchment paper between layers to prevent sticking.
- Freezer: These freeze beautifully for up to 3 months. In fact, many people (myself included!) prefer eating them straight from the freezer for an extra firm snap.
- Zero Waste Tip: If you have leftover melted chocolate, drizzle it over some pretzels or popcorn. If you have extra peanut butter dough, roll it into small bits and stir it into vanilla ice cream for a "homemade buckeye" sundae.
Pairing Your Confections Perfectly
These are rich, heavy little treats, so you want something to cut through that fat. A cold glass of milk is the classic choice, but if you're serving these at a dinner party, a strong cup of black coffee or an espresso is even better.
The bitterness of the coffee perfectly complements the sweetness of the powdered sugar.
If you're making these as part of a larger dessert spread, they go wonderfully with something lighter. I often serve them alongside some fresh berries or even a simple platter of Ultimate Buttery Rolls if it's a casual family brunch. The key is balance since these are so decadent, you don't need much else to make the meal feel complete.
There you have it! This buckeyes recipe is a staple for a reason. It's nostalgic, delicious, and honestly quite fun to make once you get the hang of the dipping. Just remember to take your time with the chilling steps; that's the real secret to getting that professional look. Happy candy making!

Buckeyes Recipe FAQs
What are the ingredients for buckeyes?
You'll need peanut butter, butter, powdered sugar, semi sweet chocolate chips, and coconut oil. Vanilla extract and fine sea salt are also crucial for flavor balance and enhancement. These ingredients create the signature peanut butter center and the rich chocolate coating.
What is the best chocolate to use for buckeyes?
Semi sweet chocolate chips are ideal for buckeyes. They offer a balanced flavor that complements the sweet peanut butter center without being too bitter or too sweet. Adding a little coconut oil to the chocolate improves its flow and creates a smoother, more professional looking shell.
What are common buckeye recipe mistakes?
Grainy texture from unsifted powdered sugar and chocolate seizing from moisture are common. Over mixing the peanut butter dough can also lead to a greasy center. Ensuring your chocolate is free from water contact is critical for a smooth coating.
What do you do with buckeyes?
You eat them, typically as a sweet treat or dessert. Buckeyes are enjoyed for their unique combination of a creamy peanut butter center and a firm chocolate shell.
They are perfect for holiday platters, gifting, or simply satisfying a sweet craving, and pair wonderfully with a strong coffee or glass of milk.
How do I get a smooth, professional looking chocolate coating on my buckeyes?
Melt your chocolate gently using a double boiler over simmering water. Stir constantly and avoid any water contact, which can cause the chocolate to seize. Adding 2 tsp of coconut oil to 2 cups of chocolate chips thins it for a smooth, even coating that hardens nicely.
Why are my buckeye centers crumbly?
This usually means the dough is too dry, often from too much powdered sugar or dry peanut butter. Add butter or a tablespoon of peanut butter a little at a time until the dough is pliable and rolls easily. If you enjoyed mastering the texture control here, apply the same fat ratio logic to our Peanut Butter Cookie Recipe: The Classic Soft Chewy Crisscross.
Can I use crunchy peanut butter for buckeyes?
Yes, but it will change the texture of the center. Using crunchy peanut butter will result in a center with noticeable peanut pieces, making it more like a "crunchy" buckeye recipe. Creamy peanut butter is traditional for the smoothest, fudgiest interior, similar to the base of our JetPuffed Fudge: No-Fail, Classic Creamy Recipe.
Buckeyes Recipe
Ingredients:
Instructions:
Nutrition Facts:
| Calories | 160 kcal |
|---|---|
| Protein | 2.5 g |
| Fat | 9.9 g |
| Carbs | 17.5 g |
| Fiber | 1.0 g |
| Sugar | 15.8 g |
| Sodium | 62 mg |
