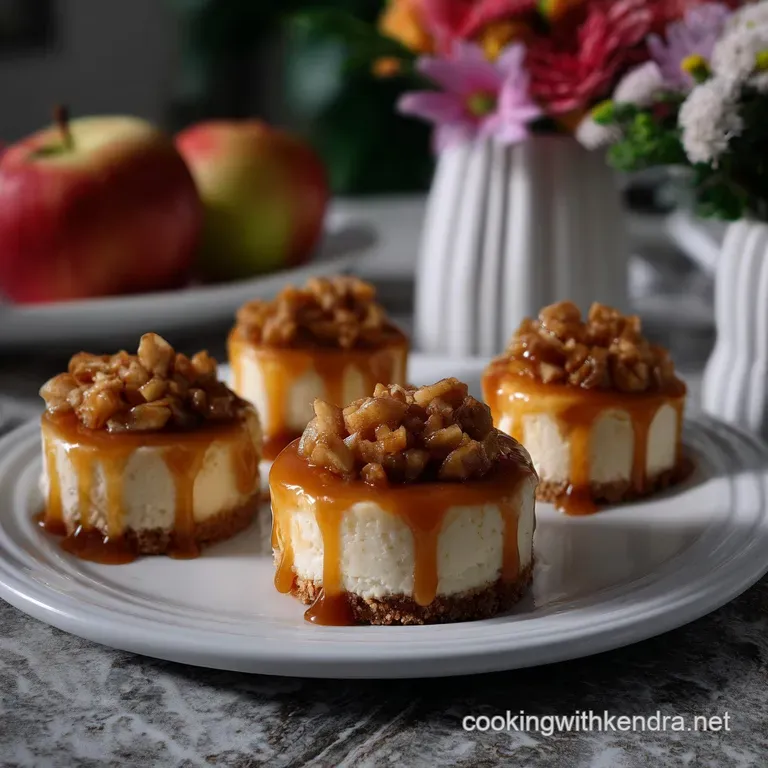
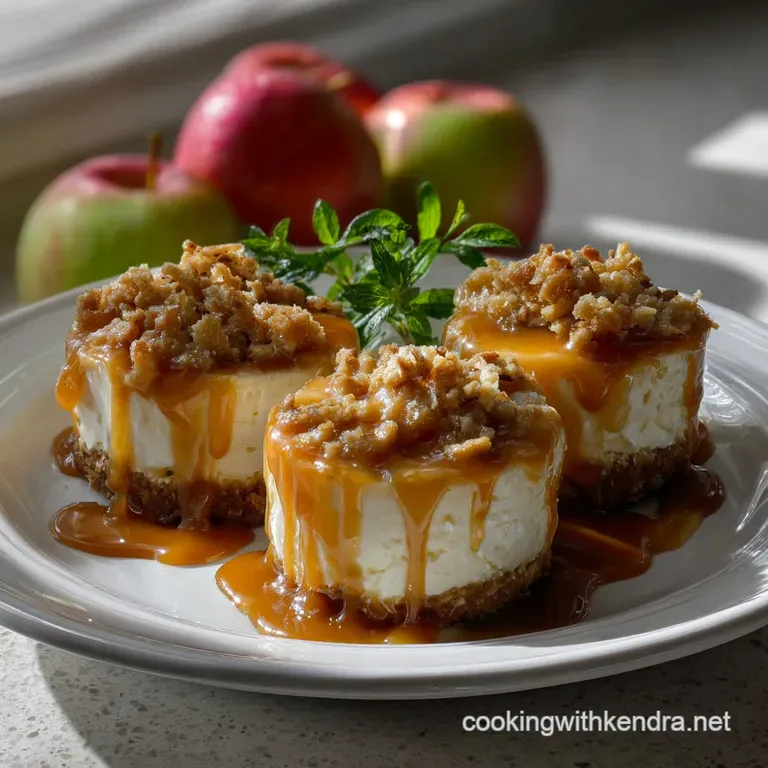
Carmel Apple Mini Cheesecakes
- Time: Active 25 minutes, Passive 20 minutes, Total 45 minutes
- Flavor/Texture Hook: Velvety cheesecake meets a tart apple crunch
- Perfect for: Fall gatherings, dinner parties, or busy weeknight treats
- Science Behind the Perfect Bite
- Component Analysis for Better Results
- Elements for Velvety Mini Cheesecakes
- Minimal Gear for Better Baking
- Create Your Carmel Apple Mini Cheesecakes
- Solving Common Baking Hurdles
- Personalizing Your Sweet Treats
- Freshness and Storage Methods
- Perfect Pairings for Dessert
- Helpful Answers for Success
- Recipe FAQs
- 📝 Recipe Card
Imagine the kitchen filling with the scent of warm cinnamon and melting butter as the leaves turn gold outside. There is something truly special about the way a tart Granny Smith apple softens in a pan, its juices mingling with brown sugar to create a topping that feels like a warm hug.
I remember making these for my first family Thanksgiving; the house smelled like a dream, and honestly, the individual servings saved me from the stress of slicing a giant cake that might crack.
We’re moving away from the heavy, intimidating cheesecake process here. This recipe is all about simple joy and reliable results. You get that satisfying shatter of the graham cracker crust followed by the creamy, cooling filling, all finished with the punchy brightness of sautéed fruit.
It’s the kind of dessert that makes people lean back and smile.
Right then, let's talk about why these work so well. We aren't just tossing things together; we're using a few smart tricks to ensure the centers stay smooth and the apples keep their bite.
Trust me, once you see how quickly these come together using just a standard muffin tin, you'll never go back to the high maintenance full sized versions for casual hosting.
Science Behind the Perfect Bite
Understanding the "why" behind your baking makes you a better cook. It isn't just magic; it's a series of predictable reactions that happen in your oven.
- Protein Denaturation: As the eggs and Philadelphia Cream Cheese heat up, their proteins uncoil and then link back together, creating a stable mesh that turns liquid batter into a firm, silky solid.
- Starch Gelatinization: The small amount of all purpose flour absorbs moisture and swells during baking, acting as a structural insurance policy to prevent the cheesecake from weeping or collapsing.
- Pectin Breakdown: Sautéing the Granny Smith apples over medium heat softens the pectin in the cell walls just enough to make them tender while the acidity keeps them from turning into mush.
- Emulsification: Mixing the room temperature sour cream and cream cheese slowly ensures the fat and water molecules stay bonded, resulting in a velvety texture rather than a grainy one.
Component Analysis for Better Results
| Ingredient | Science Role | Pro Secret |
|---|---|---|
| Full fat Cream Cheese | Provides the structural fat and protein base for the filling. | Always use the block style, never the whipped tub version for baking. |
| Large Eggs | Acts as the primary binding agent to set the cheesecake. | Whisk them in last to avoid incorporating too much air and causing cracks. |
| Granny Smith Apples | Provides acidic contrast to the heavy, sweet cheesecake base. | Dice them small so they sit perfectly on the mini surface. |
Elements for Velvety Mini Cheesecakes
Choosing the right ingredients is the first step toward success. Don't worry if you're missing something; there's usually a way to adapt.
- 150g Graham cracker crumbs: These form the crunchy base. Why this? Provides a sturdy, honey sweetened foundation that holds its shape.
- Substitute: Biscoff cookie crumbs for a deeper, spiced caramel flavor.
- 60g Unsalted butter, melted: Binds the crumbs together. Why this? Unsalted allows you to control the seasoning precisely.
- Substitute: Salted butter; just skip any extra salt in the crust.
- 25g Granulated sugar: Sweetens the crust.
- Substitute: Light brown sugar for a more molasses rich crunch.
- 1g Ground cinnamon: Adds warmth to the base.
- 450g Full fat cream cheese, room temperature: The heart of the dish. Why this? High fat content ensures a rich, creamy mouthfeel.
- Substitute: Neufchâtel cheese for a slightly lighter, lower fat option.
- 100g Granulated sugar: For a clean sweetness in the filling.
- 120g Sour cream, room temperature: Adds tang and softens the texture.
- Substitute: Full fat Greek yogurt for a similar acidic profile.
- 5ml Pure vanilla extract: Rounds out the flavors.
- 2 Large eggs, room temperature: Sets the structure.
- 10g All purpose flour: Prevents cracking and adds stability.
- 250g Granny Smith apples, finely diced: The tart topping.
- 15g Unsalted butter: For sautéing the apples.
- 15g Brown sugar: Creates a quick caramel sauce for the topping.
- 2g Ground cinnamon: Essential for that classic fall flavor.
- 60ml Salted caramel sauce: For the final drizzle.
Minimal Gear for Better Baking
You don't need a professional kitchen to make these. A few standard tools will get the job done beautifully.
I use a standard USA Pan 12 cup muffin tin because it distributes heat evenly. You’ll also want paper liners to make removal a breeze. A KitchenAid hand mixer is better than a whisk here because it incorporates the cream cheese and sugar without wearing out your arm, but don't overdo it.
A small sauté pan like a Lodge cast iron skillet is perfect for the apples because it holds heat so well, giving the fruit a lovely golden edge.
If you’re worried about the apples losing their color while you prep the batter, keep them bright by checking out this Applesolutely Fresh How recipe for simple preservation tips.
Create Your Carmel Apple Mini Cheesecakes
Let's get into the heart of the kitchen. This process is divided into simple phases to keep things organized.
Phase 1: To Set the Foundation
- Preheat and prep. Set your oven to 165°C and line a muffin tin with 12 paper liners. Note: Using liners is essential to prevent the delicate cheesecakes from sticking.
- Mix the crust. Combine 150g Graham cracker crumbs, 60g melted butter, 25g granulated sugar, and 1g cinnamon in a bowl. Mix until it looks like wet sand.
- Press the base. Spoon about one tablespoon of the mixture into each liner. Press down firmly with a small glass to create a compact, even layer.
- Par bake the crust. Bake for 5 minutes. Remove when it smells toasted. Let it cool while you make the filling.
Phase 2: The Velvety Batter
- Cream the cheese. Beat 450g room temperature cream cheese and 100g granulated sugar on medium speed. Beat until completely smooth without any lumps.
- Add the liquids. Mix in 120g sour cream, 5ml vanilla, and 10g flour. Note: Adding flour now helps it incorporate without overworking the eggs later.
- Incorporate the eggs. Add 2 eggs one at a time on low speed. Stop as soon as the yellow streaks disappear. Overbeating at this stage causes the cheesecakes to puff and then crack.
- Fill the tins. Divide the batter evenly among the 12 cups, filling them about three quarters full.
Phase 3: The Slow Bake
- Bake the cakes. Place the tin in the oven for 18-20 minutes. Bake until the edges are set but the centers still jiggle slightly.
- Cool slowly. Turn off the oven and crack the door for 10 minutes before removing. Note: This gradual cooling prevents the surface from sinking too deeply. Chill in the fridge for at least 2 hours.
Phase 4: The Sautéed Apple Finish
- Cook the apples. In a small pan, melt 15g butter. Add 250g diced apples, 15g brown sugar, and 2g cinnamon. Sauté until the apples are tender and glazed.
- Garnish and serve. Top each chilled cheesecake with a spoonful of warm apples and a generous 5ml drizzle of salted caramel sauce.
Solving Common Baking Hurdles
Even the best cooks run into trouble sometimes. Here is how to keep your dessert on track.
Filling Texture Issues
If your filling looks lumpy, it’s almost always because the cream cheese was too cold. Cold fat won't bond with sugar, leaving tiny white beads in your batter. If this happens, you can try passing the batter through a fine mesh sieve, but the real fix is patience let that cheese sit on the counter for at least two hours.
Preventing the Sunken Center
Mini cheesecakes naturally dip a little in the middle, creating a perfect well for the apples. However, a deep crater usually means the batter was whipped too fast, trapping air that expanded and then collapsed. Keep your mixer on low speed once the eggs go in.
| Problem | Cause | Fix | Pro Tip |
|---|---|---|---|
| Cracked Surface | Overbaking or sudden cooling | Check at 18 mins; cool in oven | Use the apple topping to hide any minor cracks. |
| Soggy Crust | Butter leaked or not pressed enough | Press harder; use a flat bottomed cup | Pre baking the crust is non negotiable for crunch. |
| Runny Apples | Not enough sugar or high heat | Sauté longer until syrup thickens | A tiny pinch of cornstarch fixes a watery sauce. |
Personalizing Your Sweet Treats
Baking is an art, and you can definitely make these your own. If you're looking for something with a different texture, you might enjoy my Applesauce Cake Moist recipe, which offers those same fall spices in a more traditional cake format.
Crust Foundation Options
- Ginger Snaps: Use ginger snap crumbs instead of graham crackers for a spicy kick that cuts through the creaminess.
- Nutty Base: Add 30g of finely chopped pecans to the graham cracker mix for extra texture.
For an "Apple Crisp" Twist
Instead of just sautéed apples, you can make a quick crumble by mixing oats, flour, and butter, then toasting it in a pan. Sprinkle this over the caramel for a "crisp" texture that contrasts beautifully with the velvety cheese.
For a Nutty Texture
Try adding a tablespoon of peanut butter or almond butter to the caramel sauce before drizzling. The saltiness of the nuts paired with the tart apples is a classic combination that feels very home style.
Freshness and Storage Methods
Storing these properly ensures they stay as fresh as the day you made them.
Refrigeration Standards: These cheesecakes must stay in the fridge. They will keep well in an airtight container for up to 4 days. I recommend keeping the apple topping in a separate container and adding it just before serving to prevent the crust from softening too much.
Freezing for Later: You can freeze the baked and cooled cheesecakes (without the apple topping) for up to 2 months. Wrap them individually in plastic wrap and then place them in a freezer bag. To thaw, just leave them in the fridge overnight. The texture remains remarkably silky even after freezing.
Zero Waste Tip: If you have leftover apple topping, don't throw it out! It's incredible swirled into morning oatmeal or served over a scoop of vanilla bean ice cream. If you have extra graham cracker crumbs, use them as a topping for yogurt.
Perfect Pairings for Dessert
To make this a full experience, think about what you’re serving alongside these mini treats. A hot cup of Earl Grey tea or a dark roast coffee provides a bitter balance to the sugary caramel. If you're hosting a larger party, these individual cakes look beautiful on a wooden platter next to a My Apple Pie recipe for a "dual apple" dessert station.
For a restaurant style plating, add a small sprig of fresh mint or a very light dusting of powdered sugar over the apples. The green of the mint against the amber caramel is stunning.
Helpful Answers for Success
Using Frozen Apples
You can use frozen apples if that's what you have, but be aware they release much more water than fresh ones. Thaw them completely and pat them dry with a paper towel before sautéing. You might need to simmer the topping a few minutes longer to reduce the liquid into a thick syrup.
The Water Bath Question
Most people ask if a water bath is necessary for carmel apple mini cheesecakes. The short answer is no. Because the portions are small, they bake through very quickly before the outside can overcook or crack. This is the ultimate shortcut for a busy cook who still wants professional results.
High Altitude Adjustments
If you are baking at a high altitude, increase your oven temperature by about 5 degrees and reduce the sugar by a tablespoon. This helps the structure set faster before the internal air pressure causes the cakes to rise too quickly and collapse.
Chef's Note: For the most intense flavor, grate a tiny bit of fresh nutmeg into the apple mixture while it's in the pan. It adds a depth that pre ground spices just can't match.
Fast vs Classic Comparison
| Feature | Fast (This Recipe) | Classic (Full Cake) |
|---|---|---|
| Bake Time | 20 minutes | 60-90 minutes |
| Risk of Cracks | Very Low | High |
| Serving | No slicing needed | Requires precision |
Decision Shortcut
- If you want a crunchy top, add toasted pecans to the apples.
- If you want a sharper tang, use 150g sour cream and reduce the cream cheese by 30g.
- If you want a gluten-free version, swap the graham crackers for almond flour and butter.
Dispelling Baking Myths
- Myth: You must use room temperature ingredients only for the taste. Truth: It's actually about physics. Room temperature ingredients emulsify better, creating a smooth batter that doesn't trap excess air.
- Myth: Cheesecake is ready as soon as it doesn't wobble. Truth: If it doesn't wobble at all, it's overbaked and will likely be dry or cracked. You want that "Jell O" jiggle in the very center.
These carmel apple mini cheesecakes are more than just a sweet finish; they are a celebration of the season. Whether you're making them for a quiet Sunday or a loud holiday table, they bring a sense of warmth and soul to any meal.
I hope you find as much joy in the sizzle of those sautéing apples as I do every single year. Enjoy every bite!

Recipe FAQs
Is a water bath necessary for baking these mini cheesecakes?
No, a water bath is not required. Because these are individual, small portions, they bake quickly and distribute heat evenly enough that a water bath is unnecessary.
Can I substitute the Granny Smith apples with sweeter varieties?
No, it is best to stick with tart apples like Granny Smith. The tartness provides a necessary acidic contrast to the richness of the sweet cream cheese filling, creating the classic flavor profile.
What is the best way to ensure my cream cheese filling stays smooth and lump free?
Ensure all dairy components are truly room temperature. Cold cream cheese traps moisture and sugar, resulting in a grainy texture; letting them warm up allows them to emulsify properly, yielding a velvety result similar to the texture in our No Bake Pineapple Cream Dessert: Velvety & Sliceable Set Texture.
How far in advance can I prepare the cheesecake base before topping them?
You can prepare the cheesecakes up to two days ahead of serving. Store the baked, cooled, and un-topped cheesecakes in an airtight container in the refrigerator to maintain freshness.
My mini cheesecakes are sinking slightly in the middle; what caused this?
This slight sinking is actually desirable for holding the topping, but excessive dipping is usually due to overbeating the eggs. Mixing the eggs on high speed incorporates too much air, which expands during baking and then collapses sharply upon cooling.
Can I use a different crust instead of graham crackers?
Yes, you can definitely use alternative cookie crumbs. Substituting with ginger snap cookies works wonderfully as the added spice complements the caramel apples beautifully, much like the spice balance needed in How to Bake Apple Cinnamon French Toast Delight: A Cozy Family Favorite.
Do these mini cheesecakes freeze well for later consumption?
Yes, they freeze excellently, provided you skip the apple topping first. Wrap the cooled, plain cheesecakes tightly in plastic wrap and freeze for up to two months; thaw overnight in the refrigerator before topping.
Carmel Apple Mini Cheesecakes

Ingredients:
Instructions:
Nutrition Facts:
| Calories | 338 kcal |
|---|---|
| Protein | 4.6 g |
| Fat | 22.5 g |
| Carbs | 30.2 g |
| Fiber | 0.9 g |
| Sugar | 22.4 g |
| Sodium | 215 mg |
