The Ultimate Dinerstyle Buttermilk Pancakes Light Fluffy and Flawless
- Why These Fluffy Wonders Redefine Breakfast Excellence
- Unlocking the Secret to True Diner-Style Buttermilk Pancakes
- Assembling the Essential Arsenal for Superior Buttermilk Pancakes
- Decoding the Dry and Wet Components for Peak Performance
- The Definitive Method: Step-by-Step Journey to Golden Perfection
- Mastering the Batter: The Art of Gentle Mixing
- Troubleshooting and Pro Tips for Consistent Results
- Elevating Your Stack: Flavor Enhancements and Serving Suggestions
- Recipe FAQs
- 📝 Recipe Card
Why These Fluffy Wonders Redefine Breakfast Excellence
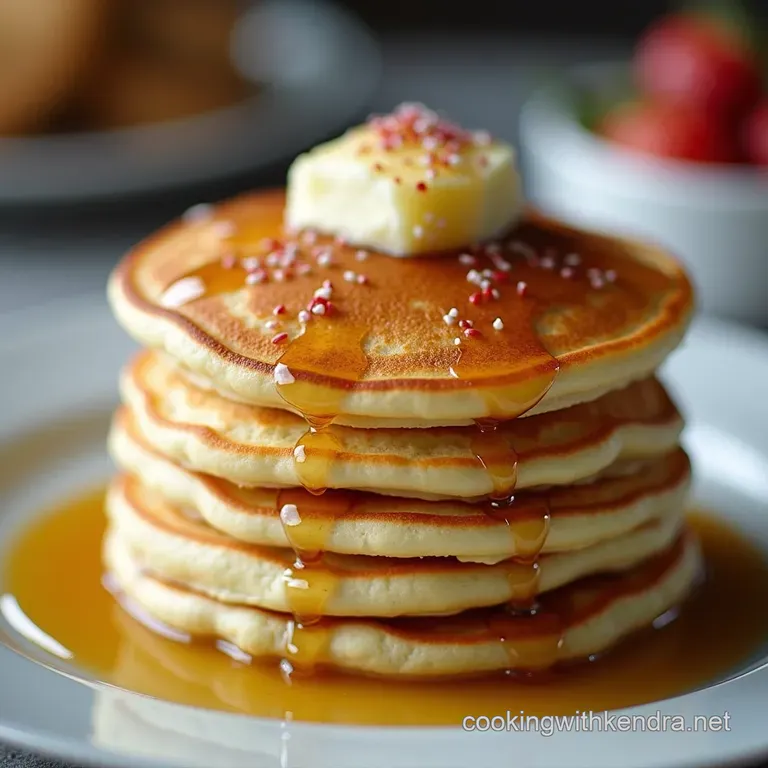
There is a specific, soul satisfying aroma that fills the kitchen when you begin preparing the ultimate weekend breakfast. We aren't talking about mediocre, sad, flat breakfast fare; we are chasing the golden standard.
The goal here is to move beyond thin, crepe like layers and create something substantial, airy, and undeniably delicious. These Buttermilk Pancakes are engineered for height and tenderness, delivering that quintessential diner experience right onto your plate.
They possess a slight, delicate tang that cuts through the sweetness of your toppings, making every bite complex and satisfying. If you’ve ever been disappointed by dense results, prepare to meet the Best Pancake Recipe you’ll ever need.
Unlocking the Secret to True Diner Style Buttermilk Pancakes
Achieving that perfect rise and cloud like interior isn't random; it's a combination of chemistry and technique. When you set out to make Buttermilk Pancakes from Scratch , you are controlling every variable, ensuring a result far superior to any box mix.
This detailed approach guarantees the Fluffy Buttermilk Pancakes Recipe delivers consistent, tall stacks every single time.
The Quest for the Perfect Golden Stack
We are aiming for a pancake that is tall enough to soak up syrup without collapsing into a soggy mess. The structure relies heavily on the leavening agents interacting correctly with the acidic buttermilk.
This chemical reaction creates the gas bubbles necessary for lift, forming the beautifully porous texture we crave in Homemade Buttermilk Pancakes .
Why Buttermilk is Non-Negotiable for Ultimate Lift
The defining element in this Pancake Recipe Buttermilk preparation is, naturally, the buttermilk itself. Its inherent acidity reacts vigorously with the baking soda included in the dry mix. This immediate foaming action provides the initial powerful lift.
While substitution is possible in a pinch, the authentic, slightly sharp flavour profile and guaranteed volume come from using real buttermilk.
A Promise of Lightness: Setting Expectations for Your Batch
It is important to note that while these are fluffy, they are not soufflés. The batter, when mixed correctly, should be thick and somewhat lumpy. On top of that,, for those looking for slightly smaller portions, this blueprint is easily adaptable; you can scale down the quantities precisely to create Buttermilk Pancakes for Two without compromising the structural integrity of the final product.
Assembling the Essential Arsenal for Superior Buttermilk Pancakes
Before we dive into the action, gathering your tools and ingredients ensures a smooth workflow. A well prepared station prevents panic when the batter is ready, which is important because the final mixing stages move quite quickly.
Having everything laid out ensures you can adhere to the crucial mixing guidelines that dictate texture.
Decoding the Dry and Wet Components for Peak Performance

The foundation of any great bake or breakfast item lies in accurately separating and preparing the dry and wet components before they meet. This segregation allows for aeration of the flour and proper dissolution of the salts and sugars, setting the stage for a perfect emulsion later on.
The Exact Measurements: Precision for Perfect Puffs
For a yield of approximately 10 to 12 medium pancakes, we rely on precise ratios. You will need 1 ½ cups (180g) of all-purpose flour, carefully spooned and leveled, paired with 2 tablespoons of granulated sugar to balance the tang.
The leavening is critical: use 1 teaspoon of baking powder alongside ½ teaspoon of baking soda the soda is essential for activating the buttermilk. Finally,, ½ teaspoon of fine sea salt sharpens the overall flavour profile.
Tools of the Trade: Griddles, Whisks, and Measuring Cups
A quality, heavy bottomed non-stick frying pan or an electric griddle is your best friend here. Heat consistency is vital for even browning. You will need two large mixing bowls one for whisking the dry elements to introduce air, and another for the wet.
Crucially, instead of a stiff wooden spoon which encourages overmixing, have a flexible rubber spatula ready for the gentle folding stage.
Sourcing Your Buttermilk: Fresh vs. Cultured Considerations
While most commercial buttermilk is cultured, full fat versions generally yield the richest flavour and best texture. If you happen to be in a bind and seeking Buttermilk Pancakes No Eggs (which is a different recipe entirely, but often requested), you can still use fresh or cultured buttermilk, though for this recipe, eggs are necessary for binding and richness.
If you lack buttermilk entirely, a quick homemade substitute is made by adding one tablespoon of white vinegar or lemon juice to 1 ¼ cups of regular milk and letting it sit for five minutes until it shows slight curdling.
Related Recipes Worth Trying
- The Ultimate Buttermilk Strawberry Shortcake Recipe with Flaky Biscuits — Ditch the sponge cake Learn to make the definitive Strawberry Shortcake featuring light buttery biscuits piled high with macerated berries Absolutely...
- The Ultimate Strawberry Shortcake Recipe with Fluffy Buttermilk Biscuits — Ditch the dry sponge cake Master our classic Strawberry Shortcake featuring tender fluffy biscuits macerated strawberries and homemade whipped cream A...
- Hoppy Easter My Easy Bunny Pancakes Recipe — Make Easter morning magical with these adorable bunny pancakes This easy recipe is perfect for kids Fluffy fun and delicious get the recipe now
The Definitive Method: step-by-step Journey to Golden Perfection
With ingredients measured and tools ready, we move into the assembly process. Remember, the magic happens in the final moments of combining the two mixtures, so focus on delicacy during that phase.
Mastering the Batter: The Art of Gentle Mixing
This phase is where most novice pancake makers stumble. We are aiming for minimal gluten development to ensure the Fluffy Buttermilk Pancakes Recipe translates into a tender bite.
Phase One: Combining Dry Ingredients Thoroughly
In your first large bowl, thoroughly whisk together the flour, sugar, baking powder, baking soda, and salt. Whisking ensures the leavening agents and salt are evenly distributed throughout the flour, preventing pockets of overly salty batter or unrisen spots in your final product.
The Crucial Step: Integrating Wet Elements Without Overworking
In the second bowl, lightly whisk the 2 large eggs before incorporating the 1 ¼ cups of cold buttermilk. Next, drizzle in the 4 tablespoons of melted, slightly cooled unsalted butter. Pour this entire wet mixture into the centre of the dry ingredients.
Using your rubber spatula, gently fold the ingredients together. You must stop mixing the moment the large streaks of dry flour disappear. Lumps are desirable they are pockets of unmixed dry matter that will hydrate during the brief rest, contributing to aeration.
Overworking the batter leads directly to tough pancakes.
Heat Management: Achieving the Ideal Griddle Temperature
Place your griddle or pan over medium heat. If the pan is too cool, the pancakes will spread thinly and absorb too much fat; if it's searing hot, the exterior burns instantly. Test the temperature by flicking a drop of water onto the surface; it should sizzle vigorously and evaporate quickly.
Lightly grease the surface with a neutral oil or a thin smear of butter just before pouring the first ladleful.
Flipping Technique: When to Turn Your Buttermilk Pancakes
Wait patiently! Pour your ¼ cup portions onto the hot surface, leaving space between them. Cook for about 2 to 3 minutes. You know they are ready to flip when the bubbles forming on the surface begin to pop and leave little craters, and the edges appear visibly set and dry.
Slide your thin spatula underneath and flip confidently. Cook the second side for only 1 to 2 minutes until it achieves a beautiful golden brown colour.
Troubleshooting and Pro Tips for Consistent Results
Even with a foolproof blueprint, the unpredictable nature of stovetops can cause minor hiccups. Knowing how to correct course quickly ensures success for the whole batch.
Solving Common Issues: From Thin Batter to Uneven Browning
If your batter seems surprisingly thin, immediately whisk in 1 tablespoon of flour at a time until the desired consistency (thick enough to drop from a ladle) is reached. If your pancakes are browning too quickly, reduce the heat slightly.
If the centres seem undercooked after flipping, briefly move the pan off the direct heat source while the second side finishes cooking.
Storage Strategies: Keeping Leftovers Fresh and Reheating Brilliance
If you are making a large batch, keep finished pancakes warm on a wire rack set over a baking sheet inside an oven set to 200° F ( 95° C).
For leftovers, cool completely, then store in an airtight container layered between parchment paper in the refrigerator for up to three days. Reheat quickly in a toaster oven or on a dry skillet for maximum crispness.
Flavor Twists: Adding Extracts, Zest, or Spices to Your Batter
To personalize your Homemade Buttermilk Pancakes , consider incorporating flavour additions during the final mixing stage. A splash of vanilla extract (about 1 teaspoon) enhances sweetness, while the zest of half a lemon adds brightness.
For a warmer profile, fold in ½ teaspoon of ground cinnamon along with your dry ingredients.
Frequently Pondered Queries Regarding Preparation and Enjoyment
Can I make this vegan? While this specific recipe relies on eggs and dairy for texture, a vegan version requires substituting the eggs with a commercial egg replacer or flax egg, and using a dairy-free milk/vinegar mix instead of buttermilk, though the lift may be slightly less pronounced. Do I need to rest the batter?
Allowing the batter to rest for 5 minutes while the griddle heats up gives the flour a chance to fully hydrate and the leavening agents a small head start, leading to lighter Buttermilk Pancakes Fluffy results.
Elevating Your Stack: Flavor Enhancements and Serving Suggestions
The pancake itself is the canvas, but the toppings are the masterpiece. Elevate your breakfast experience with thoughtful pairings that complement the slight acidity of the buttermilk.
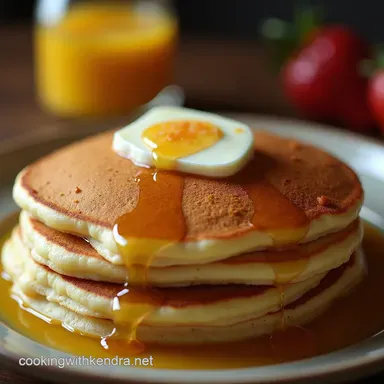
Serving these light, airy delights alongside crispy bacon or a side of fresh, slightly tart mixed berries provides a wonderful contrast in texture and flavour. For a decadent treat, use a homemade spiced pecan butter instead of standard syrup, or simply top with a drizzle of high-quality, warm maple syrup and a dusting of powdered sugar.
These Buttermilk Pancakes truly sing when treated with respect, turning a simple morning meal into a celebrated event.

Recipe FAQs
Why are my Buttermilk Pancakes not fluffy? They look a bit flat.
Nine times out of ten, this is down to overmixing the batter. You must only fold the wet and dry ingredients together until just combined; lumps are your best mate here! Also, ensure your baking powder and baking soda are fresh, as tired leavening agents won't give you that proper lift.
What's the best way to keep a big batch of pancakes warm without them getting soggy?
The secret is setting up a makeshift warming station. Place the cooked pancakes in a single layer on a wire rack set over a baking tray, and slide that tray into an oven set to its absolute lowest temperature around 200°F (95°C) is perfect.
This keeps them warm and slightly crisp until you're ready to serve the whole lot.
I don't have buttermilk; can I substitute it for regular milk in this Buttermilk Pancakes recipe?
You absolutely can fake it in a pinch! For every cup of buttermilk required, mix one cup of regular milk with one tablespoon of white vinegar or fresh lemon juice. Give it a gentle stir and let it stand for five minutes until it starts to look slightly curdled that mimics the acidity we need for the reaction.
How long can I store leftover pancake batter, and can I freeze the cooked pancakes?
Uncooked batter generally doesn't keep well; try to use it right away or within a few hours if refrigerated, as the leavening agents start to lose their fizz. Cooked pancakes freeze brilliantly; stack them with parchment paper between each one, seal them in a freezer bag, and they'll be good for about two months just pop them in the toaster to reheat!
What's the trick to getting that perfectly golden brown colour on the outside?
It all comes down to temperature control on your griddle, which can be tricky! You want the heat steady on medium too high and you’ll burn the outside before the middle is cooked through.
Wait until the bubbles have appeared and popped on the surface and the edges look set before flipping; that’s your cue for the perfect colour.
Fluffy Buttermilk Pancakes
Ingredients:
Instructions:
Nutrition Facts:
| Calories | 496 kcal |
|---|---|
| Protein | 2.2 g |
| Fat | 18.3 g |
| Carbs | 22.6 g |
| Fiber | 0.2 g |
| Sodium | 6765 mg |
