The Queens Favourite Coconut Cloud Cake the Ultimate Layer Cake
- The Royal Standard: What Elevates This Coconut Cake Above All Others?
- Curating Your Kitchen Arsenal: Essential Ingredients and Tools
- Building the Buttermilk Base: Crafting the Layered Coconut Cake Sponge
- The Tropical Infusion: Preparing and Applying the Signature Soak
- Icing and Assembly: Crown Your Creation with Cream Cheese Glory
- Mastering Longevity and Customization for Your Coconut Cake
- Recipe FAQs
- 📝 Recipe Card
The Royal Standard: What Elevates This Coconut Cake Above All Others?
This recipe elevates a beloved classic into what we confidently call The Best Coconut Cake Recipe . While many recipes rely solely on a standard sponge, our approach incorporates culinary secrets borrowed from Caribbean and Southern baking traditions to ensure unparalleled moisture.
This is not just a cake; it’s an absolute showstopper designed specifically to achieve a dreamy, melt-in-your mouth texture that is moist without being heavy. The key differentiation lies in two stages: incorporating airy, whipped egg whites into the buttermilk batter, and then dousing the warm layers with a rich, tropical soak immediately upon cooling.
If you are learning How To Make Coconut Cake that truly impresses, mastering this technique is non-negotiable.
The Caribbean Secret to Supreme Moistness: The Coconut Milk Soak
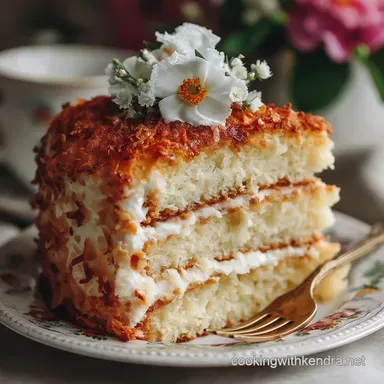
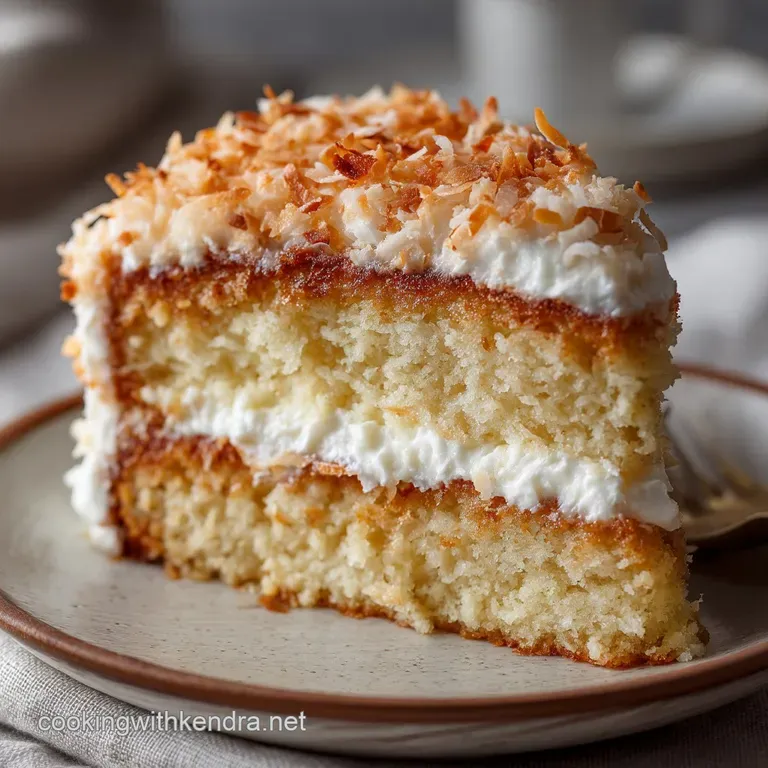
The crucial step that transforms a pleasant baked good into a truly Tender Coconut Cake is the application of the signature "soak." This warm infusion, created by gently heating full fat canned Coconut Cake With Coconut Milk combined with sweet, thick condensed milk (and an optional dash of coconut extract for boosted flavour), is spooned directly over the warm cake layers.
As the warm, porous structure of the freshly baked cake cools, it draws in this liquid gold, locking in a deep, lasting moisture and rich tropical flavour. This process ensures the cake remains utterly moist days after baking, avoiding the dry crumb often associated with standard layer cakes.
Balancing Sweetness with the Tang of Cream Cheese Frosting
A cake this rich requires a counterpoint. The creamy, slightly tangy cream cheese frosting is the perfect foil for the intense sweetness derived from the coconut milk soak and the generous use of sugar in the batter. The frosting cuts through the richness, creating a harmonious balance on the palate.
Made with cold cream cheese, softened butter, and a generous amount of sifted powdered sugar lightened with cold heavy cream, this topping provides the ideal consistency for a tall, smooth final coat before the cake is enveloped in crispy, toasted coconut flakes.
Your Timeline for Baking Commonwealth Perfection
While the outcome is sophisticated, the process is straightforward, placing this squarely in the medium difficulty category. Patience is key when assembling a stunning Coconut Layer Cake .
Active prep and mixing require about 30 minutes, followed by 30 to 35 minutes of bake time for the two 9 inch layers. The real test of patience comes during the necessary cooling and chilling stages, which total approximately 90 minutes.
This mandatory rest time allows the layers to set, the soak to fully absorb, and the crumb coat to firm up, making the total preparation time around 3 hours before the final 1-hour chill ensures the cake is ready for flawless slicing.
Curating Your Kitchen Arsenal: Essential Ingredients and Tools
Creating this majestic layer cake relies on the quality of your components and having the right tools prepared before you even turn on the mixer.
Pantry Checklist: high-quality Components for a Fluffy Crumb
For the perfect buttermilk sponge, precision matters. You will need 3 cups of sifted all-purpose flour, 1 ¾ cups of granulated sugar, and the leavening agents (1 tablespoon baking powder and 1 teaspoon baking soda).
Crucially, you must start with 1 cup (2 sticks) of high-quality unsalted butter, four large eggs (separated for superior lift), and 1 ¼ cups of full fat buttermilk all brought meticulously to room temperature to ensure proper emulsification and a tender crumb.
Selecting the Best Coconut Products: Flakes vs. Dessiccated
To achieve that authentic tropical depth in this Coconut Cake , you’ll need two distinct types of coconut product. For the internal soak, use full fat canned coconut milk (½ cup), combined with an equal amount of sweetened condensed milk. This is the source of the intense moisture.
For the exterior, we rely on 1 ½ cups of sweetened shredded coconut. Unlike dry, dessiccated coconut, the sweetened variety toasts beautifully, achieving a deep golden colour and wonderful crunch that coats the cake perfectly.
Must Have Equipment for Perfect Layer Cake Construction
A reliable electric mixer is non-negotiable; a stand mixer fitted with a paddle attachment is ideal for achieving the necessary airy quality when creaming the butter and sugar, and for whipping the egg whites into stiff peaks.
You will require two standard 9 inch round cake pans, which must be diligently greased, floured, and lined with parchment paper circles. Finally, an offset spatula is essential for spreading the frosting evenly and achieving a professional looking finish on your Coconut Layer Cake .
Building the Buttermilk Base: Crafting the Layered Coconut Cake Sponge

The path to a Simple Coconut Cake begins with careful attention to the batter. After combining your sifted dry ingredients flour, baking powder, baking soda, and salt you initiate the classic creaming method.
Using the electric mixer, beat the room temperature butter and granulated sugar until the mixture is visibly lightened, pale, and fluffy, a process that should take 3 to 5 minutes. This aeration step is vital for the cake’s final height and delicate texture.
Next, beat in the four egg yolks one at a time, followed by the vanilla. The reserved egg whites are then whipped separately until stiff, glossy peaks form this is the chef's trick for extra elevation and a truly airy texture.
Finally, the dry ingredients and the room temperature buttermilk are added alternately in three stages, mixing only on low speed until just combined. The whipped egg whites are then gently folded in using a rubber spatula; this must be done carefully to preserve the air and achieve the signature fluffiness of this particular recipe.
Related Recipes Worth Trying
- GrownUp Twinkie Cake The NoBake Golden Layer Cake — This easy Twinkie cake recipe elevates nostalgia Its a nobake Golden Delight Layer Cake with rich stabilized cream filling fresh bananas and tangy pineapple...
- Moist Pistachio Cake Recipe Brown Butter Rosewater Frosting — Forget dry bakes This Moist Pistachio Cake recipe uses nutty brown butter and ground pistachios for a truly decadent crumb Topped with a heavenly rosewater...
- Foolproof NoBake Chocolate Chip Cheesecake Sturdy Creamy and FussFree — The ultimate NoBake Chocolate Chip Cheesecake recipe that sets beautifully every time Zero faff a crunchy digestive biscuit base and an airy easy chocolate...
The Tropical Infusion: Preparing and Applying the Signature Soak
The next crucial stage of How To Make Coconut Cake focuses entirely on the moisture delivery system. While the baked cake layers are cooling on the wire rack (after the initial 10 minutes in the pan), prepare the soak.
Combine the ½ cup of full fat canned coconut milk and ½ cup of sweetened condensed milk in a small pan, heating gently until the mixture is steaming and smooth. Using a skewer or fork, systematically poke holes across the entire surface of both warm layers.
Pour half of the warm soak over each layer, ensuring even distribution. The warmth of the cake layers helps them absorb the liquid quickly and thoroughly, guaranteeing a supremely moist, Tender Coconut Cake .
Allow the layers to cool completely at least 45 to 60 minutes before proceeding to the frosting stage.
Icing and Assembly: Crown Your Creation with Cream Cheese Glory
Mixing Method Mastery for an Airy, Uniform Batter
Before moving to assembly, let’s revisit the final battery steps for ensuring success. The careful folding of the meringue (whipped egg whites) into the main buttermilk batter is the difference between a dense cake and one that rises high and evenly.
Divide the airy batter equally between the two prepared 9 inch pans to ensure uniform layers, which will bake at 350°F (175°C) for 30 to 35 minutes until golden brown and firm in the center.
Ensuring Perfectly Level Layers and Golden Edges
Once your layers are baked and cooling, inspect them for evenness. Dividing the batter precisely and avoiding opening the oven door too early helps layers bake flat. The cakes should release cleanly after the ten-minute rest period and continue cooling on a wire rack until fully chilled.
This is critical for preventing tearing during the final stacking.
Pouring the Liquid Gold: When and How to Drench Warm Cake Layers
To reiterate, the moment to apply the coconut soak is immediately after the layers are inverted onto the cooling rack, while they still hold residual heat. The pores of the cake are open and ready to receive the warm liquid.
The goal is to fully saturate the cake without making it soggy, which is achieved by pricking the surface and slowly spooning the mixture over the entire surface, allowing time for full absorption.
Achieving the Ideal Crunch: Toasting Coconut Flakes to Perfection
The texture of the cake’s exterior is just as important as the interior. Spread the 1 ½ cups of sweetened shredded coconut onto a baking sheet and toast them until they are fragrant and a beautiful golden brown.
This step massively intensifies the flavour and provides a much needed crunch, dramatically improving the presentation and taste profile of your finished Coconut Cake . Ensure the toasted coconut is completely cool before applying it to the frosted cake.
Whipping Up the Silky Smooth Cream Cheese Topping
The frosting requires a powerful start: begin by beating the cold, full fat cream cheese (8 oz block) with the room temperature butter (½ cup) until the mixture is perfectly smooth and lump free.
Then, gradually incorporate the four cups of sifted powdered sugar, alternating with the ¼ cup of cold heavy cream and vanilla extract. This ensures a thick, stable, yet spreadable frosting consistency, perfect for the height of this Coconut Layer Cake .
Layering Techniques for a Tall, Stable Showstopper
Place the first thoroughly soaked and cooled cake layer onto your serving plate. Spread a thick, even layer of cream cheese frosting over the top. Carefully place the second layer on top.
The secret to professional looking results is the crumb coat : apply a very thin layer of frosting over the entire cake sides and top to trap any loose crumbs. Chill the cake in the refrigerator for 30 minutes until this coat is firm.
This ensures a clean surface for your final, generous layer of frosting. Once fully frosted, gently press the cooled, toasted coconut flakes onto the sides and top for a spectacular finish.
Mastering Longevity and Customization for Your Coconut Cake
Proper Preservation: Storing Leftover Layers and Frosted Slices
Due to the perishable ingredients (cream cheese, buttermilk soak), this Coconut Cake must be stored in the refrigerator. Ensure the cake is covered tightly with a cake dome or plastic wrap to prevent the layers from drying out.
Properly stored, the cake will maintain its superb moisture and flavour for up to 4 days. If you wish to freeze un-frosted layers, wrap them tightly in plastic wrap and foil; they will keep for up to two months.
Solving Common Baking Missteps and Texture Issues
If your layers come out dense, the issue likely lies in ingredient temperature or overmixing. Remember that cold butter and eggs do not emulsify correctly, resulting in a heavy cake. Conversely, overmixing the batter after adding the flour will develop the gluten too much.
For the light, fluffy result of this Simple Coconut Cake version, mix only until the last streak of flour disappears. If the soak runs off rather than absorbing, your cake was likely too cold when applied; ensure the layers are warm enough to be porous.
Adaptable Recipes: Vegan and gluten-free Variation Notes
For those seeking adaptable recipes, this Coconut Layer Cake is surprisingly flexible. To create a vegan version, substitute the butter with plant based shortening, use a full fat non-dairy milk (like oat or almond) curdled with lemon juice for the buttermilk, and use a reliable vegan cream cheese frosting base.
For a gluten-free option, use a high-quality 1:1 gluten-free baking blend that includes xanthan gum. You may need to slightly increase the liquid (another tablespoon of buttermilk) as gluten-free flours tend to be thirstier.
Deciding the Perfect Portion Size and Presentation Tips
This rich recipe yields 12 generous slices. To achieve bakery quality presentation and perfect, clean cuts, the crucial trick is to chill the fully assembled cake for at least one hour before slicing. Before each cut, dip a long, sharp knife into hot water, wipe it completely dry, and then slice straight down.
Repeat this process for every slice. This Simple Coconut Cake pairs perfectly with a strong cup of Earl Grey tea or, for a more tropical flair, a chilled glass of dark rum punch.
For added zest, grate a little fresh lime zest over the top before serving to introduce a lovely tropical acidity that enhances the rich coconut flavour.
Recipe FAQs
My sponges usually come out a bit dry. What’s the secret to keeping this Coconut Cake so wonderfully moist?
The real magic happens with the "soak" it’s an absolute game changer! After baking, while the cakes are still warm, you douse them in the warm coconut milk and condensed milk mixture.
This trick ensures every single crumb is saturated with sweet liquid, guaranteeing that tropical, melt-in-your mouth texture that stops your cake from being as dry as the Sahara.
This is a beast of a cake! How long can I store leftovers, and should it live in the fridge?
Because this recipe uses a cream cheese frosting, it absolutely must be kept in the fridge, ideally in an airtight container to prevent the layers from drying out. Properly stored, it will last happily for 3 to 4 days, making it perfect for enjoying with your afternoon cuppa throughout the week.
I don't always keep buttermilk handy. Is there a simple substitute I can whip up, or is it mandatory?
No need for a frantic cupboard dash! Buttermilk provides essential acidity that reacts with the baking soda for a light lift, but you can create a simple substitute. Just measure the required amount of regular milk (full fat is best), then stir in 1 ¼ teaspoons of white vinegar or lemon juice.
Let it sit for 5 minutes until it curdles slightly, and you’re ready to go just remember all ingredients must be at room temperature!
I want to toast the coconut for maximum flavour, but I'm worried about burning it. Any tips for getting it golden brown?
Toasting coconut can be quicker than brewing a proper pot of tea, so vigilance is key! Spread the flakes thinly on a baking tray and use a low oven (about 300°F/150°C) for 5-10 minutes, stirring every couple of minutes. Alternatively, toast it gently in a dry frying pan on the hob over medium low heat.
The moment you smell that glorious tropical aroma, whip it off the heat immediately, as it carries on cooking for a few seconds even once removed.
Why do I have to chill the cake after the first layer of frosting (the crumb coat)? Surely that’s just extra faff?
While chilling the crumb coat is a bit of a faff, it’s a non-negotiable step if you want that professional, bakery worthy finish! The thin, initial layer of frosting locks in any stray cake crumbs, setting them firmly against the cold base.
Once set, the final, thicker coat of frosting goes on beautifully smooth, ensuring your layer cake looks sharp enough for royalty.
Ultimate Moist Coconut Cake