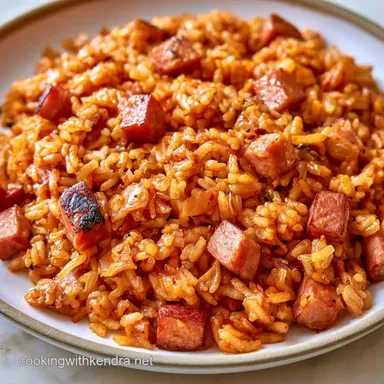
Kimchi Fried Rice with Beef Spam

- Time: 5 min active + 12 min cooking
- Flavor & Texture: Tangy, salty, and charred with crispy rice bits
- Perfect for: A fast weeknight dinner or a bold lunch
The sound of diced beef spam hitting a hot pan and sizzling into a dark golden crust is the best part of this meal. It's a punchy, salty dish that hits every taste bud at once. You don't need a professional wok to get that charred effect, just a pan that can handle high heat.
Making kimchi fried rice is more about heat management than complex technique. The goal is to get the rice to fry rather than steam. If you use fresh rice, you'll end up with a porridge, so the chilled stuff is non-negotiable.
Expect a dynamic balance of fermented funk and rich fat. The fried egg on top adds a velvety richness that cuts through the spice of the Gochujang. It's a stunning visual and a heavy-hitting flavor profile.
Kimchi Fried Rice
- Cold Rice: Chilled grains have a drier surface, which means they fry and crisp up instead of steaming and sticking.
- High Heat Sear: Letting the rice sit undisturbed for 30 seconds creates those charred, crispy bits that add a smoky depth.
- Sugar Balance: A teaspoon of sugar neutralizes the sharp acidity of fermented kimchi, rounding out the flavor.
| Pan Choice | Texture | Best For |
|---|---|---|
| Non-stick | Uniform and clean | Fast cleanup and easy stirring |
| Cast Iron | Extra char and crust | Maximum crispiness and depth |
Essential Gear
2 Must-Have Tools
A wide non-stick skillet or a carbon steel wok is a must. You need enough surface area so the rice spreads out, which helps the moisture evaporate faster.
A sturdy silicone spatula works best here. It lets you press the rice flat against the pan to maximize the sear without scratching your cookware.
Ingredient Deep Dive
| Component | Purpose | Substitute Notes |
|---|---|---|
| Day-old Rice | Prevents mushiness | Fresh rice makes the dish clumpy |
| Gochujang | Spicy, fermented base | Sriracha is thinner and less funky |
| Beef Spam | Salty, savory fat | Firm tofu for a plant-based option For a fully vegan version, also replace or leave out: eggs. |
| Napa Kimchi | Tangy acidity | Any fermented cabbage works |
The Full Ingredient List
- 3 cups (450g) day-old cooked short-grain white rice Why this? Drier grains fry better than fresh ones
- 6 oz (170g) Beef Spam, diced into small cubes
- 1 cup (150g) fermented Napa cabbage kimchi, chopped
- 1 tbsp (15ml) neutral oil
- 1 tbsp (15g) Gochujang
- 1 tbsp (15ml) reduced-sodium soy sauce
- 1 tsp (5g) granulated sugar
- 2 cloves (6g) garlic, minced
- 2 large eggs
- 2 stalks (10g) green onion, thinly sliced
- 1 tsp (5ml) toasted sesame oil
- 1 tsp (2g) toasted sesame seeds
Recipe Specs
This dish relies on a "medium-high" to "high" heat transition. Start at medium-high to brown the spam without burning the garlic. Move to high for the rice stage to drive off the remaining moisture.
The target is a deep amber color on the spam and a glossy red glaze on the rice. This should all happen within a 12-minute window once the pan is hot.
Bringing It Together
Phase 1: Searing the Protein
Warm 1 tbsp neutral oil in a spacious non-stick pan or wok over medium-high heat. Toss in 6 oz diced beef spam, sautéing for 3-5 minutes until the cubes develop a rich brown crust on all sides.

Phase 2: Building the Base
Shift the spam to the outer edges. Toss 2 cloves minced garlic and 1 cup chopped kimchi into the middle. Stir-fry for 2-3 minutes until the kimchi softens and smells fragrant. Mix in 1 tbsp Gochujang and 1 tsp granulated sugar, stirring until a glossy red glaze coats the vegetables.
Phase 3: The High-Heat Fry
Turn the heat up to high and stir in 3 cups chilled cooked short-grain white rice. Use a spatula to crumble any clumps and blend the rice with the sauce. Stir-fry for 4-6 minutes, allowing the rice to remain undisturbed for 30 seconds periodically to achieve crispy edges.
Pour in 1 tbsp reduced-sodium soy sauce and 1 tsp toasted sesame oil, tossing well. The kimchi fried rice should appear glistening and distinct.

Phase 4: The Final Garnish
Transfer the rice to a plate. Using the same pan, fry 2 large eggs; for sunny-side up, cook until the whites are fully set. Divide the rice among 4 bowls, crown each with an egg, and finish with 2 stalks sliced green onion and 1 tsp toasted sesame seeds.

Common Problems and Fixes
Correcting Mushy Rice
If the rice seems soggy or sticks together, it usually means the heat was too low or the rice was too fresh. Flatten the rice in the pan and let it sit for 2 minutes on high heat to steam off the extra moisture.
Adjusting Saltiness
The combination of Spam, kimchi, and soy sauce can make the dish very salty. If the salt is too intense, stir in one teaspoon of sugar or a little water to balance it out.
| Problem | Fix |
|---|---|
| Rice is clumping | Use a spatula to press the grains flat |
| Garlic is burning | Quickly add kimchi to lower the pan's temperature |
| Sauce is too thick | Stir in 1 tbsp of kimchi brine |
Searing meat does not "seal in juices." Moisture is lost regardless of the temperature. The brown crust is entirely for flavor and texture.
Storage and Reheating
Store the rice in a sealed plastic tub; it lasts 4 days in the refrigerator. This dish freezes well. Portion it into small containers and store for up to 2 months.
When reheating, avoid the microwave if you can. Sauté the leftover kimchi fried rice in a skillet with a teaspoon of oil over medium heat to bring back the crispiness that a microwave would flatten. Heat until it reaches 165°F (74°C) inside, checked with a food thermometer.
To avoid waste, don't discard the leftover kimchi juice in the jar. Use it as a base for a spicy vinaigrette or stir it into a bowl of plain steamed rice for a quick snack.
Flavor Variations
Plant-Based
Swap the beef spam for extra-firm tofu that has been pressed and cubed, and leave out the fried eggs. Use a vegan-friendly kimchi (some contain fish sauce) and soy sauce to keep the profile bold.
Tuna Twist
Instead of spam, use canned tuna drained of its oil. Add the tuna during the rice phase so it doesn't dry out too much in the initial sear.
Cheesy Finish
For this kimchi fried rice, I like to sprinkle a handful of shredded mozzarella on top during the last minute of frying. Cover the pan with a lid for 60 seconds until the cheese bubbles and melts.
Best Side Pairings

Because this meal is quite salty and spicy, it is best paired with something refreshing. Crisp raw cucumber slices or a light cucumber salad made with rice vinegar are excellent choices.
A side of blanched spinach with a touch of sesame oil or steamed bok choy provides a bright, green contrast to the rich, smoky notes of the rice.
Sodium Level Warning
850 mg of sodium per portion (37% of the recommended daily intake)
The American Heart Association suggests that for optimal heart health, daily sodium intake should be limited to 2,300mg.
Ways to Lower Sodium
-
Substitute the Spam
-
Wash the Kimchi
Quickly rinse the chopped kimchi under cold water before adding it to the pan to remove some of the salty brine.
-
Limit Salty Pastes
Use less soy sauce and Gochujang, and substitute the lost volume with a squeeze of lime or a bit of rice vinegar.
-
Boost the Aromatics
Add more grated ginger, fresh garlic, or crushed black pepper to create depth of flavor without using more salt.
-
Include More Veggies
Mix in sliced bell peppers, frozen peas, or diced carrots to decrease the sodium concentration per bite.
Frequently Asked Questions
How to store the leftovers?
Store the rice in a sealed plastic tub in the fridge for up to 4 days. You can also freeze portions in small containers for up to 2 months.
Can I use freshly cooked rice?
Use day-old chilled rice for the best texture. Freshly cooked grains hold too much moisture and can make the dish mushy.
Why does the rice clump together?
Press and break apart any clumps with a spatula while stir-frying over high heat. This ensures the Gochujang sauce coats every grain evenly.
Should I reheat this in the microwave?
Use a skillet with a teaspoon of oil over medium heat instead. This restores the crispiness that a microwave would flatten. When reheating cooked leftovers, check with a food thermometer that the centre reaches 165°F (74°C); the appliance temperature and time alone do not confirm this.
Is it possible to make this without beef spam?
Yes, you can omit the beef spam or substitute another protein. If you enjoyed balancing the bold flavors here, see how we create a similar savory-sweet profile in our lo mein sauce.
Which technique creates those crispy bits?
Let the rice sit for 30 seconds at a time without stirring while cooking on high heat. This process creates the toasted, crunchy edges typical of great fried rice.
Kimchi Fried Rice with Beef Spam