Korean Egg Rice: Savory and Buttery
- Time: 5 min active + 5 min cook = 10 mins total
- Flavor/Texture Hook: Velvety, buttery rice with shatter crispy egg edges
- Perfect for: Lazy weeknight dinners or a punchy Asian style breakfast
- Savoring the Quick Delicious Korean Egg Rice Recipe with Soy Sauce
- The Logic Behind the Glossy Texture
- Component Breakdown for Maximum Umami
- Essential Elements and Smart Swaps
- From Prep to Plate: Step-by-Step
- Fixing Common Texture and Taste Issues
- Adjusting Portions for More People
- Keeping Leftovers and Reducing Waste
- Dynamic Flavor Twists to Explore
- Presentation Tips for Stunning Visuals
- High in Sodium
- Recipe FAQs
- 📝 Recipe Card
Savoring the Quick Delicious Korean Egg Rice Recipe with Soy Sauce
Sizzle. That's the only sound you need to hear when you're craving something that feels like a hug in a bowl. I remember the first time I tried Gyeran Bap; I thought it was too simple to actually be "cooking." I figured a fried egg and some soy sauce were just ingredients, not a recipe. I was wrong.
The magic isn't in the complexity, but in the timing and the temperature of the fats.
Forget the idea that a stunning meal requires hours of labor or a list of twenty ingredients. This isn't about a slow braise or an intricate reduction. It's about the immediate, sharp contrast between the hot, salty soy sauce and the creamy, cooling yolk.
You'll love this quick delicious Korean egg rice recipe with soy sauce for a fast and flavorful meal that proves minimalism is often the most effective way to eat.
Right then, let's be clear: this is the ultimate "I can't even" meal. Whether you've had a brutal day at work or you're just too tired to think, this dish delivers a dynamic hit of umami and richness in ten minutes flat.
It's a masterclass in efficiency, turning basic pantry staples into something that looks and tastes high end. Trust me on this, once you get the egg edges just right, you'll never go back to plain eggs and toast.
The Logic Behind the Glossy Texture
Fat Emulsification: The butter and the liquid egg yolk combine with the heat of the rice to create a temporary emulsion, which gives the dish its velvety mouthfeel.
Starch Synergy: Short grain rice has a higher amylopectin content, meaning it's stickier and holds onto the soy butter sauce much better than long grain varieties.
Thermal Carryover: Placing the butter on hot rice ensures it melts instantly, coating every grain before the egg is added, which prevents the rice from feeling dry.
Salty Sweet Balance: A tiny pinch of sugar cuts through the intensity of the soy sauce, rounding out the flavor and making the umami notes pop.
| Method | Time | Texture | Best For |
|---|---|---|---|
| Stovetop | 10 min | Crispy edges, glossy rice | Traditional experience |
| Microwave | 7 min | Softer egg, creamy rice | Extreme convenience |
| Air Fryer | 12 min | Firm egg, toasted rice | Texture experimentation |
Component Breakdown for Maximum Umami
| Ingredient | Science Role | Pro Secret |
|---|---|---|
| Short Grain Rice | Texture Base | Use day old rice for a slightly firmer bite |
| Unsalted Butter | Flavor Carrier | Use grass fed butter for a deeper, nuttier aroma |
| Soy Sauce | Umami Punch | Warm the sauce slightly for a more integrated taste |
| Egg Yolk | Thickening Agent | Room temperature eggs fry more evenly |
Essential Elements and Smart Swaps
For this to work, you need ingredients that play well together. Don't bother with low-fat butter or thin, watery soy sauce. You want richness here.
- 1 cup (180g) cooked short grain white rice Why this? Higher starch makes it creamier (Substitute: Brown rice - Note: Denser texture, takes longer to heat)
- 1 tbsp (14g) unsalted butter Why this? Provides the velvety base (Substitute: Ghee - Note: Higher smoke point, nuttier flavor)
- 1 large egg Why this? The star protein and sauce (Substitute: Duck egg - Note: Much richer and larger yolk)
- 1 tbsp (15ml) soy sauce Why this? Core salty umami (Substitute: Tamari - Note: gluten-free, slightly sweeter)
- 1 tsp (5ml) toasted sesame oil Why this? Adds an aromatic, toasted finish (Substitute: Neutral oil + toasted sesame seeds)
- 1 pinch sugar Why this? Balances the salt (Substitute: Honey - Note: Adds floral notes, slightly thicker)
- 1 stalk (5g) green onion, thinly sliced Why this? Freshness and color (Substitute: Chives - Note: Milder, more delicate flavor)
- 1 tsp (3g) toasted sesame seeds Why this? Adds a nutty crunch (Substitute: Toasted pine nuts)
- 1 tsp (2g) gochugaru Why this? Smoky, mild heat (Substitute: Red chili flakes - Note: Usually spicier and less smoky)
From Prep to Plate: step-by-step
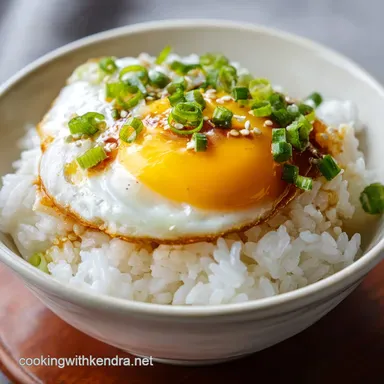
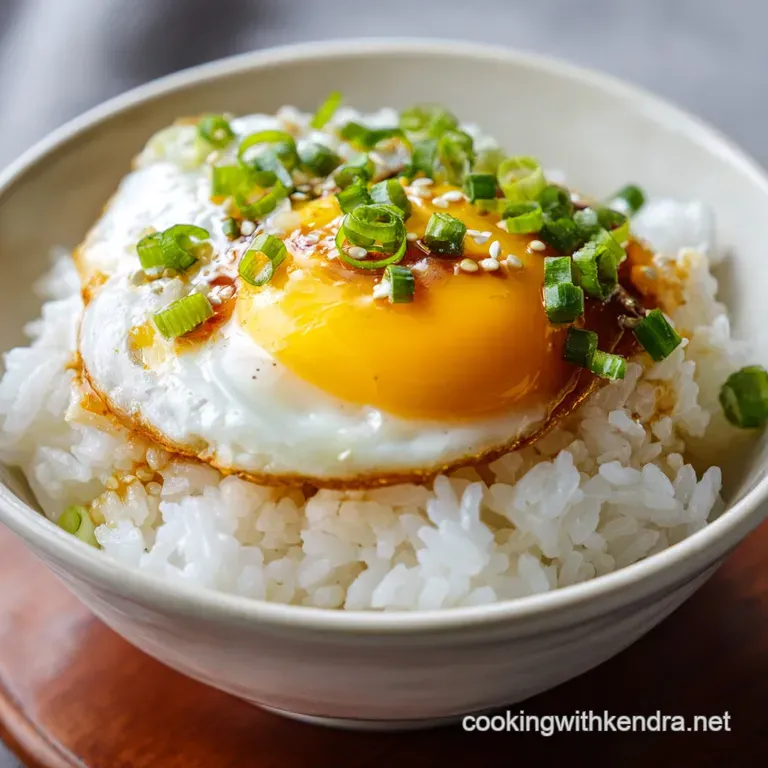
Let's crack on. The goal here is a contrast of textures: the shatter crispy edges of the egg against the silky, buttered rice.
- Place the cooked rice in a bowl and top with the butter. Note: This ensures the butter is the first thing to hit the rice.
- If the rice is cold, microwave for 45-60 seconds until the butter begins to melt and the rice is steaming.
- Heat a non stick skillet over medium high heat with a drizzle of oil. Note: The oil prevents the egg from sticking even in non stick pans.
- Crack the egg into the center and cook for about 2 minutes until the edges are golden brown and crispy, but the yolk remains liquid. To achieve this, avoid flipping the egg; let the heat do the work from the bottom up, as suggested by the frying techniques on Serious Eats.
- Slide the fried egg onto the buttered rice. Note: Use a flexible spatula to keep the yolk intact.
- Drizzle the soy sauce and sesame oil over the egg and rice. Note: Drizzling over the egg first helps the flavors seep into the yolk.
- Gently break the yolk with your spoon and fold it into the rice until it becomes a glossy, pale gold mixture.
- Sprinkle the sliced green onions, toasted sesame seeds, and gochugaru over the top.
Chef Note: Don't over mix! You want some streaks of yellow yolk and white rice to remain for a more dynamic visual appeal.
Fixing Common Texture and Taste Issues
Even with a simple dish, things can go sideways. Usually, it's a heat management problem.
Hardened Egg Yolks
If your yolk is solid, you've overcooked it. The yolk needs to be a liquid sauce for the rice. This happens if the heat is too low (meaning it sits too long) or too high (meaning it cooks through too fast).
Dry Rice Grains
This occurs when the rice is reheated too long in the microwave, evaporating the internal moisture. Always add the butter before microwaving to create a moisture barrier.
Overwhelming Saltiness
Soy sauce brands vary wildly in salt content. If the dish tastes too sharp, a tiny bit more butter or an extra pinch of sugar can neutralize the salt.
| Problem | Root Cause | Solution |
|---|---|---|
| Egg stuck to pan | Pan not hot enough | Heat oil until it shimmers before cracking egg |
| Rice is clumpy | Not enough butter/oil | Fold in an extra tsp of sesame oil |
| No "crispy" edges | Temperature too low | Increase to medium high; don't move the egg |
Common Mistakes Checklist
- ✓ Use short grain rice (long grain won't get that creamy consistency)
- ✓ Ensure the butter is melting into the rice, not just sitting on top
- ✓ Keep the egg yolk liquid; it is the primary sauce of the dish
- ✓ Use toasted sesame oil, not plain sesame oil, for the aroma
- ✓ Don't skip the pinch of sugar; it's the secret to the "restaurant" taste
Adjusting Portions for More People
Scaling this isn't as simple as doubling everything. Because the egg is the primary sauce, you need to be careful with the salt.
Scaling Down (½ Serving): Since you can't really use half an egg easily, I recommend making a full serving and sharing, or beating one egg and using half. Use a smaller bowl to keep the rice heat concentrated, and reduce the microwave time to 30 seconds.
Scaling Up (2x-4x): When making this for a group, work in batches for the eggs. If you crowd the pan, the eggs will steam instead of searing, and you'll lose those shatter crispy edges. For the seasonings, use a 1.5x ratio for the soy sauce and sugar rather than 2x.
Too much soy sauce in a large batch can make the rice overly salty and soggy.
| Budget Item | Premium Alternative | Flavor Impact | Savings |
|---|---|---|---|
| Regular Soy Sauce | Aged Shoyu | Deeper, fermented complexity | Save $5 |
| Standard Butter | European style Butter | Higher fat, more velvety | Save $3 |
| Green Onions | Chive Blossoms | More delicate, floral | Save $4 |
Keeping Leftovers and Reducing Waste
Honestly, this dish is best eaten the second it's made. The emulsion of egg and butter is temporary; once it cools, the fat solidifies and the texture becomes heavy. However, if you have leftover seasoned rice, you can store it in an airtight container in the fridge for up to 2 days.
To reheat, add a teaspoon of water and a tiny knob of butter, then microwave for 45 seconds. You'll need to fry a fresh egg to put on top, as a reheated fried egg is a tragedy.
For zero waste, don't toss the green onion roots. Soak them in a small jar of water on your windowsill, and they'll grow back in a week. If you have leftover rice, it's a great base for a Chinese Brown Sauce stir fry the next day.
Dynamic Flavor Twists to Explore
Once you've mastered the base, you can start playing with the profile. This is where the Asian Fusion element comes in.
The Spicy Kick: Instead of just gochugaru, stir in a teaspoon of Gochujang (Korean chili paste). This adds a fermented, sweet heat depth that transforms the dish into something more substantial.
The Umami Boost: If you want a more complex salt profile, replace half the soy sauce with a Homemade Soyaki Sauce. The ginger and garlic notes in the Soyaki pair brilliantly with the richness of the egg.
The Protein Swap: While the egg is classic, you can add sautéed mushrooms or crumbled tofu for a different texture. Just ensure they are cooked separately first so they don't crowd the pan and prevent the rice from staying fluffy.
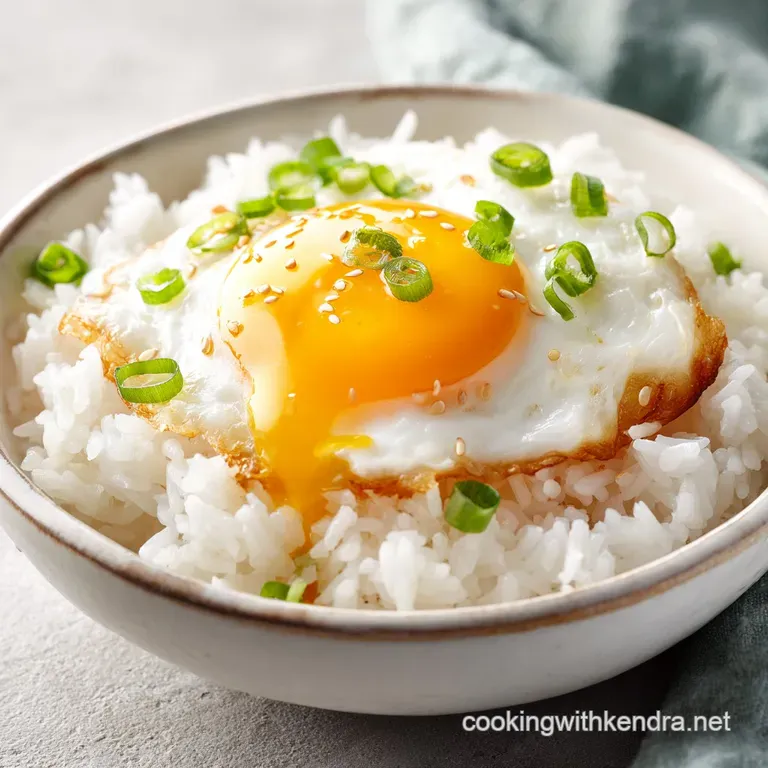
Presentation Tips for Stunning Visuals
Since we're going for a modern, bold look, the plating matters. This is a simple dish, but it should look dynamic.
Start with a wide, shallow bowl. This allows the rice to spread out, giving you more surface area for the egg. When you slide the egg on top, place it slightly off center. Before you break the yolk, take a photo the contrast of the bright yellow yolk against the white rice and green onions is stunning.
When you do break the yolk, use a slow, sweeping motion. Let the gold liquid run down the sides of the rice mound. Finish with a high contrast sprinkle of gochugaru the deep red flakes against the yellow and white create a professional, vibrant look that makes this feel like a curated meal rather than a quick fix.
High in Sodium
1120 mg 1,120 mg of sodium per serving (49% 49% of daily value)
The American Heart Association recommends a daily sodium limit of no more than 2,300 mg for most adults to maintain heart health.
Tips to Reduce Sodium
-
Use Low-Sodium Soy Sauce-30%
Substitute regular soy sauce with low-sodium soy sauce or coconut aminos to significantly lower the salt content.
-
Add Acid for Flavor-20%
Add a squeeze of fresh lime or lemon juice; the acidity mimics saltiness, allowing you to use less soy sauce.
-
Reduce Sauce Volume-15%
Reduce the soy sauce to half a tablespoon and supplement with a teaspoon of water to maintain the consistency.
-
Enhance Aromatics
Add fresh minced garlic or ginger to increase the depth of flavor without adding any extra sodium.
Recipe FAQs
Can I use long grain rice instead of short grain?
No, stick with short grain. The higher starch content in short grain white rice is essential for creating the creamy, glossy emulsion with the butter and yolk.
How to get the egg edges crispy while keeping the yolk runny?
Heat a non-stick skillet over medium high heat with oil. Fry the egg for about 2 minutes until the edges are golden brown, then slide it onto the rice immediately.
Is it true that I need a traditional stone bowl for this recipe?
No, this is a common misconception. Any microwave safe bowl works perfectly for heating the rice and melting the butter.
How to ensure the rice achieves a glossy, pale gold texture?
Gently break the yolk and fold it into the rice. This incorporates the liquid yolk and melted butter thoroughly to create a velvety coating.
Can I replace the soy sauce with another condiment?
No, soy sauce is required for the specific salt and umami profile. If you enjoyed mastering this flavor balance, see how we use similar savory depth in our authentic Zhong sauce.
Is it true that I should scramble the egg directly into the rice?
No, this is a common misconception. Frying the egg separately is the only way to get the contrast between the crispy edges and the liquid center.
How to prevent the rice from cooling down too quickly?
Microwave the rice and butter for 45 60 seconds. Ensuring the base is steaming hot helps maintain the emulsion when you fold in the egg.
Korean Soy Sauce Egg Rice